
MEF and AppDomain z
MEF and AppDomain - Remove Assemblies On The Fly
The question came up last week about swapping out an MEF enabled DLL on the fly. Because .NET locks the assembly even in an MEF enabled application, you can't replace the DLL when you release the MEF parts in your code. The only way to replace a DLL without a little elbow grease, is to shut down the application, swap out the DLL, and then restart the application. So, after researching and finding a couple of decent examples and after applying the elbow grease, I came up with this solution. It's not pretty and it doesn't do much except prove how to do this. This is a copy of my Code Project article of the same title.
This example will only work with .NET 4.5 and above and assumes you already have an understanding of how MEF works and can get around with it without going into a tutorial on that.
We will be using the AppDomain class to create an application domain for the MEF components to run in. This will allow us to access the components at run time. I'll explain more of what's going on as we progress.
First, create a console application project called AppDomainTest. And in your Program class. I have a couple of paths set up here that point to where the MEF DLLs are found and where the AppDomainSetup will cache the DLLs while running. I'll explain more of that later.
1 |
using System; |
Now, create a class library project called AppDomainTestInterfaces. This library will contain the contract interface for the MEF libraries and the main application. Add a reference to this library in the main application. Delete the class file in there and create an interface called IExport.
1 |
namespace AppDomainTestInterfaces {
public interface IExport {
void InHere();
|
Next, create a couple of MEF class library projects. Add references to AppDomainTestInterfaces and System.ComponentModel.Composition in each library.
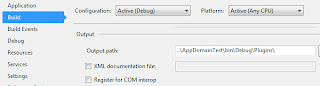
You'll want to set the build output to the bin\debug folder for the main application as shown. I put the compiled DLLs into a folder called Plugins under the main application bin\Debug folder so that they were easy to find and I could set up my code to be simple for this example. Use your own folder as needed.
Finally, create a class library project called AppDomainTestRunner and set a reference to it in the main application. Add references to System.ComponentModel.Composition, System.ComponentModel.Composition.Registration, and System.Reflection.Context to add access to the necessary MEF components used in the rest of the example. And lastly, add a reference to AppDomainTestInterfaces.
Now we can get to the meat of this project.
In the AppDomainTestRunnerlibrary project, delete the Class1file and add a Runnerclass. This is the class that will deal with the MEF imports and exports, and we will see that the entire class runs in a separate AppDomain.
1 |
using System; |
Next, set up the MEF library code as shown below. This just shows that we actually are running in the DLLs. I created two of the exact same libraries, just naming the second AppDomainTestLib2.
1 |
using System; |
Note the use of MarshalByRefObject, this will, in essence, mark this class as Serializable and enables access to objects across AppDomain boundaries, thereby gaining necessary access to methods and properties in the class residing in the hosted AppDomain.
Finally, set up the Main() method as follows. What we see here is the use of an AppDomainSetup object to define our AppDomain configuration. This establishes the shadow copying of the DLLs and where to shadow copy to. The CachePath parameter is optional, and only shown here as proof of what is happening. The parameter ShadowCopyFiles is a string parameter and accepts "true" or "false". The ShadowCopyDirectories parameter establishes which directory to shadow copy from.
1 51 52 53 54 |
using System; |
About shadow copying: ShadowCopyFiles will take a copy of the DLLs that are actually used in the AppDomain and put them in a special folder then reference them from there. This allows the DLL in the Plugins (or any other configured folder) to be deleted or replaced during runtime. The original DLL will remain in the folder until either the next startup of the application or, in the example we will see, the DirectoryCatalog is refreshed and the CompositionContainer is recomposed and re-exported.
Now, when you run the application, you see the MEF DLLs run and within "Host_AppDomain".
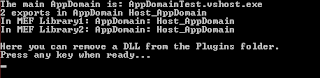
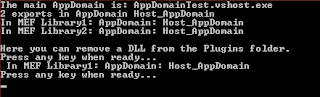
At this point, you can go into the Plugins folder and delete a DLL then press any key in the console window to see what happens when runner.Recompose() is called. We then get proof that the recompose released our DLL, but only because of the ShadowCopyFiles parameter.
Now, open another instance of Visual Studio and create a class library called AppDomainTestLib3. Add the same references as before and don't set the output directory, we'll want to copy that in by hand. Set up its Import class code just the same as the previous AppDomainTestLib classes. Go ahead and compile it.
Next, run the application in the previous Visual Studio instance and stop at the first Console.ReadKey(). Delete a DLL from the Plugins folder and copy the new one in place. Press any key to continue...
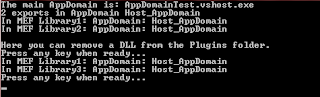
Pretty cool, eh?
Finally, to actually replace a DLL, you must delete the previous DLL prior to implementing the new one. We can demonstrate the manual way of doing this by inserting the following code into Program.
1 |
// After removing a DLL, we can now recompose the MEF parts and see that the removed DLL is no longer accessed. |
Leave the current AppDomainTestLib3 in the Plugins folder and run the application. Now, follow the prompts and when you get to "Here we will begin to replace Lib3 with an updated version.", make an observable change to the AppDomainTestLib3 and compile it. After completing the deletion of the old DLL, press any key to recompose the DLLs. Now, when you get the next prompt, drop the new DLL into the Plugins folder. Hit any key as usual. You should now see the response from your changed DLL.
The reason for the double runner.Recompose()calls is that the Exports signature for the DLL matches the previous version and MEF doesn't see a change since it doesn't look at FileInfo for differences. This then tells the AppDomain that the DLL hasn't changed either and the ShadowCopyFiles doesn't kick in to make that change. The simple work around is to delete the original, recompose, put the new one in place, and recompose one more time. The only disadvantage I can see in this is the performance of the application will drop momentarily during the recompose.
I've added a Github repository with the source. I also included in that source the ability to pass data between AppDomains. The source can be downloaded from http://github.com/johnmbaughman/MEFInAnAppDomain.
MEF and AppDomain z的更多相关文章
- MEF学习小结 z
1.什么是MEF. MEF,全称是Managed Extensibility Framework.它是.NET Framework4.0的一个类库,其主要目的是为了创建可扩展的应用程序.按照官方说法就 ...
- AppDomain卸载与代理
AppDomain卸载与代理 涉及内容: 反射与MEF解决方案 AppDomain卸载与代理 WinForm.WcfRestService示 插件系统的基本目的是实现宿主与组件的隔离,核心是作为接驳约 ...
- 动态加载与插件系统的初步实现(一):反射与MEF解决方案
涉及内容: 反射与MEF解决方案 AppDomain卸载与代理 WinForm.WcfRestService示 PRRT1: 反射实现 插件系统的基本目的是实现宿主与组件的隔离,核心是作为接驳约定的接 ...
- 【Python】使用torrentParser1.03对多文件torrent的分析结果
Your environment has been set up for using Node.js 8.5.0 (x64) and npm. C:\Users\horn1>cd C:\User ...
- CLR via C# 读书笔记 6-2 不同AppDomain之间的通信 z
跨AppDomain通信有两种方式 1.Marshal By reference : 传递引用 2.Marshal By Value : 把需要传递的对象 通过序列化反序列化的方式传递过去(值拷贝) ...
- C#进阶系列——MEF实现设计上的“松耦合”(终结篇:面向接口编程)
序:忙碌多事的八月带着些许的倦意早已步入尾声,金秋九月承载着抗战胜利70周年的喜庆扑面而来.没来得及任何准备,似乎也不需要任何准备,因为生活不需要太多将来时.每天忙着上班.加班.白加班,忘了去愤,忘了 ...
- MEF实现设计上的“松耦合”(三)
1.面向接口编程:有一定编程经验的博友应该都熟悉或者了解这种编程思想,层和层之间通过接口依赖,下层不是直接给上层提供服务,而是定义一组接口供上层调用.至于具体的业务实现,那是开发中需要做的事情,在项目 ...
- [MEF插件式开发] 一个简单的例子
偶然在博客园中了解到这种技术,顺便学习了几天. 以下是搜索到一些比较好的博文供参考: MEF核心笔记 <MEF程序设计指南>博文汇总 先上效果图 一.新建解决方案 开始新建一个解决方案Me ...
- 在.NET Core中使用MEF
(此文章同时发表在本人微信公众号"dotNET每日精华文章",欢迎右边二维码来关注.) 题记:微软的可托管扩展框架也移植到.NET Core上了. 可托管扩展框架(Managed ...
随机推荐
- Vue2.0 开发移动端音乐webApp 笔记
项目预览地址:http://ustbhuangyi.com/music/#/recommend 获取歌曲 url 地址方法升级:https://github.com/ustbhuangyi/vue-m ...
- HTTPS-加密SSL证书
从第一部分HTTP工作原理中,我们可以了解到HTTPS核心的一个部分是数据传输之前的握手,握手过程中确定了数据加密的密码.在握手过程中,网站会向浏览器发送SSL证书,SSL证书和我们日常用的身份证类似 ...
- python的map,filter,reduce学习
python2,python3中map,filter,reduce区别: 1,在python2 中,map,filter,reduce函数是直接输出结果. 2,在python3中做了些修改,输出前需要 ...
- Spring Cloud微服务视频教程-百度云
Spring Cloud微服务视频教程-百度云 链接:https://pan.baidu.com/s/1mp8SkxNw7EfoTDtDKQMpIA 提取码: 关注公众号[GitHubCN]回复521 ...
- vmware工具克隆linux系统步骤及配置
我们在学习的时候使用vmware创建自己的虚拟机,但是我们有时学习环境需要多台计算机进行操作演示,如果安装创建虚拟机.再在虚拟机上安装操作系统.这样很花费我们的时间,而且还步能保证服务的一直性,这就用 ...
- Stable Match
稳定婚姻问题 主要就是处理两个数组 boy[i][j] 存放第i个男的第j喜欢的女的 存的是女的编号!! girl[i][j] 存放 第i个女的对第j个男的的好感度 存的是值 然后只要 ...
- MarginTop 为何影响父元素的 MarginTop(转)
add by zhj: 没找到原文 这个问题困惑了很久,虽然没有大碍早就摸出来怎么搞定它,但始终不明白原因出在哪里,如果只是IE有问题我也不会太在意,可问题是所有上等浏览器都表现如此,这样叫我怎能安心 ...
- 配置https域名
https://help.aliyun.com/knowledge_detail/95505.html?spm=5176.11065259.1996646101.searchclickresult.6 ...
- 002.DNS-BIND简介
一 Linux-BIND服务器简介 Bind是Berkeley Internet Name Domain Service的简写,它是一款实现DNS服务器的开放源码软件.已经成为世界上使用最为广泛的DN ...
- Java HashMap 分析四篇连载
Java的HashMap非常的常用,本篇研究它的实现算法,最后希望计算出内存占用,性能的量化数据,然后得出什么时候使用HashMap,什么时候不能滥用的结论. HashMap实际上是一个数组,数组里 ...