YOLOV5实时检测屏幕
YOLOV5实时检测屏幕
注:此为笔记
目的:保留模型加载和推理部分,完成实时屏幕检测
实现思路:
1. 写一个实时截取屏幕的函数
2. 将截取的屏幕在窗口显示出来
3. 用OpenCV绘制一个窗口用来显示截取的屏幕
4. 在detect找出推理的代码,推理完成后得到中心点的xy坐标,宽高组成box
5. 在创建的OpenCV窗口用得到的推理结果绘制方框
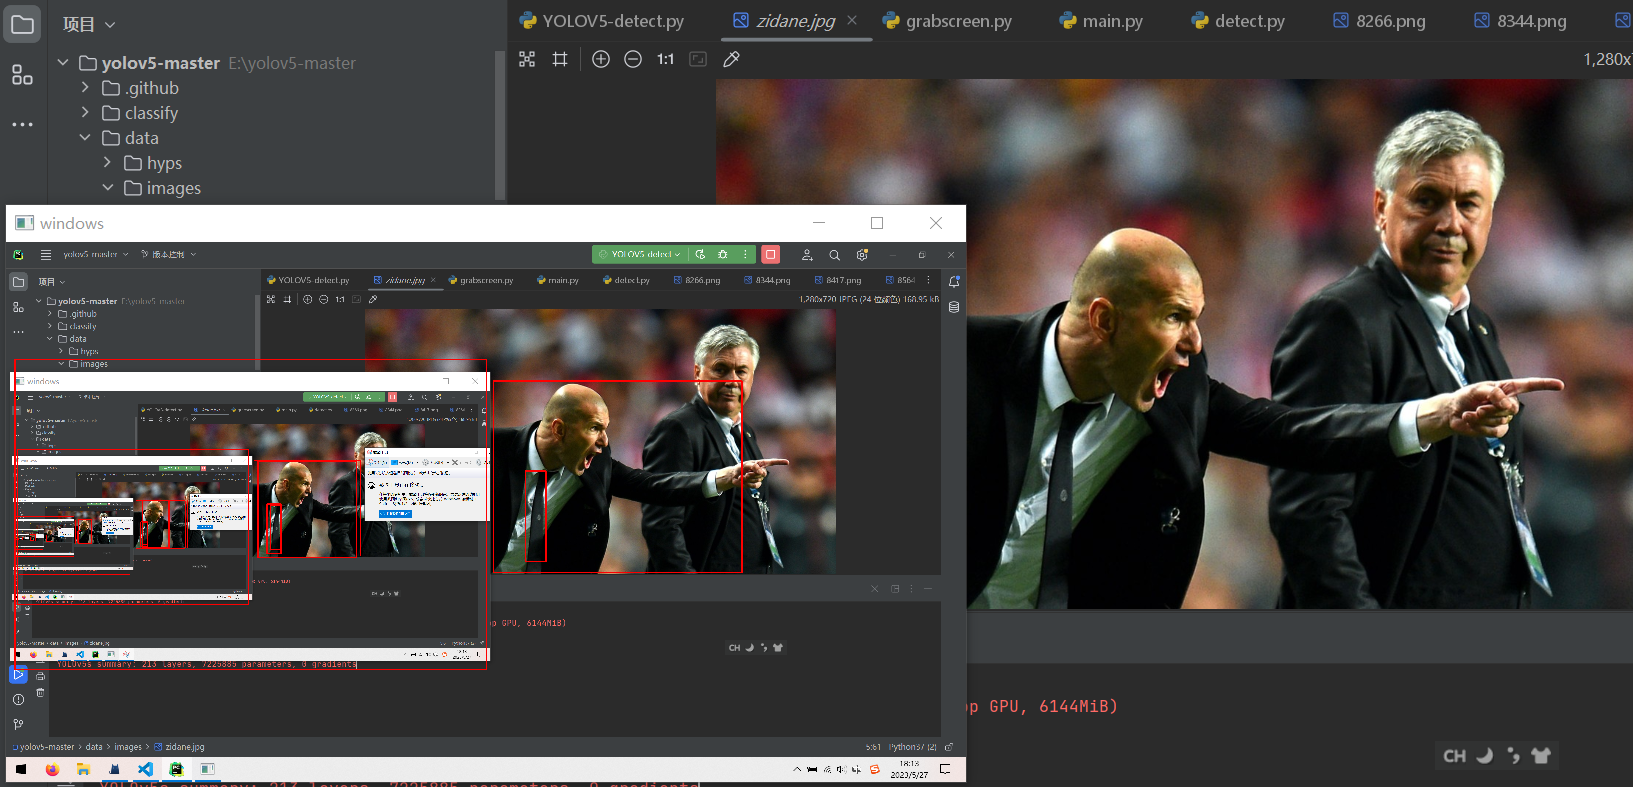
实现效果:
思考部分
先把原本的detect.py的代码贴在这里
import argparse

import os

import platform

import sys

from pathlib import Path

import torch

FILE = Path(__file__).resolve()

ROOT = FILE.parents[0]  # YOLOv5 root directory

if str(ROOT) not in sys.path:

    sys.path.append(str(ROOT))  # add ROOT to PATH

ROOT = Path(os.path.relpath(ROOT, Path.cwd()))  # relative

from models.common import DetectMultiBackend

from utils.dataloaders import IMG_FORMATS, VID_FORMATS, LoadImages, LoadScreenshots, LoadStreams

from utils.general import (LOGGER, Profile, check_file, check_img_size, check_imshow, check_requirements, colorstr, cv2,

                           increment_path, non_max_suppression, print_args, scale_boxes, strip_optimizer, xyxy2xywh)

from utils.plots import Annotator, colors, save_one_box

from utils.torch_utils import select_device, smart_inference_mode

@smart_inference_mode()

def run(

        weights=ROOT / 'yolov5s.pt',  # model path or triton URL

        source=ROOT / 'data/video/',

        data=ROOT / 'data/coco128.yaml',  # dataset.yaml path

        imgsz=(640, 640),  # inference size (height, width)

        conf_thres=0.25,  # confidence threshold

        iou_thres=0.45,  # NMS IOU threshold

        max_det=1000,  # maximum detections per image

        device='',  # cuda device, i.e. 0 or 0,1,2,3 or cpu

        view_img=False,  # show results

        save_txt=False,  # save results to *.txt

        save_conf=False,  # save confidences in --save-txt labels

        save_crop=False,  # save cropped prediction boxes

        nosave=False,  # do not save images/videos

        classes=None,  # filter by class: --class 0, or --class 0 2 3

        agnostic_nms=False,  # class-agnostic NMS

        augment=False,  # augmented inference

        visualize=False,  # visualize features

        update=False,  # update all models

        project=ROOT / 'runs/detect',  # save results to project/name

        name='exp',  # save results to project/name

        exist_ok=False,  # existing project/name ok, do not increment

        line_thickness=3,  # bounding box thickness (pixels)

        hide_labels=False,  # hide labels

        hide_conf=False,  # hide confidences

        half=False,  # use FP16 half-precision inference

        dnn=False,  # use OpenCV DNN for ONNX inference

        vid_stride=1,  # video frame-rate stride

):

    source = str(source)

    save_img = not nosave and not source.endswith('.txt')  # save inference images

    is_file = Path(source).suffix[1:] in (IMG_FORMATS + VID_FORMATS)

    is_url = source.lower().startswith(('rtsp://', 'rtmp://', 'http://', 'https://'))

    webcam = source.isnumeric() or source.endswith('.streams') or (is_url and not is_file)

    screenshot = source.lower().startswith('screen')

    if is_url and is_file:

        source = check_file(source)  # download

    # Directories

    save_dir = increment_path(Path(project) / name, exist_ok=exist_ok)  # increment run

    (save_dir / 'labels' if save_txt else save_dir).mkdir(parents=True, exist_ok=True)  # make dir

    # Load model

    device = select_device(device)

    model = DetectMultiBackend(weights, device=device, dnn=dnn, data=data, fp16=half)

    stride, names, pt = model.stride, model.names, model.pt

    imgsz = check_img_size(imgsz, s=stride)  # check image size

    # Dataloader

    bs = 1  # batch_size

    if webcam:

        view_img = check_imshow(warn=True)

        dataset = LoadStreams(source, img_size=imgsz, stride=stride, auto=pt, vid_stride=vid_stride)

        bs = len(dataset)

    elif screenshot:

        dataset = LoadScreenshots(source, img_size=imgsz, stride=stride, auto=pt)

    else:

        dataset = LoadImages(source, img_size=imgsz, stride=stride, auto=pt, vid_stride=vid_stride)

    vid_path, vid_writer = [None] * bs, [None] * bs

    # Run inference

    model.warmup(imgsz=(1 if pt or model.triton else bs, 3, *imgsz))  # warmup

    seen, windows, dt = 0, [], (Profile(), Profile(), Profile())

    for path, im, im0s, vid_cap, s in dataset:

        with dt[0]:

            im = torch.from_numpy(im).to(model.device)

            im = im.half() if model.fp16 else im.float()  # uint8 to fp16/32

            im /= 255  # 0 - 255 to 0.0 - 1.0

            if len(im.shape) == 3:

                im = im[None]  # expand for batch dim

        # Inference

        with dt[1]:

            visualize = increment_path(save_dir / Path(path).stem, mkdir=True) if visualize else False

            pred = model(im, augment=augment, visualize=visualize)

        # NMS

        with dt[2]:

            pred = non_max_suppression(pred, conf_thres, iou_thres, classes, agnostic_nms, max_det=max_det)

        # Second-stage classifier (optional)

        # pred = utils.general.apply_classifier(pred, classifier_model, im, im0s)

        # Process predictions

        for i, det in enumerate(pred):  # per image

            seen += 1

            if webcam:  # batch_size >= 1

                p, im0, frame = path[i], im0s[i].copy(), dataset.count

                s += f'{i}: '

            else:

                p, im0, frame = path, im0s.copy(), getattr(dataset, 'frame', 0)

            p = Path(p)  # to Path

            save_path = str(save_dir / p.name)  # im.jpg

            txt_path = str(save_dir / 'labels' / p.stem) + ('' if dataset.mode == 'image' else f'_{frame}')  # im.txt

            s += '%gx%g ' % im.shape[2:]  # print string

            gn = torch.tensor(im0.shape)[[1, 0, 1, 0]]  # normalization gain whwh

            imc = im0.copy() if save_crop else im0  # for save_crop

            annotator = Annotator(im0, line_width=line_thickness, example=str(names))

            if len(det):

                # Rescale boxes from img_size to im0 size

                det[:, :4] = scale_boxes(im.shape[2:], det[:, :4], im0.shape).round()

                # Print results

                for c in det[:, 5].unique():

                    n = (det[:, 5] == c).sum()  # detections per class

                    s += f"{n} {names[int(c)]}{'s' * (n > 1)}, "  # add to string

                # Write results

                for *xyxy, conf, cls in reversed(det):

                    if save_txt:  # Write to file

                        xywh = (xyxy2xywh(torch.tensor(xyxy).view(1, 4)) / gn).view(-1).tolist()  # normalized xywh

                        line = (cls, *xywh, conf) if save_conf else (cls, *xywh)  # label format

                        with open(f'{txt_path}.txt', 'a') as f:

                            f.write(('%g ' * len(line)).rstrip() % line + '\n')

                    if save_img or save_crop or view_img:  # Add bbox to image

                        c = int(cls)  # integer class

                        label = None if hide_labels else (names[c] if hide_conf else f'{names[c]} {conf:.2f}')

                        annotator.box_label(xyxy, label, color=colors(c, True))

                    if save_crop:

                        save_one_box(xyxy, imc, file=save_dir / 'crops' / names[c] / f'{p.stem}.jpg', BGR=True)

            # Stream results

            im0 = annotator.result()

            if view_img:

                if platform.system() == 'Linux' and p not in windows:

                    windows.append(p)

                    cv2.namedWindow(str(p), cv2.WINDOW_NORMAL | cv2.WINDOW_KEEPRATIO)  # allow window resize (Linux)

                    cv2.resizeWindow(str(p), im0.shape[1], im0.shape[0])

                cv2.imshow(str(p), im0)

                cv2.waitKey(1)  # 1 millisecond

            # Save results (image with detections)

            if save_img:

                if dataset.mode == 'image':

                    cv2.imwrite(save_path, im0)

                else:  # 'video' or 'stream'

                    if vid_path[i] != save_path:  # new video

                        vid_path[i] = save_path

                        if isinstance(vid_writer[i], cv2.VideoWriter):

                            vid_writer[i].release()  # release previous video writer

                        if vid_cap:  # video

                            fps = vid_cap.get(cv2.CAP_PROP_FPS)

                            w = int(vid_cap.get(cv2.CAP_PROP_FRAME_WIDTH))

                            h = int(vid_cap.get(cv2.CAP_PROP_FRAME_HEIGHT))

                        else:  # stream

                            fps, w, h = 30, im0.shape[1], im0.shape[0]

                        save_path = str(Path(save_path).with_suffix('.mp4'))  # force *.mp4 suffix on results videos

                        vid_writer[i] = cv2.VideoWriter(save_path, cv2.VideoWriter_fourcc(*'mp4v'), fps, (w, h))

                    vid_writer[i].write(im0)

        # Print time (inference-only)

        LOGGER.info(f"{s}{'' if len(det) else '(no detections), '}{dt[1].dt * 1E3:.1f}ms")

    # Print results

    t = tuple(x.t / seen * 1E3 for x in dt)  # speeds per image

    LOGGER.info(f'Speed: %.1fms pre-process, %.1fms inference, %.1fms NMS per image at shape {(1, 3, *imgsz)}' % t)

    if save_txt or save_img:

        s = f"\n{len(list(save_dir.glob('labels/*.txt')))} labels saved to {save_dir / 'labels'}" if save_txt else ''

        LOGGER.info(f"Results saved to {colorstr('bold', save_dir)}{s}")

    if update:

        strip_optimizer(weights[0])  # update model (to fix SourceChangeWarning)

def parse_opt():

    parser = argparse.ArgumentParser()

    parser.add_argument('--weights', nargs='+', type=str, default=ROOT / 'yolov5s.pt', help='model path or triton URL')

    parser.add_argument('--source', type=str, default=ROOT / '0', help='file/dir/URL/glob/screen/1(webcam)')

    parser.add_argument('--data', type=str, default=ROOT / 'data/coco128.yaml', help='(optional) dataset.yaml path')

    parser.add_argument('--imgsz', '--img', '--img-size', nargs='+', type=int, default=[640], help='inference size h,w')

    parser.add_argument('--conf-thres', type=float, default=0.45, help='confidence threshold')

    parser.add_argument('--iou-thres', type=float, default=0.2, help='NMS IoU threshold')

    parser.add_argument('--max-det', type=int, default=1000, help='maximum detections per image')

    parser.add_argument('--device', default='', help='cuda device, i.e. 0 or 0,1,2,3 or cpu')

    parser.add_argument('--view-img', action='store_true', help='show results')

    parser.add_argument('--save-txt', action='store_true', help='save results to *.txt')

    parser.add_argument('--save-conf', action='store_true', help='save confidences in --save-txt labels')

    parser.add_argument('--save-crop', action='store_true', help='save cropped prediction boxes')

    parser.add_argument('--nosave', action='store_true', help='do not save images/videos')

    parser.add_argument('--classes', nargs='+', type=int, help='filter by class: --classes 0, or --classes 0 2 3')

    parser.add_argument('--agnostic-nms', action='store_true', help='class-agnostic NMS')

    parser.add_argument('--augment', action='store_true', help='augmented inference')

    parser.add_argument('--visualize', action='store_true', help='visualize features')

    parser.add_argument('--update', action='store_true', help='update all models')

    parser.add_argument('--project', default=ROOT / 'runs/detect', help='save results to project/name')

    parser.add_argument('--name', default='exp', help='save results to project/name')

    parser.add_argument('--exist-ok', action='store_true', help='existing project/name ok, do not increment')

    parser.add_argument('--line-thickness', default=3, type=int, help='bounding box thickness (pixels)')

    parser.add_argument('--hide-labels', default=False, action='store_true', help='hide labels')

    parser.add_argument('--hide-conf', default=False, action='store_true', help='hide confidences')

    parser.add_argument('--half', action='store_true', help='use FP16 half-precision inference')

    parser.add_argument('--dnn', action='store_true', help='use OpenCV DNN for ONNX inference')

    parser.add_argument('--vid-stride', type=int, default=1, help='video frame-rate stride')

    opt = parser.parse_args()

    opt.imgsz *= 2 if len(opt.imgsz) == 1 else 1  # expand

    print_args(vars(opt))

    return opt

def main(opt):

    check_requirements(exclude=('tensorboard', 'thop'))

    run(**vars(opt))

if __name__ == '__main__':

    opt = parse_opt()

    main(opt)
分析代码并删减不用的部分
import argparse

import os

import platform

import sys

from pathlib import Path

import torch

FILE = Path(__file__).resolve()

ROOT = FILE.parents[0]  # YOLOv5 root directory

if str(ROOT) not in sys.path:

    sys.path.append(str(ROOT))  # add ROOT to PATH

ROOT = Path(os.path.relpath(ROOT, Path.cwd()))  # relative

from models.common import DetectMultiBackend

from utils.dataloaders import IMG_FORMATS, VID_FORMATS, LoadImages, LoadScreenshots, LoadStreams

from utils.general import (LOGGER, Profile, check_file, check_img_size, check_imshow, check_requirements, colorstr, cv2,

                           increment_path, non_max_suppression, print_args, scale_boxes, strip_optimizer, xyxy2xywh)

from utils.plots import Annotator, colors, save_one_box

from utils.torch_utils import select_device, smart_inference_mode
做了一些包的导入,定义了一些全局变量,先保留下来,没用的最后删
向下
if __name__ == '__main__':

    opt = parse_opt()

    main(opt)
从if __name__ == '__main__开始
opt = parse_opt 就是一个获取命令行参数的函数,我们并不需要,可以删
进入main函数
def main(opt):

    check_requirements(exclude=('tensorboard', 'thop'))

    run(**vars(opt))
check_requirements函数检查requirements是否全都安装好了,无用,删了
进入run函数
    source = str(source)

    save_img = not nosave and not source.endswith('.txt')  # save inference images

    is_file = Path(source).suffix[1:] in (IMG_FORMATS + VID_FORMATS)

    is_url = source.lower().startswith(('rtsp://', 'rtmp://', 'http://', 'https://'))

    webcam = source.isnumeric() or source.endswith('.streams') or (is_url and not is_file)

    screenshot = source.lower().startswith('screen')

    if is_url and is_file:

        source = check_file(source)  # download

    # Directories

    save_dir = increment_path(Path(project) / name, exist_ok=exist_ok)  # increment run

    (save_dir / 'labels' if save_txt else save_dir).mkdir(parents=True, exist_ok=True)  # make dir
判断source的类型,即要要推理的源是什么,判断源是文件还是url还是webcam或者screenshot ,定义保存文件夹,我不需要保存,只需要实时检测屏幕,删除
继续向下,是加载模型的代码
# Load model

device = select_device(device)

model = DetectMultiBackend(weights, device=device, dnn=dnn, data=data, fp16=half)
得知加载模型需要几个参数,分别是weights, device=device, dnn=dnn, data=data, fp16=half
通过开始的形参可知:
weights=ROOT / 'yolov5s.pt'也就是模型的名称device通过select_device函数得到dnn和fp16在run函数里的参数都是FALSE
故加载模型的代码可以改写成
def LoadModule():

    device = select_device('')

    weights = 'yolov5s.pt'

    model = DetectMultiBackend(weights, device=device, dnn=False, fp16=False)

    return model
继续往下读
 bs = 1  # batch_size

    if webcam:

        view_img = check_imshow(warn=True)

        dataset = LoadStreams(source, img_size=imgsz, stride=stride, auto=pt, vid_stride=vid_stride)

        bs = len(dataset)

    elif screenshot:

        dataset = LoadScreenshots(source, img_size=imgsz, stride=stride, auto=pt)

    else:

        dataset = LoadImages(source, img_size=imgsz, stride=stride, auto=pt, vid_stride=vid_stride)

    vid_path, vid_writer = [None] * bs, [None] * bs
这里如果是使用网络摄像头作为输入,会通过LoadStreams类加载视频流,根据图像大小和步长采样,如果使用截图作为输入,则通过LoadScreenshots加载截图,都不是则通过LoadImages类加载图片文件
这是YOLOV5提供的加载dataset的部分,我们可以添加自己的dataset,所以删掉
继续往下
# Run inference

    model.warmup(imgsz=(1 if pt or model.triton else bs, 3, *imgsz))  # warmup

    seen, windows, dt = 0, [], (Profile(), Profile(), Profile())

    for path, im, im0s, vid_cap, s in dataset:

        with dt[0]:

            im = torch.from_numpy(im).to(model.device)

            im = im.half() if model.fp16 else im.float()  # uint8 to fp16/32

            im /= 255  # 0 - 255 to 0.0 - 1.0

            if len(im.shape) == 3:

                im = im[None]  # expand for batch dim

        # Inference

        with dt[1]:

            visualize = increment_path(save_dir / Path(path).stem, mkdir=True) if visualize else False

            pred = model(im, augment=augment, visualize=visualize)

        # NMS

        with dt[2]:

            pred = non_max_suppression(pred, conf_thres, iou_thres, classes, agnostic_nms, max_det=max_det)

        # Second-stage classifier (optional)

        # pred = utils.general.apply_classifier(pred, classifier_model, im, im0s)

        # Process predictions
model.warmup(imgsz=(1 if pt or model.triton else bs, 3, *imgsz))
用于模型预热,传入形状为(1, 3, *imgsz)的图像进行预热操作,没用删了
seen, windows, dt = 0, [], (Profile(), Profile(), Profile())
未知作用,删了
for path, im, im0s, vid_cap, s in dataset:

        with dt[0]:

            im = torch.from_numpy(im).to(model.device)

            im = im.half() if model.fp16 else im.float()  # uint8 to fp16/32

            im /= 255  # 0 - 255 to 0.0 - 1.0

            if len(im.shape) == 3:

                im = im[None]  # expand for batch dim

        # Inference

        with dt[1]:

            visualize = increment_path(save_dir / Path(path).stem, mkdir=True) if visualize else False

            pred = model(im, augment=augment, visualize=visualize)

        # NMS

        with dt[2]:

            pred = non_max_suppression(pred, conf_thres, iou_thres, classes, agnostic_nms, max_det=max_det)
上面这段for循环用于遍历数据集中的每个图像或视频帧进行推理,在循环的开头,将路径、图像、原始图像、视频捕获对象和步长传递给path, im, im0s, vid_cap, s。推理实时屏幕只需要传一张图片,所以不存在将遍历推理,所以要进行改写,改写成
im = torch.from_numpy(im).to(model.device)

im = im.half() if model.fp16 else im.float()  # uint8 to fp16/32

im /= 255  # 0 - 255 to 0.0 - 1.0

if len(im.shape) == 3:

    im = im[None]  # expand for batch dim

visualize = increment_path(save_dir / Path(path).stem, mkdir=True) if visualize else False

pred = model(im, augment=augment, visualize=visualize)

pred = non_max_suppression(pred, conf_thres, iou_thres, classes, agnostic_nms, max_det=max_det)
这里是对 im 进行转换和推理,而改写的代码中没有im变量,则寻找im的来源
for path, im, im0s, vid_cap, s in dataset:
im来源于dataset
dataset = LoadImages(source, img_size=imgsz, stride=stride, auto=pt, vid_stride=vid_stride)
dataset来源于LoadImages的返回值
查看LoadImages的函数返回值和返回值的来源
在dataloaders.py中可以看到
if self.transforms:

    im = self.transforms(im0)  # transforms

else:

    im = letterbox(im0, self.img_size, stride=self.stride, auto=self.auto)[0]  # padded resize

    im = im.transpose((2, 0, 1))[::-1]  # HWC to CHW, BGR to RGB

    im = np.ascontiguousarray(im)  # contiguous

return path, im, im0, self.cap, s
如果transforms存在,则转换,如果transforms不存在,则调用letterbox函数对图像im0进行缩放和填充,使其符合模型要求的图像大小,将图像的通道顺序由HWC转换为CHW,将图像的通道顺序由BGR转换为RGB,将图像转换为连续的内存布局
其中需要的参数是im0, self.img_size, stride=self.stride, auto=self.auto
im0则是未经处理的图片,img_size填640(因为模型的图片大小训练的是640),stride填64(默认参数为64),auto填True
则得到改写代码为
im = letterbox(img0, 640, stride=32, auto=True)[0]  # padded resize

    im = im.transpose((2, 0, 1))[::-1]  # HWC to CHW, BGR to RGB

    im = np.ascontiguousarray(im)  # contiguous

    im = torch.from_numpy(im).to(model.device)

    im = im.half() if model.fp16 else im.float()  # uint8 to fp16/32

    im /= 255  # 0 - 255 to 0.0 - 1.0

    if len(im.shape) == 3:

        im = im[None]  # expand for batch dim

    pred = model(im, augment=False, visualize=False)

    pred = non_max_suppression(pred, conf_thres=conf_thres, iou_thres=iou_thres, classes=None, agnostic=False,

                               max_det=1000)
继续向下
for i, det in enumerate(pred):  # per image

            seen += 1

            if webcam:  # batch_size >= 1

                p, im0, frame = path[i], im0s[i].copy(), dataset.count

                s += f'{i}: '

            else:

                p, im0, frame = path, im0s.copy(), getattr(dataset, 'frame', 0)

            p = Path(p)  # to Path

            save_path = str(save_dir / p.name)  # im.jpg

            txt_path = str(save_dir / 'labels' / p.stem) + ('' if dataset.mode == 'image' else f'_{frame}')  # im.txt

            s += '%gx%g ' % im.shape[2:]  # print string

            gn = torch.tensor(im0.shape)[[1, 0, 1, 0]]  # normalization gain whwh

            imc = im0.copy() if save_crop else im0  # for save_crop

            annotator = Annotator(im0, line_width=line_thickness, example=str(names))

            if len(det):

                # Rescale boxes from img_size to im0 size

                det[:, :4] = scale_boxes(im.shape[2:], det[:, :4], im0.shape).round()

                # Print results

                for c in det[:, 5].unique():

                    n = (det[:, 5] == c).sum()  # detections per class

                    s += f"{n} {names[int(c)]}{'s' * (n > 1)}, "  # add to string

                # Write results

                for *xyxy, conf, cls in reversed(det):

                    if save_txt:  # Write to file

                        xywh = (xyxy2xywh(torch.tensor(xyxy).view(1, 4)) / gn).view(-1).tolist()  # normalized xywh

                        line = (cls, *xywh, conf) if save_conf else (cls, *xywh)  # label format

                        with open(f'{txt_path}.txt', 'a') as f:

                            f.write(('%g ' * len(line)).rstrip() % line + '\n')

                    if save_img or save_crop or view_img:  # Add bbox to image

                        c = int(cls)  # integer class

                        label = None if hide_labels else (names[c] if hide_conf else f'{names[c]} {conf:.2f}')

                        annotator.box_label(xyxy, label, color=colors(c, True))

                    if save_crop:

                        save_one_box(xyxy, imc, file=save_dir / 'crops' / names[c] / f'{p.stem}.jpg', BGR=True)
这段代码将推理后的结果进行转换,转换为label format,成为人能看懂的格式,删去输出结果,留下写入结果中的,格式转换,删掉保存为txt文件,得到需要的box,然后自己写一个boxs=[],将结果append进去,方便在OpenCV中绘画识别方框,改写结果为
boxs=[]

    for i, det in enumerate(pred):  # per image

        im0 = img0.copy()

        s = ' '

        s += '%gx%g ' % im.shape[2:]  # print string

        gn = torch.tensor(img0.shape)[[1, 0, 1, 0]]  # normalization gain whwh

        imc = img0  # for save_crop

        if len(det):

            # Rescale boxes from img_size to im0 size

            det[:, :4] = scale_boxes(im.shape[2:], det[:, :4], im0.shape).round()

            # Print results

            for c in det[:, 5].unique():

                n = (det[:, 5] == c).sum()  # detections per class

                s += f"{n} {names[int(c)]}{'s' * (n > 1)}, "  # add to string

        # Write results

        for *xyxy, conf, cls in reversed(det):

            xywh = (xyxy2xywh(torch.tensor(xyxy).view(1, 4)) / gn).view(-1).tolist()  # normalized xywh

            line = (cls, *xywh)  # label format

            box = ('%g ' * len(line)).rstrip() % line

            box = box.split(' ')

            boxs.append(box)
就此完成了推理部分的删减和重写
把屏幕的截图通过OpenCV进行显示
写一个屏幕截图的文件
写成 grabscreen.py
# 文件名:grabscreen.py

import cv2

import numpy as np

import win32gui

import win32print

import win32ui

import win32con

import win32api

import mss

def grab_screen_win32(region):

    hwin = win32gui.GetDesktopWindow()

    left, top, x2, y2 = region

    width = x2 - left + 1

    height = y2 - top + 1

    hwindc = win32gui.GetWindowDC(hwin)

    srcdc = win32ui.CreateDCFromHandle(hwindc)

    memdc = srcdc.CreateCompatibleDC()

    bmp = win32ui.CreateBitmap()

    bmp.CreateCompatibleBitmap(srcdc, width, height)

    memdc.SelectObject(bmp)

    memdc.BitBlt((0, 0), (width, height), srcdc, (left, top), win32con.SRCCOPY)

    signedIntsArray = bmp.GetBitmapBits(True)

    img = np.fromstring(signedIntsArray, dtype='uint8')

    img.shape = (height, width, 4)

    srcdc.DeleteDC()

    memdc.DeleteDC()

    win32gui.ReleaseDC(hwin, hwindc)

    win32gui.DeleteObject(bmp.GetHandle())

    return cv2.cvtColor(img, cv2.COLOR_BGRA2BGR)
通过img0 = grab_screen_win32(region=(0, 0, 1920, 1080))来作为im的参数传入,即可让屏幕截图作为推理图片
用OpenCV绘制窗口并显示
if len(boxs):

    for i, det in enumerate(boxs):

        _, x_center, y_center, width, height = det

        x_center, width = re_x * float(x_center), re_x * float(width)

        y_center, height = re_y * float(y_center), re_y * float(height)

        top_left = (int(x_center - width / 2.), int(y_center - height / 2.))

        bottom_right = (int(x_center + width / 2.), int(y_center + height / 2.))

        color = (0, 0, 255)  # RGB

        cv2.rectangle(img0, top_left, bottom_right, color, thickness=thickness)

和

cv2.namedWindow('windows', cv2.WINDOW_NORMAL)

cv2.resizeWindow('windows', re_x // 2, re_y // 2)

cv2.imshow('windows', img0)

HWND = win32gui.FindWindow(None, "windows")

win32gui.SetWindowPos(HWND, win32con.HWND_TOPMOST, 0, 0, 0, 0, win32con.SWP_NOMOVE | win32con.SWP_NOSIZE)
结合在一起
最终代码
import torch, pynput

import numpy as np

import win32gui, win32con, cv2

from grabscreen import grab_screen_win32 # 本地文件

from utils.augmentations import letterbox

from models.common import DetectMultiBackend

from utils.torch_utils import select_device

from utils.general import non_max_suppression, scale_boxes, xyxy2xywh

# 可调参数

conf_thres = 0.25

iou_thres = 0.05

thickness = 2

x, y = (1920, 1080)

re_x, re_y = (1920, 1080)

def LoadModule():

    device = select_device('')

    weights = 'yolov5s.pt'

    model = DetectMultiBackend(weights, device=device, dnn=False, fp16=False)

    return model

model = LoadModule()

while True:

    names = model.names

    img0 = grab_screen_win32(region=(0, 0, 1920, 1080))

    im = letterbox(img0, 640, stride=32, auto=True)[0]  # padded resize

    im = im.transpose((2, 0, 1))[::-1]  # HWC to CHW, BGR to RGB

    im = np.ascontiguousarray(im)  # contiguous

    im = torch.from_numpy(im).to(model.device)

    im = im.half() if model.fp16 else im.float()  # uint8 to fp16/32

    im /= 255  # 0 - 255 to 0.0 - 1.0

    if len(im.shape) == 3:

        im = im[None]  # expand for batch dim

    pred = model(im, augment=False, visualize=False)

    pred = non_max_suppression(pred, conf_thres=conf_thres, iou_thres=iou_thres, classes=None, agnostic=False,

                               max_det=1000)

    boxs=[]

    for i, det in enumerate(pred):  # per image

        im0 = img0.copy()

        s = ' '

        s += '%gx%g ' % im.shape[2:]  # print string

        gn = torch.tensor(img0.shape)[[1, 0, 1, 0]]  # normalization gain whwh

        imc = img0  # for save_crop

        if len(det):

            # Rescale boxes from img_size to im0 size

            det[:, :4] = scale_boxes(im.shape[2:], det[:, :4], im0.shape).round()

            # Print results

            for c in det[:, 5].unique():

                n = (det[:, 5] == c).sum()  # detections per class

                s += f"{n} {names[int(c)]}{'s' * (n > 1)}, "  # add to string

        # Write results

        for *xyxy, conf, cls in reversed(det):

            xywh = (xyxy2xywh(torch.tensor(xyxy).view(1, 4)) / gn).view(-1).tolist()  # normalized xywh

            line = (cls, *xywh)  # label format

            box = ('%g ' * len(line)).rstrip() % line

            box = box.split(' ')

            boxs.append(box)

        if len(boxs):

            for i, det in enumerate(boxs):

                _, x_center, y_center, width, height = det

                x_center, width = re_x * float(x_center), re_x * float(width)

                y_center, height = re_y * float(y_center), re_y * float(height)

                top_left = (int(x_center - width / 2.), int(y_center - height / 2.))

                bottom_right = (int(x_center + width / 2.), int(y_center + height / 2.))

                color = (0, 0, 255)  # RGB

                cv2.rectangle(img0, top_left, bottom_right, color, thickness=thickness)

    if cv2.waitKey(1) & 0xFF == ord('q'):

        cv2.destroyWindow()

        break

    cv2.namedWindow('windows', cv2.WINDOW_NORMAL)

    cv2.resizeWindow('windows', re_x // 2, re_y // 2)

    cv2.imshow('windows', img0)

    HWND = win32gui.FindWindow(None, "windows")

    win32gui.SetWindowPos(HWND, win32con.HWND_TOPMOST, 0, 0, 0, 0, win32con.SWP_NOMOVE | win32con.SWP_NOSIZE)
End.
YOLOV5实时检测屏幕的更多相关文章
- [C++]Linux之网络实时检测功能
声明:如需引用或者摘抄本博文源码或者其文章的,请在显著处注明,来源于本博文/作者,以示尊重劳动成果,助力开源精神.也欢迎大家一起探讨,交流,以共同进步,乃至成为朋友- 0.0 由于学习操作系统实验课程 ...
- YOLOv5目标检测源码重磅发布了!
YOLOv5目标检测源码重磅发布了! https://github.com/ultralytics/yolov5 该存储库代表了对未来对象检测方法的超解析开源研究,并结合了在使用之前的YOLO存储库在 ...
- [炼丹术]YOLOv5目标检测学习总结
Yolov5目标检测训练模型学习总结 一.YOLOv5介绍 YOLOv5是一系列在 COCO 数据集上预训练的对象检测架构和模型,代表Ultralytics 对未来视觉 AI 方法的开源研究,结合了在 ...
- 【YOLOv5】手把手教你使用LabVIEW ONNX Runtime部署 TensorRT加速,实现YOLOv5实时物体识别(含源码)
前言 上一篇博客给大家介绍了LabVIEW开放神经网络交互工具包[ONNX],今天我们就一起来看一下如何使用LabVIEW开放神经网络交互工具包实现TensorRT加速YOLOv5. 以下是YOLOv ...
- 页面刷新方式实时检测cookie是否失效
在浏览器端每隔10秒钟刷新一次页面,可用于检查cookie值是否失效. 在study.php文件中存在这样一条语句: <meta http-equiv="refresh" c ...
- oninput、onchange与onpropertychange事件的区别, 与input输入框实时检测
这几天项目着急,同时也学到好多以前没有接触过的知识.oninput.onchange与onpropertychange事件的区别, 与input输入框实时检测 onchange事件只在键盘或者鼠标操作 ...
- 同时绑定onpropertychange 和 oninput 事件,实时检测 input、textarea输入改变事件,支持低版本IE,支持复制粘贴
实时检测 input.textarea输入改变事件,支持低版本IE,支持复制粘贴 检测input.textarea输入改变事件有以下几种: 1.onkeyup/onkeydown 捕获用户键盘输入事件 ...
- Python OpenCV4趣味应用系列(四)---颜色物体实时检测
今天,我们来实现一个视频实时检测颜色物体的小实例,视频中主要有三个颜色物体,我们只检测红色和绿色的球状物体,如下图所示: 第一步需要打开视频(或者摄像头): cap = cv2.VideoCaptur ...
- jquery检测屏幕宽度并跳转页面
jquery检测屏幕宽度并刷新页面 var owidth = ($(window).width()); //浏览器当前窗口可视区域宽度 if(owidth<640){//小于640跳转一个网址, ...
- opencv+python+dlib人脸关键点检测、实时检测
安装的是anaconde3.python3.7.3,3.7环境安装dlib太麻烦, 在anaconde3中新建环境python3.6.8, 在3.6环境下安装dlib-19.6.1-cp36-cp36 ...
随机推荐
- GPSSworld仿真(一):程序题——单窗口排队系统
3.3 一个仓库共存放了2000吨货物,货物以三种规模出库,少量(10吨),中等(20吨),大量(50吨),分别以10±5分,15分,30±10分的速率出库.如果没有货位达到的情况下,一个仓库能维持供 ...
- MyBatisPlus 整合 SpringBoot 遇见的问题(二)
[异常]:Cause: java.sql.SQLSyntaxErrorException: Unknown column 'udf1' in 'field list'...... SQL: SELEC ...
- Sokit(TCP/UDP调试工具)
下载:http://www.winwin7.com/soft/56522.html#xiazai Sokit中文版是一款免费开源的TCP / UDP 测试(调试)工具,它主要可以用于接收和发送TCP/ ...
- 构建基于深度学习神经网络协同过滤模型(NCF)的视频推荐系统(Python3.10/Tensorflow2.11)
毋庸讳言,和传统架构(BS开发/CS开发)相比,人工智能技术确实有一定的基础门槛,它注定不是大众化,普适化的东西.但也不能否认,人工智能技术也具备像传统架构一样"套路化"的流程,也 ...
- webrtc QOS笔记二 音频buffer数据不足生成很多gap的问题
webrtc QOS笔记二 音频buffer数据不足生成很多gap的问题 目录 webrtc QOS笔记二 音频buffer数据不足生成很多gap的问题 记录个iusse. 插入音频数据后,GetAu ...
- [Java SE]JDK版本特性解读:@PostStruct[JDK1.6-JDK1.8]
1 @PostStruct 1.1 概述 定义及用途 @PostConstruct(javax.annotation.PostConstruct)注解好多人以为是Spring提供的.而实际上是Java ...
- 一文了解MySQL中的多版本并发控制
作者:京东零售 李泽阳 最近在阅读<认知觉醒>这本书,里面有句话非常打动我:通过自己的语言,用最简单的话把一件事情讲清楚,最好让外行人也能听懂. 也许这就是大道至简,只是我们习惯了烦琐和 ...
- VMware另一个程序锁定文件的一部分,进程无法访问
问题描述:搭建RAC11g,在做共享磁盘的时候,节点2要共享节点1的磁盘,但是有一个问题,节点2关机之后,再打开,是有一个访问节点1的磁盘的过程,如果访问失败,就会开不了机器 rac1加的三个磁盘: ...
- 【MyBatis】分页插件
分页插件 分页插件配置 a 添加依赖 <dependency> <groupId>com.github.pagehelper</groupId> <artif ...
- 从零开始TP6配置ThinkPHP-ApiDoc
系统:windows11 集成环境:小皮(原phpstudy) composer:2.5 准备工作:安装小皮后,在软件管理中安装composer,2.3安装不上去,只能安装1.8.5,没关系安装后升级 ...