本文主要分享的是云计算、openstack的使用、私有云平台建设、云服务器云硬盘的构建和使用。从基本概念入手到私有云建设,信息量非常大。对于openstack的安装部署都是从官方文档中一步步的介绍,内容非常详细。
一、云计算 基本概念
云计算(cloud computing)是基于互联网的相关服务的增加、使用和交付模式,通常涉及通过互联网来提供动态易扩展且经常是虚拟化的资源。云是网络、互联网的一种比喻说法。过去在图中往往用云来表示电信网,后来也用来表示互联网和底层基础设施的抽象。因此,云计算甚至可以让你体验每秒10万亿次的运算能力,拥有这么强大的计算能力可以模拟核爆炸、预测气候变化和市场发展趋势。用户通过电脑、笔记本、手机等方式接入数据中心,按自己的需求进行运算。
云计算分类
简单来说,就是把应用程序和数据都放在由大量服务器组成的云中,用户需要什么只要购买相应服务并使用即可。
云计算分为私有云、公有云、混合云。
云计算的服务分类:基础设施即服务、平台即服务、软件即服务。
- 超大规模。“云”具有相当的规模,Google云计算已经拥有100多万台服务器,亚马逊、IBM、微软和Yahoo等公司的“云”均拥有几十万台服务器。“云”能赋予用户前所未有的计算能力。
- 虚拟化。云计算支持用户在任意位置使用各种终端获取服务。所请求的资源来自“云”,而不是固定的有形的实体。应用在“云”中某处运行,但实际上用户无需了解应用运行的具体位置,只需要一台笔记本或一个PDA,就可以通过网络服务来获取各种能力超强的服务。
- 高可靠性。“云”使用了数据多副本容错、计算节点同构可互换等措施来保障服务的高可靠性,使用云计算比使用本地计算机更加可靠。
- 通用性。云计算不针对特定的应用,在“云”的支撑下可以构造出于变万化的应用,同一片“云”可以同时支撑不同的应用运行。
- 高可伸缩性。“云”的规模可以动态伸缩,满足应用和用户规模增长的需要。
- 按需服务。“云”是一个庞大的资源池,用户按需购买,像自来水、电和煤气那样计费。
- 极其廉价。“云”的特殊容错措施使得可以采用极其廉价的节点来构成云;“云”的自动化管理使数据中心管理成本大幅降低;“云”的公用性和通用性使资源的利用率大幅提升;“云”设施可以建在电力资源丰富的地区,从而大幅降低能源成本。
二、Openstack基本概念
OpenStack是一个开源的云计算管理平台项目,由几个主要的组件组合起来完成
具体工作。OpenStack支持几乎所有类型的云环境,项目目标是提供实施简单、
可大规模扩展、丰富、标准统一的云计算管理平台。OpenStack通过各种互补的
服务提供了基础设施即服务(IaaS)的解决方案,每个服务提供API以进行集成。
常见组件:
- Dashboard(web项目)
- Keystone(权限管理)
- Nova(管理虚拟机)
- Nova-network(管理网络流量和ip)
- Glance(镜像管理项目)
- Cinder(磁盘管理)
- Swift(网盘,对象)
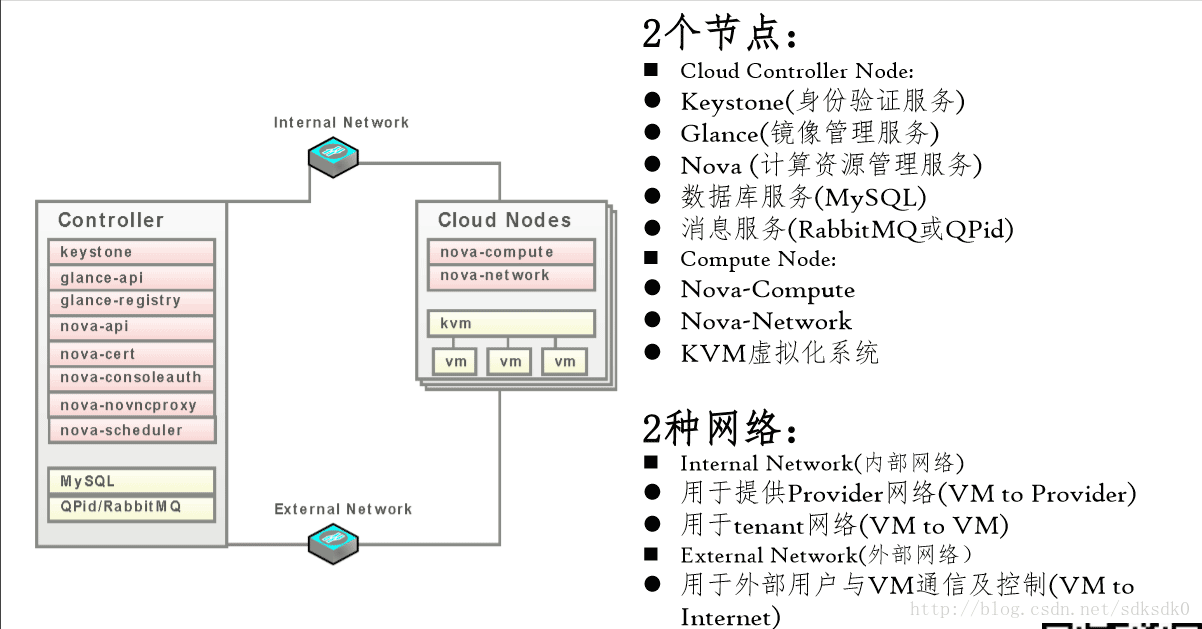
基础的系统图
Openstack安装部署
下面来说一说openstack的安装部署。首先说明openstack的整体安装非常复杂,文末提供官方安装文档下载,我就是根据这个英文的官方文档来安装部署的。以下内容是参照官方文档“openstack-install-guide-yum-icehouse.pdf”来的。
首先需要准备3台linux的机器。我这里选用的是centos6.6的64位的系统。配置IP地址,关闭防火墙,修改主机名。
• Controller Node: 1 processor, 2 GB memory, and 5 GB storage
• Compute01: 1 processor, 512 MB memory, and 5 GB storage
• Compute02 Node: 1 processor, 2 GB memory, and 10 GB storage
我这里controller的ip地址是:192.168.44.147
computer01:192.168.44.148
computer02:192.168.44.149
基本环境配置
以下内容是在controller机器上配置的。
1、数据库安装。
因为需要一个数据库,所以这里选用了mysql数据库。
|
1
|
yum install mysql mysql-server MySQL-python
|
编辑/etc/my.cnf文件,在里面添加如下内容,主要意思就是设置编码为utf-8。
|
1
2
3
4
5
|
default-storage-engine = innodb
innodb_file_per_table
collation-server = utf8_general_ci
init-connect = 'SET NAMES utf8'
character-set-server = utf8
|
然后启动服务,开机启动。
|
1
2
3
4
|
# service mysqld start
# chkconfig mysqld on
# mysql_install_db
# mysql_secure_installation
|
赋权,使其可以远程登录。
|
1
|
GRANT ALL PRIVILEGES ON *.* TO 'root'@'%' IDENTIFIED BY 'a';
|
2、openstack基本包安装。
|
1
2
3
4
5
6
7
8
9
10
|
# yum install yum-plugin-priorities
# yum install http://repos.fedorapeople.org/repos/openstack/openstackicehouse/rdo-release-icehouse-3.noarch.rpm
# yum install http://dl.fedoraproject.org/pub/epel/6/x86_64/epel-release-6-8.
noarch.rpm
# yum install openstack-utils
# yum install openstack-selinux
|
3、安装消息队列
|
1
|
yum install qpid-cpp-server
|
启动服务
|
1
2
|
service qpidd start
chkconfig qpidd on
|
权限认证服务(keystone)
安装权限认证服务:
|
1
|
yum install openstack-keystone python-keystoneclient -y
|
创建用户,写入到配置文件中:
|
1
2
|
openstack-config --set /etc/keystone/keystone.conf \
database connection mysql://keystone:KEYSTONE_DBPASS@controller/keystone
|
创建keystone数据库表:
|
1
2
3
4
5
6
7
|
$ mysql -u root -p
mysql> CREATE DATABASE keystone;
mysql> GRANT ALL PRIVILEGES ON keystone.* TO 'keystone'@'localhost' \
IDENTIFIED BY 'KEYSTONE_DBPASS';
mysql> GRANT ALL PRIVILEGES ON keystone.* TO 'keystone'@'%' \
IDENTIFIED BY 'KEYSTONE_DBPASS';
mysql> exit
|
自动生成表:
|
1
|
su -s /bin/sh -c "keystone-manage db_sync" keystone
|
设置用户环境变量:
|
1
2
3
4
5
6
7
8
|
ADMIN_TOKEN=$(openssl rand -hex 10)
echo $ADMIN_TOKEN
openstack-config --set /etc/keystone/keystone.conf DEFAULT \
admin_token $ADMIN_TOKEN
# keystone-manage pki_setup --keystone-user keystone --keystone-group keystone
# chown -R keystone:keystone /etc/keystone/ssl
# chmod -R o-rwx /etc/keystone/ssl
|
启动keystone服务:
|
1
2
|
service openstack-keystone start
chkconfig openstack-keystone on
|
将admin_token设置到环境变量中去。
|
1
2
|
export OS_SERVICE_TOKEN=$ADMIN_TOKEN
export OS_SERVICE_ENDPOINT=http://controller:35357/v2.0
|
创建管理员用户,默认的用户名为admin,密码为ADMIN_PASS,你可以自定义修改:
|
1
2
3
4
5
6
7
8
9
10
11
12
13
14
15
16
17
18
19
20
21
22
23
24
25
26
27
28
29
|
[root@controller keystone]# keystone user-create --name=admin --pass=ADMIN_PASS --email=ADMIN_EMAIL
+----------+----------------------------------+
| Property | Value |
+----------+----------------------------------+
| email | ADMIN_EMAIL|
| enabled | True |
|id| 332f5ecb18c64bf687b154facd629fb6 |
| name | admin |
| username | admin |
+----------+----------------------------------+
[root@controller keystone]# keystone role-create --name=admin
+----------+----------------------------------+
| Property | Value |
+----------+----------------------------------+
|id| ab5da2c50d7443efb0514e84c2b4adb7 |
| name | admin |
+----------+----------------------------------+
[root@controller keystone]# keystone tenant-create --name=admin --description="Admin Tenant"
+-------------+----------------------------------+
| Property | Value |
+-------------+----------------------------------+
| description | Admin Tenant |
| enabled | True |
| id | b89723a38b154eeea6416a83b293b0ad |
| name| admin |
+-------------+----------------------------------+
[root@controller keystone]# keystone user-role-add --user=admin --tenant=admin --role=admin
[root@controller keystone]# keystone user-role-add --user=admin --role=_member_ --tenant=admin
[root@controller keystone]#
|
创建一个权限认证服务,因为我这里的主机名是controller,所以下面有 http://controller:35357/v2.0 这些信息,可以自定义修改:
|
1
2
3
4
5
6
7
8
9
10
11
12
13
14
15
16
17
18
19
20
21
22
23
24
25
26
27
28
29
30
31
32
33
34
35
36
37
38
39
40
41
42
43
44
45
46
47
|
[root@controller keystone]# keystone service-create --name=keystone --type=identity \
> --description="OpenStack Identity"
+-------------+----------------------------------+
| Property | Value |
+-------------+----------------------------------+
| description |OpenStack Identity|
| enabled | True |
| id | 4bfd5f39b86c45edb92d5c0488987dd8 |
| name| keystone |
| type| identity |
+-------------+----------------------------------+
[root@controller keystone]# keystone endpoint-create \
> --service-id=$(keystone service-list | awk '/ identity / {print $2}') \
> --publicurl=http://controller:5000/v2.0 \
> --internalurl=http://controller:5000/v2.0 \
> --adminurl=http://controller:35357/v2.0
+-------------+----------------------------------+
| Property | Value |
+-------------+----------------------------------+
| adminurl | http://controller:35357/v2.0 |
| id | 0350b72901a141498fe48304b13a1b98 |
| internalurl | http://controller:5000/v2.0|
| publicurl | http://controller:5000/v2.0|
|region |regionOne |
| service_id | 4bfd5f39b86c45edb92d5c0488987dd8 |
+-------------+----------------------------------+
[root@controller keystone]# keystone user-create --name=demo --pass=DEMO_PASS --email=DEMO_EMAIL
+----------+----------------------------------+
| Property | Value |
+----------+----------------------------------+
| email |DEMO_EMAIL|
| enabled | True |
|id| b44a9a1462d74f4e928b3b339289a2ae |
| name | demo |
| username | demo |
+----------+----------------------------------+
[root@controller keystone]# keystone tenant-create --name=demo --description="Demo Tenant"
+-------------+----------------------------------+
| Property | Value |
+-------------+----------------------------------+
| description | Demo Tenant|
| enabled | True |
| id | 7bd79509ee184a2098ca0644679b60a8 |
| name| demo |
+-------------+----------------------------------+
[root@controller keystone]# keystone user-role-add --user=demo --role=_member_ --tenant=demo
[root@controller keystone]#
|
为了方便我们取到token,我们可以vi admin-openrc.sh,然后添加如下内容:
|
1
2
3
4
|
export OS_USERNAME=admin
export OS_PASSWORD=ADMIN_PASS
export OS_TENANT_NAME=admin
export OS_AUTH_URL=http://controller:35357/v2.0
|
在每次关机重启之后都要重新执行下面的命令,让环境变量起作用。否则会报”Expecting an auth URL via either –os-auth-url or env[OS_AUTH_URL]”的错误:
我们可以使用下面的命令查看keystone目前的用户有哪些:
测试效果:
打开restclient-ui-3.5-jar-with-dependencies.jar来测试效果:
url地址是: http://192.168.44.147:5000/v2.0/
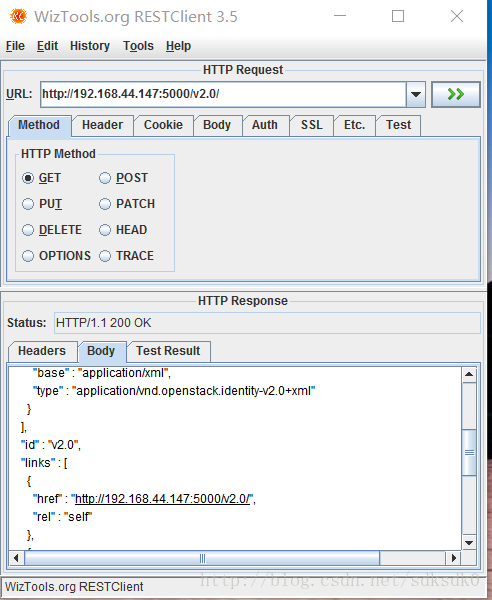
访问成功。
配置镜像服务(glance)
在controller服务器中安装服务:
|
1
2
3
4
5
6
7
8
9
|
yum install openstack-glance python-glanceclient
openstack-config --set /etc/glance/glance-api.conf database \
connection mysql://glance:GLANCE_DBPASS@controller/glance
openstack-config --set /etc/glance/glance-registry.conf database \
connection mysql://glance:GLANCE_DBPASS@controller/glance
|
在mysql数据库中创建glance数据库:
|
1
2
3
4
5
6
7
8
|
$ mysql -u root -p
mysql> CREATE DATABASE glance;
mysql> GRANT ALL PRIVILEGES ON glance.* TO 'glance'@'localhost' \
IDENTIFIED BY 'GLANCE_DBPASS';
mysql> GRANT ALL PRIVILEGES ON glance.* TO 'glance'@'%' \
IDENTIFIED BY 'GLANCE_DBPASS';
flush privileges;
|
自动生成表:
|
1
|
su -s /bin/sh -c "glance-manage db_sync" glance
|
在keystone上创建用户:
|
1
2
|
keystone user-create --name=glance --pass=GLANCE_PASS --email=glance@example.com
$ keystone user-role-add --user=glance --tenant=service --role=admin
|
配置授权服务:
|
1
2
3
4
5
6
7
8
9
10
11
12
13
14
15
16
17
18
19
20
21
22
23
24
25
26
27
28
29
30
31
32
|
openstack-config --set /etc/glance/glance-api.conf keystone_authtoken \
auth_uri http://controller:5000
openstack-config --set /etc/glance/glance-api.conf keystone_authtoken \
auth_host controller
openstack-config --set /etc/glance/glance-api.conf keystone_authtoken \
auth_port 35357
openstack-config --set /etc/glance/glance-api.conf keystone_authtoken \
auth_protocol http
openstack-config --set /etc/glance/glance-api.conf keystone_authtoken \
admin_tenant_name service
openstack-config --set /etc/glance/glance-api.conf keystone_authtoken \
admin_user glance
openstack-config --set /etc/glance/glance-api.conf keystone_authtoken \
admin_password GLANCE_PASS
openstack-config --set /etc/glance/glance-api.conf paste_deploy \
flavor keystone
openstack-config --set /etc/glance/glance-registry.conf keystone_authtoken \
auth_uri http://controller:5000
openstack-config --set /etc/glance/glance-registry.conf keystone_authtoken \
auth_host controller
openstack-config --set /etc/glance/glance-registry.conf keystone_authtoken \
auth_port 35357
openstack-config --set /etc/glance/glance-registry.conf keystone_authtoken \
auth_protocol http
openstack-config --set /etc/glance/glance-registry.conf keystone_authtoken \
admin_tenant_name service
openstack-config --set /etc/glance/glance-registry.conf keystone_authtoken \
admin_user glance
openstack-config --set /etc/glance/glance-registry.conf keystone_authtoken \
admin_password GLANCE_PASS
openstack-config --set /etc/glance/glance-registry.conf paste_deploy \
flavor keystone
|
启动服务:
|
1
2
3
4
|
service openstack-glance-api start
# service openstack-glance-registry start
# chkconfig openstack-glance-api on
# chkconfig openstack-glance-registry on
|
创建服务:
|
1
2
3
4
5
6
7
8
9
10
11
12
13
14
15
16
17
18
19
20
21
22
23
24
25
26
27
28
29
30
31
32
33
34
35
36
37
38
39
|
$ keystone service-create --name=glance --type=image \
--description="OpenStack Image Service"
$ keystone endpoint-create \
--service-id=$(keystone service-list | awk '/ image / {print $2}') \
--publicurl=http://controller:9292 \
--internalurl=http://controller:9292 \
--adminurl=http://controller:9292
[root@controller ~]# keystone service-create --name=glance --type=image \
> --description="OpenStack Image Service"
/usr/lib64/python2.6/site-packages/Crypto/Util/number.py:57: PowmInsecureWarning: Not using mpz_powm_sec. You should rebuild using libgmp >= 5 to avoid timing attack vulnerability.
_warn("Not using mpz_powm_sec. You should rebuild using libgmp >= 5 to avoid timing attack vulnerability.", PowmInsecureWarning)
+-------------+----------------------------------+
| Property | Value |
+-------------+----------------------------------+
| description | OpenStack Image Service |
| enabled | True |
| id | a45f77cfc12c42d19a45a6ea12cdfc51 |
| name| glance |
| type| image |
+-------------+----------------------------------+
[root@controller ~]# keystone endpoint-create \
> --service-id=$(keystone service-list | awk '/ image / {print $2}') \
> --publicurl=http://controller:9292 \
> --internalurl=http://controller:9292 \
> --adminurl=http://controller:9292
+-------------+----------------------------------+
| Property | Value |
+-------------+----------------------------------+
| adminurl | http://controller:9292 |
| id | 75deb2d2f85e4b7b88fe18bf5fca1a87 |
| internalurl | http://controller:9292 |
| publicurl | http://controller:9292 |
|region |regionOne |
| service_id | a45f77cfc12c42d19a45a6ea12cdfc51 |
+-------------+----------------------------------+
|
创建镜像,先将下载好的cirros-0.3.2-x86_64-disk.img放置在/root目录下,然后执行下面的命令:
复制代码 代码如下:
glance image-create --name "cirros-0.3.2-x86_64" --disk-format qcow2 \
--container-format bare --is-public True --progress < cirros-0.3.2-x86_64-disk.img
查看镜像列表:

在前面我们已经对kvm虚拟化有所了解,所以我们现在知道qcow2就是一个镜像文件。
服务器管理(Nova)
对于虚拟机管理我们需要从controller和computer01进行配置。
先来看controller的配置:
|
1
2
3
4
5
6
7
8
9
10
11
12
13
14
15
16
17
18
19
20
21
22
23
24
25
26
27
28
29
30
31
32
33
34
35
36
37
38
39
40
41
42
43
|
yum install openstack-nova-api openstack-nova-cert openstack-nova-conductor \
openstack-nova-console openstack-nova-novncproxy openstack-nova-scheduler \
python-novaclient
$ mysql -u root -p
mysql> CREATE DATABASE nova;
mysql> GRANT ALL PRIVILEGES ON nova.* TO 'nova'@'localhost' \
IDENTIFIED BY 'NOVA_DBPASS';
mysql> GRANT ALL PRIVILEGES ON nova.* TO 'nova'@'%' \
IDENTIFIED BY 'NOVA_DBPASS';
openstack-config --set /etc/nova/nova.conf database connection mysql://nova:NOVA_DBPASS@controller/nova
openstack-config --set /etc/nova/nova.conf DEFAULT rpc_backend qpid
openstack-config --set /etc/nova/nova.conf DEFAULT qpid_hostname controller
openstack-config --set /etc/nova/nova.conf DEFAULT my_ip 192.168.44.147
openstack-config --set /etc/nova/nova.conf DEFAULT vncserver_listen 192.168.216.210
openstack-config --set /etc/nova/nova.conf DEFAULT vncserver_proxyclient_address 192.168.44.147
openstack-config --set /etc/nova/nova.conf DEFAULT auth_strategy keystone
openstack-config --set /etc/nova/nova.conf keystone_authtoken auth_uri http://controller:5000
openstack-config --set /etc/nova/nova.conf keystone_authtoken auth_host controller
openstack-config --set /etc/nova/nova.conf keystone_authtoken auth_protocol http
openstack-config --set /etc/nova/nova.conf keystone_authtoken auth_port 35357
openstack-config --set /etc/nova/nova.conf keystone_authtoken admin_user nova
openstack-config --set /etc/nova/nova.conf keystone_authtoken admin_tenant_name service
openstack-config --set /etc/nova/nova.conf keystone_authtoken admin_password NOVA_PASS
$ keystone user-create --name=nova --pass=NOVA_PASS --email=nova@example.com
$ keystone user-role-add --user=nova --tenant=service --role=admin
$ keystone service-create --name=nova --type=compute \
--description="OpenStack Compute"
$ keystone endpoint-create \
--service-id=$(keystone service-list | awk '/ compute / {print $2}') \
--publicurl=http://controller:8774/v2/%\(tenant_id\)s \
--internalurl=http://controller:8774/v2/%\(tenant_id\)s \
--adminurl=http://controller:8774/v2/%\(tenant_id\)s
|
然后是computer01的配置:
|
1
2
3
4
5
6
7
8
9
10
11
12
13
14
15
16
17
18
19
20
21
22
23
24
25
26
|
yum install openstack-nova-compute
openstack-config --set /etc/nova/nova.conf database connection mysql://nova:NOVA_DBPASS@controller/nova
openstack-config --set /etc/nova/nova.conf DEFAULT auth_strategy keystone
openstack-config --set /etc/nova/nova.conf keystone_authtoken auth_uri http://controller:5000
openstack-config --set /etc/nova/nova.conf keystone_authtoken auth_host controller
openstack-config --set /etc/nova/nova.conf keystone_authtoken auth_protocol http
openstack-config --set /etc/nova/nova.conf keystone_authtoken auth_port 35357
openstack-config --set /etc/nova/nova.conf keystone_authtoken admin_user nova
openstack-config --set /etc/nova/nova.conf keystone_authtoken admin_tenant_name service
openstack-config --set /etc/nova/nova.conf keystone_authtoken admin_password NOVA_PASS
openstack-config --set /etc/nova/nova.conf DEFAULT rpc_backend qpid
openstack-config --set /etc/nova/nova.conf DEFAULT qpid_hostname controller
openstack-config --set /etc/nova/nova.conf DEFAULT my_ip 192.168.44.148
openstack-config --set /etc/nova/nova.conf DEFAULT vnc_enabled True
openstack-config --set /etc/nova/nova.conf DEFAULT vncserver_listen 0.0.0.0
openstack-config --set /etc/nova/nova.conf DEFAULT vncserver_proxyclient_address 192.168.44.148
openstack-config --set /etc/nova/nova.conf DEFAULT novncproxy_base_url http://controller:6080/vnc_auto.html
openstack-config --set /etc/nova/nova.conf DEFAULT glance_host controller
openstack-config --set /etc/nova/nova.conf libvirt virt_type kvm
|
启动服务:
|
1
2
3
4
5
6
|
service libvirtd start
service messagebus start
service openstack-nova-compute start
chkconfig libvirtd on
chkconfig messagebus on
chkconfig openstack-nova-compute on
|
网络服务配置
在controller端:
|
1
2
3
4
5
|
openstack-config --set /etc/nova/nova.conf DEFAULT \
network_api_class nova.network.api.API
openstack-config --set /etc/nova/nova.conf DEFAULT \
security_group_api nova
|
在computer01端:
|
1
2
3
4
5
6
7
8
9
10
11
12
13
14
15
16
17
18
19
20
21
22
23
24
25
26
27
28
29
30
31
|
yum install openstack-nova-network openstack-nova-api
# openstack-config --set /etc/nova/nova.conf DEFAULT \
network_api_class nova.network.api.API
# openstack-config --set /etc/nova/nova.conf DEFAULT \
security_group_api nova
# openstack-config --set /etc/nova/nova.conf DEFAULT \
network_manager nova.network.manager.FlatDHCPManager
# openstack-config --set /etc/nova/nova.conf DEFAULT \
firewall_driver nova.virt.libvirt.firewall.IptablesFirewallDriver
# openstack-config --set /etc/nova/nova.conf DEFAULT \
network_size 254
# openstack-config --set /etc/nova/nova.conf DEFAULT \
allow_same_net_traffic False
# openstack-config --set /etc/nova/nova.conf DEFAULT \
multi_host True
# openstack-config --set /etc/nova/nova.conf DEFAULT \
send_arp_for_ha True
# openstack-config --set /etc/nova/nova.conf DEFAULT \
share_dhcp_address True
# openstack-config --set /etc/nova/nova.conf DEFAULT \
force_dhcp_release True
# openstack-config --set /etc/nova/nova.conf DEFAULT \
flat_network_bridge br100
# openstack-config --set /etc/nova/nova.conf DEFAULT \
flat_interface eth1
# openstack-config --set /etc/nova/nova.conf DEFAULT \
public_interface eth0
|
nova network-create demo-net –bridge br100 –multi-host T \
–fixed-range-v4 88.8.8.16/28
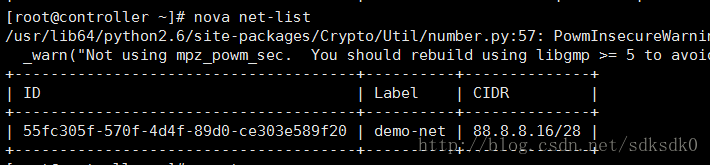
然后使用nova net-list来查看:
创建虚拟机
1、配置ssh密码登录:
2、增加公钥到openstack环境中:
|
1
|
nova keypair-add --pub-key ~/.ssh/id_rsa.pub demo-key
|
3、验证是否配置成功:
|
1
2
3
|
nova keypair-list
nova flavor-list
|
4、创建实例:
复制代码 代码如下:
nova boot --flavor m1.tiny --image cirros-0.3.2-x86_64 --nic netid=DEMO_NET_ID\
--security-group default --key-name demo-key demo-instance1
说明:
DEMO_NET_ID:指的是nova net-list的ID。
demo-instance1指的是虚拟机的名字。
例如我的成功执行如下:
nova boot --flavor m1.tiny --image cirros-0.3.2-x86_64 --nic net-id=55fc305f-570f-4d4f-89d0-ce303e589f20 \

--security-group default --key-name demo-key tfjt
5、使用nova list进行查看。

从这里我们看到我这上面有一个ip地址192.168.44.17.这个地址就是浮动IP。
6、配置浮动IP
浮动ip
|
1
|
nova-manage floating create --ip_range=192.168.44.16/28
|
查看可用地址
|
1
|
nova-manage floating list
|
nova floating-ip-create
给创建的虚拟机绑定浮动ip,这个7bc0086…就是我之前创建的虚拟机的ID。后面接上IP地址即可。
|
1
|
nova add-floating-ip 7bc00086-1870-4367-9f05-666d5067ccff 192.168.44.17
|
监听
cpdump -n -i eth0 icmp
在controller上:
nova secgroup-add-rule default icmp -1 -1 0.0.0.0/0
nova secgroup-add-rule default tcp 22 22 0.0.0.0/0
7、使用下面的命令可以输出一个url地址:
|
1
|
nova get-vnc-console tfjt novnc
|
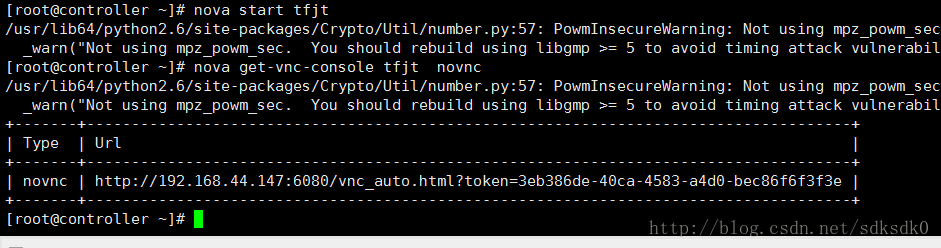
8、我们可以在浏览器中进行访问。
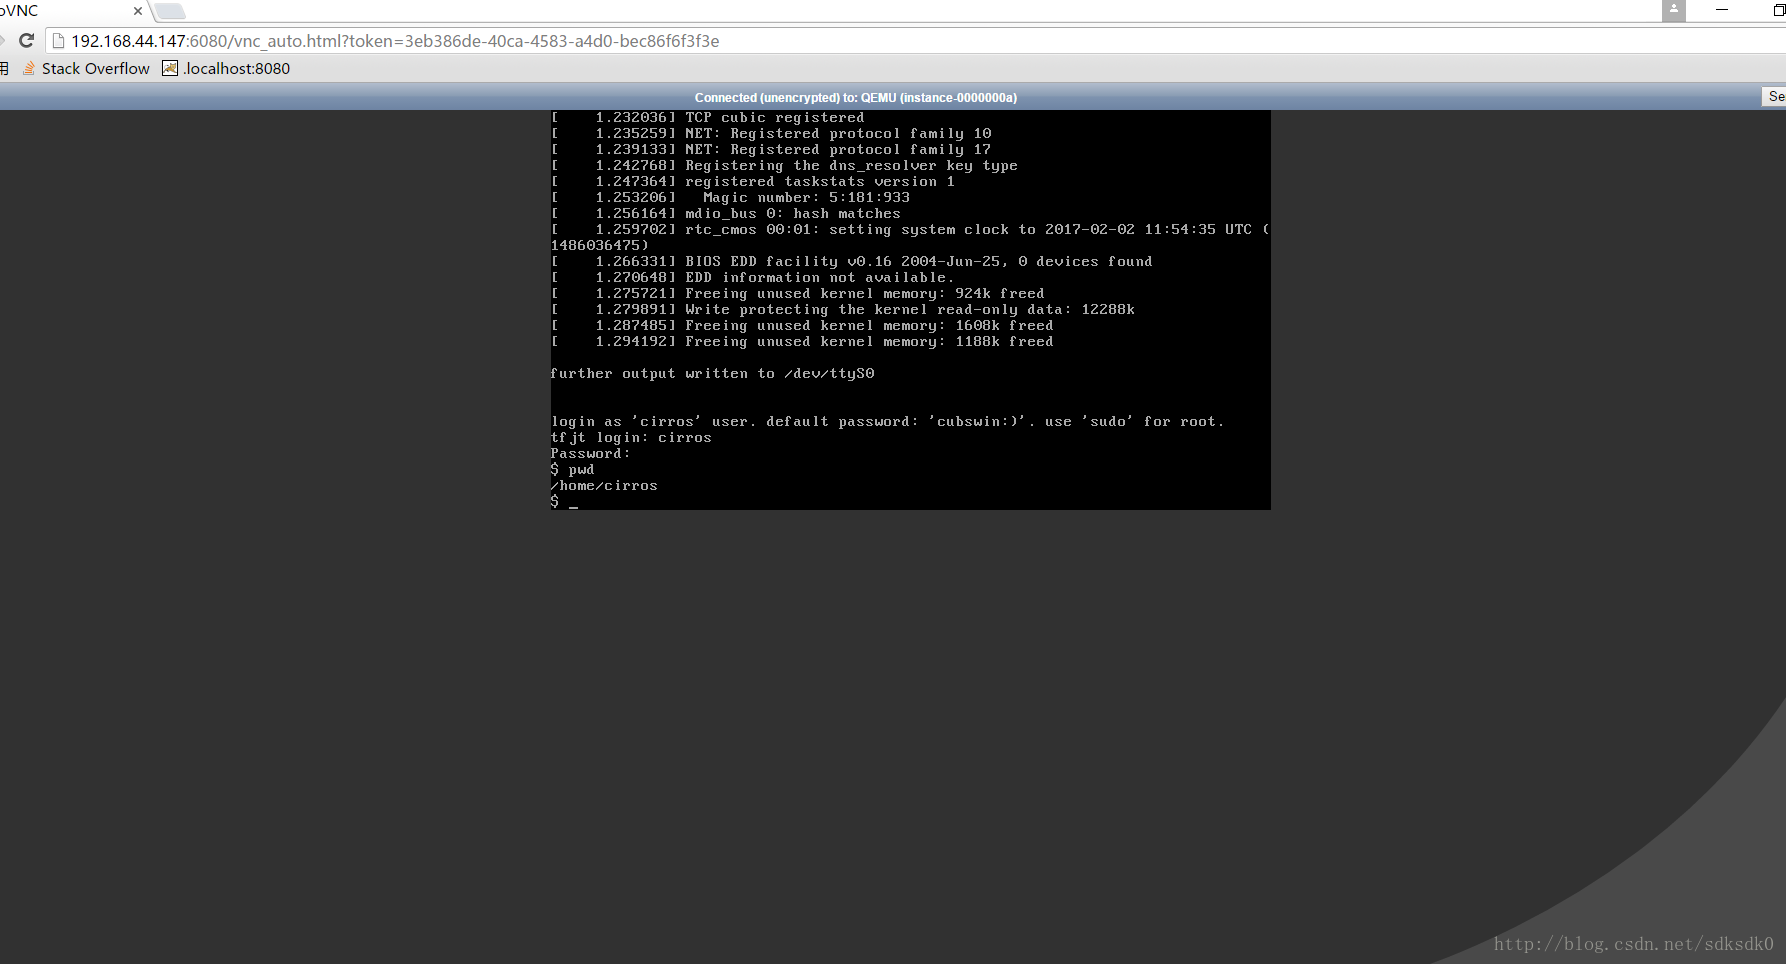
到这里为止,我们的云服务器就算完成了。可以在浏览器上访问我们的云服务器,怎么样是不是很激动。
界面服务(dashboard)
上面我们可以看到很多操作是在终端进行的,那么肯定是有界面版的,所以我们在computer02中进行配置。
1、安装服务
yum install memcached python-memcached mod_wsgi openstack-dashboard
2、文件配置。
在controller中
配置/etc/openstack-dashboard/local_settings。修改为如下内容。
|
1
2
3
4
5
6
7
8
9
10
11
|
ALLOWED_HOSTS = ['*']
CACHES = {
'default': {
'BACKEND' : 'django.core.cache.backends.memcached.MemcachedCache',
'LOCATION' : '127.0.0.1:11211'
}
}
OPENSTACK_HOST = "controller"
|
3、连接
|
1
2
3
4
5
6
|
setsebool -P httpd_can_network_connect on
service httpd start
# service memcached start
# chkconfig httpd on
# chkconfig memcached on
|
4、浏览器中访问。
|
1
|
http://192.168.44.147/dashboard/project/
|
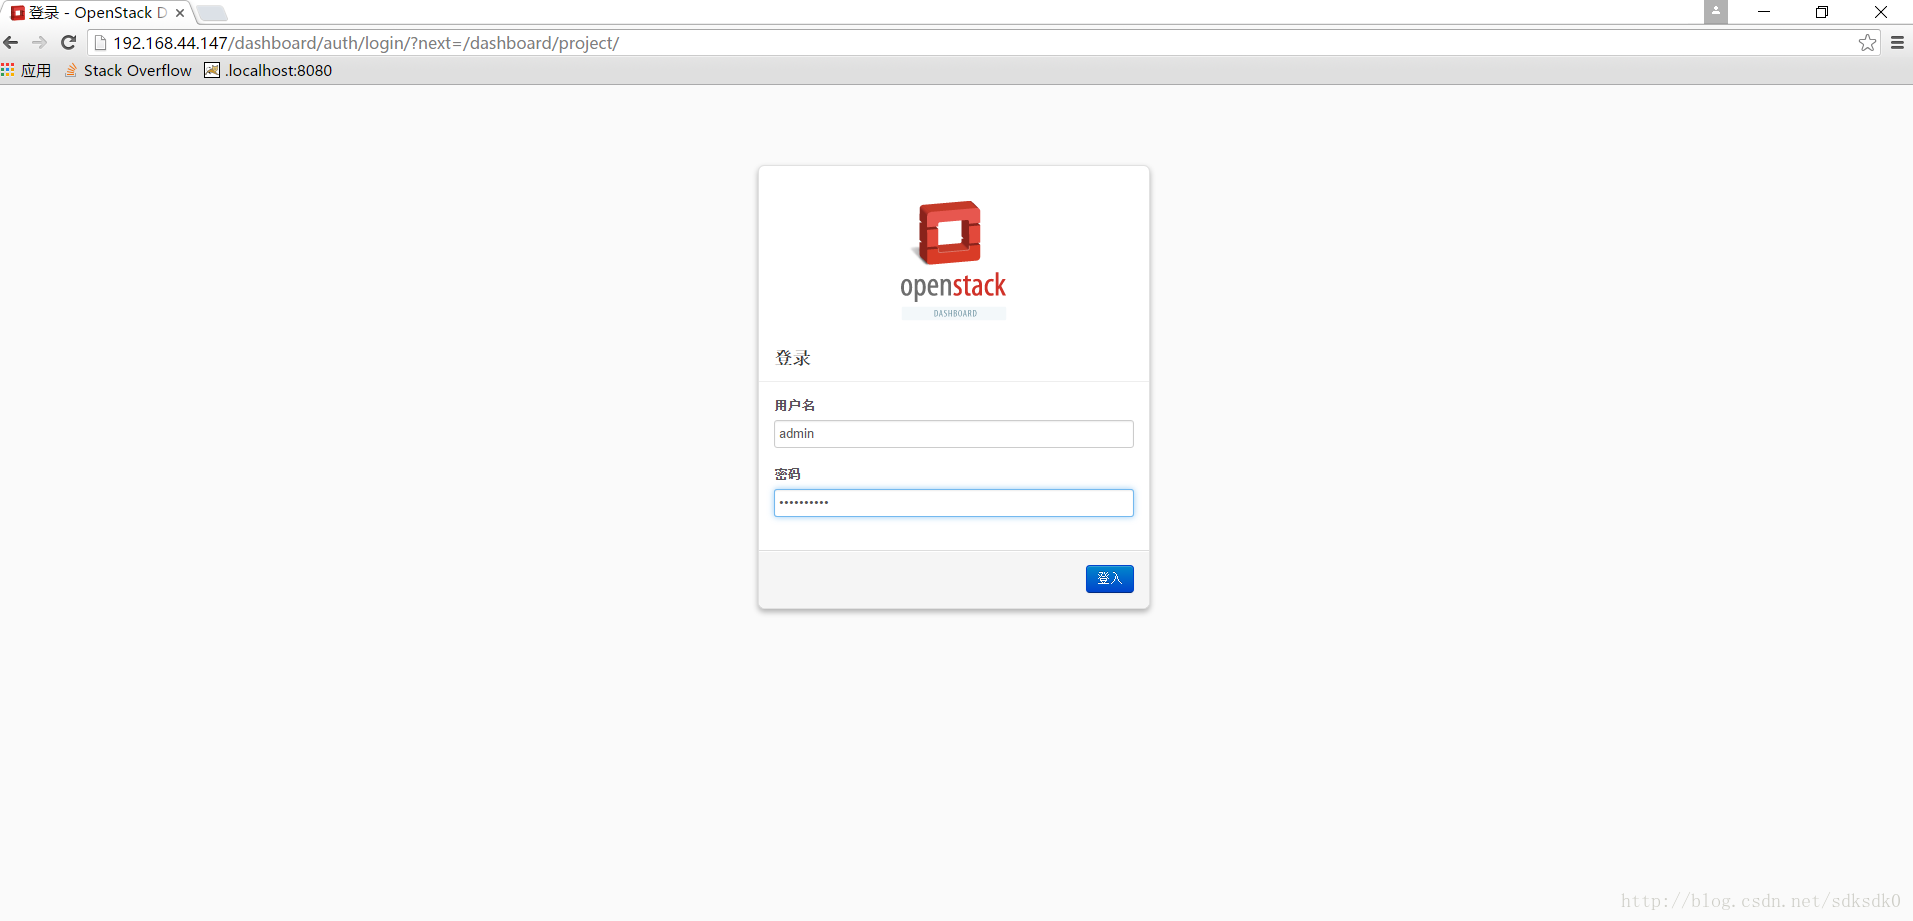
用户名就是我们之前配置的admin,密码是ADMIN_PASS
在这个界面版里面的各种操作我这里就不细说了,可以自己去体验。
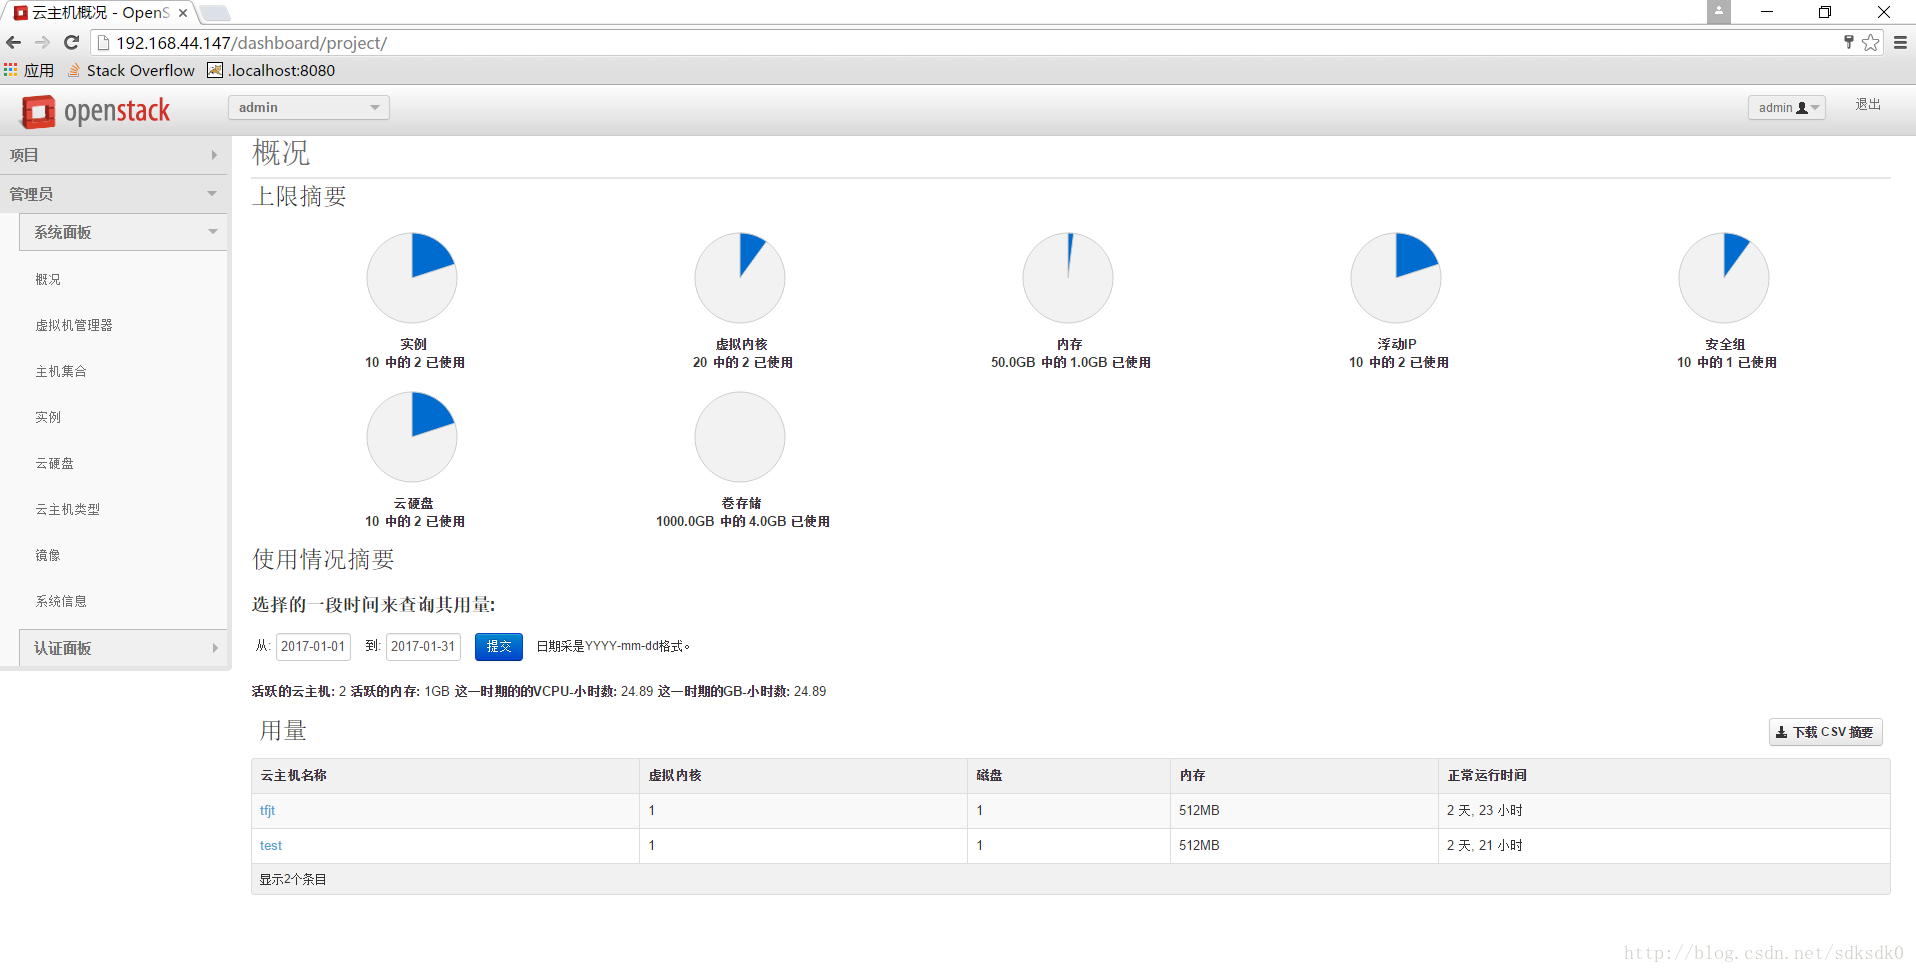
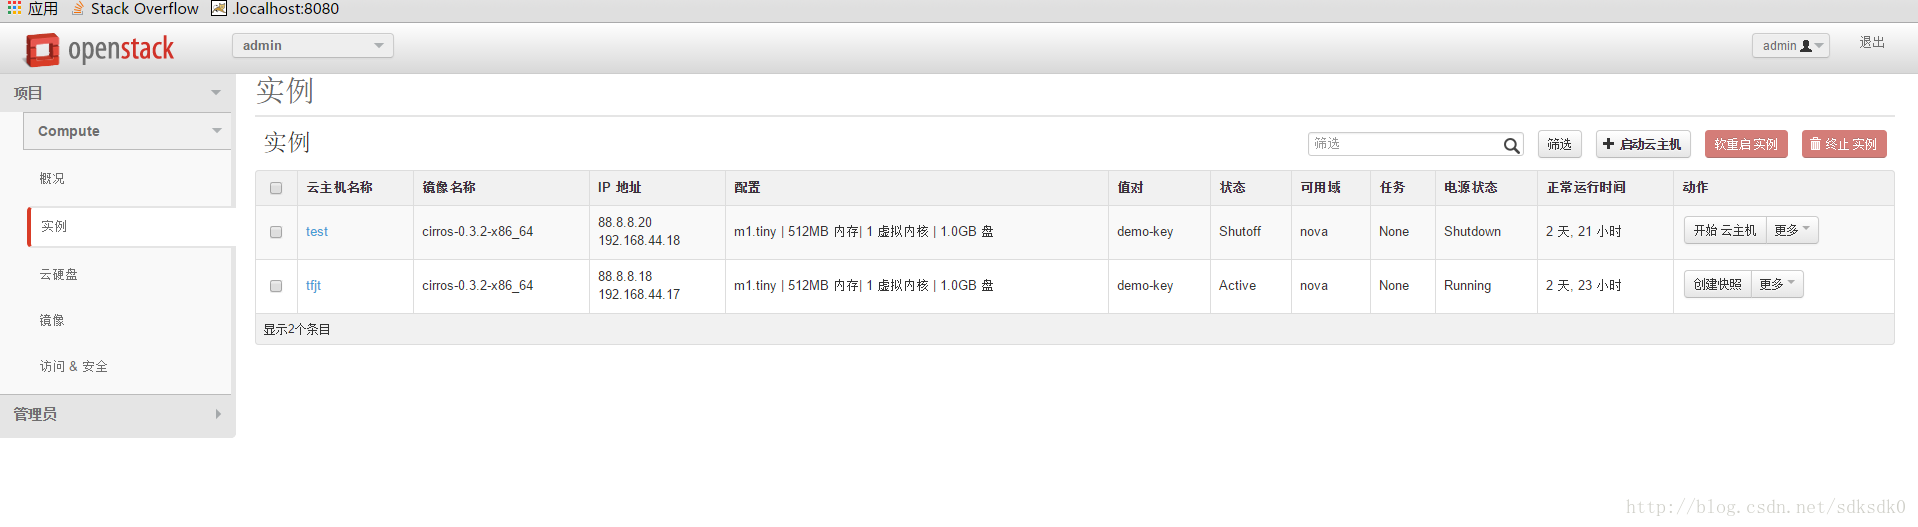
在这里可以看到我们的云服务器实例。
云硬盘服务(cinder)
了解过阿里云或者腾讯云的就知道,里面都有一个云硬盘服务,可以给我们的机器增加磁盘。
在controller端:
|
1
2
3
4
5
6
7
8
9
10
|
yum stall openstack-cinde
openstack-config --set /etc/cinder/cinder.conf \
database connection mysql://cinder:CINDER_DBPASS@controller/cinder
mysql> CREATE DATABASE cinder;
mysql> GRANT ALL PRIVILEGES ON cinder.* TO 'cinder'@'localhost' \
IDENTIFIED BY 'CINDER_DBPASS';
mysql> GRANT ALL PRIVILEGES ON cinder.* TO 'cinder'@'%' \
IDENTIFIED BY 'CINDER_DBPASS';
|
创建数据库表:
|
1
|
# su -s /bin/sh -c "cinder-manage db sync" cinder
|
创建用户并赋予角色:
|
1
2
|
$ keystone user-create --name=cinder --pass=CINDER_PASS--email=cinder@example.com
$ keystone user-role-add --user=cinder --tenant=service --role=admin
|
权限控制配置:
|
1
2
3
4
5
6
7
8
9
10
11
12
13
14
15
16
|
# openstack-config --set /etc/cinder/cinder.conf DEFAULT \
auth_strategy keystone
# openstack-config --set /etc/cinder/cinder.conf keystone_authtoken \
auth_uri http://controller:5000
# openstack-config --set /etc/cinder/cinder.conf keystone_authtoken \
auth_host controller
# openstack-config --set /etc/cinder/cinder.conf keystone_authtoken \
auth_protocol http
# openstack-config --set /etc/cinder/cinder.conf keystone_authtoken \
auth_port 35357
# openstack-config --set /etc/cinder/cinder.conf keystone_authtoken \
admin_user cinder
# openstack-config --set /etc/cinder/cinder.conf keystone_authtoken \
admin_tenant_name service
# openstack-config --set /etc/cinder/cinder.conf keystone_authtoken \
admin_password CINDER_PASS
|
消息队列配置:
|
1
2
3
4
5
6
7
8
9
10
11
12
13
14
15
16
17
18
19
20
21
22
23
24
25
26
27
28
29
30
31
32
33
34
35
36
37
38
39
40
|
# openstack-config --set /etc/cinder/cinder.conf \
DEFAULT rpc_backend qpid
# openstack-config --set /etc/cinder/cinder.conf \
DEFAULT qpid_hostname controller
$ keystone service-create --name=cinder --type=volume --description="OpenStack Block Storage"
$ keystone endpoint-create \
--service-id=$(keystone service-list | awk '/ volume / {print $2}') \
--publicurl=http://controller:8776/v1/%\(tenant_id\)s \
--internalurl=http://controller:8776/v1/%\(tenant_id\)s \
--adminurl=http://controller:8776/v1/%\(tenant_id\)s
$ keystone service-create --name=cinderv2 --type=volumev2 --description="OpenStack Block Storage v2"
$ keystone endpoint-create \
--service-id=$(keystone service-list | awk '/ volumev2 / {print $2}') \
--publicurl=http://controller:8776/v2/%\(tenant_id\)s \
--internalurl=http://controller:8776/v2/%\(tenant_id\)s \
--adminurl=http://controller:8776/v2/%\(tenant_id\)s
service openstack-cinder-api start
# service openstack-cinder-scheduler start
# chkconfig openstack-cinder-api on
# chkconfig openstack-cinder-scheduler on
cinder service-list
openstack-config --set /etc/cinder/cinder.conf \
DEFAULT qpid_hostname controller
cinder --debug list
keystone user-create --name=cinder --pass=CINDER_PASS --email=cinder@example.com
openstack-config --set /etc/cinder/cinder.conf \
DEFAULT my_ip 192.168.44.147
|
在node端(computer02)
|
1
2
3
4
5
6
7
8
9
10
11
12
13
14
15
16
17
18
19
20
21
22
23
24
25
26
27
28
29
30
31
32
33
34
35
36
37
38
39
40
41
42
43
|
pvcreate /dev/sdb
# vgcreate cinder-volumes /dev/sdb
yum install openstack-cinder scsi-target-utils
# openstack-config --set /etc/cinder/cinder.conf DEFAULT \
auth_strategy keystone
# openstack-config --set /etc/cinder/cinder.conf keystone_authtoken \
auth_uri http://controller:5000
# openstack-config --set /etc/cinder/cinder.conf keystone_authtoken \
auth_host controller
# openstack-config --set /etc/cinder/cinder.conf keystone_authtoken \
auth_protocol http
# openstack-config --set /etc/cinder/cinder.conf keystone_authtoken \
auth_port 35357
# openstack-config --set /etc/cinder/cinder.conf keystone_authtoken \
admin_user cinder
# openstack-config --set /etc/cinder/cinder.conf keystone_authtoken \
admin_tenant_name service
# openstack-config --set /etc/cinder/cinder.conf keystone_authtoken \
admin_password CINDER_PASS
# openstack-config --set /etc/cinder/cinder.conf \
DEFAULT rpc_backend qpid
# openstack-config --set /etc/cinder/cinder.conf \
DEFAULT qpid_hostname controller
# openstack-config --set /etc/cinder/cinder.conf \
database connection mysql://cinder:CINDER_DBPASS@controller/cinde
# openstack-config --set /etc/cinder/cinder.conf \
DEFAULT my_ip MANAGEMENT_INTERFACE_IP_ADDRESS
# openstack-config --set /etc/cinder/cinder.conf \
DEFAULT glance_host controller
# openstack-config --set /etc/cinder/cinder.conf \
DEFAULT iscsi_helper tgtadm
|
配置文件中:
vi /etc/tgt/targets.conf
|
1
|
include /etc/cinder/volumes/*
|
启动服务:
|
1
2
3
4
|
# service openstack-cinder-volume start
# service tgtd start
# chkconfig openstack-cinder-volume on
# chkconfig tgtd on
|
创建磁盘:
|
1
|
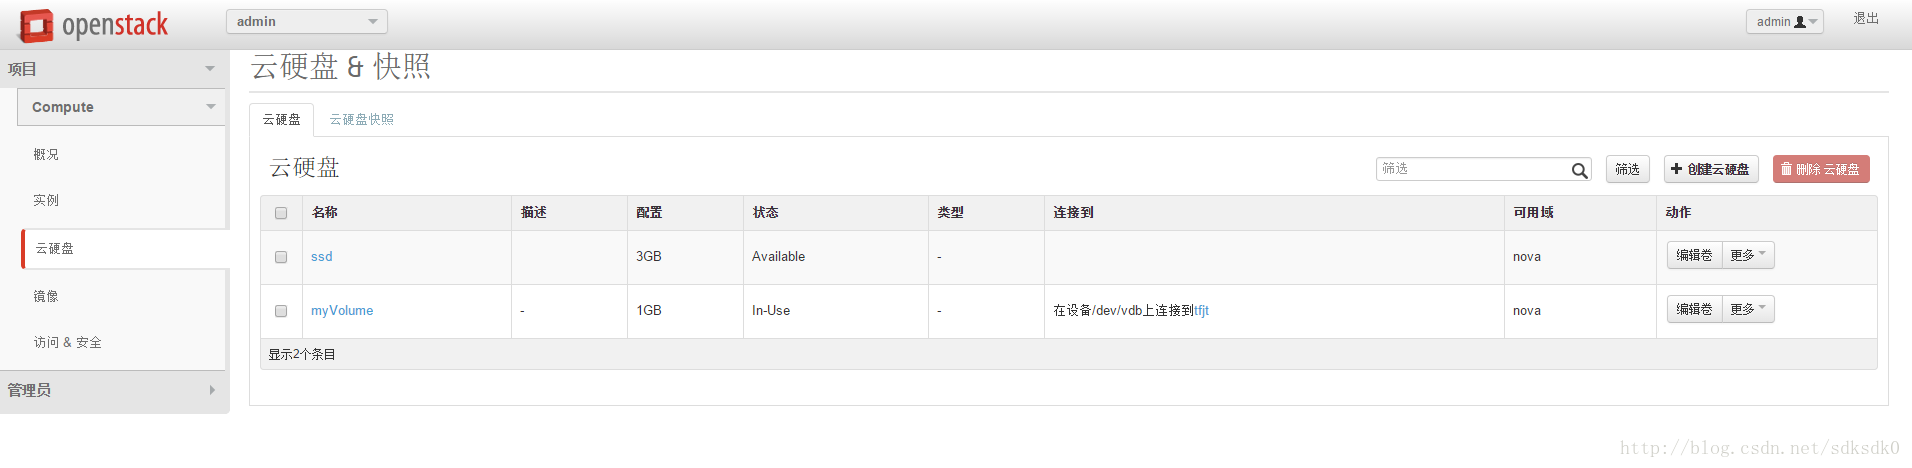
cinder create --display-name myVolume 1
|
查看磁盘列表:
然后再界面端查看云硬盘的配置并进行挂载:
在云服务器上挂载磁盘:
|
1
2
3
4
5
6
7
8
9
10
11
12
13
14
15
16
17
18
19
20
21
22
23
24
25
26
27
28
29
30
31
32
33
34
35
36
37
38
39
40
41
42
43
44
|
$ mkfs.ext3 /dev/vdb1
$ mkdir /mnt/test
$ mount /dev/vdb1 /mnt/test
$ mount
$ fdisk /dev/vdb
Device contains neither a valid DOS partition table, nor Sun, SGI or OSF disklabel
Building a new DOS disklabel with disk identifier 0x64817ea3.
Changes will remain in memory only, until you decide to write them.
After that, of course, the previous content won't be recoverable.
Warning: invalid flag 0x0000 of partition table 4 will be corrected by w(rite)
Command (m for help): n
Partition type:
p primary (0 primary, 0 extended, 4 free)
e extended
Select (default p): p
Partition number (1-4, default 1): 1
First sector (2048-2097151, default 2048): +1G
Value out of range.
First sector (2048-2097151, default 2048): +512M
Last sector, +sectors or +size{K,M,G} (1048576-2097151, default 2097151):
Using default value 2097151
Command (m for help): p
Disk /dev/vdb: 1073 MB, 1073741824 bytes
16 heads, 63 sectors/track, 2080 cylinders, total 2097152 sectors
Units = sectors of 1 * 512 = 512 bytes
Sector size (logical/physical): 512 bytes / 512 bytes
I/O size (minimum/optimal): 512 bytes / 512 bytes
Disk identifier: 0x64817ea3
Device Boot Start End Blocks Id System
/dev/vdb1 1048576 2097151 524288 83 Linux
Command (m for help): w
The partition table has been altered!
Calling ioctl() to re-read partition table.
Syncing disks.
$ df -h
|

总结:整个操作流程非常复杂,我也是花了几天才慢慢搭建好的,这其实也就是个基础,给的其实是一个思路,后面需要怎样的扩展可以根据自己的业务需要进行不同的设置。对于不明白的地方可以查阅官方文档。
转载自:http://www.jb51.net/article/104511.htm
- openstack安装部署私有云详细图文
本文主要分享的是云计算.openstack的使用.私有云平台建设.云服务器云硬盘的构建和使用.从基本概念入手到私有云建设,信息量非常大.对于openstack的安装部署都是从官方文档中一步步的介绍,内 ...
- windwos10安装mysql8.0.20详细图文教程
windwos10安装mysql8.0.20详细图文教程 1.浏览器搜索mysql下载安装 地址:https://dev.mysql.com/downloads/mysql/ 2.登录或者不登录下载 ...
- ROS2的安装与使用(超详细图文教程)
ROS2的安装与使用(超详细图文教程) 如果前面的虚拟机以及Ubuntu22.04镜像都安装好了,根据目录直接跳到ROS2的安装. 资料参考于:古月居 VMware虚拟机的安装 安装地址: 对于不了解 ...
- VMware虚拟机下安装CentOS7.0超详细图文教程
1.本文说明: 官方的第一个文本档案.也就是0_README.txt,大概意思是这样(渣翻译,但是大概意思还是有的). CentOS-7.0-1406-x86_64-DVD.iso:这个镜像(DVD ...
- Windows环境下载与安装JBOSS服务器的详细图文教程
一.JDK的安装 首先安装JDK,配置环境变量(PATH,CLASSPATH,JAVA_HOME). 可以参照:Windows环境下JDK安装与环境变量配置 二.Jboss的介绍 JBOSS是EJB的 ...
- aix 6.1系统怎么安装?这里有详细图文教程
今年六月,我们公司出现了一次非常严重的数据丢失的事故.生产服务器崩溃导致所有的业务都陷于停滞,而且由于涉及到公司机密又无法贸然到数据恢复公司进行恢复,可是自己又无法解决.权衡利弊还是决定找一家有保密资 ...
- Windows 2016 无域故障转移群集部署方法 超详细图文教程 (一)
故障转移群集是一个很实用的功能,而windows在2016版本开始,终于支持不用域做故障转移群集. 在群集中,我们可以设定一个"群集IP" 而客户端只需要根据这个"群集I ...
- ubuntu16.04下安装TensorFlow(GPU加速)----详细图文教程【转】
本文转载自:https://blog.csdn.net/zhaoyu106/article/details/52793183 le/details/52793183 写在前面 一些废话 接触深度学习已 ...
- Windows 2016 无域故障转移群集部署方法 超详细图文教程 (二)
上一章我们配置了一台设备,接着根据那个配置,配置其它设备.这里我配置了三台设备: 创建故障转移群集,并添加设备. 之前的操作都是每台服务器都要做的,而这个操作,只需要任选一台去做即可,我这里选d1 1 ...
- MySQL8.0.20下载与安装详细图文教程,mysql安装教程
MySQL下载与安装(8.0.20版)教程 mysql安装包+mysql学习视频+mysql面试指南视频教程 下载地址: 链接:https://pan.baidu.com/s/1FmLFhGlajBQ ...
随机推荐
- curator-framework 使用采坑记之org.apache.zookeeper.ClientCnxn - Opening socket connection to server..........Will not attempt to authenticate using SASL (unknown error)报错解决
一.curator-framework 简介 curator-framework 是对zookeeper做的分二次分布式封装处理,目前代码也是apache 开源社区维护,如下所示. github地址 ...
- Redis之数据持久化小结
一.概述 Redis作为内存型的数据库,虽然很快,依然有着很大的隐患,一旦服务器宕机重启,内存中数据还会存在吗? 很容易想到的一个方案是从后台数据恢复这些数据,如果数据量很小,这倒是一个可行的方案.但 ...
- 使用 Docker 部署 Answer 问答平台
1)介绍 GitHub:https://github.com/apache/incubator-answer Answer 问答社区是在线平台,让用户提出问题并获得回答.用户可以发布问题并得到其他用户 ...
- 微信小程序直播,腾讯云直播+微信小程序实现实时直播
一:小程序代码端 小程序直播使用小程序组件 live-pusher 组件和live-player组件 首先开通直播权限 小程序开发工具内进行推流拉流都不会成功,所以需要使用两个手机进行推拉流测试: 1 ...
- 被 两个 vetur 玩惨了的几天,可不是vue-helper的锅
最近由idea 转 vscode,因为 由原来一个项目变成7个项目了,2G内存不够看. 然后发现点击组件跳转不好使,装个vue-helper也是有一部分不好使. 下载vue-helper源码一通查,发 ...
- C++串口通讯解决方案
这篇文章只是笔记性质,没有实际的原创内容,主要是做一下方案的备份. 串口通讯使用开源的 CSerialPort 类,我使用的是Windows版本分支: CSerialPort 跨平台 CSerialP ...
- pod为什么会被驱逐及如何避免pod被驱逐导致的服务中断
Pod被驱逐的原因主要有以下几点: 资源不足:当节点资源(如CPU.内存.存储等)不足以满足Pod的资源需求时,调度器会选择将其中一个或多个Pod驱逐出节点,以便在资源有限的节点上安排新的Pod. 超 ...
- Pod中断预算 PodDisruptionBudget(PDB)
PodDisruptionBudget(PDB)是Kubernetes中的一个资源对象,用于确保在进行维护.升级或其他操作时,系统中的Pod不会被意外中断或终止.PDB提供了一种机制,通过限制在给定时 ...
- 【深度学习】神经网络正则化方法之Dropout
前言 正则化是一种广泛用于机器学习和深度学习的手段,它的目的就是阻碍模型过度学习(过拟合),从而提升算法的泛化能力. Dropout 是一种常见的缓解过拟合的方法.接下来,本文将从原理和实践来介绍Dr ...
- CMake的作用和价值--概念简介
一 简介: CMake是一个跨平台的安装(编译)工具,可以用简单的语句来描述所有平台的安装(编译过程).他能够输出各种各样的makefile或者project文件,能测试编译器所支持的C++特性,类似 ...