关于CoreData的理解和使用.
CoreData是苹果官方推出的一种方便的面向对象的存储方式,相信大家都已经对其有所了解,但是对于CoreData的概念大家都存在部分的误区.给大家推荐个网址是苹果的官方文档的翻译版(http://objccn.io/issue-4-1/)这里详细的解释了CoreData存在以及出现的意义.下面我就带大家来学习下如何使用CoreData.
今天我们先学习最基础的CoreData的操作(单表操作)
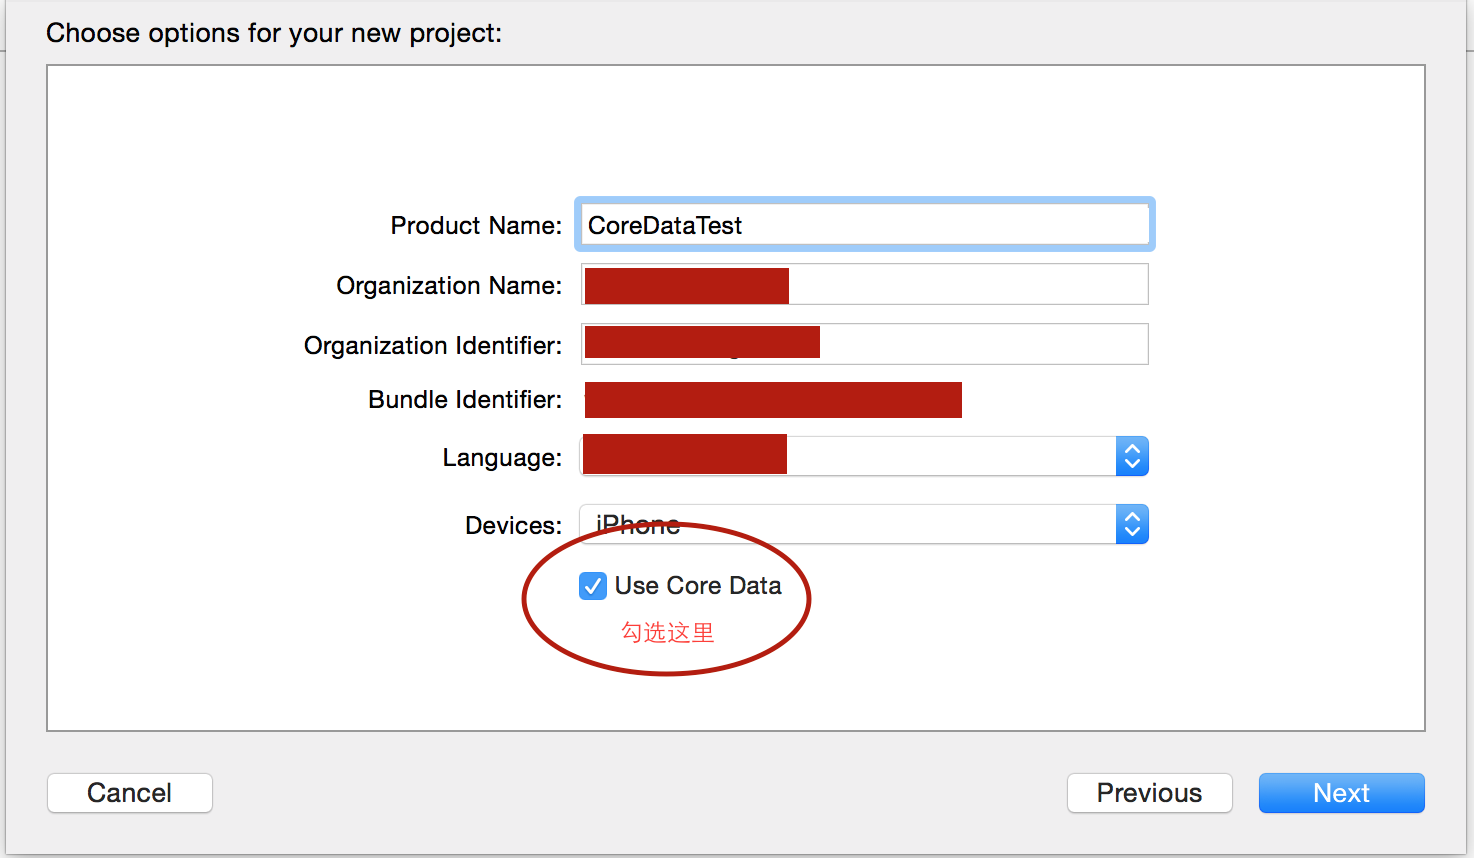
第一步 创建一个带有CoreData的工程.
创建完成带有CoreData的工程后我们可以看到我们工程左边列表里有一个名字叫做CoreDataTest.xcdatamodeld的文件在哪里就是我们创建我们Model类实体文件的地方.
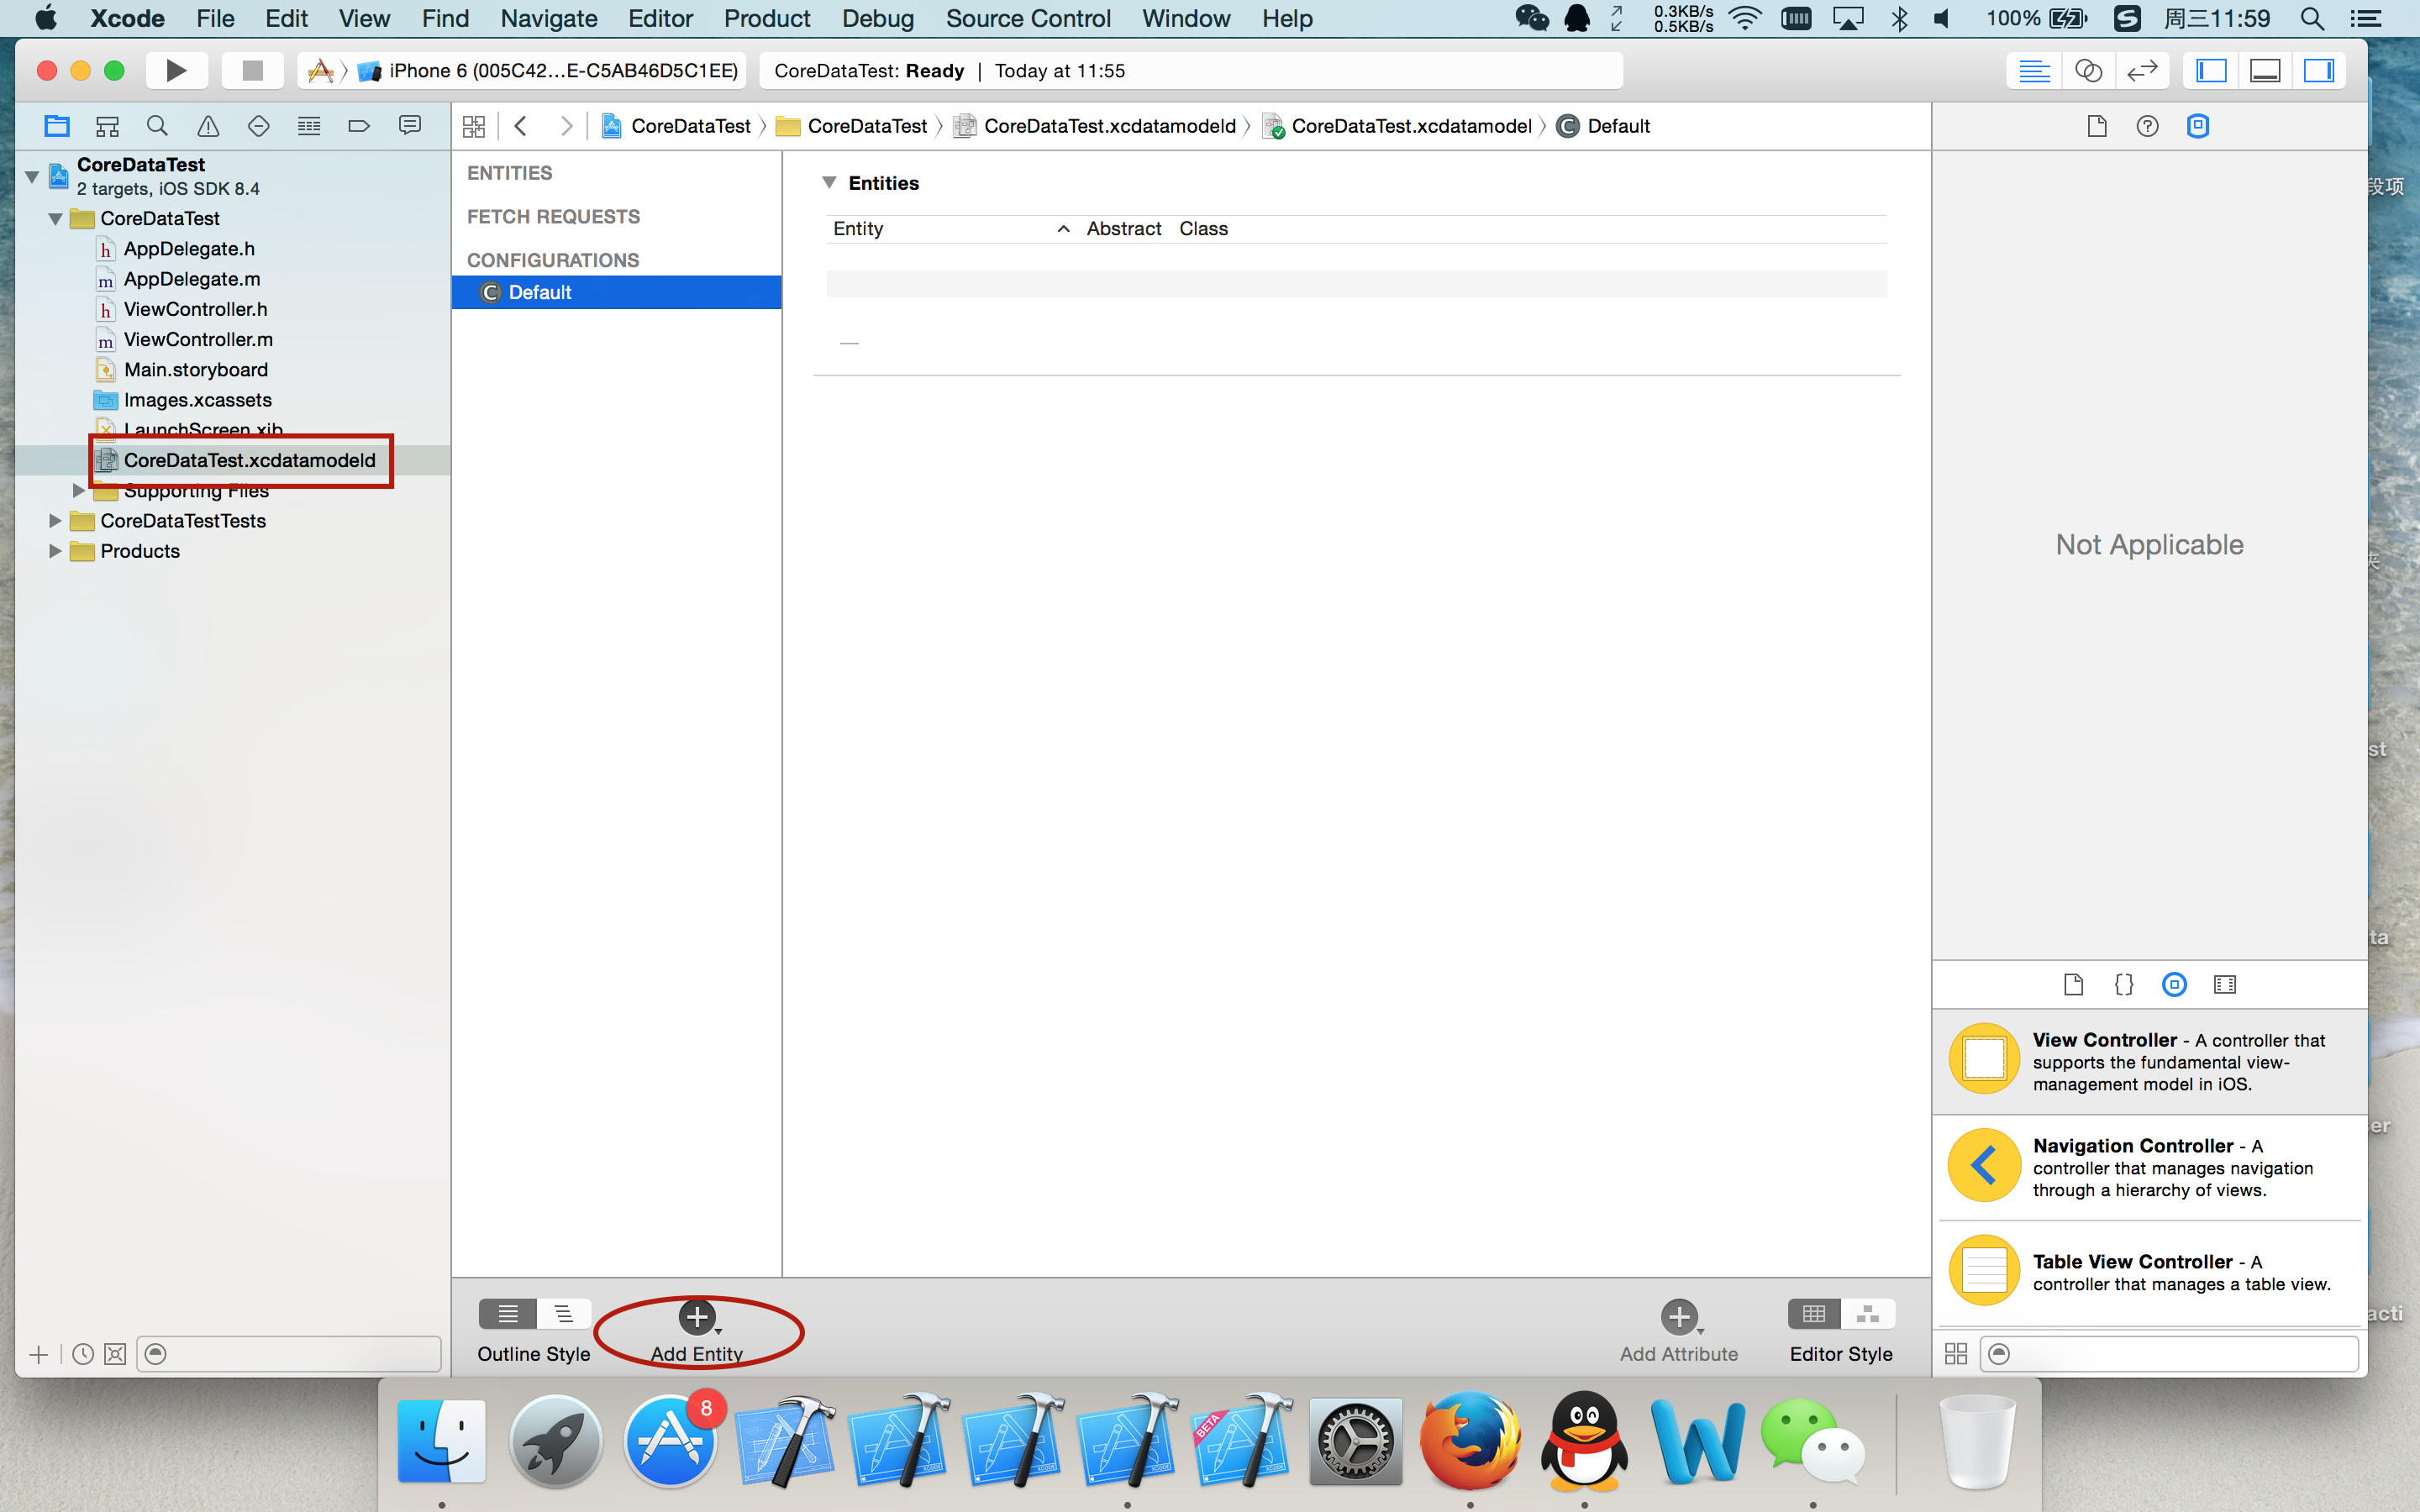
然后我们打开我们看到的那个文件,在里面我们创建一个叫做ClassEntity的实体名称.
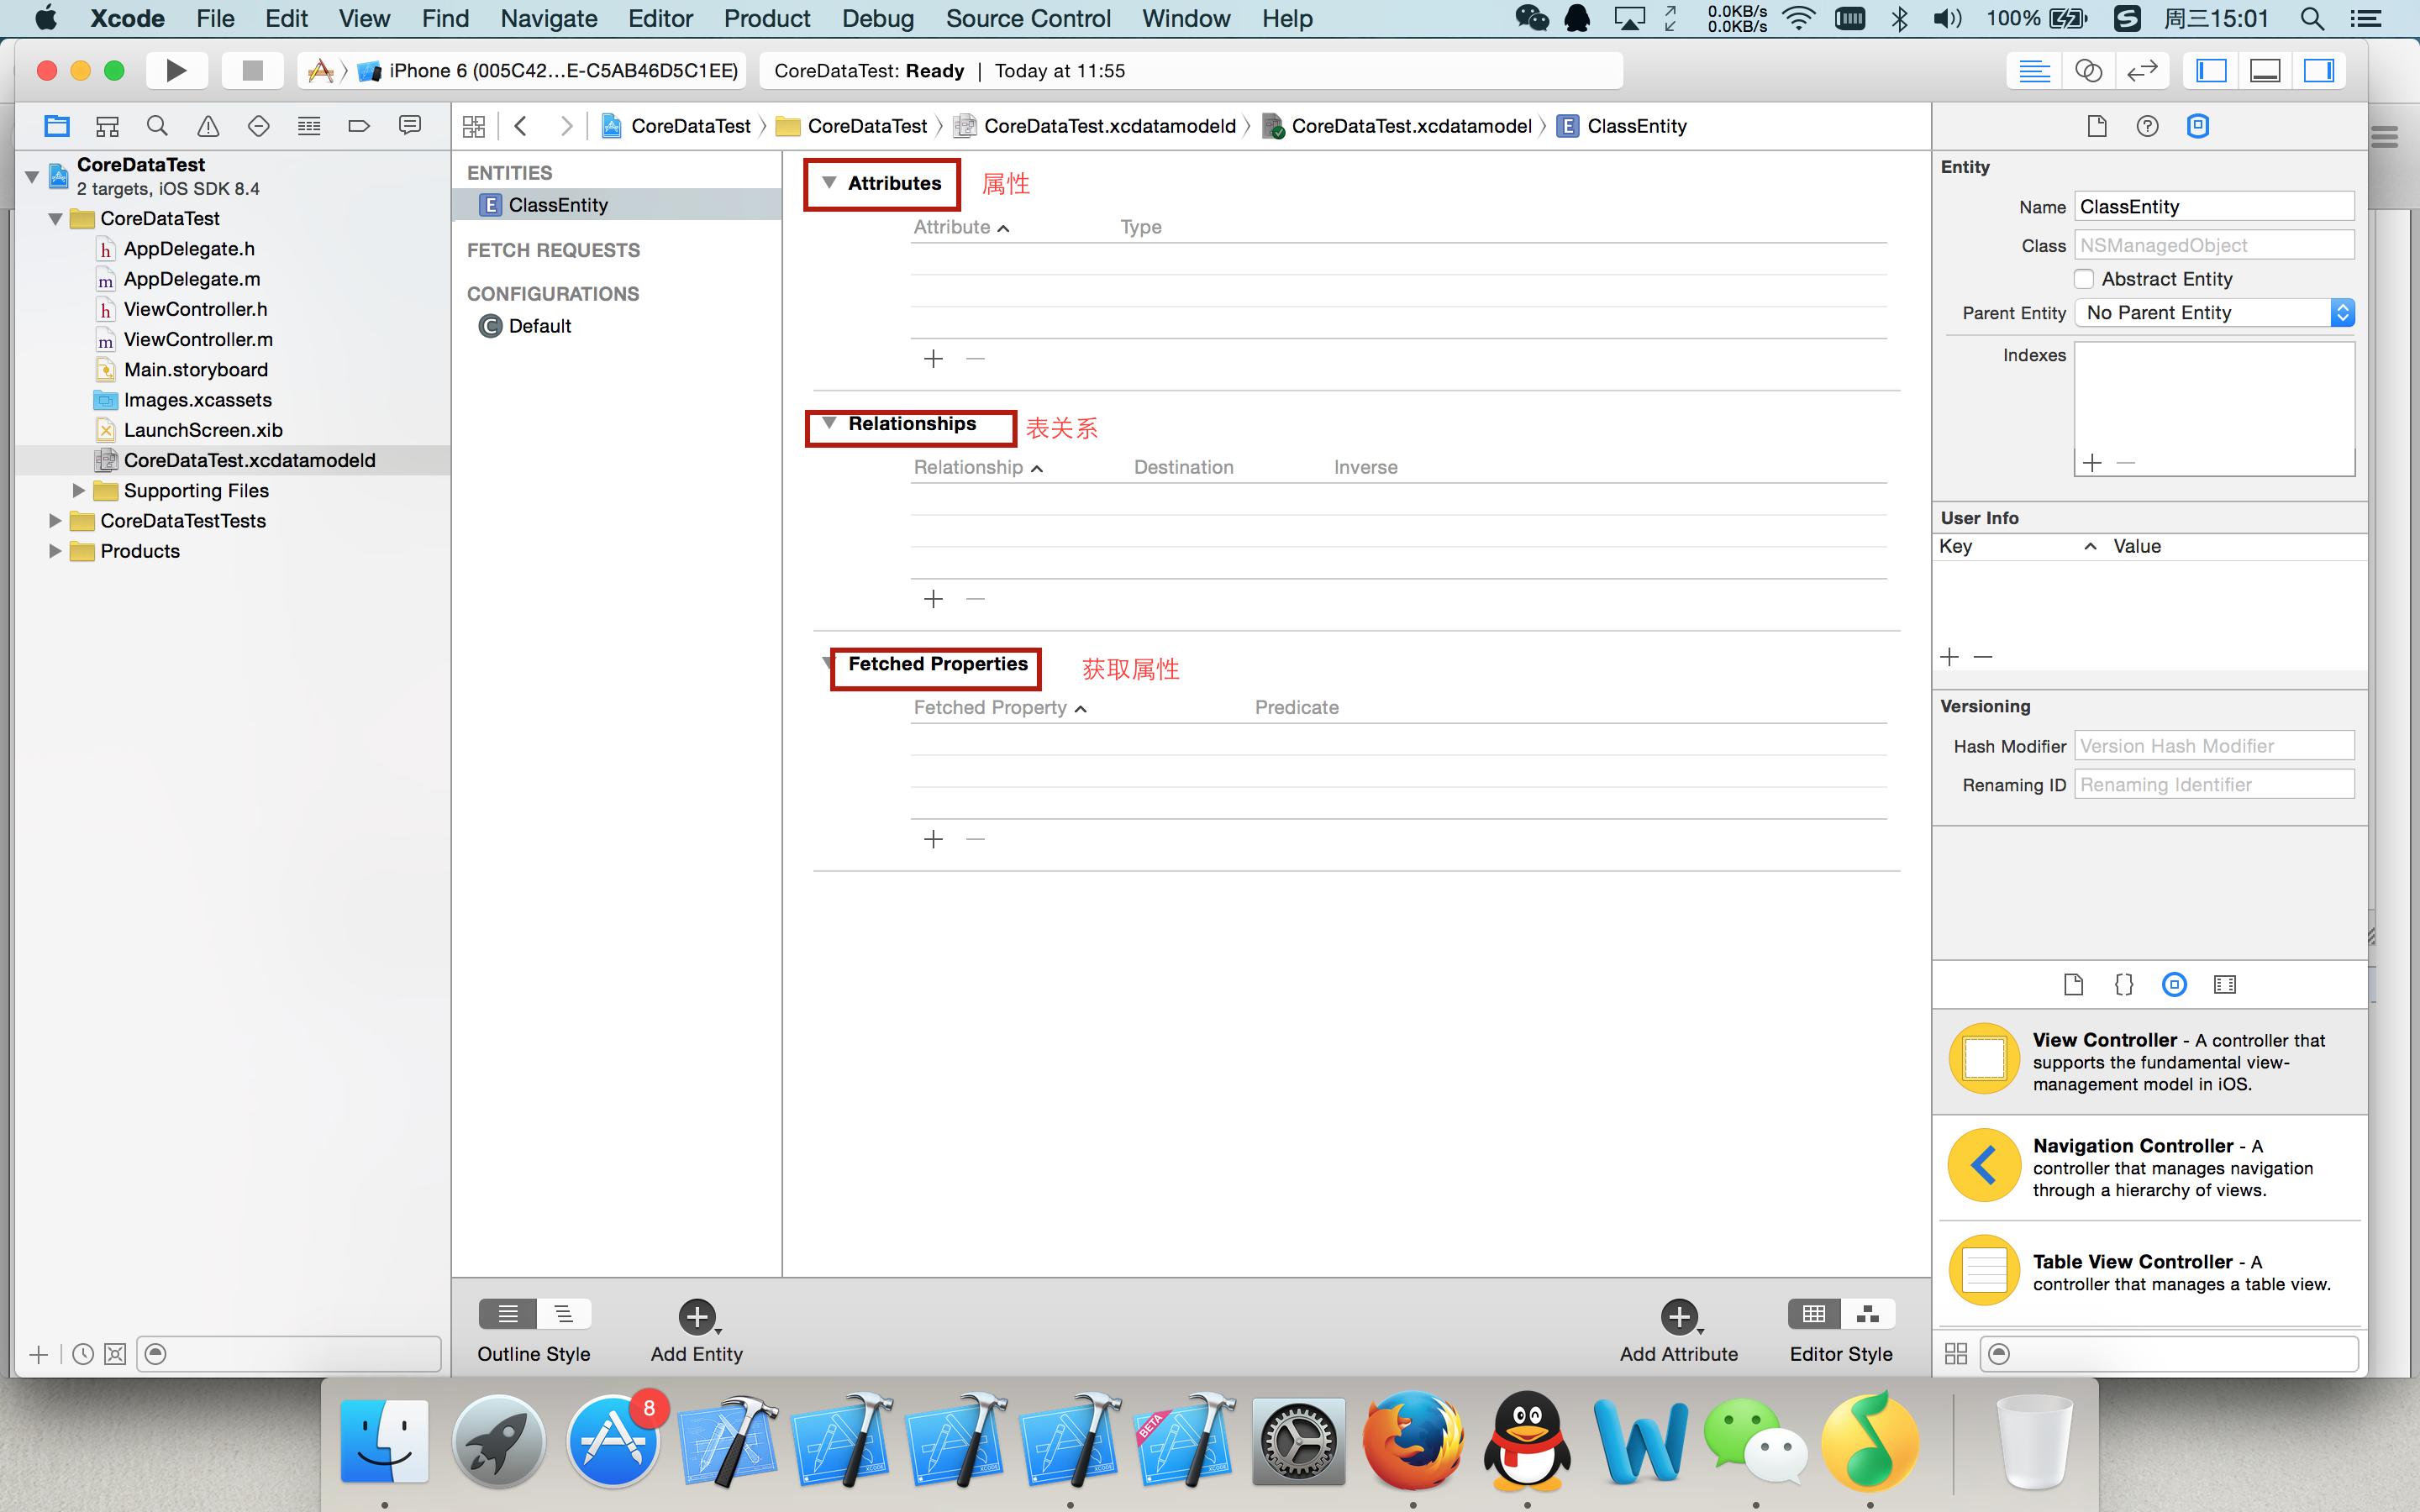
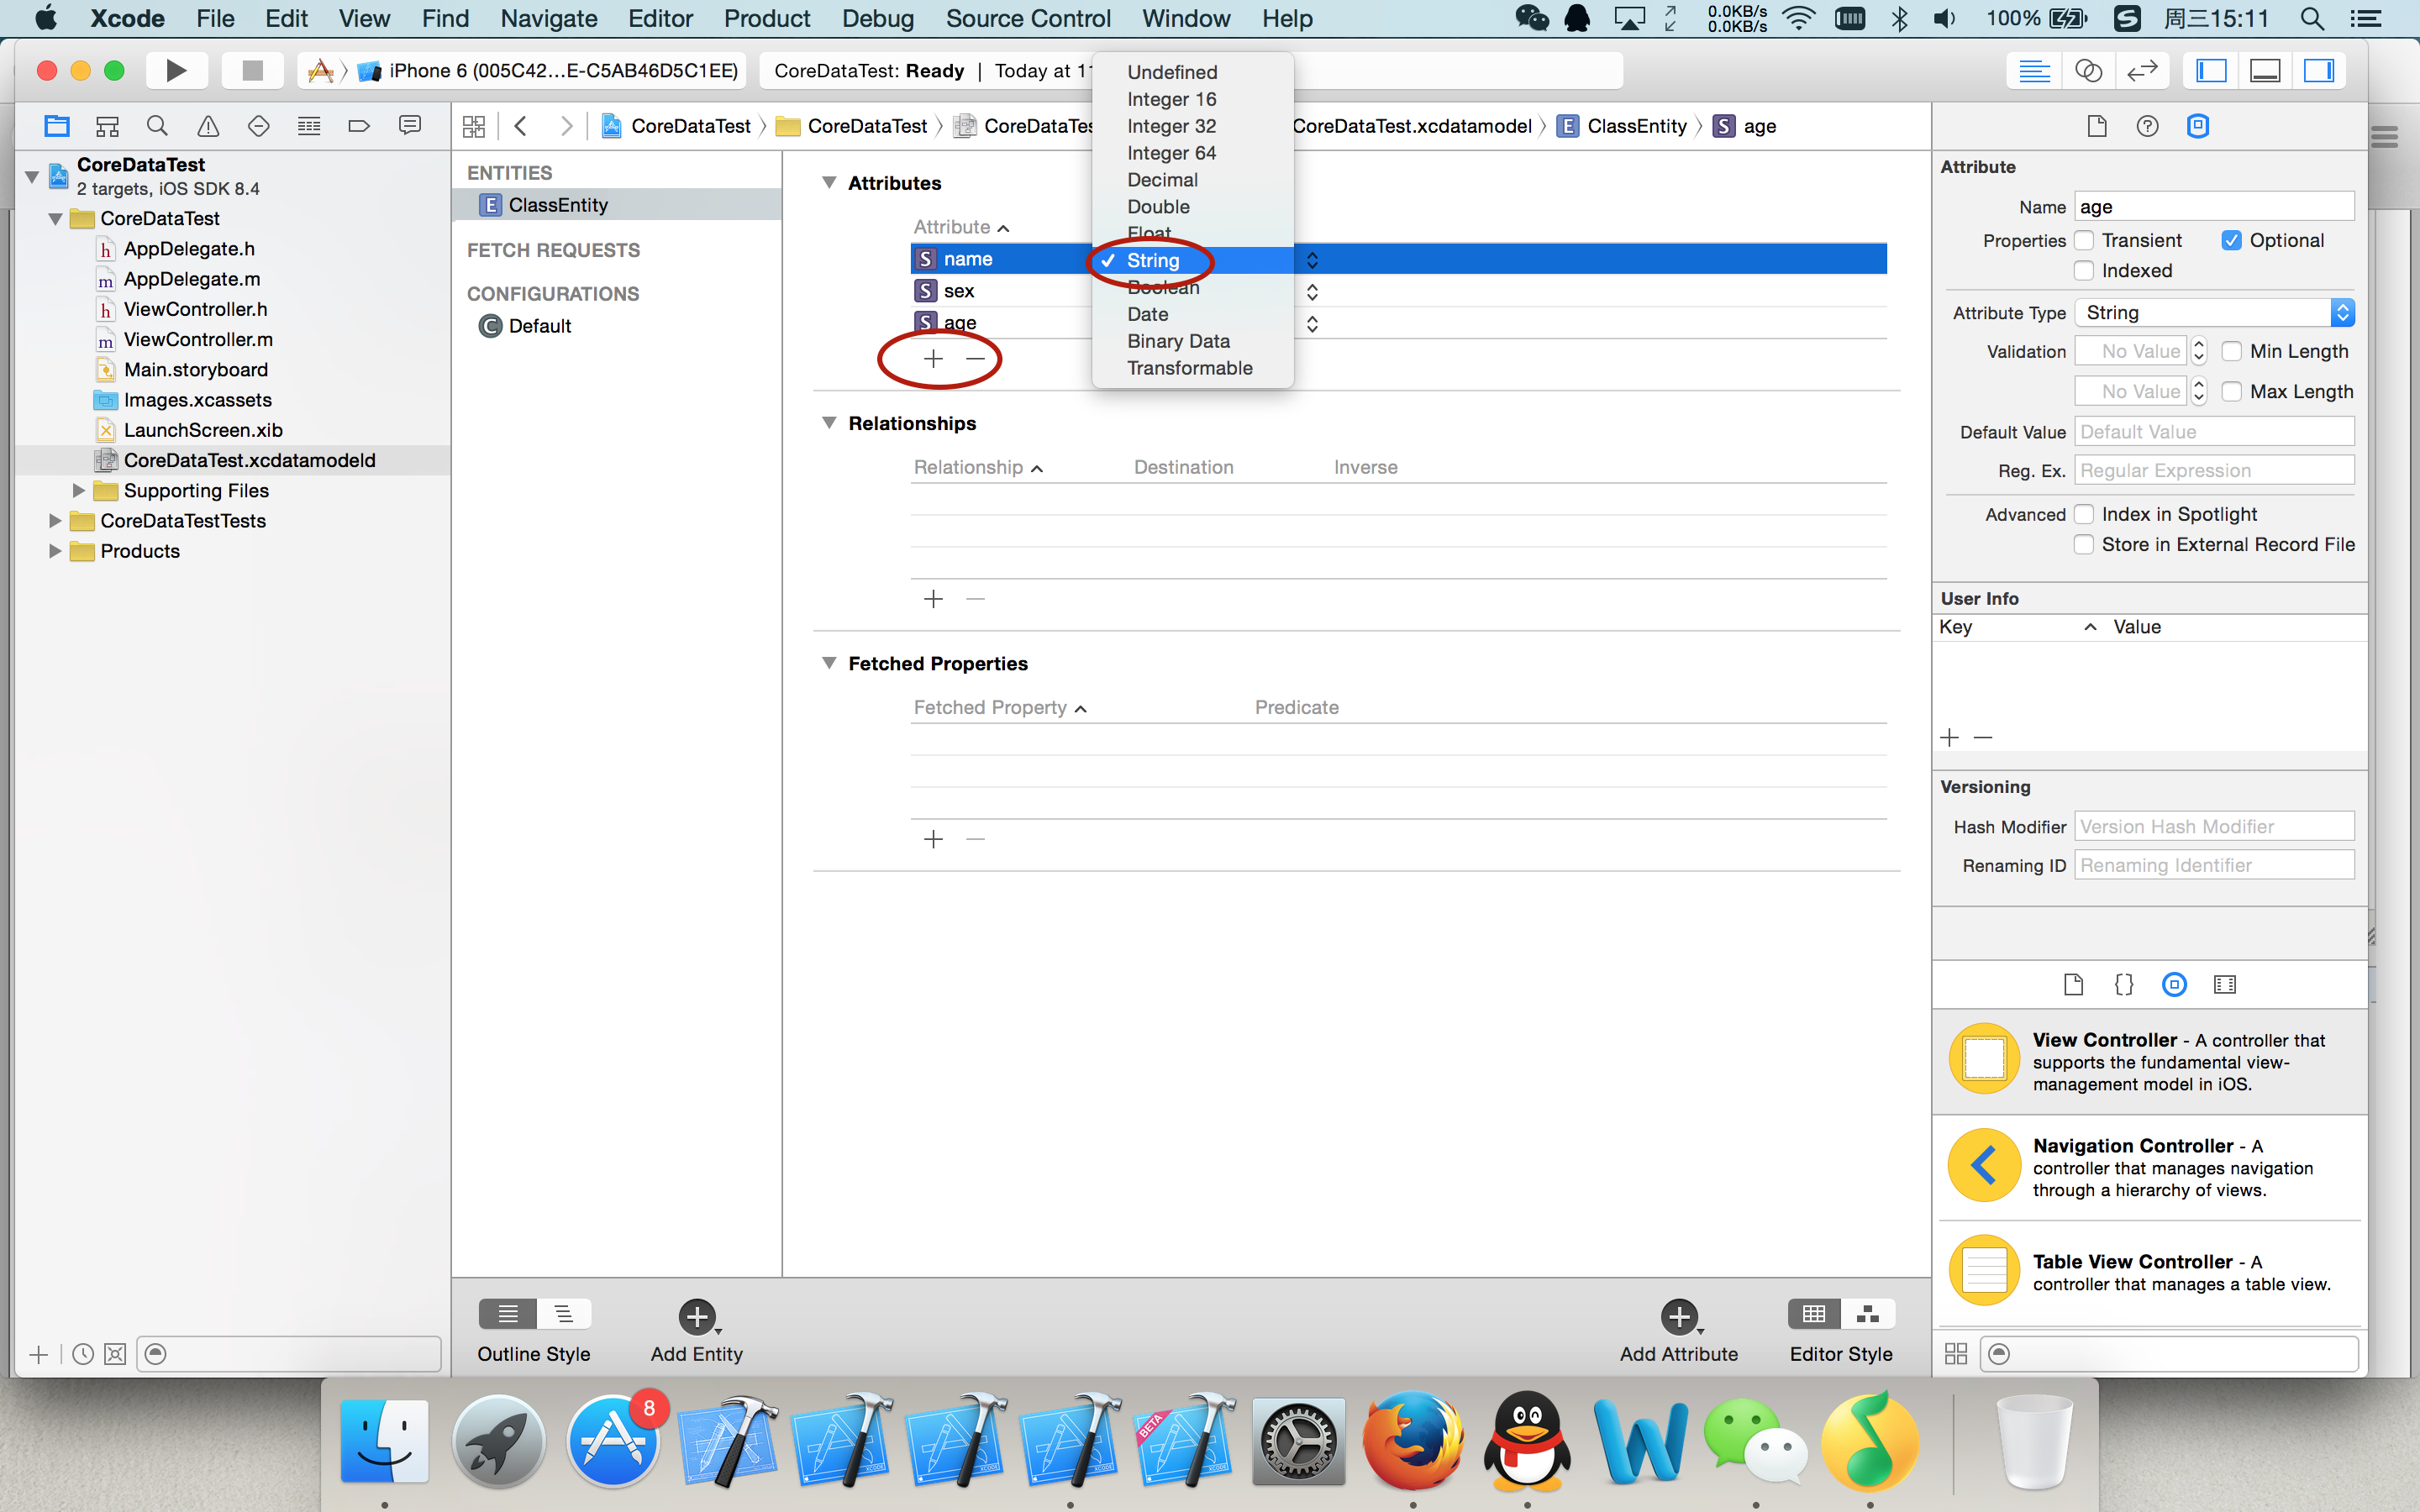
在我们创建完成那个实体文件以后我们看到我们的中间列表里面有一个添加实体属性的位置.在这里我们添加三条属性.名字分别为name sex age 类型全部选择是string
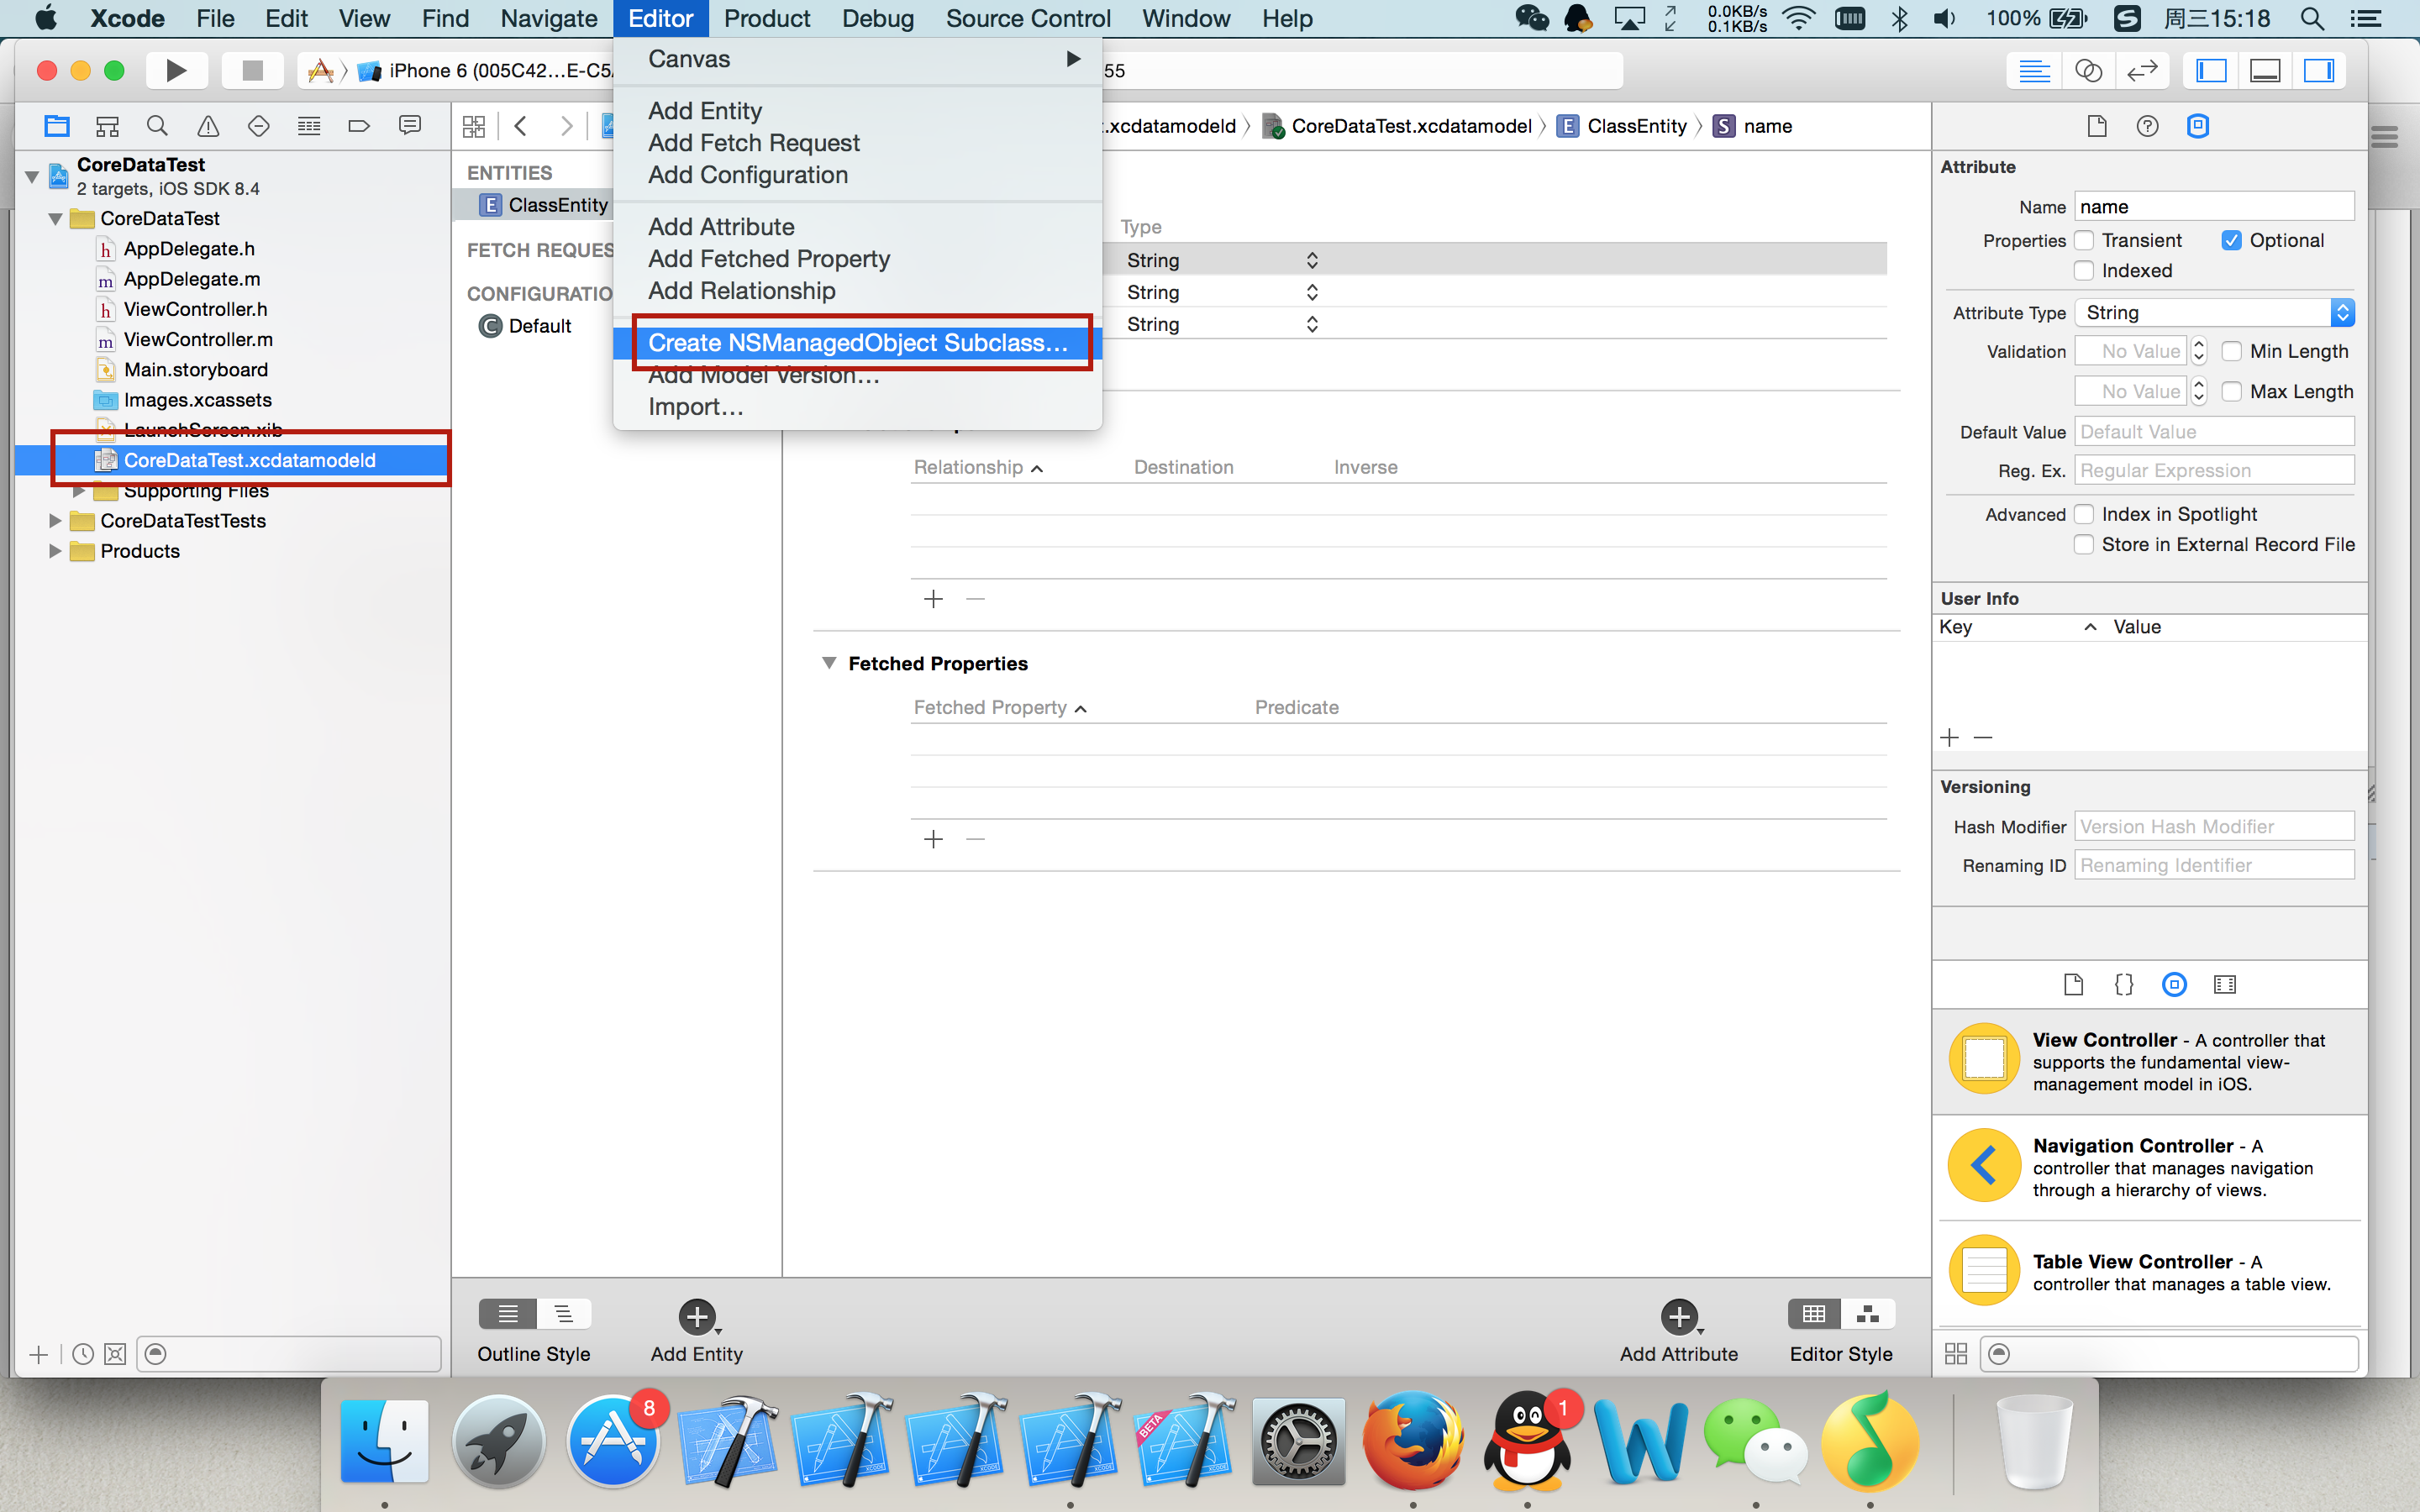
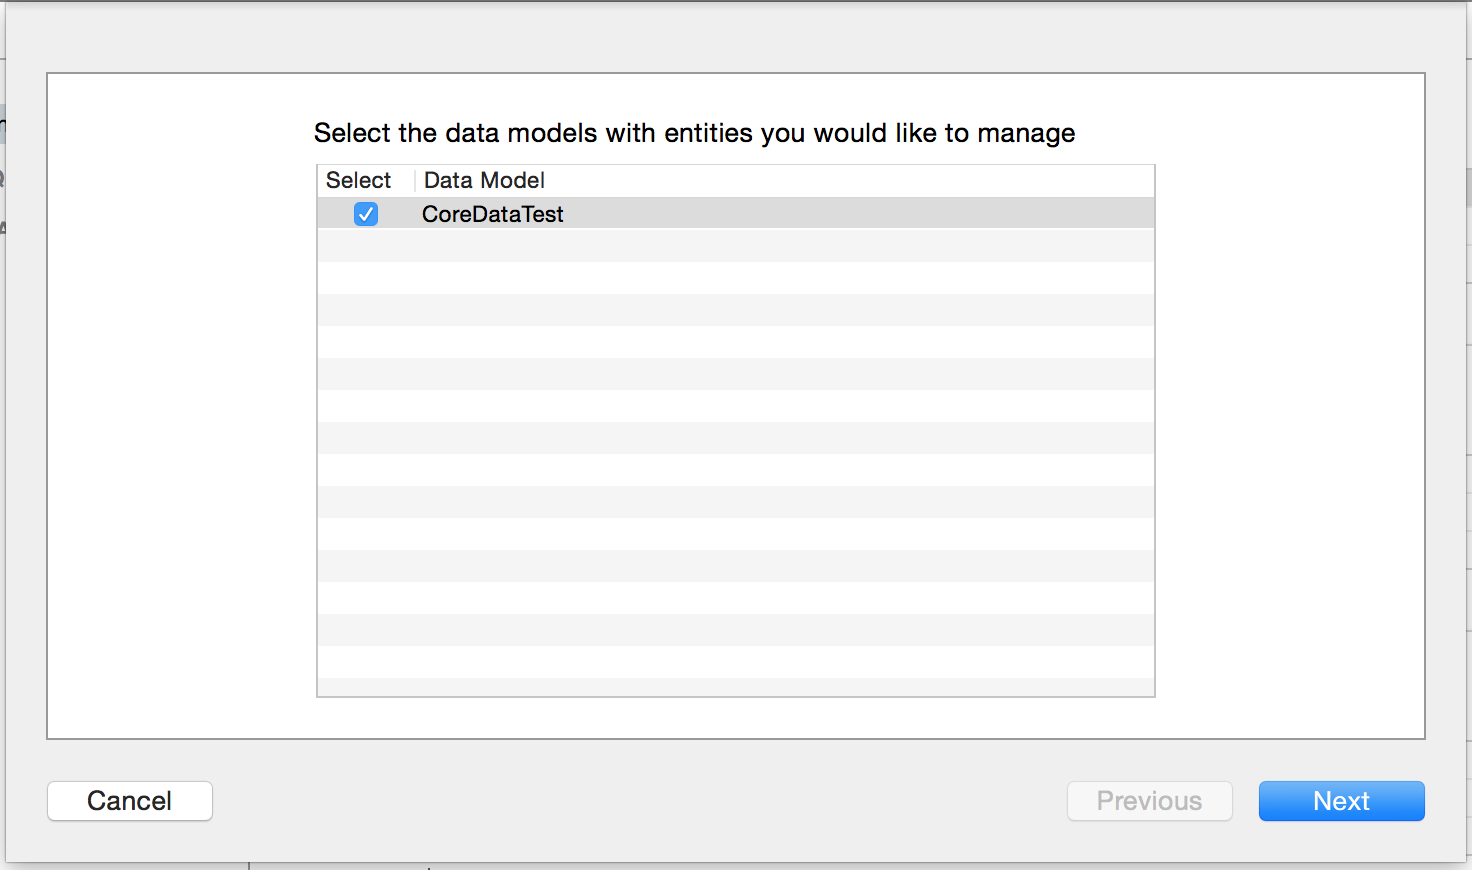
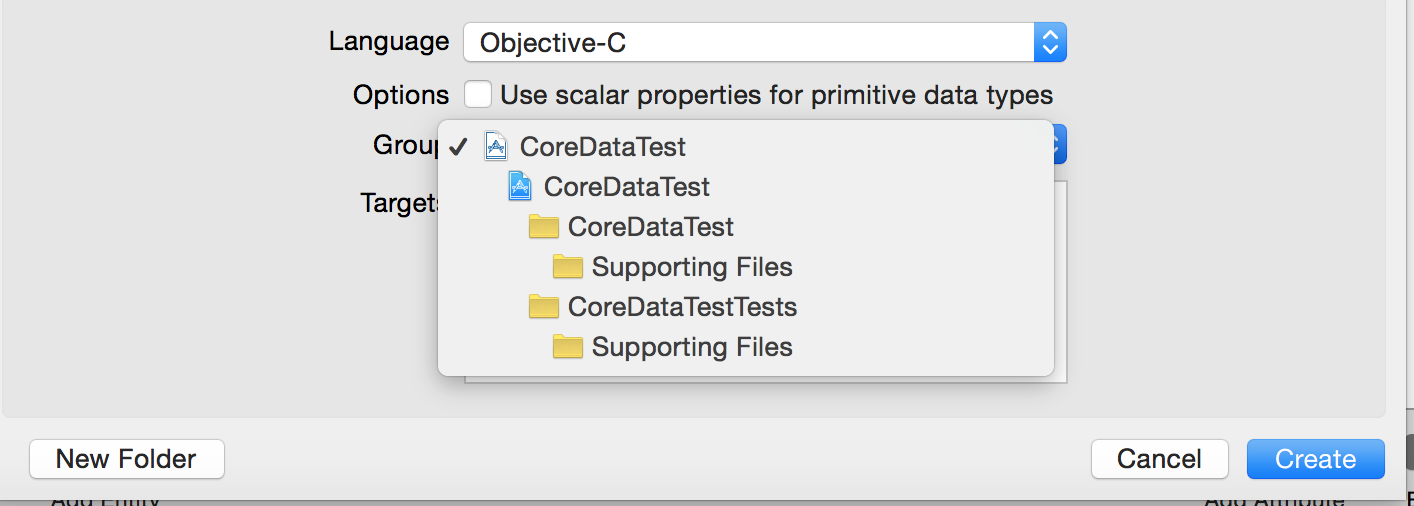
在属性添加完成后我们就可以去生成对应的实体类文件我们需要先选中CoreDataTest.xcdatamodeld这个文件然后选择菜单栏上的Editor选择Creat NSManagerObject Subclass...
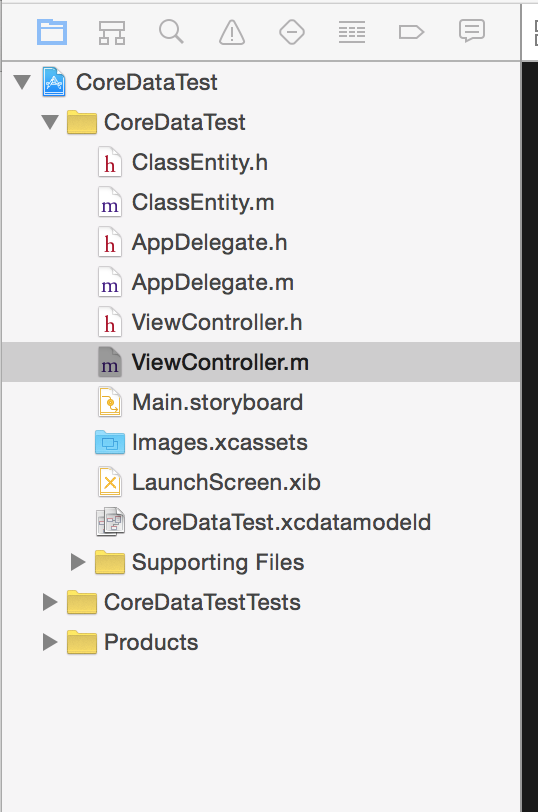
创建完成后我们可以看到两个叫做ClassEntity的文件被创建好了,然后我们再来看下其他不同于以往工程的地方.我们先来打开看下我们的AppDelegate.h文件,我们可以看到在AppDelegate.h文件中和以前我们创建的工程不同的地方.
#import <UIKit/UIKit.h>

#import <CoreData/CoreData.h>

@interface AppDelegate : UIResponder <UIApplicationDelegate>

@property (strong, nonatomic) UIWindow *window;

//被管理者对象上下文

@property (readonly, strong, nonatomic) NSManagedObjectContext *managedObjectContext;

//数据模型器管理类

@property (readonly, strong, nonatomic) NSManagedObjectModel *managedObjectModel;

//数据连接器工具类 (连接助理)

@property (readonly, strong, nonatomic) NSPersistentStoreCoordinator *persistentStoreCoordinator;

//通过对上下文的保存,将上下文管理的对象保存到实体数据库.

- (void)saveContext;

//获取数据库所在的路径

- (NSURL *)applicationDocumentsDirectory;

@end
看完AppDelegate.h中的不同后我们来看下AppDelegate.m中有什么不同.
#pragma mark - Core Data stack

@synthesize managedObjectContext = _managedObjectContext;

@synthesize managedObjectModel = _managedObjectModel;

@synthesize persistentStoreCoordinator = _persistentStoreCoordinator;

- (NSURL *)applicationDocumentsDirectory {

    // The directory the application uses to store the Core Data store file. This code uses a directory named "com.lanou.LessonCoreData" in the application's documents directory.

    NSLog(@"%@",[[[NSFileManager defaultManager] URLsForDirectory:NSDocumentDirectory inDomains:NSUserDomainMask] lastObject]);

    return [[[NSFileManager defaultManager] URLsForDirectory:NSDocumentDirectory inDomains:NSUserDomainMask] lastObject];

}

- (NSManagedObjectModel *)managedObjectModel {

    // The managed object model for the application. It is a fatal error for the application not to be able to find and load its model.

    if (_managedObjectModel != nil) {

        return _managedObjectModel;

    }

    //momd 去查询xcdatamodeld

    NSURL *modelURL = [[NSBundle mainBundle] URLForResource:@"LessonCoreData" withExtension:@"momd"];

    //创建数据器模型工具类.

    _managedObjectModel = [[NSManagedObjectModel alloc] initWithContentsOfURL:modelURL];

    return _managedObjectModel;

}

- (NSPersistentStoreCoordinator *)persistentStoreCoordinator {

    // The persistent store coordinator for the application. This implementation creates and return a coordinator, having added the store for the application to it.

    if (_persistentStoreCoordinator != nil) {

        return _persistentStoreCoordinator;

    }

    // Create the coordinator and store

    //使用数据模型器工具类实例化数据连接器工具类.

    _persistentStoreCoordinator = [[NSPersistentStoreCoordinator alloc] initWithManagedObjectModel:[self managedObjectModel]];

    //数据库的绝对路径.

    NSURL *storeURL = [[self applicationDocumentsDirectory] URLByAppendingPathComponent:@"LessonCoreData.sqlite"];

    NSError *error = nil;

    NSString *failureReason = @"There was an error creating or loading the application's saved data.";

    //创建数据库的过程.

    //1.数据持久化类型

    //2.设置信息

    //3.数据库的绝对路径.

    //4.配置SQL数据的选项

    //5.错误信息的赋值.

    if (![_persistentStoreCoordinator addPersistentStoreWithType:NSSQLiteStoreType configuration:nil URL:storeURL options:nil error:&error]) {

        // Report any error we got.

        NSMutableDictionary *dict = [NSMutableDictionary dictionary];

        dict[NSLocalizedDescriptionKey] = @"Failed to initialize the application's saved data";

        dict[NSLocalizedFailureReasonErrorKey] = failureReason;

        dict[NSUnderlyingErrorKey] = error;

        error = [NSError errorWithDomain:@"YOUR_ERROR_DOMAIN" code:9999 userInfo:dict];

        // Replace this with code to handle the error appropriately.

        // abort() causes the application to generate a crash log and terminate. You should not use this function in a shipping application, although it may be useful during development.

        NSLog(@"Unresolved error %@, %@", error, [error userInfo]);

        //程序中断

        abort();

    }

    return _persistentStoreCoordinator;

}

- (NSManagedObjectContext *)managedObjectContext {

    // Returns the managed object context for the application (which is already bound to the persistent store coordinator for the application.)

    if (_managedObjectContext != nil) {

        return _managedObjectContext;

    }

    //通过GET方法创建数据连接器工具类

    NSPersistentStoreCoordinator *coordinator = [self persistentStoreCoordinator];

    //判断数据器连接工具类是否为空

    if (!coordinator) {

        return nil;

    }

    //创建数据管理器工具类

    _managedObjectContext = [[NSManagedObjectContext alloc] init];

    //设置数据管理器工具类的数据连接器.

    [_managedObjectContext setPersistentStoreCoordinator:coordinator];

    return _managedObjectContext;

}

#pragma mark - Core Data Saving support

//保存你当前的操作到数据库中.

- (void)saveContext {

    NSManagedObjectContext *managedObjectContext = self.managedObjectContext;

    if (managedObjectContext != nil) {

        NSError *error = nil;

        if ([managedObjectContext hasChanges] && ![managedObjectContext save:&error]) {

            // Replace this implementation with code to handle the error appropriately.

            // abort() causes the application to generate a crash log and terminate. You should not use this function in a shipping application, although it may be useful during development.

            NSLog(@"Unresolved error %@, %@", error, [error userInfo]);

            abort();

        }

    }

}
这些就是我们在创建完成一个带有CoreData的工程和以前我们创建的工程的区别.然后我们来看下我们当前应该如何对我们当前创建的数据库来操作.首先进入到我们当前需要用到CoreData的类文件中创建AppDelegate的实例,然后再当前类的- (void)viewWillDidLoad方法中去实现对CoreData的操作.
#import "ViewController.h"

#import "AppDelegate.h"

#import "ClassEntity.h"

@interface ViewController ()

@end

@implementation ViewController

- (void)viewDidLoad {

    [super viewDidLoad];

    //获取当前的AppDelegate的实例.

    AppDelegate *appdelegate = [UIApplication sharedApplication].delegate;

    ////为数据库中增加数据

    //创建当前实体类的实体描述

    NSEntityDescription *entityDescription = [NSEntityDescription entityForName:@"ClassEntity" inManagedObjectContext:appdelegate.managedObjectContext];

    //通过实体描述文件来创建当前类的实例.

    ClassEntity *classEntity = [[ClassEntity alloc] initWithEntity:entityDescription insertIntoManagedObjectContext:appdelegate.managedObjectContext];

    //为实例的属性赋值.

    classEntity.name = @"张三";

    classEntity.sex = @"男";

    classEntity.age = @"21";

    //保存操作到真实的数据库内.

    [appdelegate saveContext];

    ////查询数据库内存放的实体内容.

    //创建查询语句

    NSFetchRequest *request = [[NSFetchRequest alloc] initWithEntityName:@"ClassEntity"];

    //通过AppDelegate来查询你想要的数据库.

    //注意返回值为数组.

    NSArray *arr = [appdelegate.managedObjectContext executeFetchRequest:request error:nil];

    //打印数组

    NSLog(@"%@",arr);

    ////删除数据库中存放的实体.

    //通过查询获取到你需要删除的表单中的所有内容.

    //通过返回值获取到的数组来查找你当前想要的实体位置.

    ClassEntity *classEntity1 = [arr objectAtIndex:0];

    //通过AppDelegate

    [appdelegate.managedObjectContext deleteObject:classEntity1];

    //通过AppDelegate来保存到你的真实数据库中.

    [appdelegate saveContext];

    // Do any additional setup after loading the view, typically from a nib.

}
这些就是本次的CoreData是如何使用的.这次的内容也就到这里结束了.下次会和大家分享多表的CoreData的操作.最后附上我的文件列表截图
.
关于CoreData的理解和使用.的更多相关文章
- coreData 深入理解4 --总结 (线程安全与同步--iOS5 前后对比)
Core Data是iOS中很重要的一个部分,可以理解为基于SQLite(当然也可以是其他的Storage,如In-memory,只是SQLite比较常见)的一个ORM实现,所以有关系数据库的特性,又 ...
- iOS -数据持久化方式-以真实项目讲解
前面已经讲解了SQLite,FMDB以及CoreData的基本操作和代码讲解(CoreData也在不断学习中,上篇博客也会不断更新中).本篇我们将讲述在实际开发中,所使用的iOS数据持久化的方式以及怎 ...
- 初识CoreData与详解
Core Data数据持久化是对SQLite的一个升级,它是iOS集成的,在说Core Data之前,我们先说说在CoreData中使用的几个类. (1)NSManagedObjectModel(被管 ...
- CoreData教程
网上关于CoreData的教程能搜到不少,但很多都是点到即止,真正实用的部分都没有讲到,而基本不需要的地方又讲了太多,所以我打算根据我的使用情况写这么一篇实用教程.内容将包括:创建entity.创建r ...
- iOS开发之表视图爱上CoreData
在接触到CoreData时,感觉就是苹果封装的一个ORM.CoreData负责在Model的实体和sqllite建立关联,数据模型的实体类就相当于Java中的JavaBean, 而CoreData的功 ...
- iOS - CoreData 数据库存储
1.CoreData 数据库 CoreData 是 iOS SDK 里的一个很强大的框架,允许程序员以面向对象的方式储存和管理数据.使用 CoreData 框架,程序员可以很轻松有效地通过面向对象的接 ...
- IOS中CoreData浅析
CoreData简介: 什么是CoreData? Core Data是iOS5之后才出现的一个框架,它提供了对象-关系映射(ORM)的功能,即能够将OC对象转化成数据,保存在SQLite数据库文件中, ...
- iOS-数据持久化-CoreData
CoreData详解 介绍: 在Cocoa环境下,如果你想使用数据库(如sqlite),你可以使用sql语句的方式通过相关的工具类进行数据库的直接操作.当然你也可以通过别人封装之后的一些简单框架,使得 ...
- CoreData的使用
#import "ViewController.h" #import "Person.h" @interface ViewController () <U ...
随机推荐
- cf#366....
惨惨惨.... 我需要av.. b题意看错想了个加强版博弈结果发现完全没必要= =....cwa12到结束....中途想看d....只会n^4暴力啊.. 题解明天补上
- 水务新、老营收系统大PK
今天想撩一下咱水务界的大拿——营业收费管理系统. 营业收费 随着城市供水规模的不断扩大及户表改造的深入以及阶梯水价的实行还有移动平台等第三方支付的蓬勃发展,原有的营收软件系统已经不能适应目前水司的管理 ...
- 评教数据整理专用VBA小程序
这次评教的所有数据存放在两个数据库中,比如说给某教师评论的学生有100个,可是结果有40个的数据在数据库A中,另外60人的数据在数据库B中.那么,如何将两个库中的数据整合,最后得到教师的准确成绩成为了 ...
- 学习《Python核心编程》做一下知识点提要,方便复习(一)
学习<Python核心编程>做一下知识点提要,方便复习. 计算机语言的本质是什么? a-z.A-Z.符号.数字等等组合成符合语法的字符串.供编译器.解释器翻译. 字母组合后产生各种变化拿p ...
- 算法设计手冊(第2版)读书笔记, Springer - The Algorithm Design Manual, 2ed Steven S.Skiena 2008
The Algorithm Design Manual, 2ed 跳转至: 导航. 搜索 Springer - The Algorithm Design Manual, 2ed Steven S.Sk ...
- mysql 5.7忘记密码处理
vi /etc/my.cnf在[mysqld]下面增加一行skip-grant-tables 重启 /etc/init.d/mysqld restart /usr/local/mysql/bin/m ...
- 设置grub密码
一,明文加密的方法 vi /etc/grub.conf 在hiddenmenu下添加password=1234,保存退出. 二,密文加密的方法 2.1, 使用SHA加密方式.grub-crypt 回 ...
- 学习asp.net Identity 心得体会(连接oracle)
asp.net Identity具体功能暂不在此细说,下面主要介绍几点连接oracle注意的事项, 1.首先下载连接oracle驱动Oracle.ManagedDataAccess.dll和Oracl ...
- JS 不定函数参数argument的用法
本篇文章只要是对js的隐含参数(arguments,callee,caller)使用方法进行了介绍. arguments arguments 该对象代表正在执行的函数和调用它的函数的参数. [func ...
- .Net中如何使用MySql连接池
提供一份官方的译文.翻译也挺辛苦的!! 6.4 Using Connector/Net with Connection Pooling 6.4在Connector/Net中使用连接池 The Conn ...