实战使用Axure设计App,使用WebStorm开发(4) – 实现页面UI
系列文章
实战使用Axure设计App,使用WebStorm开发(1) – 用Axure描述需求
实战使用Axure设计App,使用WebStorm开发(2) – 创建 Ionic 项目
实战使用Axure设计App,使用WebStorm开发(3) – 构建页面架构
实战使用Axure设计App,使用WebStorm开发(4) – 实现页面UI
实战使用Axure设计App,使用WebStorm开发(5) – 实现页面功能
实战使用Axure设计App,使用WebStorm开发(6) – 迈向后端
接上一篇系列文章,在本文中,将在WebStorm中继续开发,实现页面的功能。这需要一个页面一个页面的开发,来完成功能。本文将侧重把所有页面的UI都实现出来,先把前端的工作都完成了,然后再去链接后端的 RESTful Service。
登陆页面
给页面添加 login.html 添加页面Html代码。
<ion-view title="用户登录">
    <ion-content class="padding">
        <div class="login-title">
            <h2 class="energized">方便每一天</h2>
            <h2 class="assertive">配送系统</h2>
        </div>
        <div>
            <form novalidate="novalidate" on-valid-submit="doLogin()">
                <label class="item item-input validated">
                    <span class="input-label" for="account">账号</span>
                    <input id="account" type="text" ng-model="user.name" placeholder="账号" required="required" name="account" />
                    <i class="icon ion-alert-circled error"></i>
                </label>
                <label class="item item-input validated">
                    <span class="input-label" for="password">密码</span>
                    <input id="password" type="password" ng-model="user.password" placeholder="********" required="required" name="password" />
                    <i class="icon ion-alert-circled error"></i>
                </label>
                <label class="item">
                    <button type="submit" class="button button-block button-positive icon ion-person icon-text">登录</button>
                </label>
            </form>
        </div>
    </ion-content>
</ion-view>
为了实现,输入框的验证功能,需要给AngularJS加入两个自定义的标签: on-valid-submit, validated 由于这是一个全局的验证功能就把它添加到app.js ddApp module下,如果只针对某个页面,可以只添加到这个页面的 controller 下。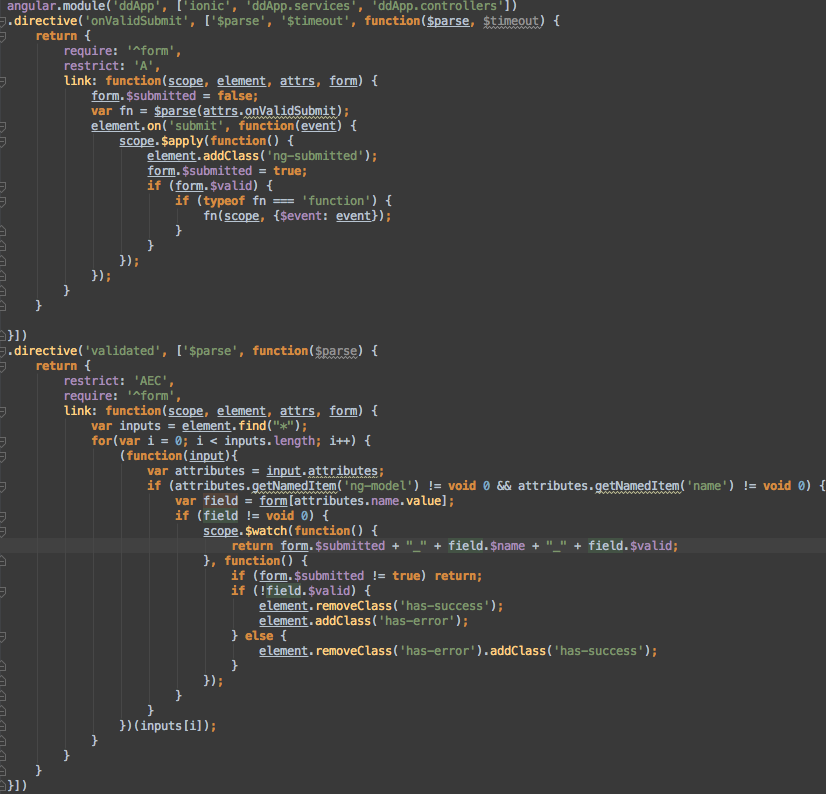
到这里登陆页面的UI就完成了。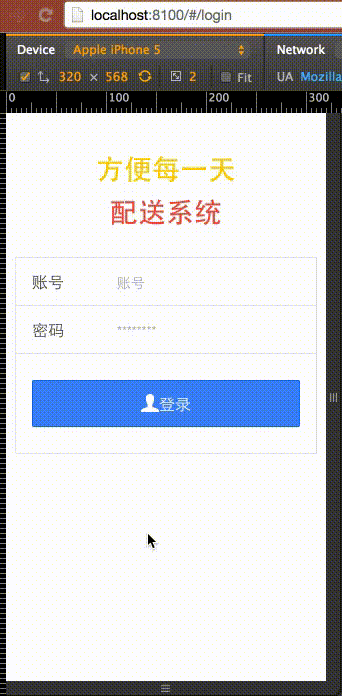
列表页面
首先构建派送列表页的Html内容:
<ion-view view-title="{{now | date:yyyy年M月d日}}">
    <ion-nav-bar class="bar bar-balanced" align-title="center">
        <ion-nav-buttons side="left">
            <li class="button icon icon-left ion-chevron-left" ng-click="doLogout()">退出</li>
        </ion-nav-buttons>
    </ion-nav-bar>
    <ion-content class="list order-list">
        <ion-item  class="item order-item" ng-repeat="order in orders">
            <img class="order-img" ng-src="{{order.qrSrc}}" ng-click="goDetail(order.id)" />
            <div class="order-text">
                <h2 ng-click="goDetail(order.id)">{{order.code}}</h2>
                <h3>{{order.pickTime}}</h3>
            </div>
            <div class="order-check" ng-click="goDetail(order.id)">
                <a class="button icon-right ion-chevron-right button-clear button-assertive"></a>
            </div>
        </ion-item >
    </ion-content>
    <div class="bar bar-footer bar-positive">
        <div class="button-bar">
            <li class="button icon ion-ios-keypad icon-text" ng-click="goManual()">手动输入</li>
            <li class="button icon ion-qr-scanner icon-text" ng-click="goScan()">扫描二维码</li>
        </div>
    </div>
</ion-view>
为了展示数据,这里在Service里做了一个MockDB使用这个MockDB为App提供数据,这样当请求使用后端数据的时候,只要后端的RESTful Service 也返回同样规格的数据就可以了。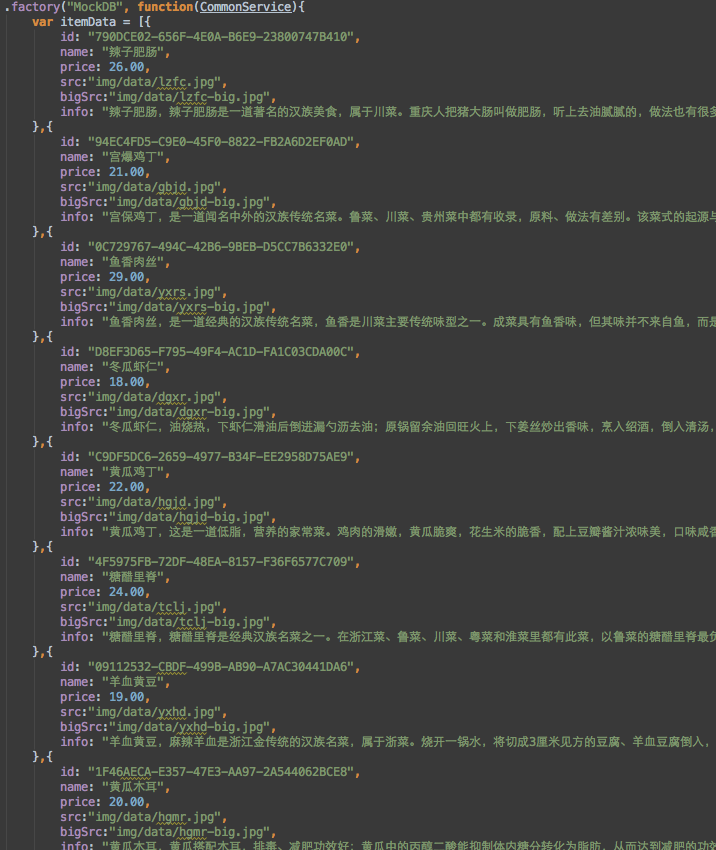
这里代码比较多,具体代码在 services.js 中。
接下来处理 派送列表 的 controller 把页面动作交互和数据连上: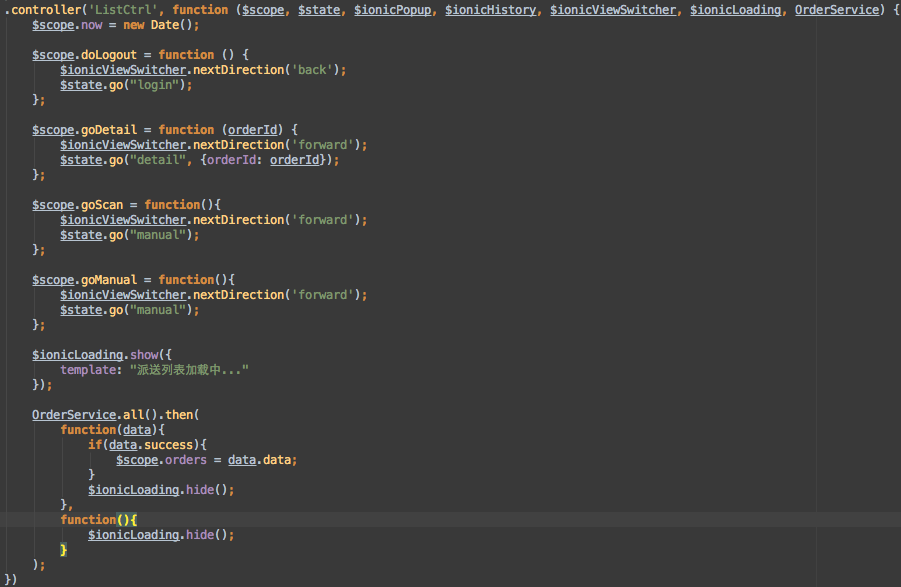
到这里派送列表页,就处理完了: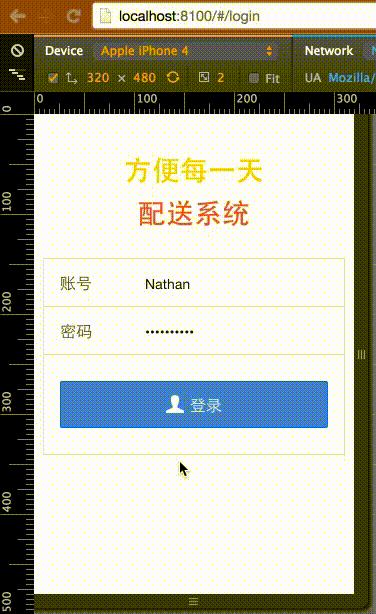
详细页面
添加 详细页面 html 代码:
<ion-view view-title="{{now | date:yyyy年M月d日}}">
    <ion-nav-bar class="bar bar-balanced" align-title="center">
        <ion-nav-buttons side="left">
            <li class="button icon icon-left ion-chevron-left" ng-click="doLogout()">退出</li>
        </ion-nav-buttons>
    </ion-nav-bar>
    <ion-content class="list order-list">
        <ion-item  class="item order-item" ng-repeat="order in orders" ng-click="goDetail(order.id)">
            <img class="order-img" ng-src="{{order.qrSrc}}" ng-click="goDetail(order.id)" />
            <div class="order-text">
                <h2 ng-click="goDetail(order.id)">{{order.code}}</h2>
                <h3>{{order.pickTime}}</h3>
            </div>
            <div class="order-check">
                <a class="button icon-right ion-chevron-right button-clear button-assertive"></a>
            </div>
        </ion-item >
    </ion-content>
    <div class="bar bar-footer bar-positive">
        <div class="button-bar">
            <li class="button icon ion-ios-keypad icon-text" ng-click="goManual()">手动输入</li>
            <li class="button icon ion-qr-scanner icon-text" ng-click="goScan()">扫描二维码</li>
        </div>
    </div>
</ion-view>
添加页面 controller :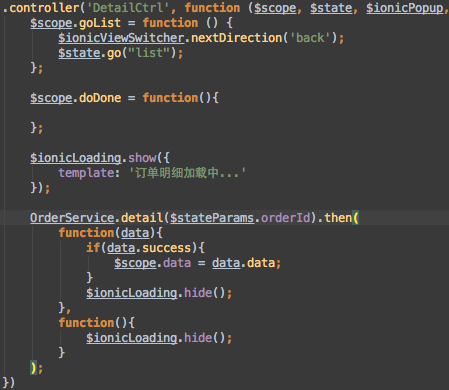
到这一步 详细页面完成了: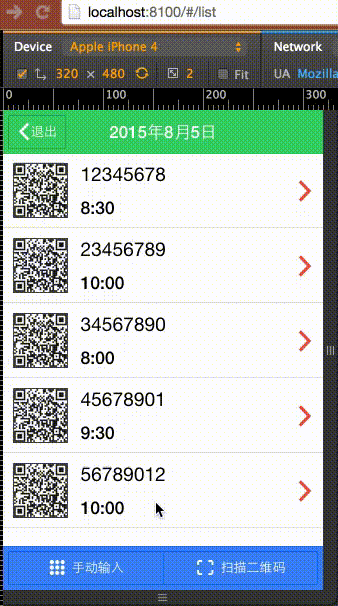
接下来就是手动输入页面,和扫描页面,这两个页面比较简单,类似于前面的页面,写好页面Html,配置好 controller 的内容,就可以了。
到这里所有页面的 UI 都完成了。 你可以到 https://github.com/zhangsichu/DeliveryApp/releases/tag/AllPageUI 下载这个阶段的代码。
也可以使用 git checkout AllPageUI 取得
| git checkout AllPageUI |
原文链接:http://zhangsichu.com/blogview.asp?Content_Id=158
实战使用Axure设计App,使用WebStorm开发(4) – 实现页面UI的更多相关文章
- 实战使用Axure设计App,使用WebStorm开发(5) – 实现页面功能
系列文章 实战使用Axure设计App,使用WebStorm开发(1) – 用Axure描述需求 实战使用Axure设计App,使用WebStorm开发(2) – 创建 Ionic 项目 实战使 ...
- 实战使用Axure设计App,使用WebStorm开发(3) – 构建页面架构
系列文章 实战使用Axure设计App,使用WebStorm开发(1) – 用Axure描述需求 实战使用Axure设计App,使用WebStorm开发(2) – 创建 Ionic 项目 实战使 ...
- 实战使用Axure设计App,使用WebStorm开发(6) – 迈向后端
系列文章 实战使用Axure设计App,使用WebStorm开发(1) – 用Axure描述需求 实战使用Axure设计App,使用WebStorm开发(2) – 创建 Ionic 项目 实战使 ...
- 实战使用Axure设计App,使用WebStorm开发(2) – 创建 Ionic 项目
系列文章 实战使用Axure设计App,使用WebStorm开发(1) – 用Axure描述需求 实战使用Axure设计App,使用WebStorm开发(2) – 创建 Ionic 项目 实战使 ...
- 实战使用Axure设计App,使用WebStorm开发(1) – 用Axure描述需求
系列文章 实战使用Axure设计App,使用WebStorm开发(1) – 用Axure描述需求 实战使用Axure设计App,使用WebStorm开发(2) – 创建 Ionic 项目 实战使 ...
- Java生鲜电商平台-App系统架构开发与设计
Java生鲜电商平台-App系统架构开发与设计 说明:阅读此文,你可以学习到以下的技术分享 1.Java生鲜电商平台-App架构设计经验谈:接口的设计2.Java生鲜电商平台-App架构设计经验谈:技 ...
- 简单5步说清App软件在线开发、App制作多少钱?
开发制作一款App,所有人都会首先关心开发一款App多少钱这个问题.从网上的信息来看,花费个几十万是很正常的事情,甚至有人说要花上百万才能制作出一款App.那么App软件的开发制作到底和什么有关?怎么 ...
- BI之SSAS完整实战教程7 -- 设计维度、细化维度中 :浏览维度,细化维度
上篇文章我们已经将Dim Geography维度设计好. 若要查看维度的成员, AS需要接收该维度的详细信息(包括已创建的特性.成员属性以及多级层次结构), 通过XMLA与AS的实例进行通信. 今天我 ...
- BI之SSAS完整实战教程6 -- 设计维度、细化维度上:创建维度定义特性关系
前面我们使用过数据源向导.数据源视图向导.Cube向导来创建相应的对象. 本篇我们将学习使用维度向导来创建维度. 通过前面几个向导的学习,我们归纳一下共同点,主要分成两步 1. 使用某种对象类型的向导 ...
随机推荐
- rsync排除文件同步
排除扩展名为log的文件 rsync -ave ssh --exclude '*.log' root@192.168.168.188:/website/abc.com/* /website/abc.c ...
- Ubuntu 14.04 更新源
deb http://mirrors.163.com/ubuntu/ trusty main restricted universe multiversedeb http://mirrors.163. ...
- ServiceStack.OrmLite中的一些"陷阱"(2)
注:此系列不是说ServiceStack.OrmLite的多个陷阱,这仅仅个人认为是某一个陷阱(毕竟我踩坑了)而引发的思考. 前文说到了项目需要使用两种不同的数据库语言,虽说前文问题已基本解决了,但是 ...
- 【Java学习笔记】foreach语句(高级for)
package p2; import java.util.ArrayList; import java.util.HashMap; import java.util.List; import java ...
- Bomb
Description The counter-terrorists found a time bomb in the dust. But this time the terrorists impro ...
- 32位Windows 7系统下,显示4G内存3G可用的原因。
由于32位操作系统只有那么多物理地址可用, 而硬盘.光驱.声卡,显卡,无线网卡等硬件设备也需要分配物理地址才可以使用, 所以系统会把一部分物理地址分配给它们, 剩下的物理地址分配给内存使用, 而剩下的 ...
- 老毛桃u盘装系统制作工具
老毛桃[url=http://www.laomaotao.cn.com/]一键u盘装系统下载[/url]告别繁琐,简单易用,一盘两用,携带方便.不需要任何技术基础,一键制作,自动完成制作,平时当U盘使 ...
- Windows Phone 8.1 新特性 - 页面导航
本篇介绍一下Windows Phone 8.1 中页面导航的实现方式. 大家对Windows Phone 8 中页面导航的实现一定不陌生,我们使用 NavigationService 来实现.具体写法 ...
- 成功转移安卓手机QQ聊天记录
废话先不说,直接上干货: 只要把两个地方的数据完整的复制到新手机对应位置就可以了,但过程相当坎坷: /data/data/com.tencent.mobileqq /sdcard/Tencent/Mo ...
- ProceedingJoinPoint获取当前方法
aspectJ切面通过ProceedingJoinPoint想要获取当前执行的方法: 错误方法: Signature s = pjp.getSignature(); MethodSignatu ...