linux常用命令之------文件操作、文件查看、权限、打包压缩
1、一般公司把linux作为自己的应用服务器,将应用和服务器部署在上面
2、测试一般用来打包、压缩、查日志,写一个简单的shell
获得linux服务器的方式
a:网上租一台云服务器
b:安装vmware
3、用xshell等工具连接vmware虚拟机
看虚拟机与本机网络是否可以ping通,如虚拟机ping www.baidu.com
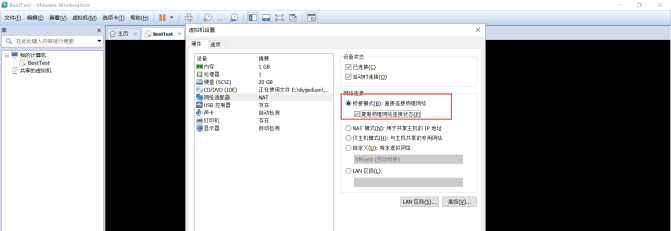
vmware网络连接方式
windows属于多根
linux属于单根:/ linux下一切皆文件
4、linux目录
bin目录:linux中的执行命令,可能是安装的程序,都可以放在里面
sbin目录:系统执行命令
etc目录:配置文件目录
opt目录:放一些安装程序都可以
tmp目录:临时目录
home目录:家目录
5、基础命令----文件操作
ls:查看当前目录下所有文件 ls -l:详细展示当前目录下文件 ls -h -l:以单位为M的形式详细展示文件信息
[root@test ~]# ls -l

总用量

-rw-------.  root root       10月   anaconda-ks.cfg

-rw-r--r--.  root root    7月     bugfree_v3.0.4.zip

-rwxrwxrwx.  root root      6月   : dang.sql

[root@test ~]# ls -h -l

总用量 136M

-rw-------.  root root .2K 10月   anaconda-ks.cfg

-rw-r--r--.  root root 4.8M 7月     bugfree_v3.0.4.zip

-rwxrwxrwx.  root root  19K 6月   : dang.sql
mkdir test:创建目录test(即创建文件夹) mkdir -p test/a/b/c:递归创建,即创建多层目录
[root@besttest test]# mkdir -p a/b/c
[root@besttest c]# pwd
/root/liyn_test/a/b/c
cd .:点代表当前目录 cd ..:代表回到上一级目录
touch test:创建test文件
[root@besttest test]# touch test

[root@besttest test]# ls

a  test
mv test a:将test文件移动到a目录下
[root@besttest test]# mv test a

[root@besttest test]# ls

a

[root@besttest test]# cd a

[root@besttest a]# ls

b  test
[root@besttest a]# mv test test1    //将test重命名为test1
[root@besttest a]# ls
b  test1
cp test.txt b/ :复制test.txt到b目录下
[root@besttest a]# cp test1 b/

[root@besttest a]# ls

b  test1

[root@besttest a]# cd b

[root@besttest b]# ls

c  test1
rm -rf test.txt :不提示也不打印任何信息,直接删除test.txt
[root@besttest b]# rm -rf test1
* :代表所有
[root@besttest a]# ls

b  test2.txt  test.txt

[root@besttest a]# mv *.txt b/    表示把所有txt文件移动到b目录下

[root@besttest a]# ls

b

[root@besttest a]# cd b

[root@besttest b]# ls

c  test2.txt  test.txt
6、基础命令----文件查看
cd ~:回到当前用户的家目录
cat test.txt:查看全文件,文件太大不适合,只适合查看小文件
[root@besttest test]# cat test.txt
more test.txt:按比例查看文件内容
less test.txt:按上下左右键,按行查看
head -100 test.txt:从头查看test.txt文件的前100行
tail -100f test.txt:从未尾动态查看test.txt文件的后100行
>:重定向 cat test.txt > test1.txt:把test.txt的文件,重定向到test1.txt
[root@besttest test]# cat test2.txt

[root@besttest test]# cat test.txt > test2.txt

[root@besttest test]# cat test2.txt
>>:追加
[root@besttest test]# cat test3.txt

[root@besttest test]# cat test.txt > test3.txt

[root@besttest test]# cat test3.txt

[root@besttest test]# cat test.txt >> test3.txt

[root@besttest test]# cat test3.txt
echo 'hello':打印
[root@besttest test]# echo 'hello'

hello
7、linux权限
linux系统是一个多用户、多任务的系统。任何一个想要使用系统资源的用户,都要向系统管理员申请一个账号,系统管理员通过这个账号,控制其能访问的资源
/etc/passwd:存储着用户信息
[root@besttest /]# cat /etc/passwd

root:x:::root:/root:/bin/bash      //每一行是一个用户

bin:x:::bin:/bin:/sbin/nologin

daemon:x:::daemon:/sbin:/sbin/nologin

adm:x:::adm:/var/adm:/sbin/nologin
//用户名:口令:用户标识号:组标识号:注释性描述:主目录:登录shell
/etc/shadow:存储着用户口令,每一行是一个用户
[root@besttest /]# head - /etc/shadow

root:$$d7VoqfSS7AdxTdZj$UL7fJDdCtKe3A1nwxcHgCEi3F40hFyq.x0vCX77KFk8vVlxsanKTT6uXSrfpCqmguG41cpJgrjY7azgREIwve/:::::::

bin:*:::::::
//用户名:加密后的密码:。。。。。。
/etc/group:用户组
[root@besttest /]# cat /etc/group

root:x::

bin:x::bin,daemon

daemon:x::bin,daemon
//组名:口令:组员
adduser tester1:创建用户
[root@besttest /]# adduser liyanan

[root@besttest /]# tail - /etc/passwd

liyanan:x::::/home/liyanan:/bin/bash
passwd liyanan:给用户设置密码
[root@besttest /]# passwd lyn

更改用户 lyn 的密码 。

新的 密码:

无效的密码: 过于简单化/系统化

无效的密码: 过于简单

重新输入新的 密码:

passwd: 所有的身份验证令牌已经成功更新。
[root@besttest usr]# cd /home
[root@besttest home]# ls
besttest  lyn    //查看家目录,有新建的用户目录
权限
[root@besttest test]# ll

总用量

drwxr-xr-x. 2 root root 4096 6月  27 04:15 a

-rw-r--r--.  root root   6月   : test3.txt

-rw-r--r--.  root root  6月   : test.txt
-rw-r--r--:第一位代表当前文件的类型,d代表目录,~代表文件,l代表软链接
       2-4(u),代表当前用户对文件的权限,r(4)代表读,w(2)代表写,x(1)代表执行
       5-7(g),代表所属组对文件的权限
       8-10(o),代表其它用户对它的权限
[root@besttest test]# chmod 555 test.txt
[root@besttest test]# ll
总用量 8
drwxr-xr-x. 2 root root 4096 6月  27 04:15 a
-rw-r--r--. 1 root root    0 6月  27 03:03 test2.txt
-rw-r--r--. 1 root root    0 6月  27 03:09 test3.txt
-r-xr-xr-x. 1 root root   20 6月  27 03:07 test.txt    //把test.txt权限改为读和执行
./test.sh:执行当前路径下的某一个文件
8、打包压缩
打包:把多个文件放在一个文件下,生成一个文件
touch {a..d}.sh :一次创建多个文件
tar cvf demo.tar {a..d}.sh : 打包,c-表示创建,v-表示打印打包的信息,f-代表后面接的文件名(也可以写成tar cvf demo.tar *.sh)
tar -tf demo.tar :查看当前包中的所有内容
tar -xvf demo.tar : 解包当前目录下的tar包,x-代表解压缩
-----------------------------------------------zip压缩方式---------------------------------------------------------------------
gzip demo.tar :将tar包压缩为zip文件
gunzip demo.tar.gz :解压缩zip文件为tar包
tar cvzf demo2.tar.zip *.txt :压缩为zip文件
tar -zxvf demo2.tar.zip :将zip文件解压缩解包
----------------------------------------------bzip2压缩方式------------------------------------------------------------------------
bzip2 demo.tar :压缩为bz2文件
bzip2 -d demo.tar.bz2 :解压缩为tar包
tar -cvjf demo.tar.bz2 *.txt :压缩为bz2文件
tar -xvf demo.tar.bz2 :解bz2文件,解包
[root@besttest test]# ls

test1.txt  test2.txt  test3.txt  test.txt

[root@besttest test]# touch {a..d}.sh

[root@besttest test]# ls

a.sh  b.sh  c.sh  d.sh  test1.txt  test2.txt  test3.txt  test.txt

[root@besttest test]# tar cvf demo.tar {a..d}.sh

a.sh

b.sh

c.sh

d.sh

[root@besttest test]# ls

a.sh  b.sh  c.sh  demo.tar  d.sh  test1.txt  test2.txt  test3.txt  test.txt

[root@besttest test]# rm -rf *.sh

[root@besttest test]# ls

demo.tar  test1.txt  test2.txt  test3.txt  test.txt

[root@besttest test]# tar -tf demo.tar

a.sh

b.sh

c.sh

d.sh

[root@besttest test]# tar -xvf demo.tar

a.sh

b.sh

c.sh

d.sh

[root@besttest test]# ls

a.sh  b.sh  c.sh  demo.tar  d.sh  test1.txt  test2.txt  test3.txt  test.txt

[root@besttest test]# gzip demo.tar
[root@besttest test]# ls
demo.tar.gz  test1.txt  test2.txt  test3.txt  test.txt
[root@besttest test]# gunzip demo.tar.gz
[root@besttest test]# ls
demo.tar  test1.txt  test2.txt  test3.txt  test.txt
[root@besttest test]# tar cvzf demo2.tar.zip *.txt
test2.txt
test3.txt
test.txt
[root@besttest test]# ls
demo2.tar.zip demo.tar test1.txt  test2.txt  test3.txt  test.txt
[root@besttest test]# rm -rf *.txt
[root@besttest test]# ls
demo2.tar.zip  demo.tar
[root@besttest test]# tar -zxvf demo2.tar.zip
test1.txt
test2.txt
test3.txt
test.txt
[root@besttest test]# ls
demo2.tar.zip  demo.tar  test1.txt  test2.txt  test3.txt  test.txt
[root@besttest test]# rm -rf *.zip
[root@besttest test]# bzip2 demo.tar
[root@besttest test]# ls
a.sh  b.sh  c.sh  demo.tar.bz2  d.sh  test1.txt  test2.txt  test3.txt  test.txt
linux常用命令之------文件操作、文件查看、权限、打包压缩的更多相关文章
- Linux常用命令--用户管理,文件权限,打包命令等
幕布链接 Linux常用命令--用户管理,文件权限,打包命令等
- Linux常用命令 - 五种创建文件命令详解
21篇测试必备的Linux常用命令,每天敲一篇,每次敲三遍,每月一循环,全都可记住!! https://www.cnblogs.com/poloyy/category/1672457.html 创建文 ...
- Linux常用命令2(远程文件下载+查看文件内容)
一.远程文件下载的两种方法:ftp命令 + scp命令 ftp命令: 服务器若安装了ftp Server,另外一台Linux可以使用ftp的client程序来进行文件的远程拷贝读取下载和写入上载. 1 ...
- Linux常用命令及重要目录文件分析总结
1.用户切换和更改密码 sudo -i / sudo su --->切换到root用户 su user --->从root用户切换回普通用户(/home/user) sudo passwd ...
- Linux常用命令详解-目录文件操作命令
来源:https://www.linuxidc.com/Linux/2018-04/151801.htm 现实中,服务器(包含Linux,Unix,Windows Server)一般都摆放在机房里,因 ...
- linux常用命令(二)文件上传下载及软件安装
1.上传下载工具安装 (1)WINDOWS 到linux的文件上传及下载: windows下打开secureCRT,通过SSH连到⾄至远程linux主机:上传下载工具安装命令:yum -y insta ...
- linux常用命令(三)文件操作命令
Linux文件的目录结构 根目录 / 家目录 /home 临时目录 /tmp 配置目录 /etc 用户程序目录 /usr 文件基本操作 ls 查看目录下的文件 touch 新建文件 mkdir 新建文 ...
- linux常用命令系列—cp 复制文件与文件夹
原文地址:http://blog.chinaunix.net/xmlrpc.php?r=blog/article&uid=2272&id=37363 指令名称:cp(copy)功能介绍 ...
- linux常用命令之--目录与文件的操作命令
1.linux的目录与文件的增.删.改.复制 pwd:用于显示当前所在的目录 ls:用于显示指定目录下的内容 其命令格式如下: ls [-option] [file] 常用参数: -l:显示文件和目录 ...
- linux常用命令:/etc/group文件详解
Linux /etc/group文件与/etc/passwd和/etc/shadow文件都是有关于系统管理员对用户和 用户组管理时相关的文件.linux /etc/group文件是有关于系统管理员对用 ...
随机推荐
- P1075 链表元素分类
P1075 链表元素分类 转跳点:
- git使用问题一新建本地仓库添加远程合并推送
1,git远程新建仓库demo 2,git本地初始化仓库demo 3,git本地添加远程仓库 git remote add <name> <url> 4,git把远程仓库pul ...
- Java8 使用LocalDate计算两个日期间隔多少年,多少月,多少天
最近项目遇到一个需要计算两个日期间隔的期限,需要计算出,整年整月整日这样符合日常习惯的说法,利用之前的Date和Calendar类会有点复杂,刚好项目使用了JDK8,那就利用起来这个新特性,上代码: ...
- 【pwnable.kr】 [simple login]
Download : http://pwnable.kr/bin/login Running at : nc pwnable.kr 9003 先看看ida里面的逻辑. 比较重要的信息时input变量再 ...
- pandas包 —— drop()、sort_values()、drop_duplicates()
一.drop() 函数 当你要删除某一行或者某一列时,用drop函数,它不改变原有的df中的数据,而是返回另一个dataframe来存放删除后的数据. 1.命令: df.drop() 删除行:df.d ...
- R box-cox变换 《回归分析与线性统计模型》page100
> rm(list = ls()) > library(openxlsx) > electric= read.xlsx("data101.xlsx",sheet ...
- 041、Java中逻辑运算之普通或运算“|”
01.代码如下: package TIANPAN; /** * 此处为文档注释 * * @author 田攀 微信382477247 */ public class TestDemo { public ...
- 八数码问题 IDA*搜索
#include<iostream> #include<string> #include<cmath> #include<cstring> #inclu ...
- 一、Vue环境搭建及基础用法
一.项目初始化及安装 官网:https://cn.vuejs.org/ 1.1安装及运行项目步骤 1.安装vue-cli(-g=-global) npm install -g vue-cli cnpm ...
- Window Server 2019 配置篇(3)- 建立hyper-v集群并在其上运行win10 pro虚拟机
上次讲到我们的域里有了网关跟DHCP,这次我们要在域中建立hyper-v集群并在其上运行win10 pro虚拟机 那么什么是hyper-v集群呢? 就是两个及两个以上的运行hyper-v服务的服务器建 ...