spring学习笔记二 注解及AOP
本节需要导入spring-aop包
注解
使用注解的目的是为了代替配置,在使用注解时,省略键时,则是为value赋值。
扫描某个包下的所有类中的注解
<?xml version="1.0" encoding="UTF-8"?>

<beans xmlns:xsi="http://www.w3.org/2001/XMLSchema-instance"
  xmlns="http://www.springframework.org/schema/beans"
  xmlns:context="http://www.springframework.org/schema/context"
  xsi:schemaLocation="http://www.springframework.org/schema/beans http://www.springframework.org/schema/beans/spring-beans-4.2.xsd http://www.springframework.org/schema/context http://www.springframework.org/schema/context/spring-context-4.2.xsd ">

<!-- 指定扫描cn.itcast.bean包下的所有类中的注解.

     注意:扫描包时.会扫描指定包下的所有子孙包

 -->

<context:component-scan base-package="cn.itcast.bean"></context:component-scan>

</beans>
1、将对象注册到Spring容器中。可以使用下面四种方式,最后三种方式更具有语义,一看就知道是哪一层。
@Component("user")
// @Service("user") service层
// @Controller("user") web层
// @Repository("user") dao层
public class User {}
2、修改对象的作用范围
//指定对象的作用范围,默认単例
@Scope(scopeName="singleton")

public class User {}
3、值类型注入
方式一:直接把@Value加到字段上,通过反射为Field赋值,破坏了封装性。
public class User {

    @Value("tom")

    private String name;

    @Value("18")

    private Integer age;

}
方式二:把@Value加到setName方法上,通过set方法赋值,推荐使用。
    @Value("tom")

    public void setName(String name) {

        this.name = name;

    }
4、引用类型注入
方式一:使用@Autowired(自动装配),此种方式如果匹配多个类型一致的对象,将无法选择具体注入哪一个对象。
@Component("car")

public class Car {}

@Component("user")

public class User {

    @Autowired //自动装配

    private Car car;

}
方式二 :使用@Qualifier注解告诉spring容器自动装配哪个名称的对象,必须配套使用。
@Component("car")

public class Car {}

@Component("user")

public class User {

    @Autowired //自动装配

    @Qualifier("car2")//使用@Qualifier注解告诉spring容器自动装配哪个名称的对象

    private Car car;

}
方式三:使用@Resource,手动指定注入哪个名称的对象
public class User {

    @Resource(name="car")//手动注入,指定注入哪个名称的对象

    private Car car;

}
5、初始化|销毁方法
public class User {

    @PostConstruct //在对象被创建后调用.init-method

    public void init(){

        System.out.println("我是初始化方法!");

    }

    @PreDestroy //在销毁之前调用.destory-method

    public void destory(){

        System.out.println("我是销毁方法!");

    }

}
spring与junit整合测试
1、导包 spring-test-4.2.4.RELEASE.jar
2、在类上配置注解
//帮我们创建容器

@RunWith(SpringJUnit4ClassRunner.class)

//指定创建容器时使用哪个配置文件

@ContextConfiguration("classpath:applicationContext.xml")
3、测试
//帮我们创建容器

@RunWith(SpringJUnit4ClassRunner.class)

//指定创建容器时使用哪个配置文件

@ContextConfiguration("classpath:applicationContext.xml")

public class Demo {

    //将名为user的对象注入到u变量中

    @Resource(name="user")

    private User u;

    @Test

    public void fun1(){

        System.out.println(u);

    }

    @Test

    public void fun2(){

        System.out.println(u);

    }

    @Test

    public void fun3(){

        System.out.println(u);

    }

}
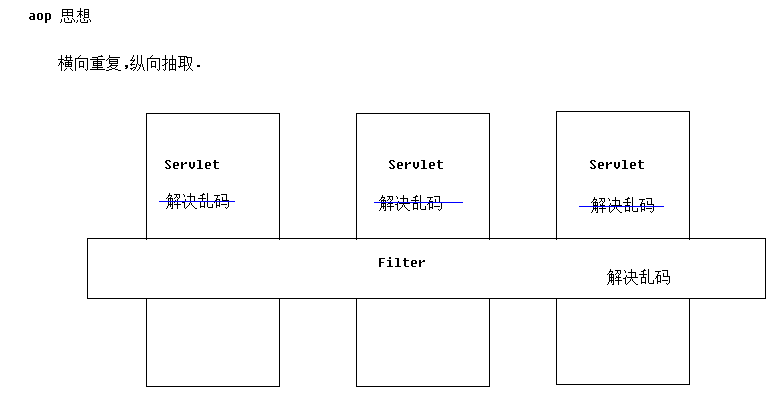
AOP
spring实现aop的原理
Spring能够为容器中管理的对象生成动态代理对象。
动态代理:被代理对象必须要实现接口,才能产生代理对象。如果没有接口将不能使用动态代理技术。
cglib代理(没有接口):第三方代理技术,cglib代理.可以对任何类生成代理。代理的原理是对目标对象进行继承代理。 如果目标对象被final修饰,那么该类无法被cglib代理。
如果有接口,会优先使用动态代理。
相关概念
Joinpoint(连接点):简单来说就是目标对象中,所有可以增强的方法。所谓连接点是指那些被拦截到的点。在 spring 中,这些点指的是方法,因为 spring 只支持方法类型的连接点。
Pointcut(切入点):简单来说就是目标对象中,已经增强的方法。所谓切入点是指我们要对哪些 Joinpoint 进行拦截的定义。
Advice(通知/增强):简单来说就是增强的代码。所谓通知是指拦截到 Joinpoint 之后所要做的事情就是通知.通知分为前置通知,后置通知,异常通知,最终通知,环绕通知(切面要完成的功能)
Introduction(引介):引介是一种特殊的通知在不修改类代码的前提下, Introduction 可以在运行期为类动态地添加一些方法或 Field.
Target(目标对象):代理的目标对象,也就是被代理对象。
Weaving(织入):是指把增强应用到目标对象来创建新的代理对象的过程.spring 采用动态代理织入,而 AspectJ 采用编译期织入和类装在期织入
Proxy(代理):一个类被 AOP 织入增强后,就产生一个结果代理类
Aspect(切面): 是切入点和通知(引介)的结合
Spring 中的AOP演示
1、导包
- spring-aspects-4.2.4.RELEASE.jar
- spring-aop-4.2.4.RELEASE.jar
spring需要第三方aop包
- com.springsource.org.aopalliance-1.0.0.jar
- com.springsource.org.aspectj.weaver-1.6.8.RELEASE.jar
2、准备目标对象
package cn.itcast.service;

public class UserServiceImpl implements UserService {

    @Override

    public void save() {

        System.out.println("保存用户!");

        //int i = 1/0;

    }

    @Override

    public void delete() {

        System.out.println("删除用户!");

    }

    @Override

    public void update() {

        System.out.println("更新用户!");

    }

    @Override

    public void find() {

        System.out.println("查找用户!");

    }

}
3、准备通知
package cn.itcast.d_springaop;

import org.aspectj.lang.ProceedingJoinPoint;

//通知类

public class MyAdvice {

    //前置通知

//        |-目标方法运行之前调用

    //后置通知(如果出现异常不会调用)

//        |-在目标方法运行之后调用

    //环绕通知

//        |-在目标方法之前和之后都调用

    //异常拦截通知

//        |-如果出现异常,就会调用

    //后置通知(无论是否出现 异常都会调用)

//        |-在目标方法运行之后调用

//----------------------------------------------------------------

    //前置通知

    public void before(){

        System.out.println("这是前置通知!!");

    }

    //后置通知

    public void afterReturning(){

        System.out.println("这是后置通知(如果出现异常不会调用)!!");

    }

    //环绕通知

    public Object around(ProceedingJoinPoint pjp) throws Throwable {

        System.out.println("这是环绕通知之前的部分!!");

        Object proceed = pjp.proceed();//调用目标方法

        System.out.println("这是环绕通知之后的部分!!");

        return proceed;

    }

    //异常通知

    public void afterException(){

        System.out.println("出事啦!出现异常了!!");

    }

    //后置通知

    public void after(){

        System.out.println("这是后置通知(出现异常也会调用)!!");

    }

}
4、配置进行织入,将通知织入目标对象中
<?xml version="1.0" encoding="UTF-8"?>

<beans xmlns:xsi="http://www.w3.org/2001/XMLSchema-instance" xmlns="http://www.springframework.org/schema/beans" xmlns:context="http://www.springframework.org/schema/context" xmlns:aop="http://www.springframework.org/schema/aop" xsi:schemaLocation="http://www.springframework.org/schema/beans http://www.springframework.org/schema/beans/spring-beans-4.2.xsd http://www.springframework.org/schema/context http://www.springframework.org/schema/context/spring-context-4.2.xsd http://www.springframework.org/schema/aop http://www.springframework.org/schema/aop/spring-aop-4.2.xsd ">

<!-- 准备工作: 导入aop(约束)命名空间 -->

<!-- 1.配置目标对象 -->

    <bean name="userService" class="cn.itcast.service.UserServiceImpl" ></bean>

<!-- 2.配置通知对象 -->

    <bean name="myAdvice" class="cn.itcast.d_springaop.MyAdvice" ></bean>

<!-- 3.配置将通知织入目标对象 -->

    <aop:config>

        <!-- 配置切入点

            public void cn.itcast.service.UserServiceImpl.save() 这样配置太啰嗦

            void cn.itcast.service.UserServiceImpl.save() public可以省

            * cn.itcast.service.UserServiceImpl.save() 对返回值不做任何要求

            * cn.itcast.service.UserServiceImpl.*() 所有空参方法

            * cn.itcast.service.*ServiceImpl.*(..) 找service包下的所有ServiceImpl结尾的方法

            * cn.itcast.service..*ServiceImpl.*(..) 找Service包下(及其子孙包)的所有的ServiceImpl结尾的方法

        -->

        <aop:pointcut expression="execution(* cn.itcast.service.*ServiceImpl.*(..))" id="pc"/>

        <aop:aspect ref="myAdvice" >

            <!-- 指定名为before方法作为前置通知 -->

            <aop:before method="before" pointcut-ref="pc" />

            <!-- 后置 -->

            <aop:after-returning method="afterReturning" pointcut-ref="pc" />

            <!-- 环绕通知 -->

            <aop:around method="around" pointcut-ref="pc" />

            <!-- 异常拦截通知 -->

            <aop:after-throwing method="afterException" pointcut-ref="pc"/>

            <!-- 后置 -->

            <aop:after method="after" pointcut-ref="pc"/>

        </aop:aspect>

    </aop:config>

</beans>
5、测试代码
@RunWith(SpringJUnit4ClassRunner.class)

@ContextConfiguration("classpath:applicationContext.xml")

public class Demo {

    @Autowired

    private UserService u;

    @Test

    public void fun1() {

      u.save();

    }

}
使用注解演示AOP
配置文件:
<?xml version="1.0" encoding="UTF-8"?>

<beans xmlns:xsi="http://www.w3.org/2001/XMLSchema-instance" xmlns="http://www.springframework.org/schema/beans" xmlns:context="http://www.springframework.org/schema/context" xmlns:aop="http://www.springframework.org/schema/aop" xsi:schemaLocation="http://www.springframework.org/schema/beans http://www.springframework.org/schema/beans/spring-beans-4.2.xsd http://www.springframework.org/schema/context http://www.springframework.org/schema/context/spring-context-4.2.xsd http://www.springframework.org/schema/aop http://www.springframework.org/schema/aop/spring-aop-4.2.xsd ">

<!-- 准备工作: 导入aop(约束)命名空间 -->

<!-- 1.配置目标对象 -->

    <bean name="userService" class="cn.itcast.service.UserServiceImpl" ></bean>

<!-- 2.配置通知对象 -->

    <bean name="myAdvice" class="cn.itcast.e_annotationaop.MyAdvice" ></bean>

<!-- 3.开启使用注解完成织入 -->

    <aop:aspectj-autoproxy></aop:aspectj-autoproxy>

</beans>
通知类
package cn.itcast.e_annotationaop;

import org.aspectj.lang.ProceedingJoinPoint;

import org.aspectj.lang.annotation.After;

import org.aspectj.lang.annotation.AfterReturning;

import org.aspectj.lang.annotation.AfterThrowing;

import org.aspectj.lang.annotation.Around;

import org.aspectj.lang.annotation.Aspect;

import org.aspectj.lang.annotation.Before;

import org.aspectj.lang.annotation.Pointcut;

//通知类

@Aspect

//表示该类是一个通知类

public class MyAdvice {

    @Pointcut("execution(* cn.itcast.service.*ServiceImpl.*(..))")

    public void pc(){}//抽取相同的execution,方便管理。

    //前置通知

    //指定该方法是前置通知,并制定切入点

    @Before("MyAdvice.pc()")

    public void before(){

        System.out.println("这是前置通知!!");

    }

    //后置通知

    @AfterReturning("execution(* cn.itcast.service.*ServiceImpl.*(..))")

    public void afterReturning(){

        System.out.println("这是后置通知(如果出现异常不会调用)!!");

    }

    //环绕通知

    @Around("execution(* cn.itcast.service.*ServiceImpl.*(..))")

    public Object around(ProceedingJoinPoint pjp) throws Throwable {

        System.out.println("这是环绕通知之前的部分!!");

        Object proceed = pjp.proceed();//调用目标方法

        System.out.println("这是环绕通知之后的部分!!");

        return proceed;

    }

    //异常通知

    @AfterThrowing("execution(* cn.itcast.service.*ServiceImpl.*(..))")

    public void afterException(){

        System.out.println("出事啦!出现异常了!!");

    }

    //后置通知

    @After("execution(* cn.itcast.service.*ServiceImpl.*(..))")

    public void after(){

        System.out.println("这是后置通知(出现异常也会调用)!!");

    }

}
更多参考:
spring学习笔记二 注解及AOP的更多相关文章
- Spring学习笔记5——注解方式AOP
第一步:注解配置业务类 使用@Component("Pservice")注解ProductService 类 package com.spring.service; import ...
- Spring学习笔记(12)——aop
先了解AOP的相关术语:1.通知(Advice):通知定义了切面是什么以及何时使用.描述了切面要完成的工作和何时需要执行这个工作.2.连接点(Joinpoint):程序能够应用通知的一个"时 ...
- springMVC学习笔记(二)-----注解和非注解入门小程序
最近一直在做一个电商的项目,周末加班,忙的都没有时间更新博客了.终于在上周五上线了,可以轻松几天了.闲话不扯淡了,继续谈谈springMvc的学习. 现在,用到SpringMvc的大部分使用全注解配置 ...
- Spring学习笔记(二)之装配Bean
一,介绍Bean的装配机制 在Spring中,容器负责对象的创建并通过DI来协调对象之间的关系.但是我们要告诉Spring创建哪些Bean并且如何将其装配在一起.,装配wiring就是DI依赖注入的本 ...
- SpringBoot学习笔记<二>注解
此篇为项目作结之笔记,关于注解. 项目启动入口@SpringBootApplication[必选] @ServletComponentScan[可选] 注解后: Servlet.Filter.Lis ...
- Spring 学习笔记(二)
spring 核心 (xml方式.注解方式) 两种方式实现 ioc :控制反转 aop : 面向切面
- Spring学习--用 ASpectJ 注解实现 AOP
用 AspectJ 注解声明切面: 要在 Spring 中声明 AspectJ 切面 , 只需要在 IOC 容器中将切面声明为 bean 实例.当在 Spring IOC 容器中初始化 AsjectJ ...
- Spring学习笔记-面向切面(AOP)-04
什么是面向切面编程 先大概了解一下部分术语 横切关注点:软件开发中,散布于多出的功能称为横切关注点(cross-cutting concern),简单的可以描述为可以影响应用多处的功能,比如日志.安全 ...
- Spring学习笔记二:注入方式
转载请注明原文地址:http://www.cnblogs.com/ygj0930/p/6774608.html 我们说,IOC的实现方式是依赖注入,也就是把被依赖对象赋值到依赖对象的成员属性.怎么做 ...
随机推荐
- C#利用 string.Join 泛型集合快速转换拼接字符串
C#利用 string.Join 泛型集合快速转换拼接字符串 List<int> superior_list = new List<int>(); superior_list. ...
- hdu5730 Shell Necklace
重温了这道cdq+FFT 讲白了就是不断对 dp[l~mid] 和 sh[1~r] 进行fft 得到 dp[mid+1~r] #include<bits/stdc++.h> using n ...
- 经典面试问题: Top K 之 ---- 海量数据找出现次数最多或,不重复的。
作者:林冠宏 / 指尖下的幽灵 掘金:https://juejin.im/user/587f0dfe128fe100570ce2d8 博客:http://www.cnblogs.com/linguan ...
- 【转载】Apache Spark Jobs 性能调优(二)
调试资源分配 Spark 的用户邮件邮件列表中经常会出现 "我有一个500个节点的集群,为什么但是我的应用一次只有两个 task 在执行",鉴于 Spark 控制资源使用的参数 ...
- 配置maven环境出现ARP tomcat native library 版本安装跟需求版本不一致时的解决方法An incompatible version xxxx of the APR based Apache Tomcat Native library is installed, while Tomcat requires version xxxx
此地址下载你所需要的library版本http://archive.apache.org/dist/tomcat/tomcat-connectors/native/ 点击binaries 点win32 ...
- jquery实现简单的搜索
对一个简单的ul列表进行输入框的搜索功能,搜索之前及搜索后显示效果如下: 用到的主要jquery技术有filter()和match()方法以及正则匹配,基础HTML+div设置: <div cl ...
- 凸包--Graham扫描法
一直听大佬们说:凸包.凸包.凸包 一直不会..... 然后.... 今天考试,考了一道计算几何的简单题.... 这,,,还是学一下吧.. 然后考试现场学习一下凸包算法. 先理解一下凸包是啥东西. 看看 ...
- 【HNOI2004】敲砖块(动态规划)
越来越懒了,不想粘题目 题解 样例的输入是个很好的提醒, 把他往左边对齐之后 如果要打掉某个位置,那么必须要打掉右上方的所有砖 然后就很明显的一个DP了.... #include<iostrea ...
- PyCharm的注册码获取
1.在server选项里边输入 http://elporfirio.com:1017/就可以了. 2.server选项里边输入 http://idea.imsxm.com/ 3.server选项里边 ...
- Django用户登录与注册系统
一.创建项目 1.1.创建项目和app python manage.py startproject mysite_login python manage.py startapp login 1.2.设 ...