微信小程序登录JAVA后台
登录流程时序登录流程时序

具体的登录说明查看 小程序官方API
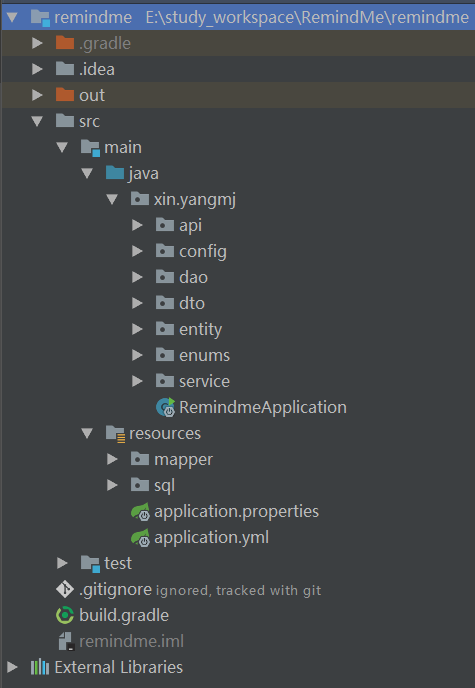
项目的结构图:
springboot项目搭建
使用idea作为开发工具,由gradle构建项目,搭建springboot项目,对这块儿不熟悉的可以自行去学习,此处不多赘述。下面是核心的配置文件。application.yml中配置springboot默认的参数,application.properties配置自定义的参数,可以统一配置在一个文件中,依据个人习惯。
buidle.gradle配置
buildscript {

	ext {

		springBootVersion = '1.5.10.RELEASE'

	}

	repositories {

        mavenLocal()

		maven { url 'http://maven.aliyun.com/nexus/content/groups/public' }

		mavenCentral()

	}

	dependencies {

		classpath("org.springframework.boot:spring-boot-gradle-plugin:${springBootVersion}")

	}

}

apply plugin: 'java'

apply plugin: 'org.springframework.boot'

group = 'xin.yangmj'

version = '1.0.1'

sourceCompatibility = 1.8

repositories {

    mavenLocal()

	maven { url 'http://maven.aliyun.com/nexus/content/groups/public' }

	mavenCentral()

}

dependencies {

	compile('org.springframework.boot:spring-boot-starter-cache')

	compile('org.springframework.boot:spring-boot-starter-data-redis')

	compile('org.mybatis.spring.boot:mybatis-spring-boot-starter:1.3.1')

	compile('org.springframework.boot:spring-boot-starter-security')

	compile('org.springframework.boot:spring-boot-starter-web')

    compile('mysql:mysql-connector-java')

    compile('org.springframework.security:spring-security-test')

    testCompile('org.springframework.boot:spring-boot-starter-test')

    compile group: 'org.apache.commons', name: 'commons-lang3', version: '3.7'

}
application.yml
logging:

  level:

    root: DEBUG

spring:

    datasource:

        url: jdbc:mysql://localhost/remindme?allowMultiQueries=true&useUnicode=true&characterEncoding=UTF-8

        username: root

        password: root

        driver-class-name: com.mysql.jdbc.Driver

    redis:

        host: localhost

        password:

        port: 6379

mybatis:

    mapperLocations: classpath:mapper/*.xml

    configuration:

        mapUnderscoreToCamelCase: true

        default-enum-type-handler: org.apache.ibatis.type.EnumOrdinalTypeHandler
application.properties
# JWT相关配置

jwt.header=Authorization

# 过期时间

jwt.expiration=864000

# 注意有一个空格

jwt.tokenHead=Bearer

# wechat Auth

auth.wechat.sessionHost=https://api.weixin.qq.com/sns/jscode2session

auth.wechat.appId=***

auth.wechat.secret=***

auth.wechat.grantType=authorization_code
权限相关的配置
WebSecurityConfig.java
@Configuration

@EnableWebSecurity

@EnableGlobalMethodSecurity(prePostEnabled = true)

public class WebSecurityConfig extends WebSecurityConfigurerAdapter {

    @Autowired

    private JwtAuthenticationEntryPoint unauthorizedHandler;

    @Bean

    public ThirdSessionAuthFilter authenticationTokenFilterBean() throws Exception {

        return new ThirdSessionAuthFilter();

    }

    @Override

    protected void configure(HttpSecurity httpSecurity) throws Exception {

        httpSecurity

                // 由于使用的是JWT,我们这里不需要csrf

                .csrf().disable()

                .exceptionHandling().authenticationEntryPoint(unauthorizedHandler).and()

                // 基于token,所以不需要session

                .sessionManagement().sessionCreationPolicy(SessionCreationPolicy.STATELESS).and()

                .authorizeRequests()

                // 允许对test的无授权访问

                .antMatchers(HttpMethod.GET, "/test").permitAll()

                // 对于获取token的rest api要允许匿名访问

                .antMatchers("/auth").permitAll();

        // 添加本地地三方session filter

        httpSecurity

                .addFilterBefore(authenticationTokenFilterBean(), UsernamePasswordAuthenticationFilter.class);

        // 禁用缓存

        httpSecurity.headers().cacheControl();

    }

}
ThirdSessionAuthFilter.java
@Component

public class ThirdSessionAuthFilter extends OncePerRequestFilter {

    @Value("${jwt.header}")

    private String tokenHeader;

    @Value("${jwt.tokenHead}")

    private String tokenHead;

    @Autowired

    private StringRedisTemplate stringRedisTemplate;

    @Autowired

    private ConsumerMapper consumerMapper;

    @Override

    protected void doFilterInternal(HttpServletRequest request,

                                    HttpServletResponse response,

                                    FilterChain chain) throws ServletException, IOException {

        //获取请求头部分的Authorization

        String authHeader = request.getHeader(this.tokenHeader);

        //如果请求路径为微信通知后台支付结果则不需要token(之后会在具体的controller中,对双方签名进行验证防钓鱼)

        String url = request.getRequestURI().substring(request.getContextPath().length());

        if (url.equals("/auth") || url.equals("/test")) {

            chain.doFilter(request, response);

            return;

        }

        if (null == authHeader || !authHeader.startsWith("Bearer")) {

            throw new RuntimeException("非法访问用户");

        }

        // The part after "Bearer "

        final String thirdSessionId = authHeader.substring(tokenHead.length());

        String wxSessionObj = stringRedisTemplate.opsForValue().get(thirdSessionId);

        if (StringUtils.isEmpty(wxSessionObj)) {

            throw new RuntimeException("用户身份已过期");

        }

        // 设置当前登录用户

        try (AppContext appContext = new AppContext(wxSessionObj.substring(wxSessionObj.indexOf("#") + 1))) {

            chain.doFilter(request, response);

        }

    }

}
AppContext.java
public class AppContext implements AutoCloseable {

    private static final ThreadLocal<String> CURRENT_CONSUMER_WECHAT_OPENID = new ThreadLocal<>();

    public AppContext(String wechatOpenid) {

        CURRENT_CONSUMER_WECHAT_OPENID.set(wechatOpenid);

    }

    @Override

    public void close() {

        CURRENT_CONSUMER_WECHAT_OPENID.remove();

    }

    public static String getCurrentUserWechatOpenId() {

        return CURRENT_CONSUMER_WECHAT_OPENID.get();

    }

}
JwtAuthenticationEntryPoint.java
@Component

public class JwtAuthenticationEntryPoint implements AuthenticationEntryPoint, Serializable {

    private static final long serialVersionUID = -8970718410437077606L;

    @Override

    public void commence(HttpServletRequest request,

                         HttpServletResponse response,

                         AuthenticationException authException) throws IOException {

        response.sendError(HttpServletResponse.SC_UNAUTHORIZED, "Unauthorized");

    }

}
WechatAuthProperties.java
@Component

public class WechatAuthProperties {

    @Value("${auth.wechat.sessionHost}")

    private String sessionHost;

    @Value("${auth.wechat.appId}")

    private String appId;

    @Value("${auth.wechat.secret}")

    private String secret;

    @Value("${auth.wechat.grantType}")

    private String grantType;

	//省略getter setter

}
相关实体类对象
public class AccountDto {

    private Long id;

    private String username;

    private Long phone;

    private Gender gender;

    private String vcode;

    private String password;

    private String promotionCode;

    private String InvitationCode;

    private String clientAssertion;

    private String code;

    //省略 getter setter

}
Consumer.java
public class Consumer {

    private Long id;

    private String username;

    private String wechatOpenid;

    private Long phone;

    private String nickname;

    private String avatarUrl;

    private Gender gender;

    private String email;

    private Long lastLoginTime;

    private Boolean deleted;

    private Long createdBy;

    private Long createdAt;

    private Long updatedBy;

    private Long updatedAt;

	// 省略 gettter setter

}
Gender.java
public enum Gender {

    UNKNOW(0, "未知"),

    MAN(1, "先生"),

    WOMAN(2, "女士");

    private Byte value;

    private String name;

    Gender(int value, String name) {

        this.value = (byte)value;

        this.name = name;

    }

    public Byte getValue() {

        return this.value;

    }

    public String getName() {

        return this.name;

    }

}
- API接口类
@RestController

public class AuthEndpoint {

    @Value("${jwt.header}")

    private String tokenHeader;

    @Value("${jwt.tokenHead}")

    private String tokenHead;

    @Autowired

    private StringRedisTemplate stringRedisTemplate;

    @Autowired

    private WechatService wechatService;

    @GetMapping("/test")

    public String test() {

        return "test_success";

    }

    @GetMapping("/testAuth")

    public String testAuth() {

        return "testAuth_success";

    }

    @PostMapping("/auth")

    public ResponseEntity<WechatAuthenticationResponse> createAuthenticationToken(@RequestBody AccountDto accountDto)

            throws AuthenticationException {

        WechatAuthenticationResponse jwtResponse = wechatService.wechatLogin(accountDto.getCode());

        return ResponseEntity.ok(jwtResponse);

    }

    @PostMapping("/updateConsumerInfo")

    public void updateConsumerInfo(@RequestBody Consumer consumer) {

        wechatService.updateConsumerInfo(consumer);

    }

}
注册核心流程
@Service

public class WechatService {

    private static final Logger LOGGER = LoggerFactory.getLogger(WechatService.class);

    @Autowired

    private ConsumerMapper consumerMapper;

    /**

     * 服务器第三方session有效时间,单位秒, 默认1天

     */

    private static final Long EXPIRES = 86400L;

    private RestTemplate wxAuthRestTemplate = new RestTemplate();

    @Autowired

    private WechatAuthProperties wechatAuthProperties;

    @Autowired

    private StringRedisTemplate stringRedisTemplate;

    public WechatAuthenticationResponse wechatLogin(String code) {

        WechatAuthCodeResponse response = getWxSession(code);

        String wxOpenId = response.getOpenid();

        String wxSessionKey = response.getSessionKey();

        Consumer consumer = new Consumer();

        consumer.setWechatOpenid(wxOpenId);

        loginOrRegisterConsumer(consumer);

        Long expires = response.getExpiresIn();

        String thirdSession = create3rdSession(wxOpenId, wxSessionKey, expires);

        return new WechatAuthenticationResponse(thirdSession);

    }

    public WechatAuthCodeResponse getWxSession(String code) {

        LOGGER.info(code);

        String urlString = "?appid={appid}&secret={srcret}&js_code={code}&grant_type={grantType}";

        String response = wxAuthRestTemplate.getForObject(

                wechatAuthProperties.getSessionHost() + urlString, String.class,

                wechatAuthProperties.getAppId(),

                wechatAuthProperties.getSecret(),

                code,

                wechatAuthProperties.getGrantType());

        ObjectMapper objectMapper = new ObjectMapper();

        ObjectReader reader = objectMapper.readerFor(WechatAuthCodeResponse.class);

        WechatAuthCodeResponse res;

        try {

            res = reader.readValue(response);

        } catch (IOException e) {

            res = null;

            LOGGER.error("反序列化失败", e);

        }

        LOGGER.info(response);

        if (null == res) {

            throw new RuntimeException("调用微信接口失败");

        }

        if (res.getErrcode() != null) {

            throw new RuntimeException(res.getErrmsg());

        }

        res.setExpiresIn(res.getExpiresIn() != null ? res.getExpiresIn() : EXPIRES);

        return res;

    }

    public String create3rdSession(String wxOpenId, String wxSessionKey, Long expires) {

        String thirdSessionKey = RandomStringUtils.randomAlphanumeric(64);

        StringBuffer sb = new StringBuffer();

        sb.append(wxSessionKey).append("#").append(wxOpenId);

        stringRedisTemplate.opsForValue().set(thirdSessionKey, sb.toString(), expires, TimeUnit.SECONDS);

        return thirdSessionKey;

    }

    private void loginOrRegisterConsumer(Consumer consumer) {

        Consumer consumer1 = consumerMapper.findConsumerByWechatOpenid(consumer.getWechatOpenid());

        if (null == consumer1) {

            consumerMapper.insertConsumer(consumer);

        }

    }

    public void updateConsumerInfo(Consumer consumer) {

        Consumer consumerExist = consumerMapper.findConsumerByWechatOpenid(AppContext.getCurrentUserWechatOpenId());

        consumerExist.setUpdatedBy(1L);

        consumerExist.setUpdatedAt(System.currentTimeMillis());

        consumerExist.setGender(consumer.getGender());

        consumerExist.setAvatarUrl(consumer.getAvatarUrl());

        consumerExist.setWechatOpenid(consumer.getWechatOpenid());

        consumerExist.setEmail(consumer.getEmail());

        consumerExist.setNickname(consumer.getNickname());

        consumerExist.setPhone(consumer.getPhone());

        consumerExist.setUsername(consumer.getUsername());

        consumerMapper.updateConsumer(consumerExist);

    }

}
微信小程序代码片段
wx.login() 获取code,然后携带code发送请求到自己服务端,获取登录信息。然后 wx.getUserInfo() 获取用户的基本信息,例如:昵称、头像等,上传本地服务器保存用户基本信息。
    // 登录

    wx.login({

      success: function(res) {

        if (res.code) {

          wx.request({

            url: "http://localhost:8080/auth",

            data: {

              code: res.code

            },

            method: "POST",

            header: {

              'content-type': 'application/json',

            },

            success: function (res) {

              console.log(res.data.access_token);

              var token = res.data.access_token;

              wx.getUserInfo({

                success: res => {

                  // 保存用户信息到服务端

                  wx.request({

                    url: "http://localhost:8080/updateConsumerInfo",

                    data: res.userInfo,

                    method: "POST",

                    header: {

                      'Authorization': 'Bearer ' + token,

                      'content-type': 'application/json',

                    },

                    success: function (res) {

                      console.log("success");

                    },

                    fail: function (error) {

                      console.log(error);

                    }

                  })

                }

              })

            },

            fail: function (error) {

              console.log(error);

            }

          })

        } else {

          console.log("error code " + res.errMsg);

        }

      }

    })
效果展示
刷新微信小程序缓存,编译使发送请求
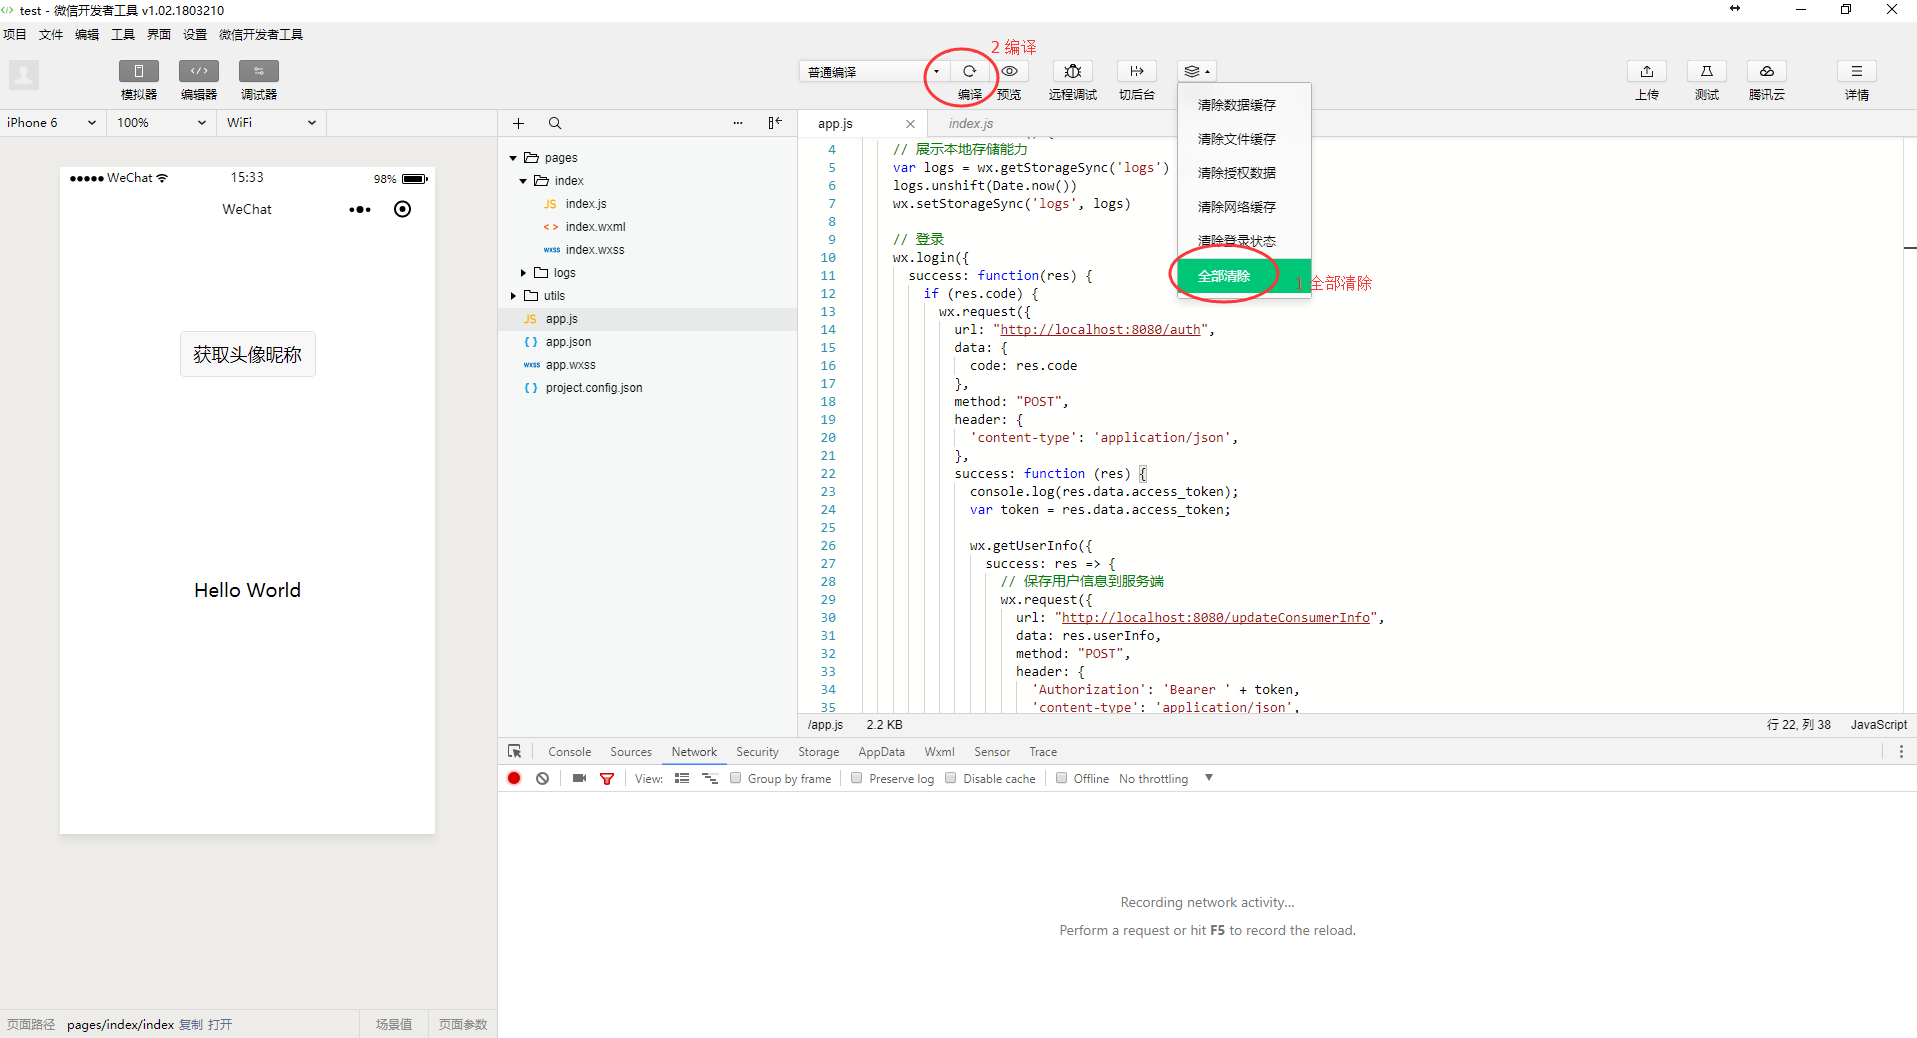
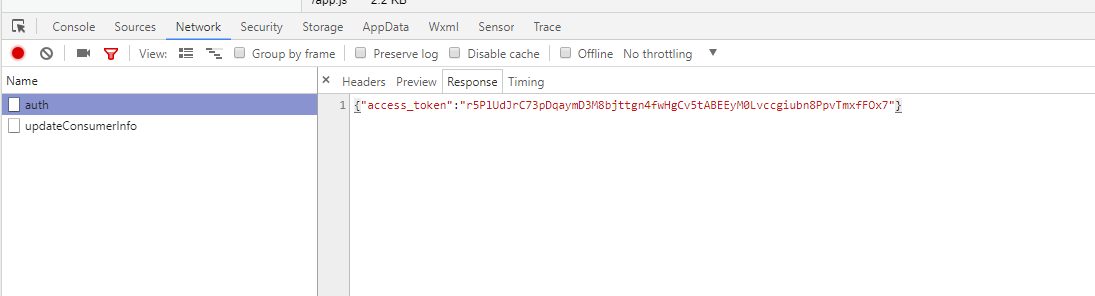
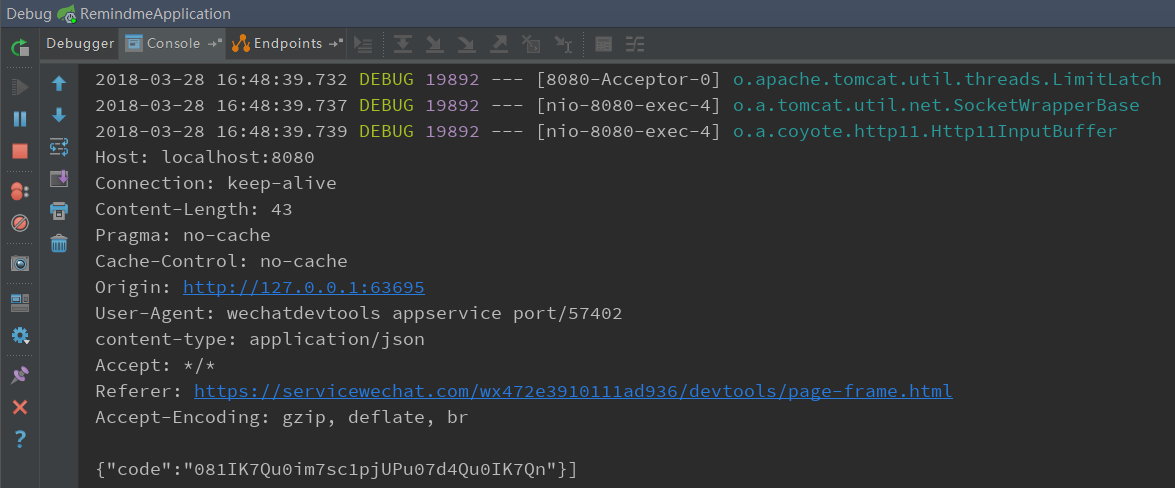
发送登录请求,完成后获取到 access_token
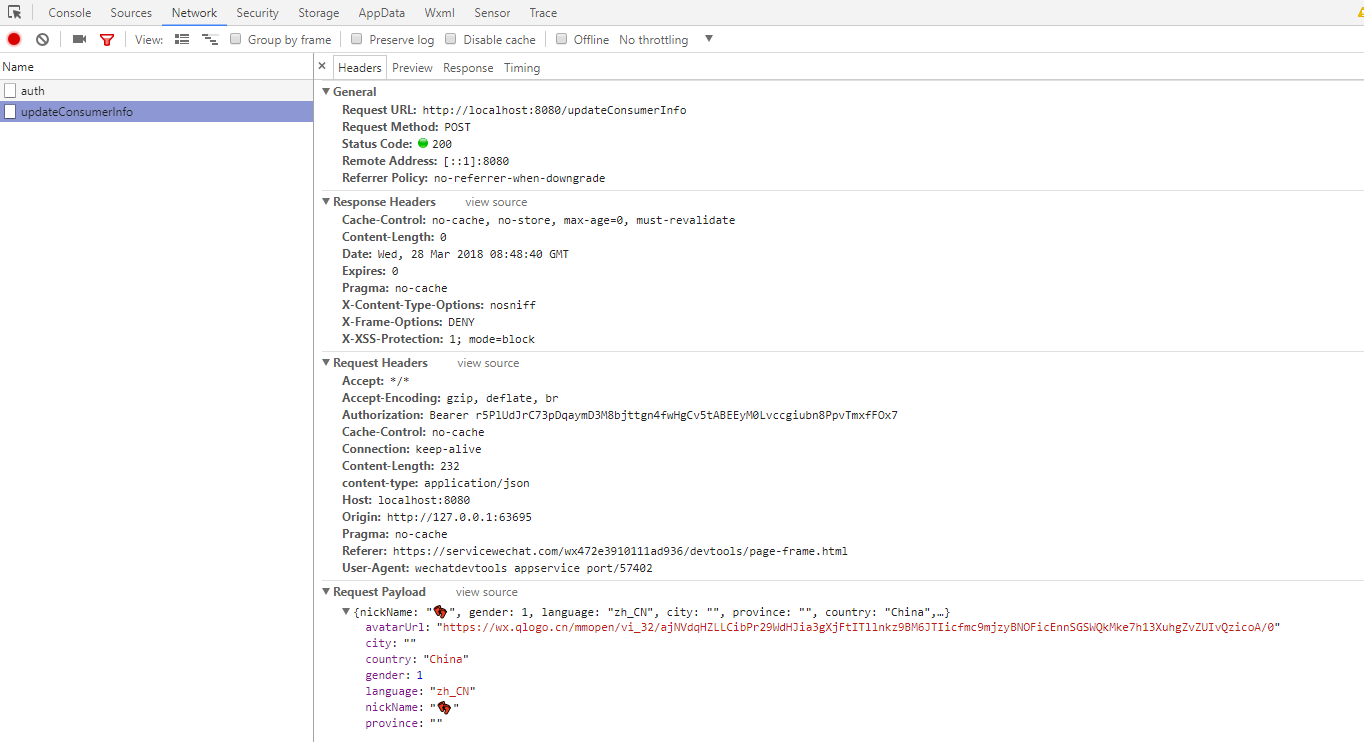
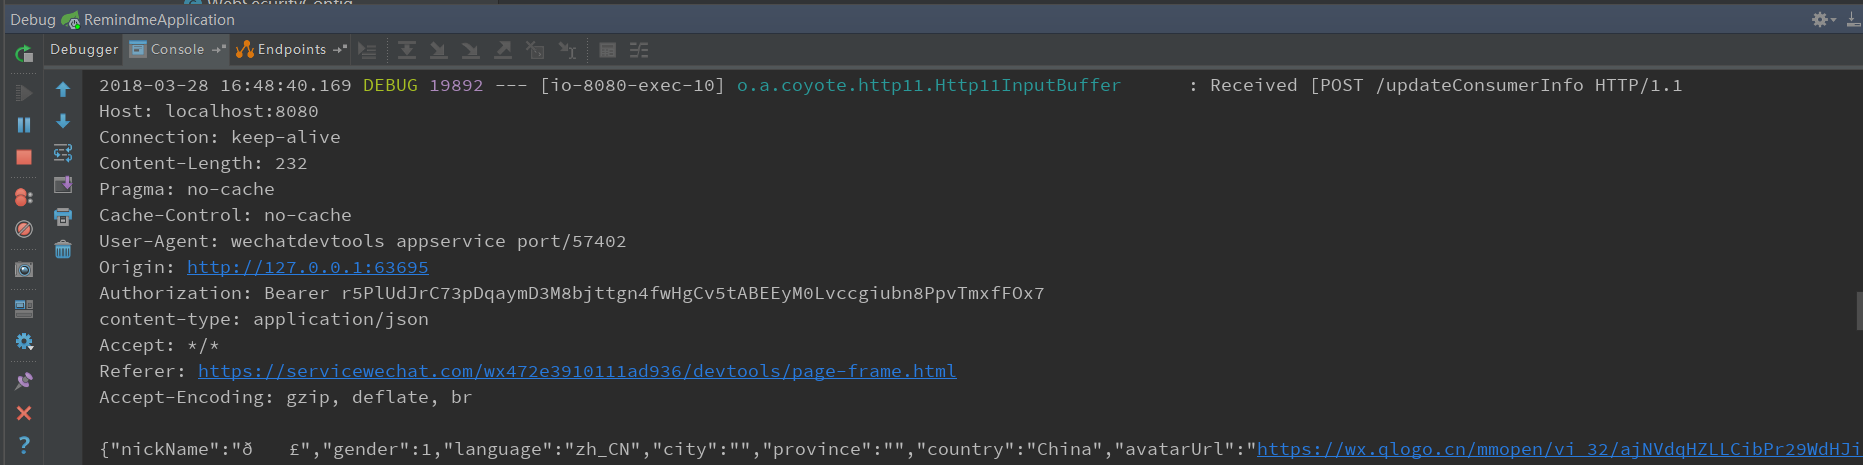
发送获取用户信息请求
小程序请求本地服务器登录接口
本地服务器请求微信服务器登录接口

小程序请求本地服务器更新用户信息接口
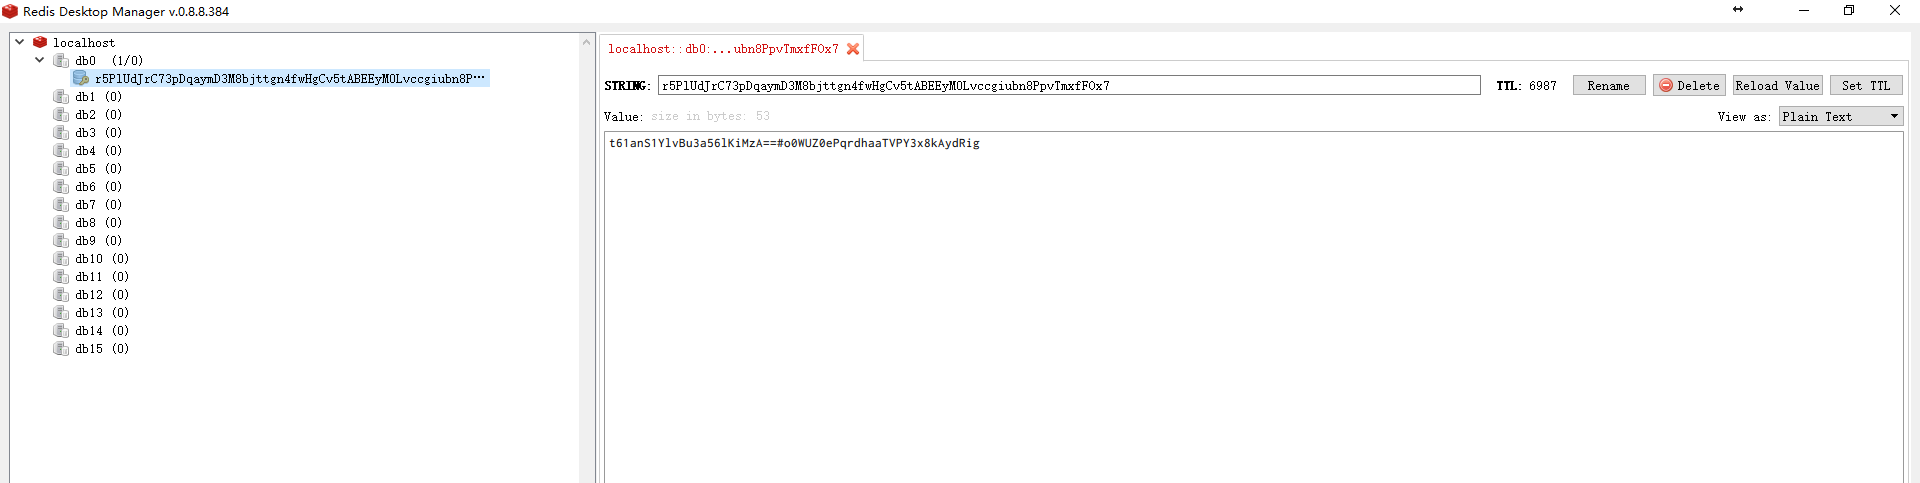
redis保存会话信息
mysql数据库存储用户信息
 微信小程序登录JAVA后台
注:本文著作权归作者,由demo大师代发,拒绝转载,转载需要作者授权
微信小程序登录JAVA后台的更多相关文章
- 微信小程序与Java后台通信
一.写在前面 最近接触了小程序的开发,后端选择Java,因为小程序的代码运行在腾讯的服务器上,而我们自己编写的Java代码运行在我们自己部署的服务器上,所以一开始不是很明白小程序如何与后台进行通信的, ...
- 微信小程序与Java后台的通信
一.写在前面 最近接触了小程序的开发,后端选择Java,因为小程序的代码运行在腾讯的服务器上,而我们自己编写的Java代码运行在我们自己部署的服务器上,所以一开始不是很明白小程序如何与后台进行通信的, ...
- 微信小程序:java后台获取openId
一.功能描述 openId是某个微信账户对应某个小程序或者公众号的唯一标识,但openId必须经过后台解密才能获取(之前实现过前台解密,可是由于微信小程序的种种限制,前台解密无法在小程序发布后使用) ...
- 微信小程序与java后台交互
java后台使用的ssm框架,小程序连接的本地接口.跟正常的web访问没什么区别,也是后台获取url,返回json数据:只是小程序前台请求的url要带上http://localhost:80801. ...
- 【原创】微信小程序支付java后台案例(公众号支付同适用)(签名错误问题)
前言 1.微信小程序支付官方接口文档:[点击查看微信开放平台api开发文档]2.遇到的坑:预支付统一下单签名结果返回[签名错误]失败,建议用官方[签名验证工具]检查签名是否存在问题.3.遇到的坑:签名 ...
- 基于Shiro,JWT实现微信小程序登录完整例子
小程序官方流程图如下,官方地址 : https://developers.weixin.qq.com/miniprogram/dev/framework/open-ability/login.html ...
- 微信小程序登录,获取code,获取openid,获取session_key
微信小程序登录 wx.login(Object object) 调用接口获取登录凭证(code).通过凭证进而换取用户登录态信息,包括用户的唯一标识(openid)及本次登录的会话密钥(session ...
- Taro -- 微信小程序登录
Taro微信小程序登录 1.调用Taro.login()获取登录凭证code: 2.调用Taro.request()将code传到服务器: 3.服务器端调用微信登录校验接口(appid+appsecr ...
- Spring Security 整合 微信小程序登录的思路探讨
1. 前言 原本打算把Spring Security中OAuth 2.0的机制讲完后,用小程序登录来实战一下,发现小程序登录流程和Spring Security中OAuth 2.0登录的流程有点不一样 ...
随机推荐
- int与Integer区别+Integer类详解
//Integer范围-128~127 //Integer与Integer比较 Integer a_127 = 127; Integer b_127 = 127; Integer c_new_127 ...
- C++笔试题目大全(笔试宝典)(不断完善中)
1.new . delete . malloc . free 关系 delete 会调用对象的析构函数 , 和 new 对应 free 只会释放内存, new 调用构造函数. malloc 与 fre ...
- BCB中选择文件对话框TOpenDialog过滤后缀名使用方法
BCB中使用TOpenDialog选择对话框时,直接OpenDialog->Execute()弹出的对话框是显示所有文件的,如果我们希望过滤指定的文件后缀名就需要在Execute()前做一些初始 ...
- HDU5469 Antonidas(树分治&&哈希)
给你一颗点上有字符的树,问一个给定的字符串是否是这棵树上的两点的路径. 树分治的思想就是每次找重心,重心下的子问题分解去做,然后就是合并了.合并的时候用一个总的set<pair<len,h ...
- 基于SpringMVC的上传文件实现
基于SpringMVC的上传文件实现 1.项目源码 源码地址:upload 2.关键代码 @RequestMapping("/upload2") public void datal ...
- 51nod 1087 1 10 100 1000【打表】
题目来源: Ural 1209 基准时间限制:1 秒 空间限制:131072 KB 分值: 5 难度:1级算法题 收藏 关注 1,10,100,1000...组成序列1101001000...,求 ...
- Buffer源码深入分析
博客园对MarkDown显示的层次感不是很好,大家可以看这里:Buffeer. 本机环境: Linux 4.4.0-21-generic #37-Ubuntu SMP Mon Apr 18 18:33 ...
- Codeforces 1010D Mars rover
题目大意:对于一个不完全二分图,根节点为1,叶节点值为0或1,非叶节点包含一个操作(and,or,xor,not),求改变各个叶节点的值时(即0改为1,1改为0),根节点的值是多少 解法:遍历图求各节 ...
- 洛谷——2639[USACO09OCT]Bessie的体重问题Bessie's We…——01
题目描述 Bessie像她的诸多姊妹一样,因为从Farmer John的草地吃了太多美味的草而长出了太多的赘肉.所以FJ将她置于一个及其严格的节食计划之中.她每天不能吃多过H (5 <= H & ...
- my-git-wiki-doing
github项目quick setup git初始化 git init git添加remote git remote add origin YOURS_REMOTE_URL git修改remote的u ...