Linux编译安装与配置-MySQL(5.5,5.6)版本系(笔记)
MySQL 5.5(5.6)后版本,需要使用cmake(Cross make , https://cmake.org/ )编译
我的环境如下:
VMWare虚拟机,CentOS 5.5 x86_64(内核:2.6.18-194.el5),SecureCRT客户端
第一步:安装开发环境
[root@ocean ~]# yum groupinstall "Development Libraries" -y
第二步:准备cmake源码包/MySQL源码包
[root@ocean ~]# mkdir /app/soft -p
[root@ocean ~]# cd /app/soft
[root@ocean soft]# rz
[root@ocean soft]# ls
cmake-3.3.2.tar.gz mysql-5.6.26.tar.gz
现在看到的 cmake-3.3.2.tar.gz 是 cmake 源码压缩包,可以在 https://cmake.org/download 下载到。
mysql-5.6.26.tar.gz 下载地址为:http://dev.mysql.com/get/Downloads/MySQL-5.6/mysql-5.6.26.tar.gz
个人建议cmake,下载2.8版本的,地址:http://www.cmake.org/files/v2.8/cmake-2.8.10.2.tar.gz
解压源码包
[root@ocean soft]# tar xf cmake-3.3.2.tar.gz
[root@ocean soft]# ls
cmake-3.3.2.tar.gz mysql-5.6.26.tar.gz
cmake-3.3.2 mysql-5.6.26
第三步:编译并安装cmake
[root@ocean soft]# cd cmake-3.3.2
[root@ocean cmake-3.3.2]# ls
Auxiliary CMakeLogo.gif CTestConfig.cmake Modules
bootstrap cmake_uninstall.cmake.in CTestCustom.cmake.in README.rst
CMakeCPack.cmake CompileFlags.cmake DartConfig.cmake Source
CMakeCPackOptions.cmake.in configure doxygen.config Templates
CMakeGraphVizOptions.cmake CONTRIBUTING.rst Help Tests
CMakeLists.txt Copyright.txt Licenses Utilities
[root@ocean cmake-3.3.2]#
[root@ocean cmake-3.3.2]# ./configure
当然除了使用源码编译安装外,还可以 yum install cmake -y 方式进行安装。
这一步,我折腾了很久。最后实在没办法,卸载3.3版本的cmake,重新安装2.8版本,终于各种奇葩的问题就没了、
第四步:创建MySQL数据库目录
我新加了一个SISC接口的磁盘来作为mysql的数据盘用的、
[root@ocean ~]# fdisk /dev/sdb
The number of cylinders for this disk is set to 2610.
There is nothing wrong with that, but this is larger than 1024,
and could in certain setups cause problems with:
1) software that runs at boot time (e.g., old versions of LILO)
2) booting and partitioning software from other OSs
(e.g., DOS FDISK, OS/2 FDISK)
Command (m for help): n
Command action
e extended
p primary partition (1-4)
p
Partition number (1-4): 2
First cylinder (1826-2610, default 1826):
Using default value 1826
Last cylinder or +size or +sizeM or +sizeK (1826-2610, default 2610): +20G
Command (m for help): w
[root@ocean ~]# mke2fs -j /dev/sdb2
[root@ocean ~]# mkdir /mydata/ # 创建sdb2的挂在目录
[root@ocean ~]# vim /etc/fstab # 磁盘自动挂载
/dev/VolGroup00/LogVol00 / ext3 defaults 1 1
LABEL=/boot /boot ext3 defaults 1 2
tmpfs /dev/shm tmpfs defaults 0 0
devpts /dev/pts devpts gid=5,mode=620 0 0
sysfs /sys sysfs defaults 0 0
proc /proc proc defaults 0 0
/dev/VolGroup00/LogVol01 swap swap defaults 0 0
/dev/sdb2 /mydata ext3 defaults 0 0
[root@ocean ~]# mount -a
[root@ocean ~]# mkdir /mydata/data -p
小提示:在SecureCRT在fdisk命令如果输错参数,退格无法删除输入字符,请使用ctrl+退格
第五步:创建MySQL用户,组,属组授权
[root@ocean soft]# groupadd -r mysql
[root@ocean soft]# useradd -r -g mysql -s /sbin/nologin mysql
[root@ocean soft]# chown -R mysql.mysql /mydata/data
第六步:编译MySQL(cmake . -LH , make && make install)
[root@ocean soft]# cmake . -LH
[root@ocean soft]# cmake . -DDATA_DIR=/mydata/data # 设置mysql数据库存放目录为第四步创建的目录,有其它参数可以在这里设置
关于cmake,可以参考下这里:http://www.ttlsa.com/mysql/configure-to-cmake/
[root@ocean soft]# make && make install
第七步:配置MySQL(mysql安装目录属组/MySQL初始化脚本)
[root@ocean soft]# cd /usr/local/mysql
[root@ocean mysql]# chown -R :mysql /usr/local/mysql # 将mysql安装目录的属组设置为mysql
[root@ocean mysql]# scripts/mysql_install_db --user=mysql --datadir=/mydata/data
Installing MySQL system tables...
OK
...........其它信息忽略了...............
第八步:配置MySQL(编辑配置文件,mysqld服务开机自启)
[root@ocean mysql]# cp support-files/my-default.cnf /etc/my.cnf
[root@ocean mysql]# cp support-files/mysql.server /etc/init.d/mysqld
[root@ocean mysql]# chkconfig --add mysqld # 添加到开机自启服务列表
[root@ocean mysql]# chkconfig --list mysqld
mysqld 0:off 1:off 2:on 3:on 4:on 5:on 6:off
[root@ocean mysql]# service mysqld start
Starting MySQL.... [OK] # 不容易啊,安装完成了,o(∩_∩)o ~~
第九步:登录MySQL
[root@ocean mysql]# ls
bin data include lib my.cnf README share support-files
COPYING docs INSTALL-BINARY man mysql-test scripts sql-bench
[root@ocean mysql]# mysql # 我已经把 /usr/local/mysql/bin 加入了PATH,但输入 mysql 登录时候得到下面的错误
mysql: error while loading shared libraries: libmysqlclient.so.15: cannot open shared object file: No such file or directory
[root@ocean mysql]# bin/mysql # 换种方式,直接用 bin/mysql ,注意哦。全路径其实是 /usr/local/mysql/bin/mysql
Welcome to the MySQL monitor. Commands end with ; or \g.
Your MySQL connection id is 8
Server version: 5.6.26 Source distribution
Copyright (c) 2000, 2015, Oracle and/or its affiliates. All rights reserved.
Oracle is a registered trademark of Oracle Corporation and/or its
affiliates. Other names may be trademarks of their respective
owners.
Type 'help;' or '\h' for help. Type '\c' to clear the current input statement.
mysql>
mysql> show databases;
+--------------------+
| Database |
+--------------------+
| information_schema |
| mysql |
| performance_schema |
| test |
+--------------------+
4 rows in set (0.00 sec)
第十步:简单的安全设置(删除匿名用户,修改密码)
mysql> drop user ''@localhost; // localhost 为主机名。或者可以直接修改修改掉所有用户的密码
mysql> update mysql.user set password=password('123@456') where user='root'; // 修改密码
mysql> flush privileges; // 刷新、重新加载权限
mysql> quit;
Bye
[root@oceanmysql]# bin/mysql
ERROR 1045 (28000): Access denied for user 'root'@'localhost' (using password: NO)
[root@oceanmysql]# bin/mysql -u root -p
Enter password:
Welcome to the MySQL monitor. Commands end with ; or \g.
Your MySQL connection id is 11
Server version: 5.6.26 Source distribution
Copyright (c) 2000, 2015, Oracle and/or its affiliates. All rights reserved.
Oracle is a registered trademark of Oracle Corporation and/or its
affiliates. Other names may be trademarks of their respective
owners.
Type 'help;' or '\h' for help. Type '\c' to clear the current input statement.
mysql>
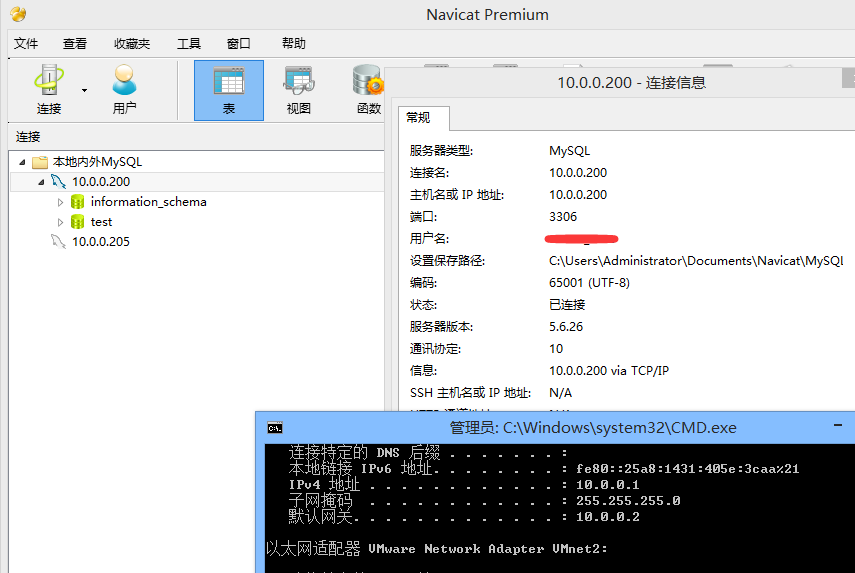
新加一个允许【客户端IP地址为:10.0.0.1;用户名:ocean;密码:123456的mysql用户】
mysql> insert into mysql.user(
mysql> host,user,password,ssl_cipher,x509_issuer,x509_subject )
mysql> values('10.0.0.1','ocean',password('123456'),'','','') ;
参数资料:http://blog.chinaunix.net/uid-20577907-id-3082601.html
注意了哦(ssl_cipher,x509_issuer,x509_subject,这三个字段。我在写入mysql.user表时候提示没有默认值,才加了这三个字段,一般只需要host,user,password 就可以了、)
来一张10.0.0.1客户端通过Navicat连接到数据的截图。
第十一步:本地不输入密码连接到MySQL(在用户家目录下,编辑一个 .my.cnf)
[root@ocean ~]# vi .my.cnf
[client]
user=root
host=localhost
password=123@456
[root@hevin ~]# /usr/local/mysql/bin/mysql
Welcome to the MySQL monitor. Commands end with ; or \g.
Your MySQL connection id is 17
Server version: 5.6.26 Source distribution
Copyright (c) 2000, 2015, Oracle and/or its affiliates. All rights reserved.
Oracle is a registered trademark of Oracle Corporation and/or its
affiliates. Other names may be trademarks of their respective
owners.
Type 'help;' or '\h' for help. Type '\c' to clear the current input statement.
mysql>
-----------------------------------------------------------------------------------------------------
啊哈,笔记终于完成了咯。
温馨提示、再提供了一个对 剪贴板图片轻松保存的 小工具。有兴趣的园友试试看。
轻松保存您剪贴板中的截图到任意目录。【支持ctrl+v快捷】,不妨看看,或许你用到了呢?~
http://www.cnblogs.com/oceanho/p/4714204.html
Linux编译安装与配置-MySQL(5.5,5.6)版本系(笔记)的更多相关文章
- CentOS6.7下使用非root用户(普通用户)编译安装与配置mysql数据库并使用shell脚本定时任务方式实现mysql数据库服务随机自动启动
CentOS6.7下使用非root用户(普通用户)编译安装与配置mysql数据库并使用shell脚本定时任务方式实现mysql数据库服务随机自动启动1.关于mysql?MySQL是一个关系型数据库管理 ...
- 在linux下安装并配置mysql数据库
在linux下安装并配置mysql数据库 工具/原料 MySql5.6 CentOS 方法/步骤 1 查找以前是否安装有mysql,使用下面命令: rpm -qa|grep -i mysql ...
- 【MySQL】源码编译安装和配置MySql 5.5.32(单实例)
[需求描述] 在CentOS环境中,通过编译源码的方式,安装并且配置“单实例”的MySQL5.5.32数据库. MySQL的安装目录为:/application/mysql-5.5.32 MySQL数 ...
- linux编译安装php apache mysql (已试过)
阅读目录 (全部使用源码安装方式,先安装mysql,然后是apache,再是php,这样好像能防止挺多问题的,期间出现问题基本是依赖没有或者版本不对) 1.简介 2.安装apache 2.1.yum方 ...
- 记录下在阿里云linux上安装与配置Mysql
环境:阿里云ECS服务器,系统为centos7.2 用户:root 参考博客:https://blog.csdn.net/kunzai6/article/details/81938613 师兄的哈哈哈 ...
- Linux下面安装和配置MySQL
如何从MySQL官方Yum仓库安装MySQL5.6 首先我们需要从MySQL开发者网站下载Yum仓库文件 Download MySQL Yum Repository 从上面的连接地址下载:Red Ha ...
- 【linux】安装和配置 mysql服务器
按照官网教程,根据自己的系统安装不同的发行版 https://dev.mysql.com/doc/refman/5.6/en/linux-installation-yum-repo.html 配置: ...
- 【转】linux 编译安装nginx,配置自启动脚本
linux 编译安装nginx,配置自启动脚本 本文章来给各位同学介绍一篇关于linux 编译安装nginx,配置自启动脚本教程,希望有需要了解的朋友可一起来学习学习哦. 在公司的suse服务器装ng ...
- linux 编译安装nginx,配置自启动脚本
本文章来给各位同学介绍一篇关于linux 编译安装nginx,配置自启动脚本教程,希望有需要了解的朋友可一起来学习学习哦. 在公司的suse服务器装nginx,记录下安装过程: 参照这篇文章:Linu ...
随机推荐
- 目的檔格式 (ELF)
http://ccckmit.wikidot.com/lk:elf 目的檔ELF 格式(Executable and Linking Format) 是 UNIX/Linux 系統中較先進的目的檔格式 ...
- iOS逆向命令集
越狱命令行 破壳: 10.10.215.119 ssh root@10.10.215.119 ssh root@10.10.213.176 CCBMobileBank Fuqianlade-iPhon ...
- 种类并查集,TOJ(1706)
题目链接:http://acm.tju.edu.cn/toj/showp1706.html 很类似Poj的一道帮派的问题,记得找到的可疑的关系,不要将集合刷新就可以了. 1706. A Bug's ...
- flex布局-常用布局
在使用flex布局,老是需要去查资料,很多常用的,知道大概,可还是需要去过一遍,这里记录一下几个常用的flex布局 一个div,内容垂直居中 html <div className='topHe ...
- 7 MSSQL数据库备份与恢复
0 MSSQL数据库备份 1 SQLAgent配置 2 设置连接属性 3 输入SA账号密码 4 SQL备份脚本配置 5 生成SQL全量备份脚本 6 生成SQL差异备份脚本 7 修改SQL差异备份脚本 ...
- 【转】在程序中设置android:gravity 和 android:layout_Gravity属性
在进行UI布局的时候,可能经常会用到 android:gravity 和 android:layout_Gravity 这两个属性. 关于这两个属性的区别,网上已经有很多人进行了说明,这边再简单说一 ...
- 今天 小小收获, 看了 sam Xiao 的好帖子 明白了 泛型委托 的 意思。
Func<int,int,int> cAdd1 = (int x, int y) => { return x + y; }; int result= aAdd1(1,2); cons ...
- C#语言概述
C#语言概述 一..NET Framework .NET Framework是Windows的一个不可或缺的组件,它包括公共语言运行库(CLR)和类库两部分. CLR是Microsoft的公共语言基础 ...
- Ecliplse 重命名后web.xml 报错Attribute "xmlns" was already specified for element "web-app".
报错信息:Attribute "xmlns" was already specified for element "web-app" 由于项目的重命名,出现 ...
- caffe的损失函数
损失函数,一般由两项组成,一项是loss term,另外一项是regularization term. J=L+R 先说损失项loss,再说regularization项. 1. 分对得分1,分错得分 ...