iOS scrollView中嵌套多个tableView处理方案
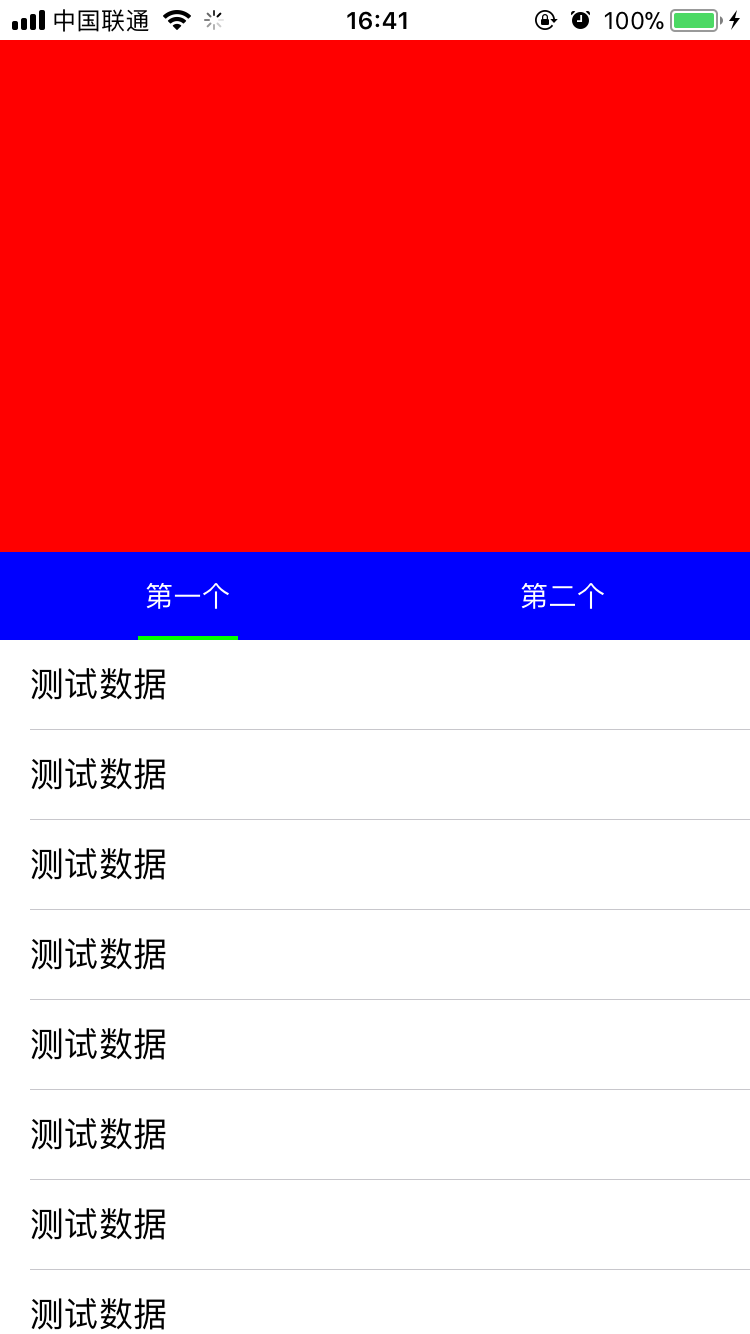

项目中经常会有这样的需求,scrollView有个头部,当scrollView滚动的时候头部也跟着滚动,同时头部还有一个tab会锁定在某个位置,scrollView中可以放很多不同的view,这些view可以在scrollView中横向滚动,要实现这样的需求,按理说如果头部是固定不动的,那么在scrollView嵌套多层view,同时控制这些view的在scrollView中的位置,是很好实现的,这里的难点在scrollView的头部也是可以滚动的。
解决以上问题有2中方法可以考虑
方法1:
不用scrollView,直接用一个tableView,头部作为tableView的tableHeaderView。当头部的tab被点击了,切换tableView的数据源,通过一个index来标识当前选中了那个tab,然后让tableView去刷新指定的数据源。如果你用这种方法好处是很快就可以实现功能,我想遇到这样的需求,大部分人都是采用的这种方案吧。缺点了也是很明显,所有tab公用一个tableView,就会导致tableView中的业务相当复杂,tableView中的代码会非常多,并且可拓展性也不强。
方法2:
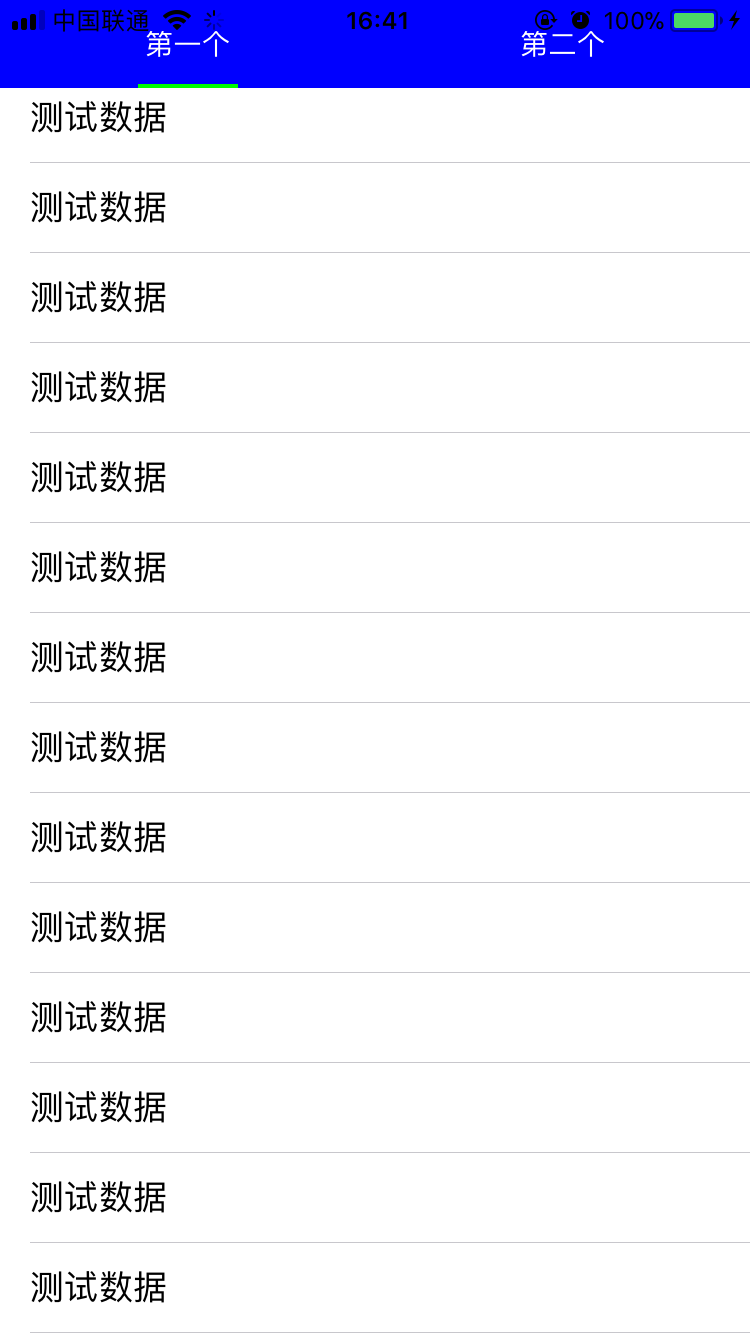
用scrollView,让scrollView覆盖其父视图的整个界面,然后创建多个view作为scrollView的子视图,这里的view不限定是tableView,collectionView也是可以的,把创建的n个View依次添加到scrollView中,注意这些view的x轴,同时设置scrollview的contentsize,我们再创建一个headerView,作为scrollView的头部。同时通过addSubview的方式把headerView添加到scrollView中,注意要保证headerView要在最上层,防止其被遮住。每个tableView在被创建的时候提供一个setHeader的方法,并且传入这个创建headerView,在setheader方法中,我们拿到headerView的真实宽高,并为该tableView添加一个相同高度的tableHeaderView,其实大概意思就是为所有tableView都添加一个和scrollView的headview大小相同的tableViewHeaderView,由于我们的scrollView的header浮在最上层,刚好完美的遮住这些tableView的tableHeaderView,当我们tableView上下滑动的时候控制headerView和tableView的tableHeaderView同步滑动就可以了,当我们需要横向滑动的时候,监听scrollView的contentoffset,让headrView的x轴跟随scrollView滑动,这样联动就算完成了。剩下的就是处理点击事件,处理滑动事件的问题了。说了这么多,估计都有点糊涂了把,还是直接上代码把,这里把部分核心代码帖处理,并且在文章结束的时候送上测试demo
#import "ViewController.h"

#import "UIView+XYView.h"

#import "TYTableView1.h"

#import "TableView2.h"

#import "TYHeaderView.h"

#define kHeadHeight    300

@interface ViewController ()<UIScrollViewDelegate,headerViewDelegate>

@property (nonatomic, strong) UIScrollView *scrollView;

@property (nonatomic, strong) TYHeaderView *headerView;

@property (nonatomic, strong) TYTableView1 *tableView1;

@property (nonatomic, strong) TableView2 *tableView2;

@property (nonatomic, assign) CGPoint lastContentOffset;

@end

@implementation ViewController

- (void)viewDidLoad {

    [super viewDidLoad];

    // Do any additional setup after loading the view, typically from a nib.

    [self setupUI];

}

-(TYHeaderView *)headerView{

    if (!_headerView) {

        _headerView = [[TYHeaderView alloc] initWithFrame:CGRectMake(0, 0, SCREEN_WIDTH, kHeadHeight)];

        _headerView.backgroundColor = [UIColor redColor];

        _headerView.delegate = self;

    }

    return _headerView;

}

-(UIScrollView *)scrollView{

    if (!_scrollView) {

        _scrollView = [[UIScrollView alloc] initWithFrame:CGRectMake(0, 0, SCREEN_WIDTH, SCREEN_HEIGHT)];

        _scrollView.delegate = self;

        _scrollView.pagingEnabled = YES;

        _scrollView.showsVerticalScrollIndicator = NO;

        _scrollView.showsHorizontalScrollIndicator = NO;

        _scrollView.contentSize = CGSizeMake(SCREEN_WIDTH *2, 0);

    }

    return _scrollView;

}

-(UITableView *)tableView1{

    if (!_tableView1) {

        _tableView1 = [[TYTableView1 alloc] initWithFrame:CGRectMake(0, 0,SCREEN_WIDTH, self.scrollView.height)];

        _tableView1.showsHorizontalScrollIndicator = NO;

        _tableView1.showsVerticalScrollIndicator = NO;

        _tableView1.headerView = self.headerView;

    }

    return _tableView1;

}

-(UITableView *)tableView2{

    if (!_tableView2) {

        _tableView2 = [[TableView2 alloc] initWithFrame:CGRectMake(SCREEN_WIDTH, 0,SCREEN_WIDTH, self.scrollView.height)];

        _tableView2.showsHorizontalScrollIndicator = NO;

        _tableView2.showsVerticalScrollIndicator = NO;

        _tableView2.headerView = self.headerView;

    }

    return _tableView2;

}

-(void)setupUI{

    [self.view addSubview:self.scrollView];

    [self.scrollView addSubview:self.tableView1];

    [self.scrollView addSubview:self.tableView2];

    [self.scrollView addSubview:self.headerView];

}

#pragma mark - ScrollViewDelegate

-(void)scrollViewDidScroll:(UIScrollView *)scrollView{

    if (scrollView == self.scrollView) {

        self.headerView.x = scrollView.contentOffset.x;

        int index = 0;

        if (self.lastContentOffset.x < scrollView.contentOffset.x) {

            //往右滑动,向上取整

            index = ceil((scrollView.contentOffset.x/SCREEN_WIDTH));

        }else if (self.lastContentOffset.x > scrollView.contentOffset.x)

        {

            //往左滑动,向下取整

            index = floor((scrollView.contentOffset.x/SCREEN_WIDTH));

        }else

        {

            //没动

            index = (scrollView.contentOffset.x/SCREEN_WIDTH);

        }

        CGFloat mobileDistance = (0-self.headerView.y);

        switch (index) {

            case 0:{

                //修改circleTableView

                if (self.tableView1.contentOffset.y<mobileDistance) {

                    [self.tableView1 setContentOffset:CGPointMake(0, mobileDistance) animated:NO];

                }

            }

                break;

            case 1:{

                //修改photoView

                if (self.tableView2.contentOffset.y<mobileDistance) {

                    [self.tableView2 setContentOffset:CGPointMake(0, mobileDistance) animated:NO];

                }

            }

                break;

            default:

                break;

        }

        self.lastContentOffset = scrollView.contentOffset;

    }

}

-(void)scrollViewDidEndDecelerating:(UIScrollView *)scrollView{

    static int lastIndex = 0;

    int index = 0;

    if (self.lastContentOffset.x < scrollView.contentOffset.x) {

        //往右滑动,向上取整

        index = ceil((scrollView.contentOffset.x/SCREEN_WIDTH));

    }else if (self.lastContentOffset.x > scrollView.contentOffset.x)

    {

        //往左滑动,向下取整

        index = floor((scrollView.contentOffset.x/SCREEN_WIDTH));

    }else

    {

        //没动

        index = (scrollView.contentOffset.x/SCREEN_WIDTH);

    }

//    if (lastIndex != index) {  //让headerView重新设置选中的item

        self.headerView.selectIndex = index;

//    }

    lastIndex = index;

}

#pragma mark - headerViewDelegate

-(void)headerView:(TYHeaderView *)headerView SelectionIndex:(NSInteger)index{

    //让scrollView滚动到指定位置

    [self.scrollView setContentOffset:CGPointMake(self.scrollView.width*index, 0) animated:YES];

}
上面这段代码主要就怎么给scrollView添加子视图 如果设置子视图的位置和headerView的位置
#import "TYTableView1.h"

@interface TYTableView1 ()<UITableViewDelegate,UITableViewDataSource>

@property (nonatomic, assign) CGPoint lastContentOffset;

@end

@implementation TYTableView1

-(void)setHeaderView:(TYHeaderView *)headerView{

    _headerView = headerView;

    self.dataSource = self;

    self.delegate = self;

    self.scrollIndicatorInsets = UIEdgeInsetsMake(headerView.height, 0, 0, 0);

    UIView *tableHeaderView = [[UIView alloc] initWithFrame:CGRectMake(0, 0, SCREEN_WIDTH, self.headerView.height)];

    self.tableHeaderView = tableHeaderView;

    [self reloadData];

}

#pragma mark - ScrollViewDelegate

-(void)scrollViewDidScroll:(UIScrollView *)scrollView{

    CGFloat placeHolderHeight = self.headerView.height - 44;

    CGFloat offsetY = scrollView.contentOffset.y;

    if (offsetY >= 0 && offsetY <= placeHolderHeight) {

        if (offsetY > self.lastContentOffset.y) {

            //往上滑动

            if (offsetY>(-self.headerView.y)) {

                self.headerView.y = -offsetY;

            }

        }else

        {

            //往下滑动

            if (offsetY<(-self.headerView.y)) {

                self.headerView.y = -offsetY;

            }

        }

    }

    else if (offsetY > placeHolderHeight) {

        if (self.headerView.y != (-placeHolderHeight)) {

            if (offsetY > self.lastContentOffset.y) {

                //往上滑动

                self.headerView.y = self.headerView.y - (scrollView.contentOffset.y-self.lastContentOffset.y);

            }

            if (self.headerView.y < (-placeHolderHeight)) {

                self.headerView.y = -placeHolderHeight;

            }

            if (self.headerView.y>=0) {

                self.headerView.y = 0;

            }

        }

    }

    else if (offsetY <0) {

        self.headerView.y =  - offsetY;

    }

//    if (offsetY>50) {

//        self.headerView.navView.transparency = 1;

//    }else

//    {

//        self.headerView.navView.transparency = 0;

//    }

    self.lastContentOffset = scrollView.contentOffset;

}

#pragma mark - UITableViewDelegate && UITableViewDataSource

-(NSInteger)numberOfSectionsInTableView:(UITableView *)tableView{

    return 1;

}

-(NSInteger)tableView:(UITableView *)tableView numberOfRowsInSection:(NSInteger)section{

    return 20;

}

-(UITableViewCell *)tableView:(UITableView *)tableView cellForRowAtIndexPath:(NSIndexPath *)indexPath{

    UITableViewCell *cell = [tableView dequeueReusableCellWithIdentifier:@"cell"];

    if (cell == nil) {

        cell = [[UITableViewCell alloc] initWithStyle:UITableViewCellStyleDefault reuseIdentifier:@"cell"];

    }

    cell.textLabel.text = @"测试数据";

    return cell;

}
这一段主要是目的就是如果setHederView,并且设置一个同header同样宽高的tableViewHeaderView,并且监听tableView的滚动,保证headerView的滚动和tableHeaderView同步,第一个tableView的设置是这样的,第二个,第三个tableView的设置也是一样的,这里就不在多说了,这里还有一个注意点,就是当header滚动要一定程度了之后需要控制headerView的最大滚动区域,这样才可以保障tab始终悬浮在tableView的最顶部。
整体的实现思路和相关代码都已经贴出来,多的我也就不废话了,
demo的下载地址 https://github.com/qqcc1388/xmDemo
转载请标注来源 http://www.cnblogs.com/qqcc1388/p/8662375.html
iOS scrollView中嵌套多个tableView处理方案的更多相关文章
- iOS scrollView中嵌套多个tabeleView处理方案
项目中经常会有这样的需求,scrollView有个头部,当scrollView滚动的时候头部也跟着滚动,同时头部还有一个tab会锁定在某个位置,scrollView中可以放很多不同的view,这些vi ...
- scrollview 中嵌套多个listview的最好解决办法
在scrollview中嵌套多个listview的显示问题. 只需要调用如下的方法传入listview和adapter数据即可. /** * 动态设置ListView组建的高度 */ public s ...
- ScrollView中嵌套ListView显示
想要ScrollView中嵌套显示ListView 需要自定义ListView 并重写onMeasure方法 重新计算 heightMeasureSpec的高度 int newHeight = Me ...
- Android 如何在ScrollView中嵌套ListView
前几天因为项目的需要,要在一个ListView中放入另一个ListView,也即在一个ListView的每个ListItem中放入另外一个ListView.但刚开始的时候,会发现放入的小ListVie ...
- 解决ScrollView中嵌套ListView滚动效果冲突问题
在ScrollView中嵌套使用ListView,ListView只会显示一行到两行的数据.起初我以为是样式的问题,一直在对XML文件的样 式进行尝试性设置,但始终得不到想要的效果.后来在网上查了查, ...
- Android实战技巧:如何在ScrollView中嵌套ListView
前几天因为项目的需要,要在一个ListView中放入另一个ListView,也即在一个ListView的每个ListItem中放入另外一个ListView.但刚开始的时候,会发现放入的小ListVie ...
- Android -- 在ScrollView中嵌套ListView
在做一个工程,这个工程的布局可以相当的复杂,最外面是ScrollView,在ScrollView里面有两个Listview,这下好了,布局出来了,放在机子上跑,卡得想死有木有,信息乱跑乱出现,表示非常 ...
- ScrollView中嵌套ListView的问题
网上关于怎样在ScrollView中嵌套ListView的讨论有很多,我大概是搜索了一下,简单总结如下: 1.不要在ScrollView中嵌套ListView a.用一个LinearLayout来代替 ...
- 解决scrollView中嵌套编辑框导致不能上下滑动的问题
EditText设置maxLines之后,文本行数超过maxLines,会网上折叠,上下滑动能够浏览全部文本. 若EditText外层有scrollView.在EditText上下滑动,不会像正常情况 ...
随机推荐
- SpringCloud集群(三)
一.构造步骤 1.进行其他的服务中心的域名映射 127.0.0.1 eureka7001.com 127.0.0.1 eureka7002.com 127.0.0.1 eureka7003.com 2 ...
- AppScan入门工作原理详解
AppScan,即 AppScan standard edition.其安装在 Windows 操作系统上,可以对网站等 Web 应用进行自动化的应用安全扫描和测试. Rational AppScan ...
- 三. Java类与对象9. 源文件的声明规则
当在一个源文件中定义多个类,并且还有import语句和package语句时,要特别注意这些规则: 一个源文件中只能有一个public类. 一个源文件可以有多个非public类. 源文件的名称应该和pu ...
- Android笔试总结
1.请谈一下Android系统的架构.答:Android系统采用了分层架构,从高层到低层分别是应用程序层.应用程序框架层.系统运行库层和linux核心层. 2.谈谈android大众常用的五种布局.答 ...
- 怎对于Foreach 不能添加IF的问题
我不们直接在Foreach 里面直接添加IF,这样会报错,这个前提是子视图,其他的我没有试验过.像这样: @foreach (Gift.Modules.Model.Entitys.XT_CZ item ...
- 如何评价 GitHub 发布的文本编辑器 Atom?
这里是HN上的讨论:GitHub's new text editor leaked on Twitter这里是github page:Atom · GitHub 好多repo啊我不知道有没有知友了解更 ...
- 机器学习第3课:线性代数回顾(Linear Algebra Review)
3.1 矩阵和向量 如图:这个是 4×2 矩阵,即 4 行 2 列,如 m 为行,n 为列,那么 m×n 即 4×2 矩阵的维数即行数×列数 矩阵元素(矩阵项): Aij 指第 i 行,第 j 列的 ...
- Java高级特性—反射和动态代理
1).反射 通过反射的方式可以获取class对象中的属性.方法.构造函数等,一下是实例: 2).动态代理 使用场景: 在之前的代码调用阶段,我们用action调用service的方法实现业务即可. 由 ...
- [Angular] ngPlural
The usecase is very simple: <div [ngPlural]="items.length"> <ng-template ngPlural ...
- rpc接口mock平台
转载:http://blog.csdn.net/ronghuanye/article/details/71124320 1.简介 平台采用struts.spring.mybatis框架开发设计,主要用 ...