
OpenLayers结合Turf实现空间运算
1. 引言
空间运算利用几何函数来接收输入的空间数据,对其进行分析,然后生成输出数据,输出数据为针对输入数据执行分析的派生结果。
可从空间运算中获得的派生数据包括:
- 作为输入要素周围缓冲区的面
- 作为对几何集合执行分析的结果的单个要素
- 作为比较结果以确定不与其他要素位于同一物理空间的要素部分的单个要素
- 作为比较结果以查找与其他要素的物理空间相交的要素部分的单个要素
- 由彼此不位于同一物理空间的输入要素部分组成的多部分 (multipart) 要素
- 作为两个几何的并集的要素
参考文档:空间运算—ArcMap | 文档 (arcgis.com)
Turf.js是MapBox公司研发的基于浏览器端的空间分析库,它使用JavaScript进行编写,通过npm进行包管理。值得一提的是,良好的模块化设计使其不仅能够作用于浏览器端、还可通过Node.js在服务端使用。Turf 原生支持 GeoJSON 矢量数据。GeoJSON 的优点是结构简单,并且得到了所有网页地图API的支持;但 GeoJSON 不支持空间索引,这个缺点可能会限制 Turf 处理大型文件的能力效率。其适用于轻量级(数据轻量而非功能轻量)的WebGIS应用
参考文献:Turf.js—让你在浏览器上实现地理分析 - 掘金 (juejin.cn)
turf.js官网:Turf.js | Advanced Geospatial Analysis (turfjs.org)
中文站点:Turf.js中文网 (fenxianglu.cn)
Turf.js Github地址:Turfjs/turf: A modular geospatial engine written in JavaScript (github.com)
空间运算可谓是空间分析的基础,Turf.js提供了大量的空间分析功能,包含了空间运算功能,本文参考OpenLayers与Turf集成的官方示例,使用示例数据和原生JavaScript,进行求交运算与缓冲区运算,并进行可视化
OpenLayers与Turf集成示例:turf.js (openlayers.org)
2.初始化地图
引入OpenLayers和Turf.js的CDN:
<link rel="stylesheet"  href="https://cdn.jsdelivr.net/gh/openlayers/openlayers.github.io@master/en/v6.14.1/css/ol.css"  type="text/css">

<script src="https://cdn.jsdelivr.net/gh/openlayers/openlayers.github.io@master/en/v6.14.1/build/ol.js"></script>

<script src='https://unpkg.com/@turf/turf@6/turf.min.js'></script>
注意:
- OpenLayers与Turf集成示例使用的Turf版本是2.0.0,版本偏老,与目前版本(6.5.0)部分API不兼容,不建议使用
构建网页基本内容,添加地图容器:
<!DOCTYPE html>

<html lang="en">

<head>

    <meta charset="UTF-8">

    <meta http-equiv="X-UA-Compatible" content="IE=edge">

    <meta name="viewport" content="width=device-width, initial-scale=1.0">

    <title>Document</title>

    <link rel="stylesheet"

        href="https://cdn.jsdelivr.net/gh/openlayers/openlayers.github.io@master/en/v6.14.1/css/ol.css" type="text/css">

    <script src="https://cdn.jsdelivr.net/gh/openlayers/openlayers.github.io@master/en/v6.14.1/build/ol.js"></script>

    <script src='https://unpkg.com/@turf/turf@6/turf.min.js'></script>

    <style>

        html,

        body,

        #map {

            height: 100%;

        }

    </style>

</head>

<body>

    <div id="map"></div>

</body>

</html>
添加地图并加载示例矢量数据:
<script>

    fetch('https://openlayers.org/en/latest/examples/data/geojson/roads-seoul.geojson')

        .then(response => response.json())

        .then(function (json){

        var vectorSource = new ol.source.Vector({

            features: (new ol.format.GeoJSON()).readFeatures(json, {

                featureProjection: 'EPSG:3857'

            })

        });

        var vectorLayer = new ol.layer.Vector({

            source: vectorSource

        });

        var map = new ol.Map({

            layers: [

                new ol.layer.Tile({

                    source: new ol.source.OSM()

                }),

                vectorLayer

            ],

            target: 'map',

            view: new ol.View({

                center: ol.proj.fromLonLat([126.980366, 37.52654]),

                zoom: 15

            })

        });

    })

</script>
完整代码如下:
<!DOCTYPE html>

<html lang="en">

<head>

    <meta charset="UTF-8">

    <meta http-equiv="X-UA-Compatible" content="IE=edge">

    <meta name="viewport" content="width=device-width, initial-scale=1.0">

    <title>Document</title>

    <link rel="stylesheet"

        href="https://cdn.jsdelivr.net/gh/openlayers/openlayers.github.io@master/en/v6.14.1/css/ol.css" type="text/css">

    <script src="https://cdn.jsdelivr.net/gh/openlayers/openlayers.github.io@master/en/v6.14.1/build/ol.js"></script>

    <script src='https://unpkg.com/@turf/turf@6/turf.min.js'></script>

    <style>

        html,

        body,

        #map {

            height: 100%;

        }

    </style>

</head>

<body>

    <div id="map"></div>

    <script>

        fetch('https://openlayers.org/en/latest/examples/data/geojson/roads-seoul.geojson')

            .then(response => response.json())

            .then(function (json){

            var vectorSource = new ol.source.Vector({

                features: (new ol.format.GeoJSON()).readFeatures(json, {

                    featureProjection: 'EPSG:3857'

                })

            });

            var vectorLayer = new ol.layer.Vector({

                source: vectorSource

            });

            var map = new ol.Map({

                layers: [

                    new ol.layer.Tile({

                        source: new ol.source.OSM()

                    }),

                    vectorLayer

                ],

                target: 'map',

                view: new ol.View({

                    center: ol.proj.fromLonLat([126.980366, 37.52654]),

                    zoom: 15

                })

            });

        })

    </script>

</body>

</html>
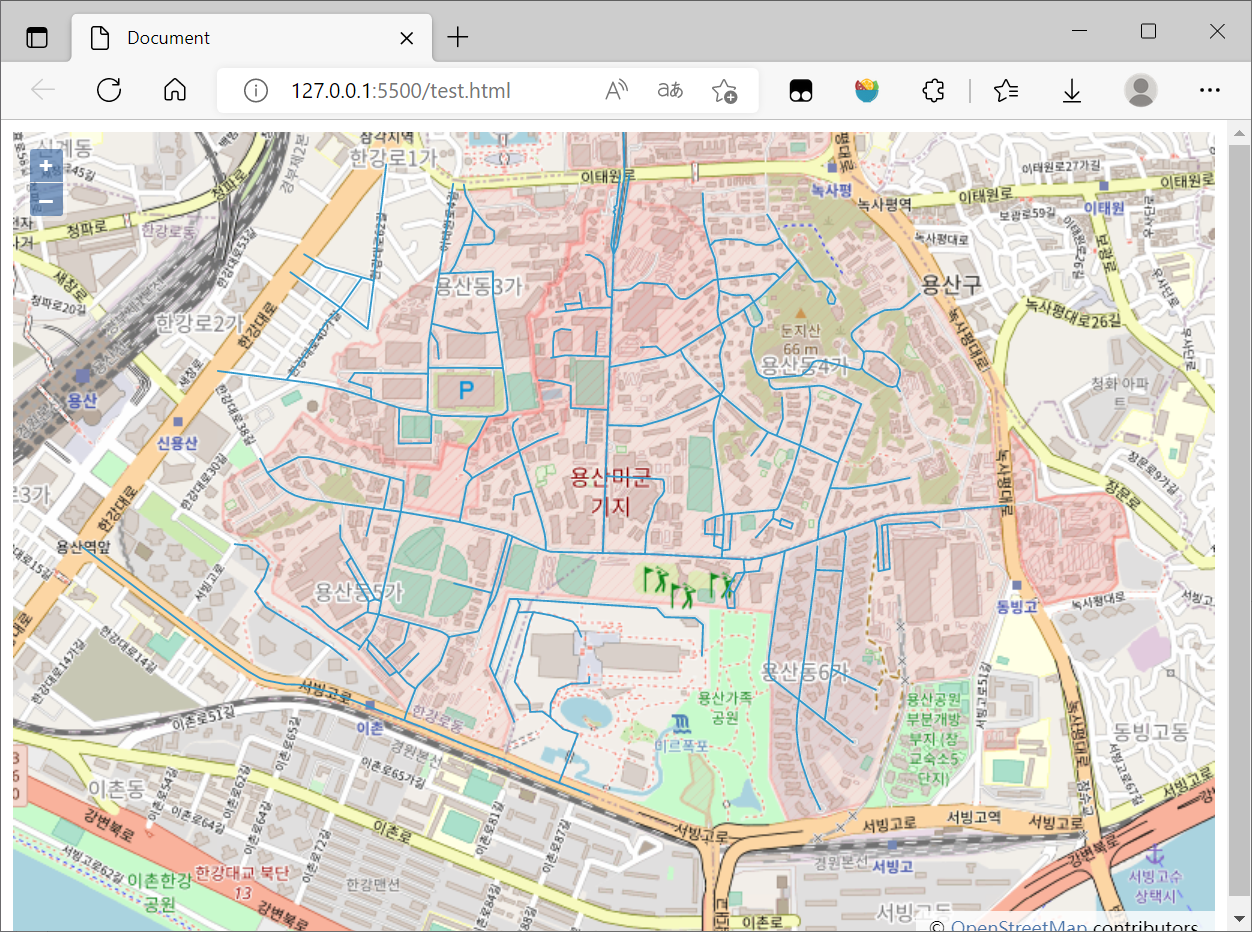
初始化的地图:
3. 缓冲区计算
参考官方文档:Turf.js | Advanced geospatial analysis (turfjs.org)
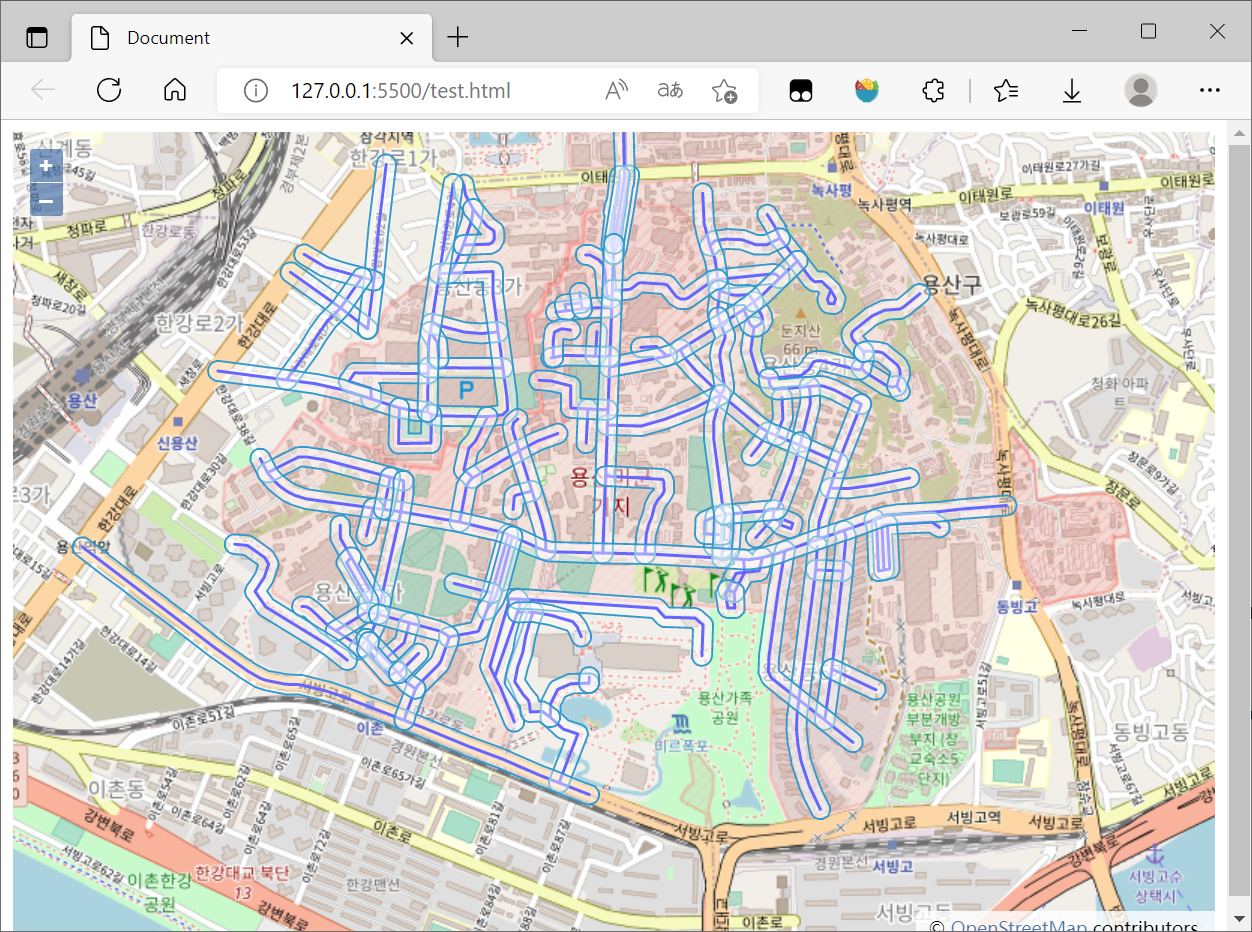
步骤实质就是:
- 将Openlayers的Features对象转换为Turf支持的GeoJSON对象
- 调用Turf.buff()函数得到运算结果
- OpenLayers读取运算后的GeoJSON数据加载到图层中
缓存区计算的核心代码如下:
const features = vectorSource.getFeatures();

const turfLines = (new ol.format.GeoJSON()).writeFeaturesObject(features, {

    featureProjection: 'EPSG:3857'

});

var buffered = turf.buffer(turfLines, 25, { units: 'meters' });

const bufferedLayer = new ol.layer.Vector({

    source: new ol.source.Vector({

        features: (new ol.format.GeoJSON()).readFeatures(buffered, {

            featureProjection: 'EPSG:3857'

        })

    })

})

map.addLayer(bufferedLayer);
注意:
- 从OpenLayers的Feature对象转换为Turf支持的GeoJSON对象时务必指定坐标系
这一步的完成代码如下:
<!DOCTYPE html>

<html lang="en">

<head>

    <meta charset="UTF-8">

    <meta http-equiv="X-UA-Compatible" content="IE=edge">

    <meta name="viewport" content="width=device-width, initial-scale=1.0">

    <title>Document</title>

    <link rel="stylesheet"

        href="https://cdn.jsdelivr.net/gh/openlayers/openlayers.github.io@master/en/v6.14.1/css/ol.css" type="text/css">

    <script src="https://cdn.jsdelivr.net/gh/openlayers/openlayers.github.io@master/en/v6.14.1/build/ol.js"></script>

    <script src='https://unpkg.com/@turf/turf@6/turf.min.js'></script>

    <!-- <script src="https://api.tiles.mapbox.com/mapbox.js/plugins/turf/v2.0.0/turf.min.js"></script> -->

    <style>

        html,

        body,

        #map {

            height: 100%;

        }

    </style>

</head>

<body>

    <div id="map"></div>

    <script>

        var map = new ol.Map({

            layers: [

                new ol.layer.Tile({

                    source: new ol.source.OSM()

                })

            ],

            target: 'map',

            view: new ol.View({

                center: ol.proj.fromLonLat([126.980366, 37.52654]),

                zoom: 15

            })

        });

        fetch('https://openlayers.org/en/latest/examples/data/geojson/roads-seoul.geojson')

            .then(response => response.json())

            .then(function (json) {

                var vectorSource = new ol.source.Vector({

                    features: (new ol.format.GeoJSON()).readFeatures(json, {

                        featureProjection: 'EPSG:3857'

                    })

                });

                var vectorLayer = new ol.layer.Vector({

                    source: vectorSource,

                    style: new ol.style.Style({

                        stroke: new ol.style.Stroke({

                            color: '#0000ff',

                            width: 2

                        })

                    })

                });

                map.addLayer(vectorLayer);

                const features = vectorSource.getFeatures();

                const turfLines = (new ol.format.GeoJSON()).writeFeaturesObject(features, {

                    featureProjection: 'EPSG:3857'

                });

                var buffered = turf.buffer(turfLines, 25, { units: 'meters' });

                const bufferedLayer = new ol.layer.Vector({

                    source: new ol.source.Vector({

                        features: (new ol.format.GeoJSON()).readFeatures(buffered, {

                            featureProjection: 'EPSG:3857'

                        })

                    })

                })

                map.addLayer(bufferedLayer);

            })

    </script>

</body>

</html>
结果图如下:
4. 相交计算
参考官方文档:Turf.js | Advanced geospatial analysis (turfjs.org)
步骤与缓冲区计算类似:
- 将Openlayers的Features对象转换为Turf支持的GeoJSON对象
- 调用Turf.lineIntersect()函数得到运算结果
- OpenLayers读取运算后的GeoJSON数据加载到图层中
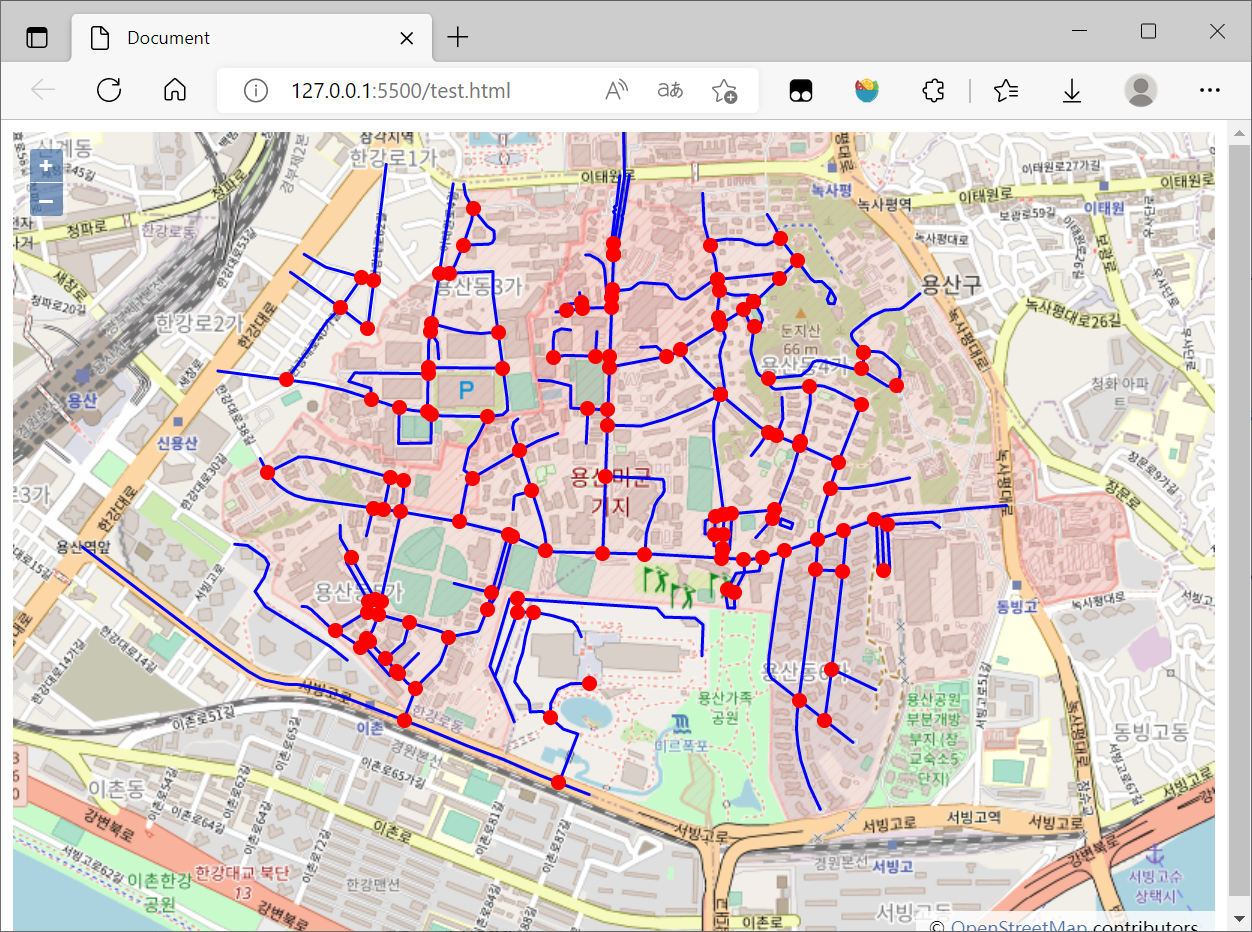
本文所使用的数据是LineString,所以此处的相交计算的是线段相交
相交运算的核心代码如下:
const features = vectorSource.getFeatures();

const turfLines = (new ol.format.GeoJSON()).writeFeaturesObject(features, {

    featureProjection: 'EPSG:3857'

});

const intersectionSource = new ol.source.Vector()

for (let i = 0; i < turfLines.features.length; i++) {

    for (let j = i + 1; j < turfLines.features.length; j++) {

        const intersections = turf.lineIntersect(turfLines.features[i], turfLines.features[j]);

        if (intersections) {

            if (intersections.features.length > 0) {

                intersectionSource.addFeatures(new ol.format.GeoJSON().readFeatures(intersections, {

                    featureProjection: 'EPSG:3857'

                }))

            }

        }

    }

}

const intersectionLayer = new ol.layer.Vector({

    source: intersectionSource,

    style: new ol.style.Style({

        stroke: new ol.style.Stroke({

            color: '#ff0000',

            width: 2

        }),

        fill: new ol.style.Fill({

            color: '#ff0000'

        }),

        image: new ol.style.Circle({

            radius: 5,

            fill: new ol.style.Fill({

                color: '#ff0000'

            })

        })

    })

})

map.addLayer(intersectionLayer);
注意:
- 计算结果为点集合(Point),最好设置一定的显示样式,不然难以看见
这一步的完成代码如下:
<!DOCTYPE html>

<html lang="en">

<head>

    <meta charset="UTF-8">

    <meta http-equiv="X-UA-Compatible" content="IE=edge">

    <meta name="viewport" content="width=device-width, initial-scale=1.0">

    <title>Document</title>

    <link rel="stylesheet"

        href="https://cdn.jsdelivr.net/gh/openlayers/openlayers.github.io@master/en/v6.14.1/css/ol.css" type="text/css">

    <script src="https://cdn.jsdelivr.net/gh/openlayers/openlayers.github.io@master/en/v6.14.1/build/ol.js"></script>

    <script src='https://unpkg.com/@turf/turf@6/turf.min.js'></script>

    <!-- <script src="https://api.tiles.mapbox.com/mapbox.js/plugins/turf/v2.0.0/turf.min.js"></script> -->

    <style>

        html,

        body,

        #map {

            height: 100%;

        }

    </style>

</head>

<body>

    <div id="map"></div>

    <script>

        var map = new ol.Map({

            layers: [

                new ol.layer.Tile({

                    source: new ol.source.OSM()

                })

            ],

            target: 'map',

            view: new ol.View({

                center: ol.proj.fromLonLat([126.980366, 37.52654]),

                zoom: 15

            })

        });

        fetch('https://openlayers.org/en/latest/examples/data/geojson/roads-seoul.geojson')

            .then(response => response.json())

            .then(function (json) {

                var vectorSource = new ol.source.Vector({

                    features: (new ol.format.GeoJSON()).readFeatures(json, {

                        featureProjection: 'EPSG:3857'

                    })

                });

                var vectorLayer = new ol.layer.Vector({

                    source: vectorSource,

                    style: new ol.style.Style({

                        stroke: new ol.style.Stroke({

                            color: '#0000ff',

                            width: 2

                        })

                    })

                });

                map.addLayer(vectorLayer);

                const features = vectorSource.getFeatures();

                const turfLines = (new ol.format.GeoJSON()).writeFeaturesObject(features, {

                    featureProjection: 'EPSG:3857'

                });

                const intersectionSource = new ol.source.Vector()

                for (let i = 0; i < turfLines.features.length; i++) {

                    for (let j = i + 1; j < turfLines.features.length; j++) {

                        const intersections = turf.lineIntersect(turfLines.features[i], turfLines.features[j]);

                        if (intersections) {

                            // console.log(intersections)

                            if (intersections.features.length > 0) {

                                intersectionSource.addFeatures(new ol.format.GeoJSON().readFeatures(intersections, {

                                    featureProjection: 'EPSG:3857'

                                }))

                                // console.log(intersectionSource.getFeatures())

                            }

                        }

                    }

                }

                // console.log(intersectionSource)

                const intersectionLayer = new ol.layer.Vector({

                    source: intersectionSource,

                    style: new ol.style.Style({

                        stroke: new ol.style.Stroke({

                            color: '#ff0000',

                            width: 2

                        }),

                        fill: new ol.style.Fill({

                            color: '#ff0000'

                        }),

                        image: new ol.style.Circle({

                            radius: 5,

                            fill: new ol.style.Fill({

                                color: '#ff0000'

                            })

                        })

                    })

                })

                map.addLayer(intersectionLayer);

            })

    </script>

</body>

</html>
结果图如下:
5. 整合
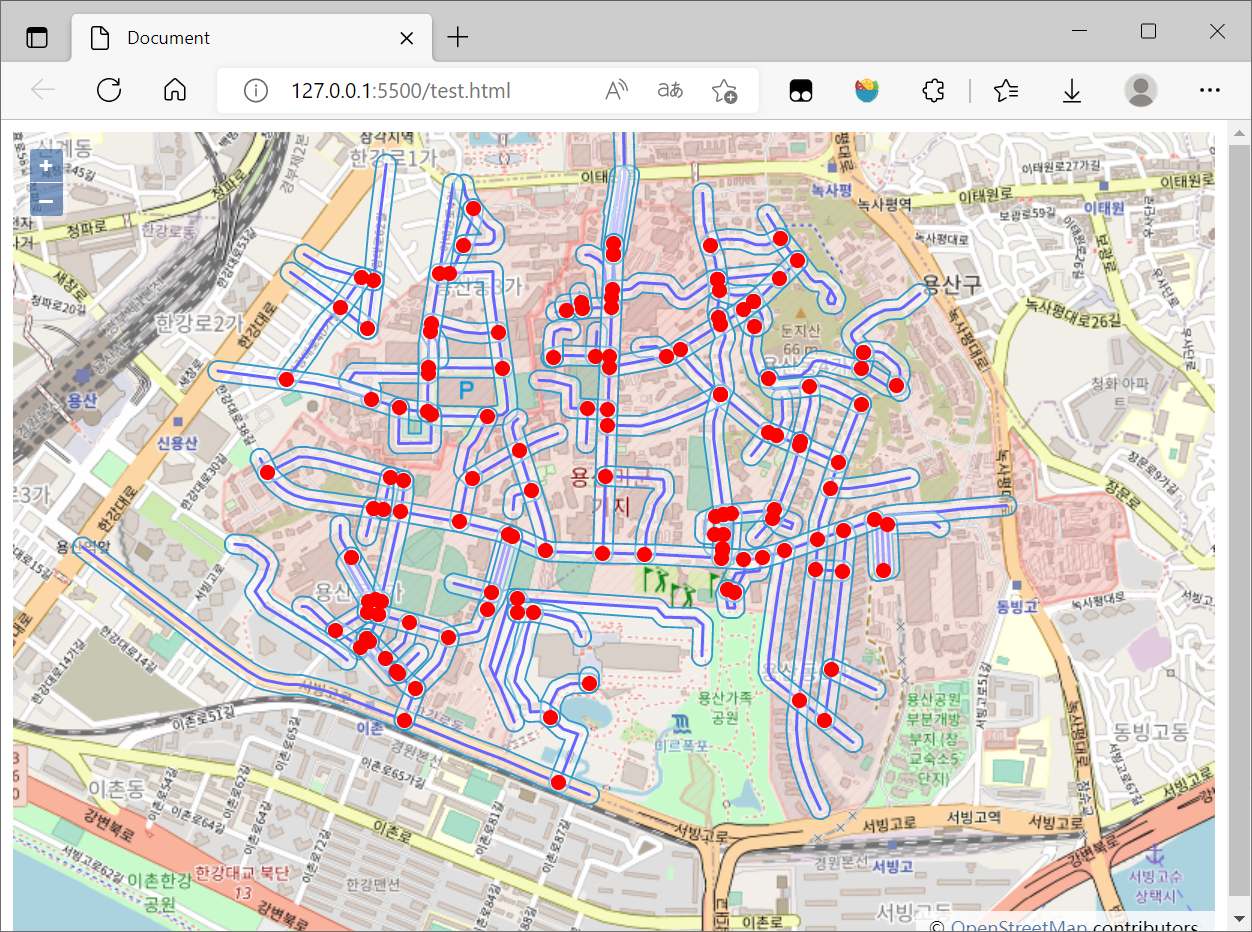
将两个运算结果结合在一起,完整代码如下:
<!DOCTYPE html>

<html lang="en">

<head>

    <meta charset="UTF-8">

    <meta http-equiv="X-UA-Compatible" content="IE=edge">

    <meta name="viewport" content="width=device-width, initial-scale=1.0">

    <title>Document</title>

    <link rel="stylesheet"

        href="https://cdn.jsdelivr.net/gh/openlayers/openlayers.github.io@master/en/v6.14.1/css/ol.css" type="text/css">

    <script src="https://cdn.jsdelivr.net/gh/openlayers/openlayers.github.io@master/en/v6.14.1/build/ol.js"></script>

    <script src='https://unpkg.com/@turf/turf@6/turf.min.js'></script>

    <!-- <script src="https://api.tiles.mapbox.com/mapbox.js/plugins/turf/v2.0.0/turf.min.js"></script> -->

    <style>

        html,

        body,

        #map {

            height: 100%;

        }

    </style>

</head>

<body>

    <div id="map"></div>

    <script>

        var map = new ol.Map({

            layers: [

                new ol.layer.Tile({

                    source: new ol.source.OSM()

                })

            ],

            target: 'map',

            view: new ol.View({

                center: ol.proj.fromLonLat([126.980366, 37.52654]),

                zoom: 15

            })

        });

        fetch('https://openlayers.org/en/latest/examples/data/geojson/roads-seoul.geojson')

            .then(response => response.json())

            .then(function (json) {

                var vectorSource = new ol.source.Vector({

                    features: (new ol.format.GeoJSON()).readFeatures(json, {

                        featureProjection: 'EPSG:3857'

                    })

                });

                var vectorLayer = new ol.layer.Vector({

                    source: vectorSource,

                    style: new ol.style.Style({

                        stroke: new ol.style.Stroke({

                            color: '#0000ff',

                            width: 2

                        })

                    })

                });

                map.addLayer(vectorLayer);

                const features = vectorSource.getFeatures();

                const turfLines = (new ol.format.GeoJSON()).writeFeaturesObject(features, {

                    featureProjection: 'EPSG:3857'

                });

                // console.log(turfLines)

                // const buffered = turf.buffer(turfLines, 25);

                var buffered = turf.buffer(turfLines, 25, { units: 'meters' });

                const bufferedLayer = new ol.layer.Vector({

                    source: new ol.source.Vector({

                        features: (new ol.format.GeoJSON()).readFeatures(buffered, {

                            featureProjection: 'EPSG:3857'

                        })

                    })

                })

                map.addLayer(bufferedLayer);

                const intersectionSource = new ol.source.Vector()

                for (let i = 0; i < turfLines.features.length; i++) {

                    for (let j = i + 1; j < turfLines.features.length; j++) {

                        const intersections = turf.lineIntersect(turfLines.features[i], turfLines.features[j]);

                        if (intersections) {

                            // console.log(intersections)

                            if (intersections.features.length > 0) {

                                intersectionSource.addFeatures(new ol.format.GeoJSON().readFeatures(intersections, {

                                    featureProjection: 'EPSG:3857'

                                }))

                                // console.log(intersectionSource.getFeatures())

                            }

                        }

                    }

                }

                // console.log(intersectionSource)

                const intersectionLayer = new ol.layer.Vector({

                    source: intersectionSource,

                    style: new ol.style.Style({

                        stroke: new ol.style.Stroke({

                            color: '#ff0000',

                            width: 2

                        }),

                        fill: new ol.style.Fill({

                            color: '#ff0000'

                        }),

                        image: new ol.style.Circle({

                            radius: 5,

                            fill: new ol.style.Fill({

                                color: '#ff0000'

                            })

                        })

                    })

                })

                map.addLayer(intersectionLayer);

            })

    </script>

</body>

</html>
结果图如下:
6. 参考资料
[1]空间运算—ArcMap | 文档 (arcgis.com)
[2]Turf.js—让你在浏览器上实现地理分析 - 掘金 (juejin.cn)
[3]Turf.js | Advanced Geospatial Analysis (turfjs.org)
[5]Turfjs/turf: A modular geospatial engine written in JavaScript (github.com)
[6]使用 Fetch - Web API 接口参考 | MDN (mozilla.org)
[8]openlayers+turf.js实现缓冲区的绘制_gis_SSS的博客-CSDN博客_openlayers缓冲区分析
[9]OpenLayers v6.14.1 API - Class: EsriJSON
OpenLayers结合Turf实现空间运算的更多相关文章
- (转)R空间数据处理与可视化
前言 很多朋友说在R里没法使用高德地图,这里给出一个基于leaflet包的解决方法. library(leaflet) # 添加高德地图 m <- leaflet() %>% addTil ...
- MySQL中的GIS几何函数和空间分析函数
MySQL空间扩展不仅提供了空间数据的存储能力,而且还具备一些空间运算能力,这些功能通过MySQL内建的几何函数实现.最简单的几何函数昨天已经有所涉及,也就是转换WTK的GEOMFROMTEXT和AS ...
- OpenGIS 介绍
转自:http://www.blogjava.net/sinoly/archive/2007/09/25/148002.html 值此FOSS4G大会即将召开之日,最近我会在Blog上依次介绍一些Op ...
- GIS应用及OpenGIS介绍
转自:http://blog.csdn.net/cdl2008sky/article/details/7266680 GIS的三大应用第一类是政府应用,“电子政务” 是当今政府加强信息化建设的新方向, ...
- OpenGIS 介绍(转)
值此FOSS4G大会即将召开之日,最近我会在Blog上依次介绍一些OpenGIS标准.架构及用于实现的软件.一方面给初涉此行的朋友一个快速入门的概览,另一方面也是对我接触OpenGIS近一年来的总结. ...
- Gamma校正与线性空间
基础知识部分 为了方便理解,首先会对(Luminance)的相关概念做一个简单介绍.如果已经了解就跳到后面吧. 我们用Radiant energy(辐射能量)来描述光照的能量,单位是焦耳(J),因为光 ...
- 转自一个CG大神的文章
<如何学好游戏3D引擎编程>此篇文章献给那些为了游戏编程不怕困难的热血青年,它的神秘要我永远不间断的去挑战自我,超越自我,这样才能攀登到游戏技术的最高峰 ——阿哲VS自 ...
- 转载:[转]如何学好3D游戏引擎编程
[转]如何学好3D游戏引擎编程 Albert 本帖被 gamengines 从 游戏引擎(Game Engine) 此文为转载,但是值得一看. 此篇文章献给那些为了游戏编程不怕困难的热血青年,它的 ...
- PRML读书会第七章 Sparse Kernel Machines(支持向量机, support vector machine ,KKT条件,RVM)
主讲人 网神 (新浪微博: @豆角茄子麻酱凉面) 网神(66707180) 18:59:22 大家好,今天一起交流下PRML第7章.第六章核函数里提到,有一类机器学习算法,不是对参数做点估计或求其分 ...
- ArcGIS 帮助(10.2、10.2.1 和 10.2.2)收集
帮助首页 [Oracle基础] 快速浏览:Oracle 地理数据库 什么是 Oracle Spatial? 设置到 Oracle 的连接 存储在 Oracle 地理数据库中的系统表 结合企业级地理数据 ...
随机推荐
- .net6+wpf制作指定局域网ip无法上网的arp欺诈工具
摘一段来自网上的arp欺诈解释:ARP欺骗(ARP spoofing),又称ARP毒化(ARP poisoning,网络上多译为ARP病毒)或ARP攻击,是针对以太网地址解析协议(ARP)的一种攻击技 ...
- NavigationDuplicated Navigating to current location (“/XXX”) is not allowed
导航不允许导航到当前位置https://stackoverflow.com/questions/57837758/navigationduplicated-navigating-to-current- ...
- Django批量插入(自定义分页器)
目录 一:批量插入 1.常规批量插入数据(时间长,效率低 不建议使用) 2.使用orm提供的bulk_create方法批量插入数据(效率高 减少操作时间) 3.总结 二:自定义分页器 1.自定义分页器 ...
- 04-CURD
Insert @Test//测试插入 public void insertTest(){ User user = new User(); user.setName("wsk"); ...
- C语言读写txt文件
写入和读取txt文件 #include<stdio.h> #include<string.h> int main( int argc, char *argv[] ) { int ...
- [R语言] R语言快速入门教程
本文主要是为了从零开始学习和理解R语言,简要介绍了该语言的最重要部分,以快速入门.主要参考文章: R-Tutorial R语言程序的编写需要安装R或RStudio,通常是在RStudio中键入代码.但 ...
- 动力节点——day03
接收键盘的输入:1.创建一个键盘扫描器对象 java.util.Scanner s=new Scanner(System.in); 2.接收用户输入s.nextInt(); 静态变量在类加载的时候就分 ...
- C# 线程查漏补缺
进程和线程 不同程序执行需要进行调度和独立的内存空间 在单核计算机中,CPU 是独占的,内存是共享的,这时候运行一个程序的时候是没有问题.但是运行多个程序的时候,为了不发生一个程序霸占整个 CPU 不 ...
- VMware vSphere vCenter ServerAppliance 7.0安装配置
VMware vSphere vCenter ServerAppliance 7.0安装配置 环境说明: 1.将vCenter ServerAppliance部署在ESXi主机上,安装配置好ESXi主 ...
- 创建型模式 - 建造者模式Builder
学习而来,代码是自己敲的.也有些自己的理解在里边,有问题希望大家指出. 最近这个脑T---瘫----CSDN有毛病吧?我写这个都是涉及到广告了?谁家的广告? 谁给我钱了?审核策略设计者是什么NTR? ...