
ppt/word公式LaTeX环境配置
PPT使用Latex说明
一.下载IguanaTex_v1_57
http://www.jonathanleroux.org/software/iguanatex/download.html
Installation:
1. Load the add-in:
in "File" > "Options" > "Add-Ins" >
"Manage:", choose "PowerPoint Add-Ins" then
"Go...", then click "Add New", select the .ppam file in the
default Add-In folder or in the folder where you downloaded it, then
"Close"
2. Create and set a temporary file
folder:
IguanaTex needs access to a folder with read/write permissions to store
temporary files.
The default is
"C:\Temp\". If you have write permissions under "C:\",
create the folder "C:\Temp\". You're all set.
If you cannot create this folder,
choose/create a folder with write permission at any other location. In the
IguanaTex tab, choose "Main Settings" and put the path to the folder
of your choice. You can also use a relative path under the presentation's
folder (e.g., ".\" for the presentation folder itself).
3. (Optional, for pdflatex/xelatex/lualatex support) Install and set path to GhostScript and ImageMagick:
To use the PDF to PNG conversion (i.e., with pdflatex, xelatex and lualatex)
instead of the default DVI to PNG one, you need to install GhostScript (gs9.26
is the currently recommended version, as issues with 9.27 have been reported)
and ImageMagick and
set the appropriate full paths to gswin32c.exe/gswin64c.exe
(note the "c"!) and convert.exe in the "Main Settings"
window. When installing ImageMagick, make sure to check the box to
"Install development headers and libraries for C and C++" and (in
recent versions) to "Install legacy utilities (e.g. convert)".
Download links are provided in the Main Settings window.
4. (Optional, for vector graphics
support) Install and set path to TeX2img:
To use vector graphics output, you need to install TeX2img (here
is the direct download link for recommended version 2.1.0). After unpacking
TeX2img somewhere on your machine, please run TeX2img.exe once to set the
various paths to latex/ghostscript, then set the full path to
TeX2imgc.exe (note the "c"!) in the "Main Settings" windows
第一步很关键。
注意第三步的When installing ImageMagick, make sure to check the box to "Install development headers and libraries for C and C++" and (in recent versions) to "Install legacy utilities (e.g. convert)".
第四步因为下载包没有.exe文件,我没有装成功,不过没关系,前三步安装成功能保证正常使用。
二. 配置路径和pdflatex。
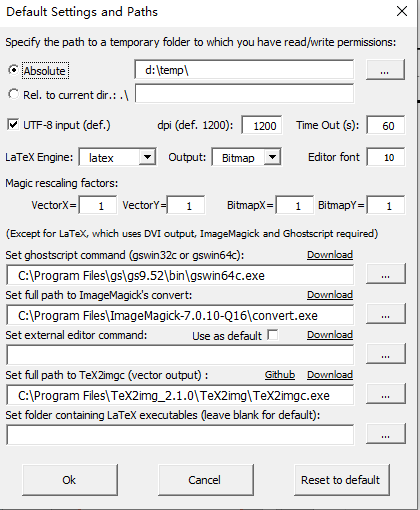
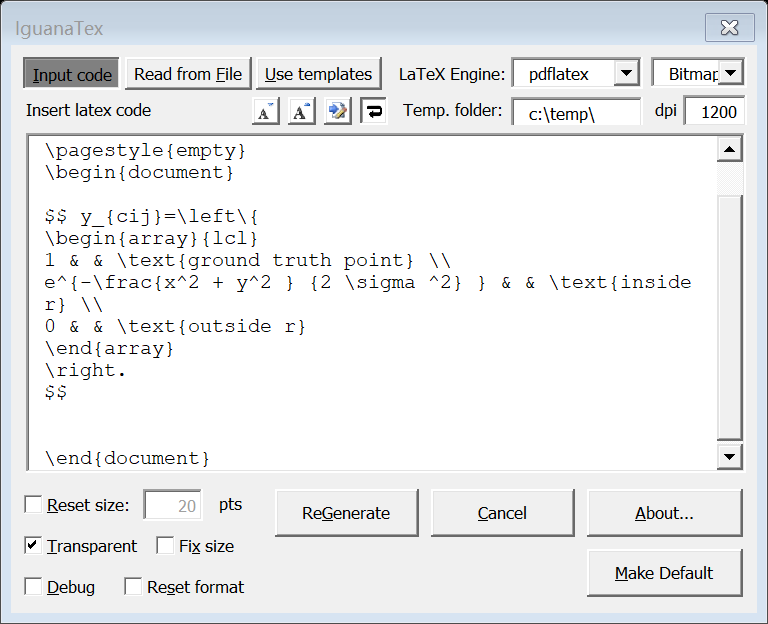
$F_{v,p}^{def}(x_s,y)=\max\nolimits_{\delta_{i},\delta{j}} F_{v,p}^{part}[p_i+\delta_i,p_j+\delta_j]+\omega_{D,v,p}^{part}\phi_{D}(\delta_i,\delta_j)$
安装http://www.jonathanleroux.org/software/iguanatex/ 路径下的requirements,能保证成功使用。
安装不成功,重启电脑。
=======================
一.Word安装LaTeX插件
1. 下载aurora和注册机,安装。
执行aurora-setup.exe,安装过程,不要选Micro MikTex。
2. Aurora是一款可以在Office中插入LaTeX公式的小软件。众所周知的是LaTeX输入公式的方式和显示效果都要比Office自带的公式编辑器好很多,而且也比MathType强,相关文章《可以在Word中插入LaTeX公式的软件——Aurora》。
3. 注册机使用方法:
首先安装Aurora 2.x,然后下载注册机并运行,在文本框中随便输入点什么东西都行,然后点Register即可完成注册。然后再运行Aurora应该就不会再有需要注册的提示了。
需要注意的是输入的东西不要太长,而且不要输入中文,因为Aurora是基于Unicode的,而这个注册机不是Unicode的,所以输入中文会有问题。
4. 下载之后点击运行,再打开PPT或者Word,【插入】-【对象】-【Aurora Equation】输入latex代码,refresh编译就会在文档界面看到想要的公式了。
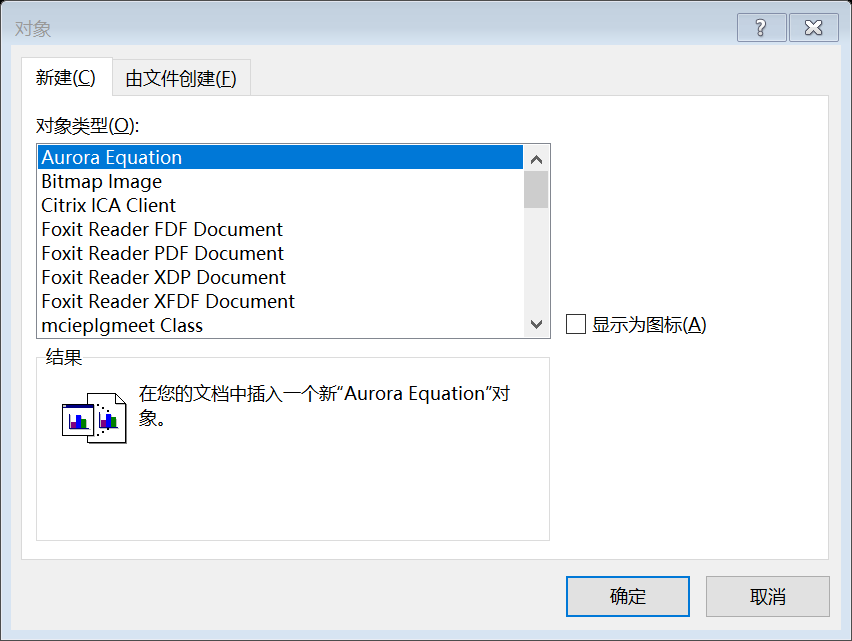
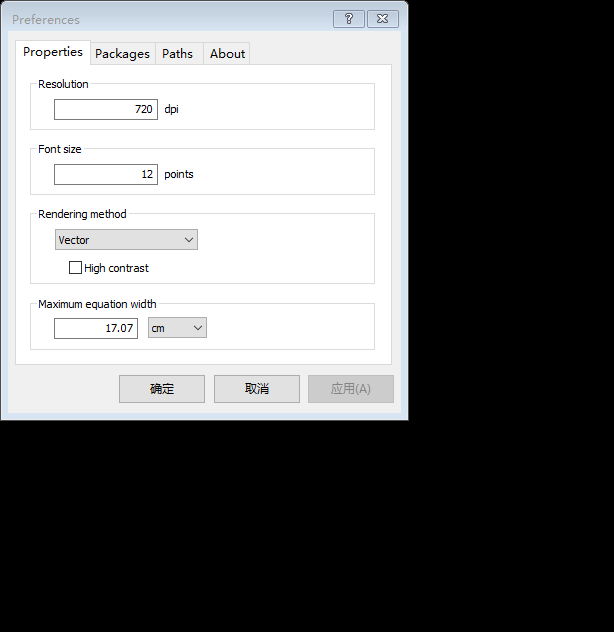
5. 安装完aurora 使用时一直是problems running latex这个错误,问题在于如图,Rendering Method选择第二个或者第三个就可以。

ppt/word公式LaTeX环境配置的更多相关文章
- Latex公式导出word,Latex转换MathML使用POI导出公式可编辑的Word文件
背景 之前在 使用spire.doc导出支持编辑Latex公式的标准格式word 博客中写过,使用spire.doc来生成word,不得不说spire.doc的api操作起来还是比较方便,但是使用的过 ...
- latex转word公式 java (latextoword,latex_word,latex2word,latex_omml)
latex_word 主要目的: 给大家分享一个我的原创作品:latex转为word公式(omml)工具 [java] 此工具主要用于将含有latex公式的文本下载成word时,将latex转 ...
- Atom + Texlive 配置 Latex 环境
Atom + Texlive 配置 Latex 环境 步骤1: 安装TexliveTexlive点击 "Download" 下载,然后安装,等待安装完成即可 步骤2: 安装Atom ...
- Win10下 VSCode配置LaTex环境
------------恢复内容开始------------ 环境:win10 软件:Tex Live, VSCode ,Sumatra Tex Live官网下载速度很慢,所以推荐使用清华镜像下载链接 ...
- LaTeX 环境安装&编译器配置
推荐网站:https://www.latexstudio.net/articles/ (基本所有的latex疑惑都可以在这里得到解决) 入门视频:两小时短小精悍,让你轻松入门,https://www. ...
- MIT JOS学习笔记01:环境配置、Boot Loader(2016.10.22)
未经许可谢绝以任何形式对本文内容进行转载! 一.环境配置 关于MIT课程中使用的JOS的配置教程网上已经有很多了,在这里就不做介绍,个人使用的是Ubuntu 16.04 + qemu.另注,本文章中贴 ...
- [转载] 高效 MacBook 工作环境配置
原文: http://mp.weixin.qq.com/s?__biz=MjM5NzMyMjAwMA==&mid=208231200&idx=1&sn=8a76ddc56c1f ...
- [转载] 高效MacBook工作环境配置
原文: http://www.xialeizhou.com/?p=71 高效MacBook工作环境配置 发表于 2015 年 8 月 1 日 由 xialeizhou 本文记录整个配置过程,供新入手M ...
- 高效 MacBook 工作环境配置
转自:https://mp.weixin.qq.com/s/sloc6HgKcosXtWcbMB_5hA 工欲善其事,必先利其器,工具永远都是用来解决问题的,没必要为了工具而工具,一切工具都是为了能快 ...
随机推荐
- Blazor Bootstrap 组件库地理定位/移动距离追踪组件介绍
地理定位/移动距离追踪组件 通过浏览器 API 获取定位信息 DEMO https://www.blazor.zone/geolocations 小提示 注意: 出于安全考虑,当网页请求获取用户位置信 ...
- Halo 开源项目学习(二):实体类与数据表
基本介绍 Halo 项目中定义了一些实体类,用于存储博客中的关键数据,如用户信息.文章信息等.在深入学习 Halo 的设计理念与实现过程之前,不妨先学习一下一个完整的博客系统都由哪些元素组成. 实体类 ...
- js数组操作集合
1. join() 功能:将数组中所有元素都转化为字符串并连接在一起. 2. reverse() 功能:将数组中的元素颠倒顺序. 3. concat() 功能:数组拼接的功能 ,返回新数组,原数组不受 ...
- Bootstrap Blazor Table 组件(三)智能生成
原文链接:https://www.cnblogs.com/ysmc/p/16201153.html Bootstrap Blazor 官网地址:https://www.blazor.zone 有了解过 ...
- Linux -4-作业练习
1.编写脚本实现登陆远程主机.(使用expect和shell脚本两种形式). expect脚本格式 expect总结点击查看 登录直接远程控制主机 #!/usr/bin/expect # # set ...
- Linux中几个正则表达式的用法
开源Linux 长按二维码加关注~ 上一篇:盘点提高国内访问Github的速度的9种方案 正则表达式就是用于匹配每行输入的一种模式,模式是指一串字符序列.拥有强大的字符搜索功能.也非常方便的搜索过滤出 ...
- 【mq】从零开始实现 mq-07-负载均衡 load balance
前景回顾 [mq]从零开始实现 mq-01-生产者.消费者启动 [mq]从零开始实现 mq-02-如何实现生产者调用消费者? [mq]从零开始实现 mq-03-引入 broker 中间人 [mq]从零 ...
- 图解BM(Boyer-Moore)字符串匹配算法+代码实现
简介 本篇文章主要分为两个大的部分,第一部分通过图解的方式讲解BM算法,第二部分则代码实现一个简易的BM算法. 基本概念 bm是一个字符串匹配算法,有实验统计,该算法是著名kmp算法性能的3-4倍,其 ...
- Git生成ssh keys加密算法ed25519
1:桌面右击后出现Git push hehe点击进入直接输入以下命令 ①:ssh-keygen -t ed25519 -f my_github_ed25519 -C "xxxxx" ...
- 796. Rotate String - LeetCode
Question 796. Rotate String Solution 题目大意:两个字符串匹配 思路:Brute Force Java实现: public boolean rotateString ...