我的第一个springboot starter
在springboot中有很多starter,很多是官方开发的,也有是个人或开源组织开发的。这些starter是用来做什么的呐?
一、认识starter
所谓的starter,在springboot中其实是一个依赖,是springboot官方为了方便开发者更好的管理依赖而开发的,像前边提到的mybatis的starter,
<dependency>

            <groupId>org.mybatis.spring.boot</groupId>

            <artifactId>mybatis-spring-boot-starter</artifactId>

            <version>2.1.3</version>

</dependency>
这是一个在springboot中使用mybatis的starter,看下其包含了哪些内容,下面是该starter中包含的依赖,
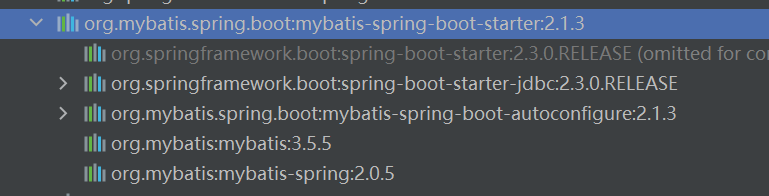
更有意思的一点是mybatis-spring-boot-starter没有代码,

也就是说mybatis-spring-boot-starter不具备实际功能,仅仅提供所需的依赖。那么是如何把mybatis相关的内容注入到springboot中的呐,是因为mybatis中有两位一个依赖”mybatis-spring-boot-autoconfigure“,该依赖中有有关自动配置的相关内容,先混个眼熟,
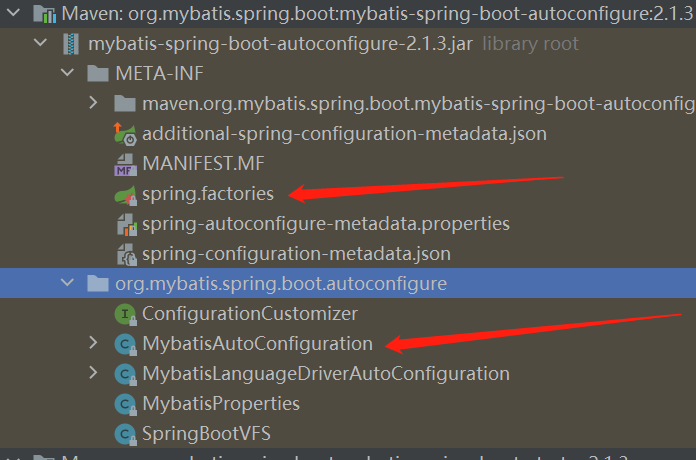
其中,META-INF下的spring.factories和MybatisAutoConfiguration两个文件是重点,后面会重点分析springboot自动配置的原理。
现在,现在对starter有了一个清析的认识,starter提供一个组件集成springboot的入口,包含了需要的依赖以及自动配置类。
下面,看下springboot提供了哪些starter。
二、starter汇总
2.1、spring-boot-starter
其依赖为,
<dependency>

      <groupId>org.springframework.boot</groupId>

      <artifactId>spring-boot-starter</artifactId>

    </dependency>
2.2、spring-boot-starter-web
这个是开发springboot web项目时的starter,
<dependency>

      <groupId>org.springframework.boot</groupId>

      <artifactId>spring-boot-starter-web</artifactId>

    </dependency>
2.3、spring-boot-starter-jdbc
和jdbc相关的,其依赖为
<dependency>

      <groupId>org.springframework.boot</groupId>

      <artifactId>spring-boot-starter-jdbc</artifactId>

    </dependency>
2.4、spring-boot-starter-activemq
和activeMQ相关的
<dependency>

      <groupId>org.springframework.boot</groupId>

      <artifactId>spring-boot-starter-activemq</artifactId>

    </dependency>
2.5、spring-boot-starter-data-elasticsearch
和ES相关的
<dependency>

      <groupId>org.springframework.boot</groupId>

      <artifactId>spring-boot-starter-data-elasticsearch</artifactId>

    </dependency>
2.6、spring-boot-starter-data-jpa
和JPA相关的
<dependency>

      <groupId>org.springframework.boot</groupId>

      <artifactId>spring-boot-starter-data-jpa</artifactId>

    </dependency>
2.7、spring-boot-starter-data-mongodb
和mongodb相关的
<dependency>

      <groupId>org.springframework.boot</groupId>

      <artifactId>spring-boot-starter-data-mongodb</artifactId>

    </dependency>
2.8、spring-boot-starter-quartz
和定时任务相关的
 <dependency>

      <groupId>org.springframework.boot</groupId>

      <artifactId>spring-boot-starter-quartz</artifactId>

    </dependency>
2.9、mybatis-spring-boot-starter
和mybatis相关的
<dependency>

            <groupId>org.mybatis.spring.boot</groupId>

            <artifactId>mybatis-spring-boot-starter</artifactId>

            <version>2.1.3</version>

        </dependency>
还有很多starter,这里暂且列举那么多,有个名称上的区别大家发现没,有的是”spring-boot-starter-XX“,有的是”XX-spring-boot-starter“,对于前者可以理解为是springboot官方提供的,对于后者可以理解为是第三方自己开发,我们如果自己开发一个其命名规范最好遵循后者。
三、自定义starter
前边说了很多有关官方的starter,现在自定义一个starter,有如下要求,该starter的名字暂定为:”customer-spring-boot-starter“,其包含一个依赖”customer-spring-boot-autoconfigurer“,在”customer-spring-boot-autoconfigurer“中会读取前缀为”my.customer“的配置文件,并且把MyCustomerService注入到springboot中,现在看要如何自定义一个starter。
3.1、customer-spring-boot-starter
从”mybatis-spring-boot-starter“知道,XX-spring-boot-starter是一个空项目,在该项目中会依赖XX-spring-boot-autoconfigurer,下面新建空项目”customer-spring-boot-starter“,
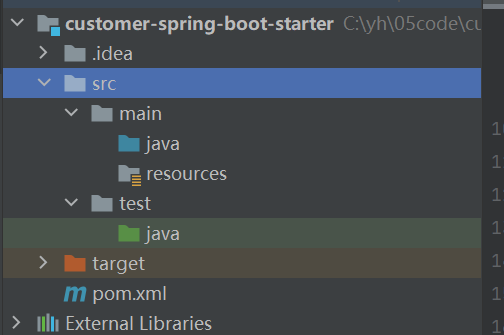
对于src目录完全可以删除,这里暂时保留,重点看下pom.xml文件,我这里仅依赖了”customer-spring-boot-autoconfigurer“,
<?xml version="1.0" encoding="UTF-8"?>

<project xmlns="http://maven.apache.org/POM/4.0.0"

         xmlns:xsi="http://www.w3.org/2001/XMLSchema-instance"

         xsi:schemaLocation="http://maven.apache.org/POM/4.0.0 http://maven.apache.org/xsd/maven-4.0.0.xsd">

    <modelVersion>4.0.0</modelVersion>

    <groupId>org.example</groupId>

    <artifactId>customer-spring-boot-starter</artifactId>

    <version>1.0-SNAPSHOT</version>

    <properties>

        <maven.compiler.source>8</maven.compiler.source>

        <maven.compiler.target>8</maven.compiler.target>

    </properties>

    <dependencies>

        <!--自动配置模块-->

        <dependency>

            <groupId>org.example</groupId>

            <artifactId>customer-spring-boot-autoconfigurer</artifactId>

            <version>1.0-SNAPSHOT</version>

        </dependency>

    </dependencies>

</project>
”customer-spring-boot-starter“就这样了,打包安装到本地仓库即可。
3.2、customer-spring-boot-autoconfigurer
相对于”customer-spring-boot-starter“来说,”custoerm-spring-boot-autoconfigurer“要复杂一些。建一个普通的maven项目即可,
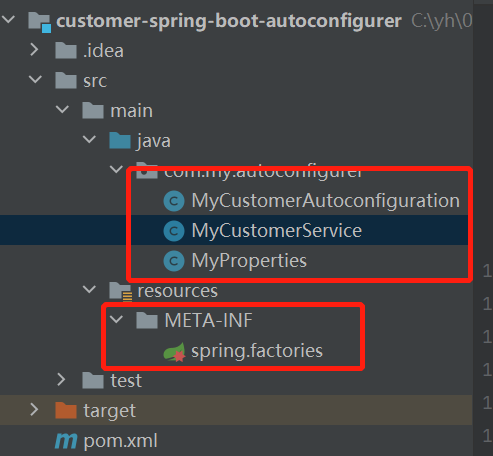
先看MyProperties文件吧,该文件负责读取配置文件(application.properties)文件中前缀为”my.customer“的配置,
MyProperties.java
package com.my.autoconfigurer;

import org.springframework.boot.context.properties.ConfigurationProperties;

/**

 * 读取配置文件中的配置

 * 读取前缀为my.customer的配置

 * @date 2022/6/12 17:06

 */

@ConfigurationProperties(prefix = "my.customer")

public class MyProperties {

    private String name;

    private String code;

    public String getName() {

        return name;

    }

    public void setName(String name) {

        this.name = name;

    }

    public String getCode() {

        return code;

    }

    public void setCode(String code) {

        this.code = code;

    }

}
该类中使用了@ConfigurationProperties注解用来读取配置文件,所以要引入spring-boot-autoconfigure的依赖,后边pom.xml会体现。下面看要注入的服务,
MyCustomerService.java
package com.my.autoconfigurer;

/**

 * 自定义的服务类

 * @date 2022/6/12 17:05

 */

public class MyCustomerService {

    //MyProperties的引用

    private MyProperties myProperties;

    public MyProperties getMyProperties() {

        return myProperties;

    }

    public void setMyProperties(MyProperties myProperties) {

        this.myProperties = myProperties;

    }

    //自定义方法

    public void myCustomerMethod(){

        System.out.println("name:"+myProperties.getName()+",code:"+myProperties.getCode());

    }

}
这个类也很简单,有一个MyProperties的属性,另外有一个自定义方法myCustomerMethod方法。主角要登场了,自动配置类,
MyCustomerAutoconfiguration.java
package com.my.autoconfigurer;

import org.springframework.boot.context.properties.EnableConfigurationProperties;

import org.springframework.context.annotation.Bean;

import org.springframework.context.annotation.Configuration;

/**

 * 自定义的自动配置类

 * @date 2022/6/12 17:11

 */

@Configuration

@EnableConfigurationProperties(MyProperties.class)

public class MyCustomerAutoconfiguration {

   //向springboot的容器中注入名为"myCustomerService"的实例

    @Bean

    public MyCustomerService myCustomerService(MyProperties myProperties){

        MyCustomerService myCustomerService=new MyCustomerService();

        myCustomerService.setMyProperties(myProperties);

        return myCustomerService;

    }

}
上面就是一个简单的自定义配置类。配置完这些完了吗,还没有,重量级选手登场,在src/resources下新建”META-INF“文件夹,且在下面新建文件”spring.factories“,

该文件的内容为,
org.springframework.boot.autoconfigure.EnableAutoConfiguration=com.my.autoconfigurer.MyCustomerAutoconfiguration配置这样一个key-value即可,key只能为”org.springframework.boot.autoconfigure.EnableAutoConfiguration“,value就是自定义的配置类,如果有多个使用”,“分割即可。另外该文件的名称也只能是”spring.factories“
上面的这些配置完成,最后看下pom.xml文件,
<?xml version="1.0" encoding="UTF-8"?>

<project xmlns="http://maven.apache.org/POM/4.0.0"

         xmlns:xsi="http://www.w3.org/2001/XMLSchema-instance"

         xsi:schemaLocation="http://maven.apache.org/POM/4.0.0 http://maven.apache.org/xsd/maven-4.0.0.xsd">

    <modelVersion>4.0.0</modelVersion>

    <groupId>org.example</groupId>

    <artifactId>customer-spring-boot-autoconfigurer</artifactId>

    <version>1.0-SNAPSHOT</version>

    <properties>

        <maven.compiler.source>8</maven.compiler.source>

        <maven.compiler.target>8</maven.compiler.target>

    </properties>

    <dependencies>

    <!--springboot的自动配置依赖-->

        <dependency>

            <groupId>org.springframework.boot</groupId>

            <artifactId>spring-boot-autoconfigure</artifactId>

            <version>2.3.3.RELEASE</version>

        </dependency>

    </dependencies>

</project>
至此,自定义自动配置完成,打包安装到本地仓库即可。
3.3、使用customer-spring-boot-starter
上面已经完成了第一个自定义的starter,到了真金验证的时候了,
导入”customer-spring-boot-starter“依赖,

写个测试类,测试下是否自动导入了”MyCustomerService“类,
package com.my.template.controller;

import com.my.autoconfigurer.MyCustomerService;

import org.springframework.beans.factory.annotation.Autowired;

import org.springframework.stereotype.Controller;

import org.springframework.web.bind.annotation.RequestMapping;

import org.springframework.web.bind.annotation.ResponseBody;

/**

 * 测试自动配置类

 * @date 2022/6/12 17:46

 */

@Controller

public class MyController {

    //自动注入的类

    @Autowired

    private MyCustomerService myCustomerService;

    @RequestMapping("test")

    @ResponseBody

    public void test(){

        myCustomerService.myCustomerMethod();

    }

}
另外在application.properites文件中配置自定义的配置文件,
#自定义配置

my.customer.name=hello

my.customer.code=autoconfiguration
启动服务,看下打印结果,

可以看到打印的和配置的是一样的,证明自定义的自动配置类成功,就是说自定义starter成功。
四、总结
本文从”mybatis-spring-boot-starter“开始,分析了一个starter的组成部分,然后总结了常用的starter,重点是实现了一个自定义的starter,并成功获取到自定义的配置。
1、starter包含要注入的类的依赖及自定配置模块(XX-spring-boot-autoconfigure);
2、自动配置模块(XX-spring-boot-autoconfigure)包含自动配置类及spring.factories文件;
不知道小伙伴对springboot如何实现自动配置好奇吗,我们下期见。

我的第一个springboot starter的更多相关文章
- 从头带你撸一个Springboot Starter
我们知道 SpringBoot 提供了很多的 Starter 用于引用各种封装好的功能: 名称 功能 spring-boot-starter-web 支持 Web 开发,包括 Tomcat 和 spr ...
- 手写一个springboot starter
springboot的starter的作用就是自动装配.将配置类自动装配好放入ioc容器里.作为一个组件,提供给springboot的程序使用. 今天手写一个starter.功能很简单,调用start ...
- SpringBoot Starter缘起
SpringBoot通过SpringBoot Starter零配置自动加载第三方模块,只需要引入模块的jar包不需要任何配置就可以启用模块,遵循约定大于配置的思想. 那么如何编写一个SpringBoo ...
- 手撸一个SpringBoot的Starter,简单易上手
前言:今天介绍一SpringBoot的Starter,并手写一个自己的Starter,在SpringBoot项目中,有各种的Starter提供给开发者使用,Starter则提供各种API,这样使开发S ...
- (02) 第一个springboot程序
1. 创建一个springboot程序 1. idea 自带的springboot插件 2. 直接从https://start.spring.io 创建好程序下载下来, 之后覆盖你的创建的项目 2. ...
- 整理代码,将一些曾经用过的功能整合进一个spring-boot
一 由于本人的码云太多太乱了,于是决定一个一个的整合到一个springboot项目里面. 附上自己的项目地址https://github.com/247292980/spring-boot 功能 1. ...
- 用MyEclipse2016 CI版创建一个SpringBoot程序
之前先要在Eclipse里安装STS,步骤如下: 1.点击菜单Help->Install from Catalog 2.在弹出的对话框中点击Popular选项卡,在STS旁边点Install按钮 ...
- 使用IDEA创建一个springboot项目
工欲善其事,必先利其器. 不难发现,还是有很多小朋友在使用eclipse开发java项目.当你接触IDEA后,一切都变得美好了. 使用IDEA创建一个springboot项目是一件极其简单的事情.界面 ...
- SpringBoot | 第一章:第一个SpringBoot应用
springboot简单介绍 概述 SpringBoot的核心功能 优缺点 优点 缺点 工程搭建 创建项目 项目结构 pom依赖 主入口 编写controller 启动应用 总结 老生常谈 sprin ...
随机推荐
- Taro下拉刷新,上拉加载更多
1.引入插件 import Taro, { Component } from '@tarojs/taro' import { View, Text, ScrollView } from '@taroj ...
- numpy教程03---ndarray的运算
欢迎关注公众号[Python开发实战], 获取更多内容! 工具-numpy numpy是使用Python进行数据科学的基础库.numpy以一个强大的N维数组对象为中心,它还包含有用的线性代数,傅里叶变 ...
- 第一阶段:Java基础之数组
注意点: @Java语言是把数组当作一个"对象"来看待的 @把数组分为两部分看,一部分是数组的引用,放置在栈内存中,一部分是数组对象,放置在堆内存中 @数组的引用可以指向任何有效的 ...
- [UE][虚幻]创建默认媒体打包资源路径
**创建默认媒体打包资源路径** **个人笔记** **翻阅官方资料,实践出来的!** **转载,"借鉴",重写...其他行为必须标明出处!!!** UE 官方默认有一个专 ...
- Linux 开启远程访问
系统:Ubuntu16.0 虚拟机 问题:Windows访问Ubun被拒绝 解决方法: 1.先检测是否安装SSH服务 1 sudo apt-get install ssh 2.编辑ssh配置文件 1 ...
- Zabbix-Proxy 部署和运行
Zabbix-Proxy 部署&运行 前提 版本: zabbix-server 5.4 任务: 通过SNMP监控网络设备,需要需通过zabbix-proxy 发送到zabbix-server. ...
- form表单请求
form 表单的acton属性指向url:端口号/(服务器get,post的参数), meyhod='get'/'post' 请求方式,必须要加上name属性. <form action=&q ...
- BurpSuite下提示embedded browser initialisation failed(嵌入式浏览器初始化失败)的解决方法
BurpSuite可谓是渗透测试过程经常使用的神器之一,但使用中经常会碰到奇奇怪怪的问题,比如有时抓http包,发送到Repeater(中继器,也叫重发器)模块后,在右边Render模块下,却无法看到 ...
- 2022.02.27 CF811E Vladik and Entertaining Flags
2022.02.27 CF811E Vladik and Entertaining Flags https://www.luogu.com.cn/problem/CF811E Step 1 题意 在一 ...
- Vue 组件实战
目录 Vue 组件 axios实现数据请求 计算属性 案例一:首字母大写 案例二:过滤案例 监听属性 局部组件 全局组件 组件通信之父传子 组件通信之子传父 ref属性(组件间通信) 普通标签使用 组 ...