
Qt-QPalette-调色板学习
1. QPalette::Active: 获得焦点的状态
2. QPalette::Inactive: 未获得焦点的状态
3. QPalette::Disable:不可用状态
其中Active和Inactive状态在通常情况下,颜色显示是一致的。也可以根据需求设置为不一样的颜色。
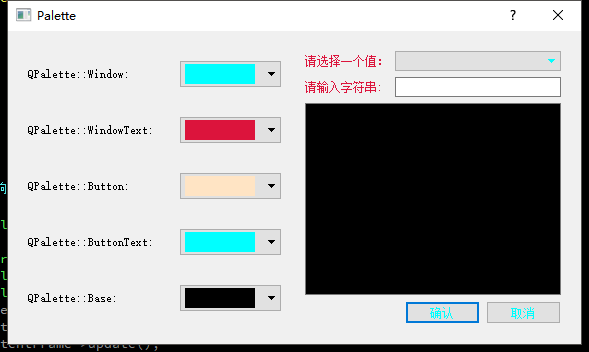
palette.h
#ifndef PALETTE_H

#define PALETTE_H

#include <QDialog>

#include <QComboBox>

#include <QLabel>

#include <QTextEdit>

#include <QPushButton>

#include <QLineEdit>

class Palette : public QDialog

{

    Q_OBJECT

public:

    Palette(QWidget *parent = 0);

    ~Palette();

    void createCtrlFrame();			//完成窗体左半部分颜色选择区的创建

    void createContentFrame();		//完成窗体右半部分的创建

    void fillColorList(QComboBox *comboBox);

    //完成向颜色下拉列表框中插入颜色的工作

private slots:

    void ShowWindow();

    void ShowWindowText();

    void ShowButton();

    void ShowButtonText();

    void ShowBase();

private:

    QFrame *ctrlFrame;                  //颜色选择面板

    QLabel *windowLabel;

    QComboBox *windowComboBox;

    QLabel *windowTextLabel;

    QComboBox *windowTextComboBox;

    QLabel *buttonLabel;

    QComboBox *buttonComboBox;

    QLabel *buttonTextLabel;

    QComboBox *buttonTextComboBox;

    QLabel *baseLabel;

    QComboBox *baseComboBox;

    QFrame *contentFrame;              	//具体显示面板

    QLabel *label1;

    QComboBox *comboBox1;

    QLabel *label2;

    QLineEdit *lineEdit2;

    QTextEdit *textEdit;

    QPushButton *OkBtn;

    QPushButton *CancelBtn;

};

#endif // PALETTE_H
palette.cpp
#include "palette.h"

#include <QHBoxLayout>

#include <QGridLayout>

Palette::Palette(QWidget *parent)

    : QDialog(parent)

{

    createCtrlFrame();

    createContentFrame();

    QHBoxLayout *mainLayout =new QHBoxLayout(this);

    mainLayout->addWidget(ctrlFrame);

    mainLayout->addWidget(contentFrame);

}

Palette::~Palette()

{

}

void Palette::createCtrlFrame()

{

    ctrlFrame =new QFrame;                  //颜色选择面板

    windowLabel =new QLabel(tr("QPalette::Window: "));

    windowComboBox =new QComboBox;			//创建一个QComboBox对象

    fillColorList(windowComboBox);

    connect(windowComboBox,SIGNAL(activated(int)),this,SLOT(ShowWindow()));

    windowTextLabel =new QLabel(tr("QPalette::WindowText: "));

    windowTextComboBox =new QComboBox;

    fillColorList(windowTextComboBox);

    connect(windowTextComboBox,SIGNAL(activated(int)),this,SLOT(ShowWindowText()));

    buttonLabel =new QLabel(tr("QPalette::Button: "));

    buttonComboBox =new QComboBox;

    fillColorList(buttonComboBox);

    connect(buttonComboBox,SIGNAL(activated(int)),this,SLOT(ShowButton()));

    buttonTextLabel =new QLabel(tr("QPalette::ButtonText: "));

    buttonTextComboBox =new QComboBox;

    fillColorList(buttonTextComboBox);

    connect(buttonTextComboBox,SIGNAL(activated(int)),this,SLOT(ShowButtonText()));

    baseLabel =new QLabel(tr("QPalette::Base: "));

    baseComboBox =new QComboBox;

    fillColorList(baseComboBox);

    connect(baseComboBox,SIGNAL(activated(int)),this,SLOT(ShowBase()));

    QGridLayout *mainLayout=new QGridLayout(ctrlFrame);

    mainLayout->setSpacing(20);

    mainLayout->addWidget(windowLabel,0,0);

    mainLayout->addWidget(windowComboBox,0,1);

    mainLayout->addWidget(windowTextLabel,1,0);

    mainLayout->addWidget(windowTextComboBox,1,1);

    mainLayout->addWidget(buttonLabel,2,0);

    mainLayout->addWidget(buttonComboBox,2,1);

    mainLayout->addWidget(buttonTextLabel,3,0);

    mainLayout->addWidget(buttonTextComboBox,3,1);

    mainLayout->addWidget(baseLabel,4,0);

    mainLayout->addWidget(baseComboBox,4,1);

}

void Palette::createContentFrame()

{

    contentFrame =new QFrame;                	//具体显示面板

    label1 =new QLabel(tr("请选择一个值:"));

    comboBox1 =new QComboBox;

    label2 = new QLabel(tr("请输入字符串: "));

    lineEdit2 =new QLineEdit;

    textEdit =new QTextEdit;

    QGridLayout *TopLayout =new QGridLayout;

    TopLayout->addWidget(label1,0,0);

    TopLayout->addWidget(comboBox1,0,1);

    TopLayout->addWidget(label2,1,0);

    TopLayout->addWidget(lineEdit2,1,1);

    TopLayout->addWidget(textEdit,2,0,1,2);

    OkBtn =new QPushButton(tr("确认"));

    CancelBtn =new QPushButton(tr("取消"));

    QHBoxLayout *BottomLayout =new QHBoxLayout;

    BottomLayout->addStretch(1);

    BottomLayout->addWidget(OkBtn);

    BottomLayout->addWidget(CancelBtn);

    QVBoxLayout *mainLayout =new QVBoxLayout(contentFrame);

    mainLayout->addLayout(TopLayout);

    mainLayout->addLayout(BottomLayout);

}

void Palette::fillColorList(QComboBox *comboBox)

{

    QStringList colorList = QColor::colorNames();

    QString color;

    foreach(color,colorList)

    {

        QPixmap pix(QSize(70,20));

        pix.fill(QColor(color));

        comboBox->addItem(QIcon(pix),NULL);

        comboBox->setIconSize(QSize(70,20));

        comboBox->setSizeAdjustPolicy(QComboBox::AdjustToContents);

        //(f)

    }

}

/*

 * 用于响应对背景颜色的选择

 */

void Palette::ShowWindow()

{

    QStringList colorList = QColor::colorNames();

    QColor color = QColor(colorList[windowComboBox->currentIndex()]);

    QPalette p = contentFrame->palette();

    p.setColor(QPalette::Window,color);

    contentFrame->setPalette(p);

    contentFrame->update();

}

/*

 * 用于响应对应文字颜色的选择

 */

void Palette::ShowWindowText()

{

    QStringList colorList = QColor::colorNames();

    QColor color = colorList[windowTextComboBox->currentIndex()];

    QPalette p = contentFrame->palette();

    p.setColor(QPalette::WindowText,color);

    contentFrame->setPalette(p);

}

void Palette::ShowButton()

{

    QStringList colorList = QColor::colorNames();

    QColor color =QColor(colorList[buttonComboBox->currentIndex()]);

    QPalette p = contentFrame->palette();

    p.setColor(QPalette::Button,color);

    contentFrame->setPalette(p);

    contentFrame->update();

}

void Palette::ShowButtonText()

{

    QStringList colorList = QColor::colorNames();

    QColor color = QColor(colorList[buttonTextComboBox->currentIndex()]);

    QPalette p =contentFrame->palette();

    p.setColor(QPalette::ButtonText,color);

    contentFrame->setPalette(p);

}

void Palette::ShowBase()

{

    QStringList colorList = QColor::colorNames();

    QColor color = QColor(colorList[baseComboBox->currentIndex()]);

    QPalette p = contentFrame->palette();

    p.setColor(QPalette::Base,color);

    contentFrame->setPalette(p);

}

Qt-QPalette-调色板学习的更多相关文章
- Pyqt 设置 背景颜色和背景图片、 QPalette 调色板 与QPainter 画板区别 、 不规则图片
设置 背景颜色和背景图片 首先设置autoFillBackground属性为真然后定义一个QPalette对象设置QPalette对象的背景属性(颜色或图片)最后设置QWidget对象的Palette ...
- (转)Qt Model/View 学习笔记 (七)——Delegate类
Qt Model/View 学习笔记 (七) Delegate 类 概念 与MVC模式不同,model/view结构没有用于与用户交互的完全独立的组件.一般来讲, view负责把数据展示 给用户,也 ...
- (转)Qt Model/View 学习笔记 (五)——View 类
Qt Model/View 学习笔记 (五) View 类 概念 在model/view架构中,view从model中获得数据项然后显示给用户.数据显示的方式不必与model提供的表示方式相同,可以与 ...
- Qt 智能指针学习(7种指针)
Qt 智能指针学习 转载自:http://blog.csdn.net/dbzhang800/article/details/6403285 从内存泄露开始? 很简单的入门程序,应该比较熟悉吧 ^_^ ...
- 第15.10节 PyQt(Python+Qt)入门学习:Qt Designer可视化设计界面组件与QWidget类相关的组件属性详解
PyQt学习有阵子了,对章节的骨架基本考虑好了,准备本节就写组件的属性的,结果一是日常工作繁忙,经常晚上还要加班,二是Qt的组件属性很多,只能逐一学习.研究和整理,花的时间有点长,不过终于将可视化设计 ...
- Qt 设置背景图片3种方法(三种方法:QPalette调色板,paintEvent,QSS)
方法1. setStylSheet{"QDialog{background-image:url()"}} //使用styleSheet 这种方法的好处是继承它的dialog都会自 ...
- QT控件学习
一.QPushButton 1.设置背景色: ui->pushButton->setStyleSheet("background-color: rgb(170, 0, 255)& ...
- qt和makefile学习网址
http://blog.51cto.com/zt/20/1/ ---qt学习网站 http://www.chinaunix.net/old_jh/23/408225.html [精华] 跟我一起 ...
- 【Qt官方例程学习笔记】Application Example(构成界面/QAction/退出时询问保存/用户偏好载入和保存/文本文件的载入和保存/QCommandLineParser解析运行参数)
The Application example shows how to implement a standard GUI application with menus, toolbars, and ...
- 【Qt官方例程学习笔记】Raster Window Example(画笔的平移/旋转/缩放应用)
这个例子显示了如何使用QPainter渲染一个简单的QWindow. 值得学习的内容 <QtGui>头文件 #include <QtGui>就可以使用Qt GUI模块中的所有类 ...
随机推荐
- IP黑白名单
防攻击可以增加IP白名单/etc/hosts.allow和黑名单/etc/hosts.deny /etc/hosts.allow IP白名单 /etc/hosts.deny IP黑名单 /etc ...
- Anaconda常用命令
conda版本: conda --version 环境信息: 激活环境后,conda info 查看环境已安装包: conda list 新建环境: conda create -n {NAME} [ ...
- PAT——1005. 继续(3n+1)猜想 (25)
卡拉兹(Callatz)猜想已经在1001中给出了描述.在这个题目里,情况稍微有些复杂. 当我们验证卡拉兹猜想的时候,为了避免重复计算,可以记录下递推过程中遇到的每一个数.例如对n=3进行验证的时候, ...
- Flex控件之repeater和radioButton应用
代码:http://www.cnblogs.com/modou/articles/2108346.html <?xml version="1.0" encoding=&quo ...
- 小修改,让mvc的验证锦上添点花
首先,mvc的客户端验证用的是jquery.validate.js, jquery.validate本身已经提供了很好的扩展功能,通过简单点配置就可以做得更好看些. 而Microsoft通过jquer ...
- 常用的layer弹出层
本文来自 松耦合 的CSDN 博客 ,全文地址请点击:https://blog.csdn.net/dunegao/article/details/78978448?utm_source=copy 常用 ...
- ESP8266 wifi干扰钓鱼实现
说明:绝大部分都是对着下面的参考文章来做的.这里只把基本流程和我自己遇到的问题写一下.如有其他问题可以访问文章末的参考文章进行查找! esp8266模块 我们需要购买一块esp8266模块,如下图所示 ...
- 逍遥云天 微信小程序开发之获取用户手机号码——使用简单php接口demo进行加密数据解密
后边要做一个微信小程序,并要能获取用户微信绑定的手机号码.而小程序开发文档上边提供的获取手机号码的接口(getPhoneNumber())返回的是密文,需要服务器端进行解密,但是官方提供的开发文档一如 ...
- 【js】中的小技巧
本文主要介绍一些JS中用到的小技巧 1. 类型强制转换 1.1 string强制转换为数字 可以用*1来转化为数字(实际上是调用.valueOf方法) 然后使用Number.isNaN来判断是否为 ...
- DW CS5序列号
先要改host文件,以防止其连接 Adobe 的激活验证服务器 1. 用记事本编辑“C:\Windows\System32\Drivers\etc\”目录下的 hosts 文件, 在末尾加上: 127 ...