
【经典转载】关于Struts2的拦截器
拦截器(interceptor)是Struts2最强大的特性之一,也可以说是struts2的核心,拦截器可以让你在Action和result被执行之前或之后进行一些处理。同时,拦截器也可以让你将通用的代码模块化并作为可重用的类。Struts2中的很多特性都是由拦截器来完成的。拦截是AOP的一种实现策略。在Webwork的中文文档的解释为:拦截器是动态拦截Action调用的对象。它提供了一种机制可以使开发者可以定义在一个action执行的前后执行的代码,也可以在一个action执行前阻止其执行。同时也是提供了一种可以提取action中可重用的部分的方式。谈到拦截器,还有一个词大家应该知道——拦截器链(Interceptor Chain,在Struts 2中称为拦截器栈Interceptor Stack)。拦截器链就是将拦截器按一定的顺序联结成一条链。在访问被拦截的方法或字段时,拦截器链中的拦截器就会按其之前定义的顺序被调用。
一.拦截器的实现原理:
大部分时候,拦截器方法都是通过代理的方式来调用的。Struts 2的拦截器实现相对简单。当请求到达Struts 2的ServletDispatcher时,Struts 2会查找配置文件,并根据其配置实例化相对的拦截器对象,然后串成一个列表(list),最后一个一个地调用列表中的拦截器。事实上,我们之所以能够如此灵活地使用拦截器,完全归功于“动态代理”的使用。动态代理是代理对象根据客户的需求做出不同的处理。对于客户来说,只要知道一个代理对象就行了。那Struts2中,拦截器是如何通过动态代理被调用的呢?当Action请求到来的时候,会由系统的代理生成一个Action的代理对象,由这个代理对象调用Action的execute()或指定的方法,并在struts.xml中查找与该Action对应的拦截器。如果有对应的拦截器,就在Action的方法执行前(后)调用这些拦截器;如果没有对应的拦截器则执行Action的方法。其中系统对于拦截器的调用,是通过ActionInvocation来实现的。代码如下:
- if (interceptors.hasNext()) {
- Interceptor interceptor=(Interceptor)interceptors.next();
- resultCode = interceptor.intercept(this);
- } else {
- if (proxy.getConfig().getMethodName() == null) {
- resultCode = getAction().execute();
- } else {
- resultCode = invokeAction(getAction(), proxy.getConfig());
- }
- }
可以发现Action并没有与拦截器发生直接关联,而完全是“代理”在组织Action与拦截器协同工作。如下图:
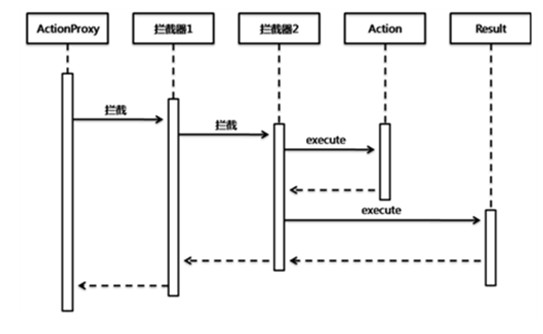
二.拦截器执行分析
我们大家都知道,Interceptor的接口定义没有什么特别的地方,除了init和destory方法以外,intercept方法是实现整个拦截器机制的核心方法。而它所依赖的参数ActionInvocation则是著名的Action调度者。我们再来看看一个典型的Interceptor的抽象实现类:
- public abstract class AroundInterceptor extends AbstractInterceptor {
- /* (non-Javadoc)
- * @see com.opensymphony.xwork2.interceptor.AbstractInterceptor#intercept(com.opensymphony.xwork2.ActionInvocation)
- */
- @Override
- public String intercept(ActionInvocation invocation) throws Exception {
- String result = null;
- before(invocation);
- // 调用下一个拦截器,如果拦截器不存在,则执行Action
- result = invocation.invoke();
- after(invocation, result);
- return result;
- }
- public abstract void before(ActionInvocation invocation) throws Exception;
- public abstract void after(ActionInvocation invocation, String resultCode) throws Exception;
- }
在这个实现类中,实际上已经实现了最简单的拦截器的雏形。这里需要指出的是一个很重要的方法invocation.invoke()。这是ActionInvocation中的方法,而ActionInvocation是Action调度者,所以这个方法具备以下2层含义:
1. 如果拦截器堆栈中还有其他的Interceptor,那么invocation.invoke()将调用堆栈中下一个Interceptor的执行。
2. 如果拦截器堆栈中只有Action了,那么invocation.invoke()将调用Action执行。
所以,我们可以发现,invocation.invoke()这个方法其实是整个拦截器框架的实现核心。基于这样的实现机制,我们还可以得到下面2个非常重要的推论:
1. 如果在拦截器中,我们不使用invocation.invoke()来完成堆栈中下一个元素的调用,而是直接返回一个字符串作为执行结果,那么整个执行将被中止。
2. 我们可以以invocation.invoke()为界,将拦截器中的代码分成2个部分,在invocation.invoke()之前的代码,将会在Action之前被依次执行,而在invocation.invoke()之后的代码,将会在Action之后被逆序执行。
由此,我们就可以通过invocation.invoke()作为Action代码真正的拦截点,从而实现AOP。
三.源码解析
下面我们通过查看源码来看看Struts2是如何保证拦截器、Action与Result三者之间的执行顺序的。之前我曾经提到,ActionInvocation是Struts2中的调度器,所以事实上,这些代码的调度执行,是在ActionInvocation的实现类中完成的,这里,我抽取了DefaultActionInvocation中的invoke()方法,它将向我们展示一切。
- /**
- * @throws ConfigurationException If no result can be found with the returned code
- */
- public String invoke() throws Exception {
- String profileKey = "invoke: ";
- try {
- UtilTimerStack.push(profileKey);
- if (executed) {
- throw new IllegalStateException("Action has already executed");
- }
- // 依次调用拦截器堆栈中的拦截器代码执行
- if (interceptors.hasNext()) {
- final InterceptorMapping interceptor = (InterceptorMapping) interceptors.next();
- UtilTimerStack.profile("interceptor: "+interceptor.getName(),
- new UtilTimerStack.ProfilingBlock<String>() {
- public String doProfiling() throws Exception {
- // 将ActionInvocation作为参数,调用interceptor中的intercept方法执行
- resultCode = interceptor.getInterceptor().intercept(DefaultActionInvocation.this);
- return null;
- }
- });
- } else {
- resultCode = invokeActionOnly();
- }
- // this is needed because the result will be executed, then control will return to the Interceptor, which will
- // return above and flow through again
- if (!executed) {
- // 执行PreResultListener
- if (preResultListeners != null) {
- for (Iterator iterator = preResultListeners.iterator();
- iterator.hasNext();) {
- PreResultListener listener = (PreResultListener) iterator.next();
- String _profileKey="preResultListener: ";
- try {
- UtilTimerStack.push(_profileKey);
- listener.beforeResult(this, resultCode);
- }
- finally {
- UtilTimerStack.pop(_profileKey);
- }
- }
- }
- // now execute the result, if we're supposed to
- // action与interceptor执行完毕,执行Result
- if (proxy.getExecuteResult()) {
- executeResult();
- }
- executed = true;
- }
- return resultCode;
- }
- finally {
- UtilTimerStack.pop(profileKey);
- }
- }
从源码中,我们可以看到Action层的4个不同的层次,在这个方法中都有体现,他们分别是:拦截器(Interceptor)、Action、PreResultListener和Result。在这个方法中,保证了这些层次的有序调用和执行。由此我们也可以看出Struts2在Action层次设计上的众多考虑,每个层次都具备了高度的扩展性和插入点,使得程序员可以在任何喜欢的层次加入自己的实现机制改变Action的行为。
在这里,需要特别强调的,是其中拦截器部分的执行调用:
- resultCode = interceptor.getInterceptor().intercept(DefaultActionInvocation.this);
表面上,它只是执行了拦截器中的intercept方法,如果我们结合拦截器来看,就能看出点端倪来:
- public String intercept(ActionInvocation invocation) throws Exception {
- String result = null;
- before(invocation);
- // 调用invocation的invoke()方法,在这里形成了递归调用
- result = invocation.invoke();
- after(invocation, result);
- return result;
- }
原来在intercept()方法又对ActionInvocation的invoke()方法进行递归调用,ActionInvocation循环嵌套在intercept()中,一直到语句result = invocation.invoke()执行结束。这样,Interceptor又会按照刚开始执行的逆向顺序依次执行结束。一个有序链表,通过递归调用,变成了一个堆栈执行过程,将一段有序执行的代码变成了2段执行顺序完全相反的代码过程,从而巧妙地实现了AOP。这也就成为了Struts2的Action层的AOP基础。
下一篇就带大家一起来自定义自己的拦截器请看:http://blog.csdn.net/csh624366188/article/details/7545677
转载自:http://blog.csdn.net/csh624366188/article/details/7543342
【经典转载】关于Struts2的拦截器的更多相关文章
- 简单理解Struts2中拦截器与过滤器的区别及执行顺序
简单理解Struts2中拦截器与过滤器的区别及执行顺序 当接收到一个httprequest , a) 当外部的httpservletrequest到来时 b) 初始到了servlet容器 传递给一个标 ...
- struts2总结六: Struts2的拦截器
一.Struts2的系统结构图
- Struts2使用拦截器完成权限控制示例
http://aumy2008.iteye.com/blog/146952 Struts2使用拦截器完成权限控制示例 示例需求: 要求用户登录,且必须为指定用户名才可以查看系统中某个视图资源:否 ...
- Struts2自定义拦截器Interceptor以及拦截器登录实例
1.在Struts2自定义拦截器有三种方式: -->实现Interceptor接口 public class QLInterceptorAction implements Interceptor ...
- struts2之拦截器
1. 为什么需要拦截器 早期MVC框架将一些通用操作写死在核心控制器中,致使框架灵活性不足.可扩展性降低, Struts 2将核心功能放到多个拦截器中实现,拦截器可自由选择和组合,增强了灵活性,有利于 ...
- Struts2【拦截器】就是这么简单
什么是拦截器 拦截器Interceptor.....拦截器是Struts的概念,它与过滤器是类似的...可以近似于看作是过滤器 为什么我们要使用拦截器 前面在介绍Struts的时候已经讲解过了,Str ...
- 【struts2】拦截器基础
1)拦截器是什么? 拦截器(Interceptor)是Struts2最强大的特性之一,它是一种可以让你在Action执行之前和Result执行之后进行一些功能处理的机制.来回顾一下官方给出的Strut ...
- JavaWeb框架_Struts2_(三)---->Struts2的拦截器
2. Struts2的拦截器(使用拦截器实现权限控制) 2.1 拦截器的概述 拦截器是Struts2的核心组成部分,它可以动态的拦截Action调用的对象,类似与Servlet中的过滤器.Struts ...
- (转)Struts2的拦截器
http://blog.csdn.net/yerenyuan_pku/article/details/68648101 Struts2的拦截器 拦截器的概述 拦截器,在AOP(Aspect-Orien ...
- 通俗易懂之SpringMVC&Struts2前端拦截器详解
直接进入主题吧!一,配置Struts2的拦截器分两步走1配置对应的拦截器类:2在配置文件Struts.xml中进行配置拦截器同时在Strust2中配置拦截器类有三种方法1实现Interceptor接口 ...
随机推荐
- python面向对象--类的内置函数
#isinstance(obj,cls)判断obj是否是类cls的实例 #issubclass(cls,cls1)判断cls是否是cls1的子类或派生类 class Foo: pass class B ...
- Ubuntu16.04 启用root权限
装了Ubuntu 16.04之后想使用超级权限对系统进行操作 使用命令 su - 切换超级用户,提示输入密码,却怎么都不对,网上找的资料说是没有启用root权限,于是根据网上提供的方法启用root权限 ...
- 记录一次 Linux crontab 执行django 脚本 失败 的经历和解决办法
目的是想通过定时任务来执行一次数据统计,本来可以用celery来做,但是想着这个项目整个就没用到异步的地方,所以决定用crontab来做.之前做过数据库的热备份,想来用该没啥问题,但是现实打脸啪啪响. ...
- bzoj3252 攻略 贪心+dfs序+线段树
题目传送门 https://lydsy.com/JudgeOnline/problem.php?id=3252 题解 有一个非常显然的贪心思路:每次选择目前走到那儿能够获得的新权值最大的点. 证明的话 ...
- thinkphp获取目录的方法
1.获取根目录 http://localhost/ 下面两种方法效果一样 $_SERVER['REQUEST_SCHEME']."://".$_SERVER['HTTP_HOST' ...
- tensorflow函数介绍 (5)
1.tf.ConfigProto tf.ConfigProto一般用在创建session的时候,用来对session进行参数配置: with tf.Session(config=tf.ConfigPr ...
- 一个KVO 实现WKWebView加载进度条的例子 (注意最后移除观察者)
// // OpenWebViewController.m // Treasure // // Created by 蓝蓝色信子 on 16/7/29. // Copyright © 2016年 GY ...
- Android逆向之旅---基于对so中的函数加密技术实现so加固
一.前言 今天我们继续来介绍so加固方式,在前面一篇文章中我们介绍了对so中指定的段(section)进行加密来实现对so加固 http://blog.csdn.net/jiangwei0910410 ...
- Yii 1.1 常规框架部署和配置
<?php //index.php //入口文件配置操作 // change the following paths if necessary $yii=dirname(__FILE__).'/ ...
- css3的各种属性的讲解
1.渐变(gradients) 水平渐变:linear gradient 语法:background:linear-gradient(direction,color1,color2); directi ...