
Network基础(四):MAC地址表及邻居信息查看、配置接口速率及双工模式、配置交换机管理IP
一、MAC地址表及邻居信息查看
目标:
本例要求为修改计算机名并加入工作组:
- 查看交换机MAC地址表
- 查看CISCO设备邻居信息
方案:
网络拓扑,如下图所示。
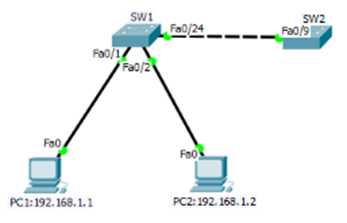
步骤:
步骤一:查看交换机sw1的mac地址表
1)在PC1上ping PC2:192.168.1.2:
PC>ipconfig /all
FastEthernet0 Connection:(default port)
Connection-specific DNS Suffix..:
Physical Address................: 00E0.B079.7815
Link-local IPv6 Address.........: FE80::2E0:B0FF:FE79:7815
IP Address......................: 192.168.1.1
Subnet Mask.....................: 255.255.255.0
Default Gateway.................: 0.0.0.0
DNS Servers.....................: 0.0.0.0
DHCP Servers....................: 0.0.0.0
DHCPv6 Client DUID..............: 00-01-00-01-E3-E0-53-04-00-E0-B0-79-78-15
PC>ping 192.168.1.2
Pinging 192.168.1.2 with 32 bytes of data:
Reply from 192.168.1.2: bytes=32 time=1ms TTL=128
Reply from 192.168.1.2: bytes=32 time=0ms TTL=128
Reply from 192.168.1.2: bytes=32 time=1ms TTL=128
Reply from 192.168.1.2: bytes=32 time=0ms TTL=128
Ping statistics for 192.168.1.2:
Packets: Sent = 4, Received = 4, Lost = 0 (0% loss),
Approximate round trip times in milli-seconds:
Minimum = 0ms, Maximum = 1ms, Average = 0ms
2)查看PC2的IP信息
PC>ipconfig /all
FastEthernet0 Connection:(default port)
Connection-specific DNS Suffix..:
Physical Address................: 0003.E49E.6445
Link-local IPv6 Address.........: FE80::203:E4FF:FE9E:6445
IP Address......................: 192.168.1.2
Subnet Mask.....................: 255.255.255.0
Default Gateway.................: 0.0.0.0
DNS Servers.....................: 0.0.0.0
DHCP Servers....................: 0.0.0.0
DHCPv6 Client DUID..............: 00-01-00-01-DB-A7-C6-5E-00-03-E4-9E-64-45
3)在查看交换机sw1的mac地址表
Switch#hostname SW1
SW1#show mac-address-table
Mac Address Table
-------------------------------------------
Vlan Mac Address Type Ports
---- ----------- -------- -----
1 0003.e49e.6445 DYNAMIC Fa0/2
1 0010.1148.9309 DYNAMIC Fa0/24
1 00e0.b079.7815 DYNAMIC Fa0/1
步骤二:查看交换机sw1邻居信息
1)更改交换机sw2的主机名
Switch>enable
SW2#configure terminal
SW2(config)#hostname SW2
SW2(config)#
2)进入交换机SW1特权模式通过命令查看CISCO设备邻居信息:
Switch#show cdp neighbors
Capability Codes: R - Router, T - Trans Bridge, B - Source Route Bridge
S - Switch, H - Host, I - IGMP, r - Repeater, P - Phone
Device ID Local Intrfce Holdtme Capability Platform Port ID
SW2 Fas 0/24 174 S 2950 Fas 0/9
二、配置接口速率及双工模式
目标:
配置交换机接口双工模式为半双工,端口速率为10M并查看
方案:
网络拓扑图如下图
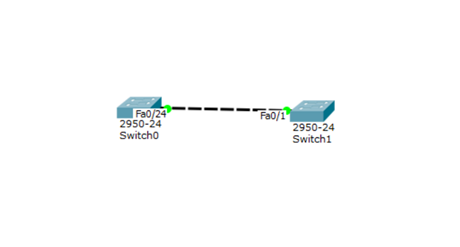
步骤:
步骤一:配置交换机接口模式
Switch>enable
Switch#configure terminal
Switch(config)#interface fastEthernet 0/24
Switch(config-if)#duplex half
Switch(config-if)#speed 10
Switch#show interfaces fastEthernet 0/24
FastEthernet0/24 is up, line protocol is up (connected)
Hardware is Lance, address is 00d0.5807.8301 (bia 00d0.5807.8301)
BW 10000 Kbit, DLY 1000 usec,
reliability 255/255, txload 1/255, rxload 1/255
Encapsulation ARPA, loopback not set
Keepalive set (10 sec)
Half-duplex, 10Mb/s
input flow-control is off, output flow-control is off
ARP type: ARPA, ARP Timeout 04:00:00
Last input 00:00:08, output 00:00:05, output hang never
Last clearing of "show interface" counters never
Input queue: 0/75/0/0 (size/max/drops/flushes); Total output drops: 0
Queueing strategy: fifo
Output queue :0/40 (size/max)
5 minute input rate 0 bits/sec, 0 packets/sec
5 minute output rate 0 bits/sec, 0 packets/sec
956 packets input, 193351 bytes, 0 no buffer
Received 956 broadcasts, 0 runts, 0 giants, 0 throttles
0 input errors, 0 CRC, 0 frame, 0 overrun, 0 ignored, 0 abort
0 watchdog, 0 multicast, 0 pause input
0 input packets with dribble condition detected
2357 packets output, 263570 bytes, 0 underruns
0 output errors, 0 collisions, 10 interface resets
0 babbles, 0 late collision, 0 deferred
0 lost carrier, 0 no carrier
0 output buffer failures, 0 output buffers swapped out
Switch#
最长 = 0ms,平均 = 0ms
三、配置交换机管理IP
目标:
配置交换机管理IP为192.168.1.1 ,默认网关为192.168.1.100
方案:
网络拓扑图如下图
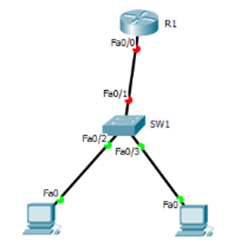
步骤:
步骤一:配置交换机接口模式
1)配置路由器R1的接口IP作为192.168.1.0网段的网关地址
Router>enable
Router#configure terminal
Router(config)#interface fastEthernet 0/0
Router(config-if)#ip address 192.168.1.100
Router(config-if)#ip address 192.168.1.100 255.255.255.0
Router(config-if)#no shutdown
2)配置交换机管理IP和网关地址
Switch(config)#interface vlan 1
Switch(config-if)#ip address 192.168.1.1 255.255.255.0
Switch(config-if)#no shutdown
Switch(config-if)#exit
Switch(config)#ip default-gateway 192.168.1.100
3)用ping命令进行测试
PC>ipconfig
FastEthernet0 Connection:(default port)
Link-local IPv6 Address.........: FE80::200:CFF:FEE4:90B0
IP Address......................: 192.168.1.2
Subnet Mask.....................: 255.255.255.0
Default Gateway.................: 192.168.1.100
PC>ping 192.168.1.1
Pinging 192.168.1.1 with 32 bytes of data:
Request timed out.
Reply from 192.168.1.1: bytes=32 time=0ms TTL=255
Reply from 192.168.1.1: bytes=32 time=3ms TTL=255
Reply from 192.168.1.1: bytes=32 time=0ms TTL=255
Ping statistics for 192.168.1.1:
Packets: Sent = 4, Received = 3, Lost = 1 (25% loss),
Approximate round trip times in milli-seconds:
Minimum = 0ms, Maximum = 3ms, Average = 1ms
PC>ping 192.168.1.100
Pinging 192.168.1.100 with 32 bytes of data:
Reply from 192.168.1.100: bytes=32 time=50ms TTL=255
Reply from 192.168.1.100: bytes=32 time=0ms TTL=255
Reply from 192.168.1.100: bytes=32 time=0ms TTL=255
Reply from 192.168.1.100: bytes=32 time=0ms TTL=255
Ping statistics for 192.168.1.100:
Packets: Sent = 4, Received = 4, Lost = 0 (0% loss),
Approximate round trip times in milli-seconds:
Minimum = 0ms, Maximum = 50ms, Average = 12ms
Network基础(四):MAC地址表及邻居信息查看、配置接口速率及双工模式、配置交换机管理IP的更多相关文章
- 交换机-查看mac地址表
1.使用交换机命令行 en 或者 enable 进入特权模式 Switch> Switch>en Switch# Switch# 2.查看交换机中的MAC地址表 Switch#sh ...
- (转载)详解网络传输中的三张表,MAC地址表、ARP缓存表以及路由表
郑重声明:原文转载于http://dengqi.blog.51cto.com/5685776/1223132 向好文章致敬!!! 一:MAC地址表详解 说到MAC地址表,就不得不说一下交换机的工作原理 ...
- 网络传输中的三张表,MAC地址表、ARP缓存表以及路由表
一:MAC地址表详解 说到MAC地址表,就不得不说一下交换机的工作原理了,因为交换机是根据MAC地址表转发数据帧的.在交换机中有一张记录着局域网主机MAC地址与交换机接口的对应关系的表,交换机就是根据 ...
- MAC地址表配置与绑定
MAC地址表分类 ---静态MAC地址表项由用户手工配置,表项不老化: ---黑洞MAC地址表项包括源黑洞MAC地址表项和目的黑洞MAC地址表项,用于丢弃含有特定源MAC地址或目的MAC地址的报文(例 ...
- MAC地址表、ARP缓存表以及路由表
一:MAC地址表详解 说到MAC地址表,就不得不说一下交换机的工作原理了,因为交换机是根据MAC地址表转发数据帧的.在交换机中有一张记录着局域网主机MAC地址与交换机接口的对应关系的表,交换机就是根据 ...
- 详解网络传输中的三张表,MAC地址表、ARP缓存表以及路由表
原创作品,允许转载,转载时请务必以超链接形式标明文章 原始出处 .作者信息和本声明.否则将追究法律责任.http://dengqi.blog.51cto.com/5685776/1223132 一:M ...
- 交换机工作原理、MAC地址表、路由器工作原理详解
一:MAC地址表详解 说到MAC地址表,就不得不说一下交换机的工作原理了,因为交换机是根据MAC地址表转发数据帧的.在交换机中有一张记录着局域网主机MAC地址与交换机接口的对应关系的表,交换机就是根据 ...
- 巧用MAC地址表
对于身处网络环境的人来说,不少朋友应该遇到过这种的情况:某一个终端找不到接在了哪一个交换机口上,也不知道数据包怎样走的. ok,那么这时候MAC地址表就作用了,拿下图的实验环境(H3C)来说好了 环境 ...
- [转载]详解网络传输中的三张表,MAC地址表、ARP缓存表以及路由表
[转载]详解网络传输中的三张表,MAC地址表.ARP缓存表以及路由表 虽然学过了计算机网络,但是这部分还是有点乱.正好在网上看到了一篇文章,讲的很透彻,转载过来康康. 本文出自 "邓奇的Bl ...
随机推荐
- JS中数据结构之链表
1.链表的基本介绍 数组不总是组织数据的最佳数据结构,在很多编程语言中,数组的长度是固定的,所以当数组已被数据填满时,再要加入新的元素就会非常困难.在数组中,添加和删除元素也很麻烦,因为需要将数组中的 ...
- Fraction Comparision
题目链接 题意:输入x,a,y,b求x/a和y/b的大小,范围long long int 思路:因为不想用精度,嫌麻烦,所以用了个巧方法.先求x/a和y/b整形的大小,如果相等,再求(x%a)*b和( ...
- 转载:IDEA lombok插件的安装和使用
转载自:https://jingyan.baidu.com/article/0a52e3f4e53ca1bf63ed725c.html lombok插件的安装 1 首先我们需要安装IntelliJ ...
- 原生js深拷贝函数
function deepClone(data){ if(!data || !(data instanceof Object) || (typeof data=="function" ...
- 2.tensorflow——Softmax回归
import numpy as np import tensorflow as tf import matplotlib.pyplot as plt from tensorflow.examples. ...
- git设置忽略文件.gitignore
在仓库目录下新建一个名为.gitignore的文件(因为是点开头,没有文件名,没办法直接在windows目录下直接创建,必须通过右键Git Bash,按照linux的方式来新建.gitignore文件 ...
- Qt Creator 中的插件Plugin, 区分说明。。。
Qt Creator 中可以创建 三中类型的插件Plugin: 1.用的最多的,派生自QGenericPlugin类: 在新建Library, Plugin类型工程中,新建. 调用使用QPlugi ...
- Cocos2d-x之Label
| 版权声明:本文为博主原创文章,未经博主允许不得转载. 在游戏开发中经常会使用标签文字,例如,游戏介绍,玩家积分,菜单选项,文字提示等等. LabelTTF 直接支持使用 TTF 字库 ...
- apache 安装配置 (centos)
1. 使用yum包安装Apache软件 [root@Apache ~]# yum -y install httpd* [root@Apache ~]# rpm -qa | grep httpd --查 ...
- PyQt5实战1-搭建conda环境
一.安装Anaconda 下载地址:https://repo.anaconda.com/archive/Anaconda3-2019.03-Windows-x86_64.exe 软件版本:Anacon ...