Springboot注解@ServletComponentScan和@ComponentScan(转)
一、SpringBoot中使用Servlet
在SpringBootApplication上使用@ServletComponentScan注解后,Servlet、Filter、Listener可以直接通过@WebServlet、@WebFilter、@WebListener注解自动注册,无需其他代码。
1.在入口Application类上加入注解@ServletComponentScan
package com.hui;

import org.springframework.boot.SpringApplication;

import org.springframework.boot.autoconfigure.SpringBootApplication;

import org.springframework.boot.web.servlet.ServletComponentScan;

@SpringBootApplication

@ServletComponentScan

public class Application {

    public static void main(String[] args) {

        SpringApplication.run(Application.class, args);

    }

}
2.新建Servlet类,继承HttpServlet并且加入注解@WebServlet(name=“TestServlet”,urlPatterns="/test")
package com.hui.qiang;

import java.io.IOException;

import javax.servlet.ServletException;

import javax.servlet.annotation.WebServlet;

import javax.servlet.http.HttpServlet;

import javax.servlet.http.HttpServletRequest;

import javax.servlet.http.HttpServletResponse;

@WebServlet(name="TestServlet",urlPatterns="/test")

public class TestServlet extends HttpServlet {

    private static final long serialVersionUID = 1L;

    @Override

    protected void doGet(HttpServletRequest req, HttpServletResponse resp)

            throws ServletException, IOException {

        System.out.println("doGet");

    }

}
3.之后运行代码,在浏览器地址栏输入http://localhost:8080/test,若看到控制台打印doGet,则表示Servlet创建成功。
注意:
(1)如果不加@ServletComponentScan注解则会报404即找不到页面,控制台也扫描不到我们配置的servlet:/test,即无法被映射
(2)如果Application类和Servlet类不在同一包下,则@ServletComponentScan需要添加相应的路径,如Application类在包com.hui.xiao下,则写为@ServletComponentScan(“com.hui.xiao”)或@ServletComponentScan(“com.hui”)


二、Spring, Spring Boot中的@ComponentScan注解用法介绍
@ComponentScan
如果你理解了ComponentScan,你就理解了Spring.
Spring是一个依赖注入(dependency injection)框架。所有的内容都是关于bean的定义及其依赖关系。
定义Spring Beans的第一步是使用正确的注解-@Component或@Service或@Repository.
但是,Spring不知道你定义了某个bean除非它知道从哪里可以找到这个bean.
ComponentScan做的事情就是告诉Spring从哪里找到bean
由你来定义哪些包需要被扫描。一旦你指定了,Spring将会将在被指定的包及其下级的包(sub packages)中寻找bean
下面分别介绍在Spring Boot项目和非Spring Boot项目(如简单的JSP/Servlet或者Spring MVC应用)中如何定义ComponentScan
注:@ComponentScan的不同写法
1.@ComponentScan({“com.xiao.hui”,“com.xiao.qiang”})或@ComponentScan(basePackages = {“com.xiao.hui”,“com.xiao.qiang”})
2.@ComponentScan(“com.xiao”)或@ComponentScan(value = “com.xiao”)或@ComponentScan(basePackages = { “com.xiao” })
3.@ComponentScan(basePackageClasses=要扫描类.class所在位置的包) 意思是要扫描哪个类所在的包,如@ComponentScan(basePackageClasses=hehe.class),这种写法不如上面的那种写法好有局限性
Spring Boot项目
总结:
1.SpringBoot在写启动类的时候如果不使用@ComponentScan指明对象扫描范围,默认指扫描当前启动类所在的包里的对象,如果你的其他包都在使用了@SpringBootApplication注解的主类所在的包及其下级包,则你什么都不用做,SpringBoot会自动帮你把其他包都扫描了。为了方便,我一般都把主类放在了所有类的上一级包中,如项目所有的class文件都放在了包com.beauty的下级包中,则把spring boot的主类放在包com.beauty下。
2.如果当前启动类没有包,则在启动时会报错:Your ApplicationContext is unlikely to start due to a @ComponentScan of the default package错误,因为启动类不能直接放在main/java文件夹下,必须要建一个包把它放进去或者使用@ComponentScan指明要扫描的包。
3.如果你有一些bean所在的包,不在主类的包及其下级包,那么你需要手动加上@ComponentScan注解并指定那个bean所在的包。
举个栗子,看下面定义的类:
package com.xiao.qiang.qianming;

import org.springframework.boot.SpringApplication;

import org.springframework.boot.autoconfigure.SpringBootApplication;

import org.springframework.context.ApplicationContext;

import org.springframework.context.ConfigurableApplicationContext;

@SpringBootApplication

public class SpringbootApplication {

    public static void main(String[] args) {

        ApplicationContext applicationContext =

                SpringApplication.run(SpringbootApplication.class, args);

        for (String name : applicationContext.getBeanDefinitionNames()) {

            System.out.println(name);

        }

    }

}
类SpringbootApplication在com.xiao.qiang.qianming包下,这个类使用了@SpringBootApplication注解,该注解定义了Spring将自动扫描包com.xiao.qiang.qianming及其子包下的bean
如果你项目中所有的类都定义在上面的包及其子包下,那你不需要做任何事。
但假如你一个类定义在包com.xiao.hui下,则你需要将这个新包也纳入扫描的范围,有两个方案可以达到这个目的。
方案1
定义@ComponentScan(“com.xiao”),这么做扫描的范围扩大到整个父包com.xiao
@ComponentScan("com.xiao")

@SpringBootApplication

public class SpringbootIn10StepsApplication {
方案2
定义分别扫描两个包
@ComponentScan({"com.xiao.hui","com.xiao.qiang"})

@SpringBootApplication

public class SpringbootIn10StepsApplication {
非Spring Boot项目
在非Spring Boot项目中,我们必须显式地使用@ComponentScan注解定义被扫描的包,可以通过XML文件在应用上下文中定义或在Java代码中对应用上下文定义
Java代码方式:
@ComponentScan({"com.xiao.package1","com.xiao.package2"})

@Configuration

public class SpringConfiguration {
注:@Configuration 和@ComponentScan注解背后会做什么呢?
其实很简单,@ComponentScan告诉Spring 哪个packages 的用注解标识的类 会被spring自动扫描并且装入bean容器。
例如,如果你有个类用@Controller注解标识了,那么,如果不加上@ComponentScan,自动扫描该controller,那么该Controller就不会被spring扫描到,更不会装入spring容器中,因此你配置的这个Controller也没有意义。
类上的注解@Configuration 是最新的用注解配置spring,也就是说这是个配置文件,和原来xml配置是等效的,只不过现在用java代码进行配置了 加上一个@Configuration注解就行了,是不是很方便,不需要那么繁琐的xml配置了,这样基于注解的配置,可读性也大大增高了。
XML文件方式:
<context:component-scan base-package=“com.xiao.package1, com.xiao.package2” />
三、使用@ComponentScan自动扫描组件实例
包扫描会扫描只要标注了@Controller,@Service,@Repository,@Component这四个注解都会被扫描到容器中。
1、@Controller 控制器(注入服务)
用于标注控制层,相当于struts中的action层
2、@Service 服务(注入dao)
用于标注服务层,主要用来进行业务的逻辑处理
3、@Repository(实现dao访问)
用于标注数据访问层,也可以说用于标注数据访问组件,即DAO组件.
4、@Component (把普通pojo实例化到spring容器中,相当于配置文件中的<bean id="" class=""/>)
泛指各种组件,就是说当我们的类不属于各种归类的时候(不属于@Controller、@Services等的时候),我们就可以使用@Component来标注这个类。
案例:<context:component-scan base-package=”com.*”>
上面的这个例子是引入Component组件的例子,其中base-package表示为需要扫描的所有子包。
有一篇不错的文章(Spring注解详解):https://blog.csdn.net/xyh820/article/details/7303330/
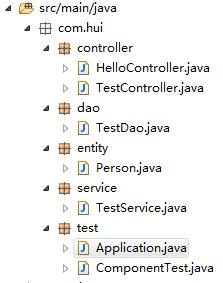
新增控制层的java类:TestController和HelloController
import org.springframework.stereotype.Controller;

@Controller

public class TestController {

}
import org.springframework.web.bind.annotation.RequestMapping;

import org.springframework.web.bind.annotation.RequestMethod;

import org.springframework.web.bind.annotation.RestController;

@RestController

public class HelloController {

    @RequestMapping(value="/hello", method = RequestMethod.GET)

    public String hello() {

         return "Hello, Spring Boot";

    }

}
新建一个业务逻辑层类:TestService
import org.springframework.stereotype.Service;

@Service

public class TestService {

}
新建一个Person:
public class Person {

    public Person(String string, int i) {

    }

}
主方法测试:
spring boot:
import org.springframework.boot.SpringApplication;

import org.springframework.boot.autoconfigure.SpringBootApplication;

import org.springframework.context.ApplicationContext;

import org.springframework.context.annotation.ComponentScan;

@SpringBootApplication

@ComponentScan(value = "com.hui")

public class Application {

    public static void main(String[] args) {

        ApplicationContext applicationContext =

                SpringApplication.run(Application.class, args);

        for (String name : applicationContext.getBeanDefinitionNames()) {

            System.out.println(name);

        }

    }

}
非spring boot:
import org.springframework.context.ApplicationContext;

import org.springframework.context.annotation.AnnotationConfigApplicationContext;

import org.springframework.context.annotation.Bean;

import org.springframework.context.annotation.ComponentScan;

import org.springframework.context.annotation.Configuration;

import com.hui.entity.Person;

@Configuration

@ComponentScan(value = "com.hui")

public class ComponentTest {

    @Bean

    public Person getPerson() {

        return new Person("百度好帅", 10000);

    }

    public static void main(String[] args) {

        @SuppressWarnings("resource")

        ApplicationContext applicationContext =

                new AnnotationConfigApplicationContext(ComponentTest.class);

        String[] beanNames = applicationContext.getBeanDefinitionNames();

        for (String bean : beanNames) {

            System.out.println(bean);

        }

    }

}
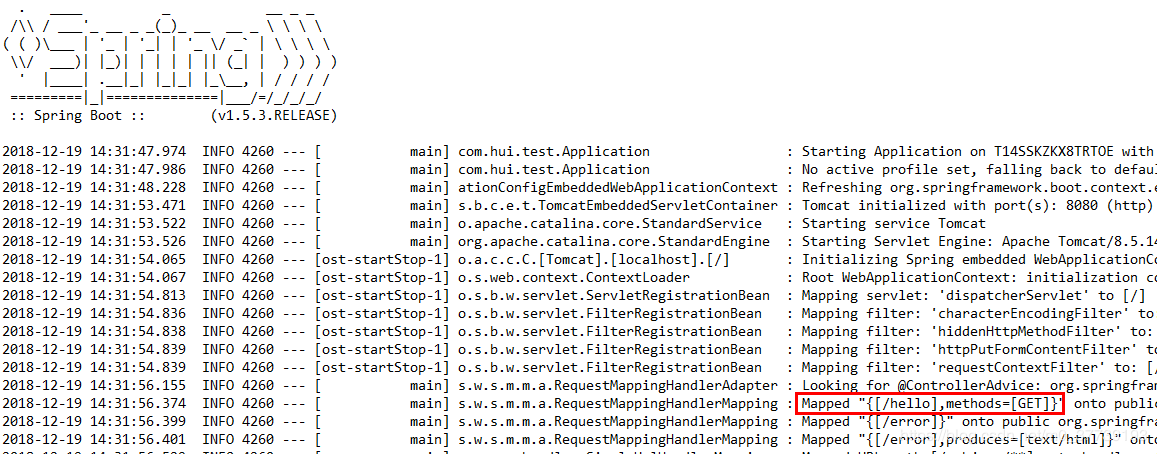
运行Application:
控制台扫描到了/hello,即映射成功
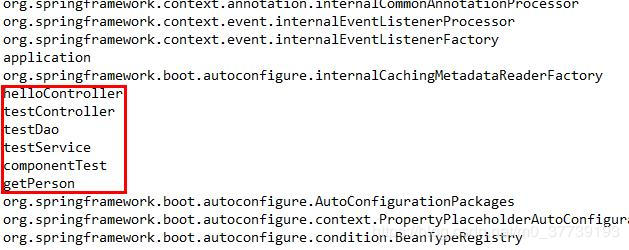
把Application注释掉运行ComponentTest:

参考:
https://blog.csdn.net/Lamb_IT/article/details/80918704
https://jingyan.baidu.com/article/7908e85cc6930daf481ad2b6.html
————————————————
版权声明:本文为CSDN博主「小强签名设计」的原创文章,遵循 CC 4.0 BY-SA 版权协议,转载请附上原文出处链接及本声明。
原文链接:https://blog.csdn.net/m0_37739193/article/details/85097477
Springboot注解@ServletComponentScan和@ComponentScan(转)的更多相关文章
- springboot注解使用说明
springboot注解 @RestController和@RequestMapping注解 我们的Example类上使用的第一个注解是 @RestController .这被称为一个构造型(ster ...
- SpringBoot注解大全 转
2019年3月17日22:30:10 一.注解(annotations)列表 @SpringBootApplication:包含了@ComponentScan.@Configuration和@Enab ...
- springBoot系列-->springBoot注解大全
一.注解(annotations)列表 @SpringBootApplication:包含了@ComponentScan.@Configuration和@EnableAutoConfiguration ...
- SpringBoot注解大全(转)
原文链接:[springBoot系列]--springBoot注解大全 一.注解(annotations)列表 @SpringBootApplication:包含了@ComponentScan.@Co ...
- springboot注解大全
springboot注解:@Service: 注解在类上,表示这是一个业务层bean@Controller:注解在类上,表示这是一个控制层bean@Repository: 注解在类上,表示这是一个数据 ...
- SpringBoot注解把配置文件自动映射到属性和实体类实战
SpringBoot注解把配置文件自动映射到属性和实体类实战 简介:讲解使用@value注解配置文件自动映射到属性和实体类 1.配置文件加载 方式一 1.Controller上面配置 @Propert ...
- 转-spring-boot 注解配置mybatis+druid(新手上路)-http://blog.csdn.net/sinat_36203615/article/details/53759935
spring-boot 注解配置mybatis+druid(新手上路) 转载 2016年12月20日 10:17:17 标签: sprinb-boot / mybatis / druid 10475 ...
- SpringBoot注解大全*(转发:http://www.cnblogs.com/ldy-blogs/p/8550406.html)
一.注解(annotations)列表 @SpringBootApplication:包含了@ComponentScan.@Configuration和@EnableAutoConfiguration ...
- 【转载】springboot注解
https://blog.csdn.net/yitian_66/article/details/80866571 springboot注解:@Service: 注解在类上,表示这是一个业务层bean@ ...
随机推荐
- Word、Excel、PPT 2016、2013、2010、2007 没有保存或断电导致文件丢失怎么恢复?
1. 前言 没有保存文档还能恢复吗?死机.断电.蓝屏导致来不及保存文档,还能恢复吗?答案当然是可以的!Office中本身就有恢复文档的功能,可以帮助我们最大化的挽回损失. Office2013与Off ...
- Laravel安装和composer安装
下载地址:https://getcomposer.org/download/ 他会自动找到你的php目录,如果没有记得手动修改 一直点下一步,即可. 如果安装不成功,可能是之前安装过composer ...
- Python笔记001-Python入门
第一章:Python入门 1.Python介绍 1.1 简介 Python是一种解释型,面向对象的语言.由吉多·范罗苏姆(Guido van Rossum)于1989年发明,1991年正式公布.官网: ...
- apache - storm - Setting Up a Development Environment
Installing a Storm release locally If you want to be able to submit topologies to a remote cluster f ...
- uboot 与 代码重定位
ref: https://blog.csdn.net/dhauwd/article/details/78566668 https://blog.csdn.net/yueqian_scut/articl ...
- df执行hang住
一.现象 在linux操作系统中,执行df -h命令,后hang住 二.思路 排查是否存在Nfs问题,无法正常挂载nfs路径导致的问题. 三.解决过程 3.1 cat /etc/rc.local #m ...
- 点标记(lambda表达式+linq查询标记符)与linq语句(查询表达式)
什么是Linq表达式?什么是Lambda表达式? 参照:https://www.cnblogs.com/zhaopei/p/5746414.html
- [Vue]vue-router嵌套路由(子路由)
总共添加两个子路由,分别命名Collection.vue(我的收藏)和Trace.vue(我的足迹) 1.重构router/index.js的路由配置,需要使用children数组来定义子路由,具体如 ...
- [异步请求]ajax、axios、fetch之间的详细区别以及优缺点
1.jQuery ajax $.ajax({ type: 'POST', url: url, data: data, dataType: dataType, success: function () ...
- OutOfRangeError的解决办法
自制TFRecord数据集,训练神经网络出现的一个问题,及解决办法. 错误现象: 数据训练完成后,测试数据集正确率时,运行mnist_test.py文件,出现错误代码 问题分析:显示需测试数据10 ...