mybatis-plus简单了解
mybatis-plus入门了解和简单使用
MyBatis-Plus(简称 MP)是一个 MyBatis 的增强工具,在 MyBatis 的基础上只做增强不做改变,为简化开发、提高效率而生。
特性:
无侵入:只做增强不做改变,引入它不会对现有工程产生影响,如丝般顺滑
损耗小:启动即会自动注入基本 CURD,性能基本无损耗,直接面向对象操作
强大的 CRUD 操作:内置通用 Mapper、通用 Service,仅仅通过少量配置即可实现单表大部分 CRUD 操作,更有强大的条件构造器,满足各类使用需求
支持 Lambda 形式调用:通过 Lambda 表达式,方便的编写各类查询条件,无需再担心字段写错
支持主键自动生成:支持多达 4 种主键策略(内含分布式唯一 ID 生成器 - Sequence),可自由配置,完美解决主键问题
支持 ActiveRecord 模式:支持 ActiveRecord 形式调用,实体类只需继承 Model 类即可进行强大的 CRUD 操作
支持自定义全局通用操作:支持全局通用方法注入( Write once, use anywhere )
内置代码生成器:采用代码或者 Maven 插件可快速生成 Mapper 、 Model 、 Service 、 Controller 层代码,支持模板引擎,更有超多自定义配置等您来使用
内置分页插件:基于 MyBatis 物理分页,开发者无需关心具体操作,配置好插件之后,写分页等同于普通 List 查询
分页插件支持多种数据库:支持 MySQL、MariaDB、Oracle、DB2、H2、HSQL、SQLite、Postgre、SQLServer2005、SQLServer 等多种数据库
内置性能分析插件:可输出 Sql 语句以及其执行时间,建议开发测试时启用该功能,能快速揪出慢查询
内置全局拦截插件:提供全表 delete 、 update 操作智能分析阻断,也可自定义拦截规则,预防误操作
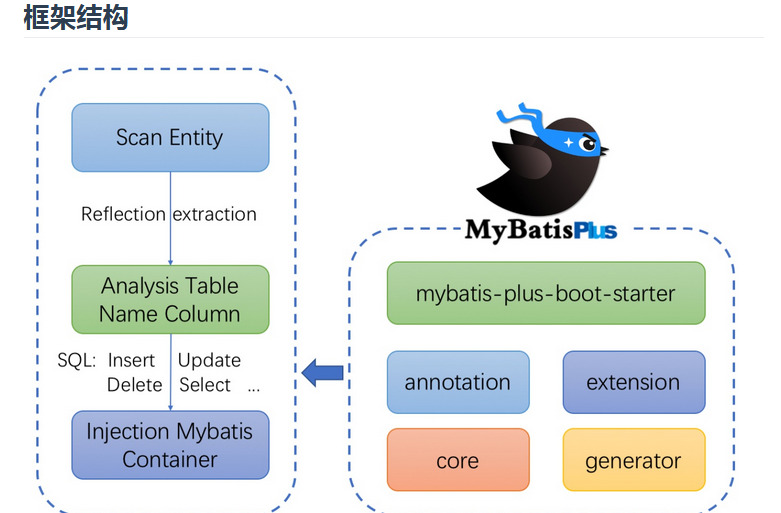
它的框架结构:
下面是我实现的简单crud操作。
第一步先导入依赖
    <dependencies>

        <!--web启动器-->

        <dependency>

            <groupId>org.springframework.boot</groupId>

            <artifactId>spring-boot-starter-web</artifactId>

        </dependency>

        <!--热部署工具-->

        <dependency>

            <groupId>org.springframework.boot</groupId>

            <artifactId>spring-boot-devtools</artifactId>

            <scope>runtime</scope>

            <optional>true</optional>

        </dependency>

		<!--mysql驱动-->

        <dependency>

            <groupId>mysql</groupId>

            <artifactId>mysql-connector-java</artifactId>

            <scope>runtime</scope>

        </dependency>

        <!--mybatis-plus启动器-->

        <dependency>

            <groupId>com.baomidou</groupId>

            <artifactId>mybatis-plus-boot-starter</artifactId>

            <version>3.1.1</version>

        </dependency>

        <!--h2内存数据库-->

        <!-- <dependency>

             <groupId>com.h2database</groupId>

             <artifactId>h2</artifactId>

             <scope>runtime</scope>

         </dependency>-->

        <!--可以帮忙省略掉 Get/Set 方法用于简化代码-->

        <dependency>

            <groupId>org.projectlombok</groupId>

            <artifactId>lombok</artifactId>

            <optional>true</optional>

        </dependency>

        <!--springboot 模板引擎-->

        <dependency>

            <groupId>org.springframework.boot</groupId>

            <artifactId>spring-boot-starter-thymeleaf</artifactId>

        </dependency>

        <!--测试依赖-->

        <dependency>

            <groupId>org.springframework.boot</groupId>

            <artifactId>spring-boot-starter-test</artifactId>

            <scope>test</scope>

        </dependency>

    </dependencies>
第二步建topic表并且插入数据
CREATE TABLE `topic` (

  `id` int(11) NOT NULL AUTO_INCREMENT,

  `title` varchar(255) DEFAULT NULL,

  `content` varchar(255) DEFAULT NULL,

  `tag` varchar(255) DEFAULT NULL,

  `in_time` datetime DEFAULT NULL,

  PRIMARY KEY (`id`)

) ENGINE=InnoDB AUTO_INCREMENT=14 DEFAULT CHARSET=utf8;

INSERT INTO `topic` (`id`, `title`, `content`, `tag`, `in_time`)

VALUES

	(1, 'title1', 'content1', 'tag1', '2019-04-15 09:33:35'),

	(2, 'title2', 'content2', 'tag2', '2019-04-15 09:33:35'),

	(3, 'title3', 'content3', 'tag3', '2019-04-15 09:33:35'),
第三步创建实体类
@Data //该注释可以帮助我们建立setter和getter方法

public class Topic {

    private Integer id;

    private String title;

    private String content;

    private String tag;

    @DateTimeFormat(pattern = "yyyy-MM-dd")

    private Date inTime;

}
第四步创建mapper文件
//需要建立这么一个接口并且继承BaseMapper即可

public interface TopicMapper extends BaseMapper<Topic> {

}
第五步编写service方法
@Service

public class TopicService {

    @Autowired

    private TopicMapper topicMapper;

	//查询所有

    public List<Topic> list() {

        return topicMapper.selectList(new QueryWrapper<>());

    }

	//根据id查询

    public Topic selectbyId(int id) {

        return topicMapper.selectOne(new QueryWrapper<Topic>().eq("id", id));

    }

	//插入数据

    public void insert(Topic topic) {

        topicMapper.insert(topic);

    }

	//根据id删除数据

    public void deletebyid(int id){

        topicMapper.deleteById(id);

    }

}
第六步编写控制器
@Controller

public class TopicController {

    @Autowired

    private TopicService topicService;

    @RequestMapping("/list")

    @ResponseBody

    public Object list() {

        return topicService.list();

    }

    @RequestMapping("/selectbyid/{id}")

    @ResponseBody

    public Topic selectOne(@PathVariable int id) {

        return topicService.selectbyId(id);

    }

    //添加操作是使用的是thymeleaf页面模板

    @RequestMapping("/add")

    public String add(Model model) {

        model.addAttribute("topic", new Topic());

        return "add";

    }

    @RequestMapping("/save")

    @ResponseBody

    public List<Topic> sava(@ModelAttribute Topic topic) {

        topicService.insert(topic);

        return topicService.list();

    }

    //删除操作

    @RequestMapping("/delete/{id}")

    @ResponseBody

    public List<Topic> del(@PathVariable int id){

        topicService.deletebyid(id);

        return topicService.list();

    }

}
页面模板
<!DOCTYPE html>
<html lang="en" xmlns:th="http://www.thymeleaf.org"
xmlns="http://www.w3.org/1999/xhtml">
<head>
<meta charset="UTF-8">
<title>添加页面</title>
</head>
<body>
<form th:action="@{/save}" method="post">
<label>
<input type="text" th:field="${topic.id}" placeholder="请输入id">
</label><br>
<label>
<input type="text" th:field="${topic.title}" placeholder="请输入title">
</label><br>
<label>
<input type="text" th:field="${topic.content}" placeholder="请输入content">
</label><br>
<label>
<input type="text" th:field="${topic.tag}" placeholder="请输入tag">
</label><br>
<label>
<input type="date" th:field="${topic.inTime}" placeholder="请输入date">
</label><br>
<input type="submit" value="提交">
<input type="reset" value="重置">
</form>
</body>
</html>
启动类
@SpringBootApplication

@MapperScan("cn.jason.demo.mapper")

public class DemoApplication {

    public static void main(String[] args) {

        SpringApplication.run(DemoApplication.class, args);

    }

}
通过以上几个步骤就可以实现简单的crud操作,mybatis-plus真的强大,mapper接口文件只需要继承baseMapper即可。太简化了。
但是在导入包的时候需要注意的是,在导入时只需要导入mybatis-plus-boot-starter就可以了,还有就是mybatis-plus,其他的就不要导入了。
今天先就了解这么多,后面仔细学一学这个强大的玩意儿。
它的更多信息可以查看官网以及慕课网入门视频
mybatis-plus官网链接:https://mp.baomidou.com/guide/#特性
mybatis-plus慕课网入门视频链接:https://www.imooc.com/learn/1130
mybatis-plus简单了解的更多相关文章
- Mybatis框架简单使用
Mybatis框架简单使用 环境搭建 新建一个JavaWeb项目,在web\WEB-INF\创建lib文件,并且在其下添加Mybatis的核心包以及依赖包,以及Mysql驱动包,junit4测试包等. ...
- MyBatis(1)-简单入门
简介 什么是 MyBatis ? MyBatis 是一款优秀的持久层框架,它支持定制化 SQL.存储过程以及高级映射.MyBatis 避免了几乎所有的 JDBC 代码和手动设置参数以及获取结果集.My ...
- MyBatis 使用简单的 XML或注解用于配置和原始映射
MyBatis 本是apache的一个开源项目iBatis, 2010年这个项目由apache software foundation 迁移到了google code,并且改名为MyBatis .My ...
- 单独使用MyBatis的简单示例
单独使用MyBatis的简单示例:mybaties-config.xml:MyBatis配置文件 <?xml version="1.0" encoding="UTF ...
- Mybatis的简单增删改查
刚开始学习Mybatis可以先看下官方文档,MyBatis是支持定制化SQL.存储过程以及高级映射的优秀的持久层框架.MyBatis避免了几乎所有的JDBC代码和手工设置参数以及抽取结果集.MyBat ...
- Mybatis实现简单的CRUD(增删改查)原理及实例分析
Mybatis实现简单的CRUD(增删改查) 用到的数据库: CREATE DATABASE `mybatis`; USE `mybatis`; DROP TABLE IF EXISTS `user` ...
- Mybatis实现简单增删改查
Mybatis的简单应用 学习内容: 需求 环境准备 代码 总结: 学习内容: 需求 使用Mybatis实现简单增删改查(以下是在IDEA中实现的,其他开发工具中,代码一样) jar 包下载:http ...
- MyBatis学习--简单的增删改查
jdbc程序 在学习MyBatis的时候先简单了解下JDBC编程的方式,我们以一个简单的查询为例,使用JDBC编程,如下: Public static void main(String[] args) ...
- Mybatis的简单示例
首先新建一个JavaWeb项目并导入mybatis依赖的jar包,同时Mybatis是对数据库的操作所以我们需要在数据库中新建一个表user用来演示. 新建完表之后我们还需要建立相对应的实体类User ...
- MyBatis的简单操作
这里将的是简单的增.删.改.查等基本操作 首先创建java项目,导入相应的依赖包,这里可以参考上一篇博客 1.添加数据 在jike.book.pojo包中,新建java类 JiKeUser.java: ...
随机推荐
- layui中从内置的分页中获取总记录数(转)
封装的工具类: https://blog.csdn.net/QYHuiiQ/article/details/82147537
- 小程序web-view利用url给内嵌的网页传值
这个方法跟网页上的一样,直接通过截取url中传过来的参数来取值 <web-view src="https://www.baidu.com/test.html?url=http://ww ...
- Git clone 报错 128
使用tortoiseGit检出项目是报错,错误代码128: 使用git bash检出相同目录时返回 git clone fatal:destination path already exists an ...
- C# 中使用RegisterShellHookWindow Hook窗体创建
前言:最近在写一个桌面程序时需要全局HOOK 窗体的创建,但是在.net中SetWindowsHookEx()只可实现键盘鼠标的全局钩子,其余的全局钩子都需要使用DLL.难道就没有解决办法了么?经过长 ...
- 转发:Java对象及其引用
原文: http://zwmf.iteye.com/blog/1738574 Java对象及其引用 关于对象与引用之间的一些基本概念. 初学Java时,在很长一段时间里,总觉得基本概念很模糊.后来才知 ...
- jsp页面中使用javabean
<%@ page language="java" import="java.util.*,com.loaderman.demo.b_cases.*" pa ...
- ABAP 判断字符串是否是数字
通过正则表达式: IF cl_abap_matcher=>matches( pattern = '^(-?[1-9]\d*(\.\d*[1-9])?)|(-?0\.\d*[1-9])$' tex ...
- js继承的实现(原型/链、函数伪装)
一.原型继承父类的实例 //父类及其原型属性/方法 function SuperType () { this.name = ['zc','ls','ww']; } SuperType.prototyp ...
- mysql 索引失效的几种情况+
- go中的数据结构-字典map
1. map的使用 golang中的map是一种数据类型,将键与值绑定到一起,底层是用哈希表实现的,可以快速的通过键找到对应的值. 类型表示:map[keyType][valueType] key一定 ...