deep_learning_LSTM长短期记忆神经网络处理Mnist数据集
1、RNN(Recurrent Neural Network)循环神经网络模型
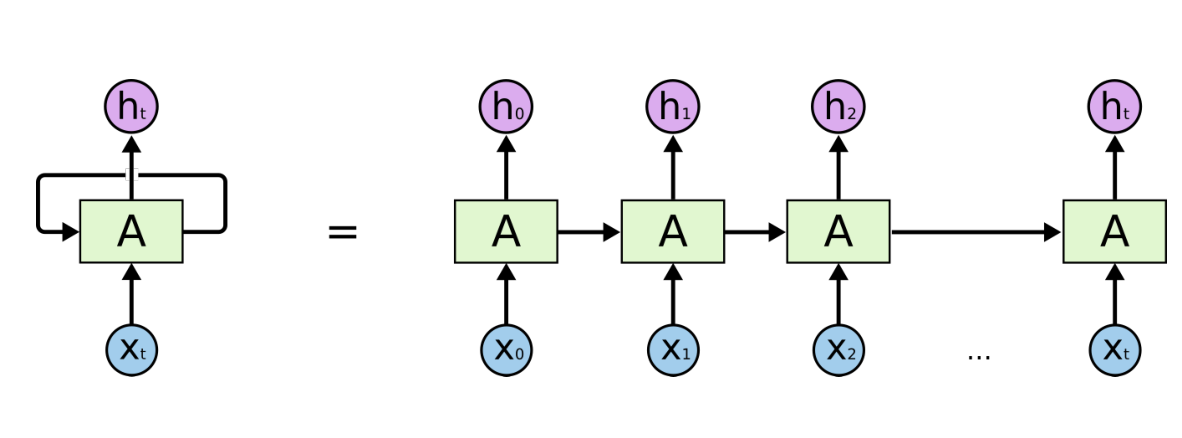
详见RNN循环神经网络:https://www.cnblogs.com/pinard/p/6509630.html
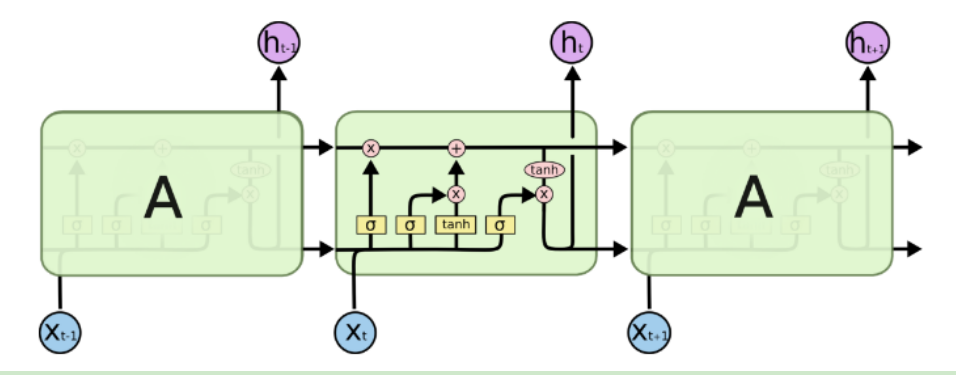
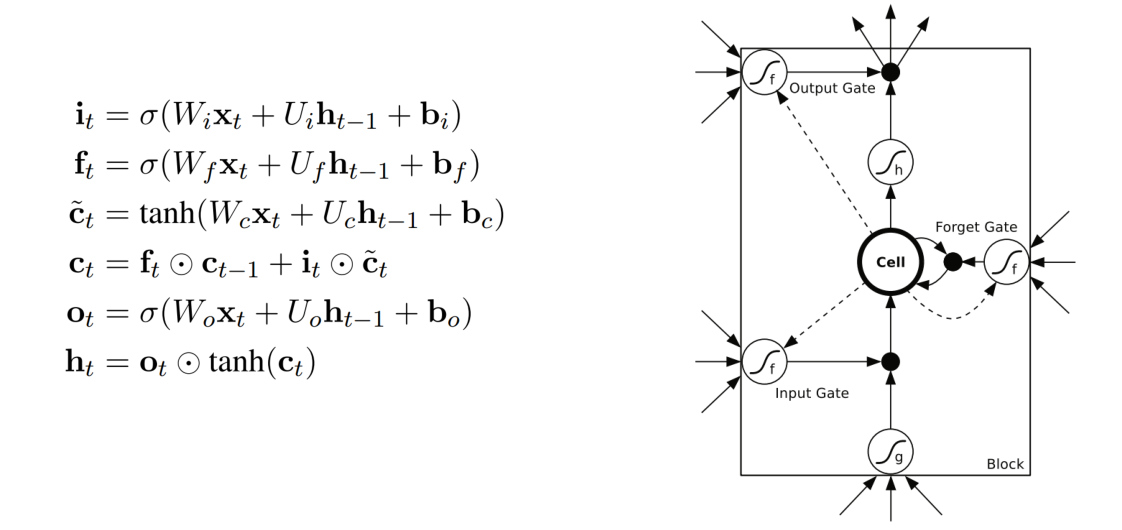
2、LSTM(Long Short Term Memory)长短期记忆神经网络模型
|
1
2
3
4
5
6
7
8
9
10
11
12
13
14
15
16
17
18
19
20
21
22
23
24
25
26
27
28
29
30
31
32
33
34
35
36
37
38
39
40
41
42
43
44
45
46
47
48
49
50
51
52
53
54
55
56
57
58
59
|
import tensorflow as tffrom tensorflow.examples.tutorials.mnist import input_datafrom tensorflow.contrib import rnn# 载入数据集mnist = input_data.read_data_sets("MNIST_data/", one_hot=True)# 输入图片是28*28n_inputs = 28 # 输入一行,一行有28个数据(28个像素点),即输入序列长度为28max_time = 28 # 一共28行lstm_size = 100 # 隐层单元n_classes = 10 # 10个分类batch_size = 50 # 每批次50个样本n_batch = mnist.train.num_examples // batch_size # 计算一共有多少个批次# 这里的none表示第一个维度可以是任意的长度x = tf.placeholder(tf.float32, [None, 784])# 正确的标签y = tf.placeholder(tf.float32, [None, 10])# 初始化权值weights = tf.Variable(tf.truncated_normal([lstm_size, n_classes], stddev=0.1))# 初始化偏置值biases = tf.Variable(tf.constant(0.1, shape=[n_classes]))# 定义RNN网络def RNN(X, weights, biases): inputs = tf.reshape(X, [-1, max_time, n_inputs]) # 定义LSTM基本CELL lstm_cell = rnn.BasicLSTMCell(lstm_size) # final_state[0]是cell state # final_state[1]是hidden_state outputs, final_state = tf.nn.dynamic_rnn(lstm_cell, inputs, dtype=tf.float32) results = tf.nn.softmax(tf.matmul(final_state[1], weights) + biases) return results# 计算RNN的返回结果prediction = RNN(x, weights, biases)# 损失函数cross_entropy = tf.reduce_mean(tf.nn.softmax_cross_entropy_with_logits(logits=prediction, labels=y))# 使用AdamOptimizer进行优化train_step = tf.train.AdamOptimizer(1e-4).minimize(cross_entropy)# 结果存放在一个布尔型列表中correct_prediction = tf.equal(tf.argmax(y, 1), tf.argmax(prediction, 1)) # argmax返回一维张量中最大的值所在的位置# 求准确率accuracy = tf.reduce_mean(tf.cast(correct_prediction, tf.float32)) # 把correct_prediction变为float32类型# 初始化init = tf.global_variables_initializer()with tf.Session() as sess: sess.run(init) for epoch in range(21): for batch in range(n_batch): batch_xs, batch_ys = mnist.train.next_batch(batch_size) sess.run(train_step, feed_dict={x: batch_xs, y: batch_ys}) acc = sess.run(accuracy, feed_dict={x: mnist.test.images, y: mnist.test.labels}) print("Iter " + str(epoch) + ", Testing Accuracy= " + str(acc)) |
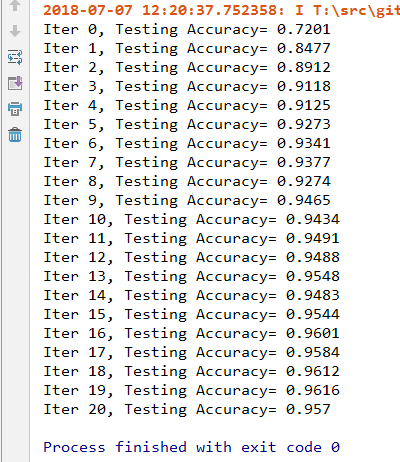
结果为:
deep_learning_LSTM长短期记忆神经网络处理Mnist数据集的更多相关文章
- TensorFlow——LSTM长短期记忆神经网络处理Mnist数据集
1.RNN(Recurrent Neural Network)循环神经网络模型 详见RNN循环神经网络:https://www.cnblogs.com/pinard/p/6509630.html 2. ...
- Python实现bp神经网络识别MNIST数据集
title: "Python实现bp神经网络识别MNIST数据集" date: 2018-06-18T14:01:49+08:00 tags: [""] cat ...
- TensorFlow——CNN卷积神经网络处理Mnist数据集
CNN卷积神经网络处理Mnist数据集 CNN模型结构: 输入层:Mnist数据集(28*28) 第一层卷积:感受视野5*5,步长为1,卷积核:32个 第一层池化:池化视野2*2,步长为2 第二层卷积 ...
- TensorFlow初探之简单神经网络训练mnist数据集(TensorFlow2.0代码)
from __future__ import print_function from tensorflow.examples.tutorials.mnist import input_data #加载 ...
- Tensorflow学习教程------普通神经网络对mnist数据集分类
首先是不含隐层的神经网络, 输入层是784个神经元 输出层是10个神经元 代码如下 #coding:utf-8 import tensorflow as tf from tensorflow.exam ...
- 使用一层神经网络训练mnist数据集
import numpy as np import tensorflow as tf from tensorflow.examples.tutorials.mnist import input_dat ...
- mxnet卷积神经网络训练MNIST数据集测试
mxnet框架下超全手写字体识别—从数据预处理到网络的训练—模型及日志的保存 import numpy as np import mxnet as mx import logging logging. ...
- Tensorflow学习教程------利用卷积神经网络对mnist数据集进行分类_利用训练好的模型进行分类
#coding:utf-8 import tensorflow as tf from PIL import Image,ImageFilter from tensorflow.examples.tut ...
- 递归神经网络之理解长短期记忆网络(LSTM NetWorks)(转载)
递归神经网络 人类并不是每时每刻都从头开始思考.正如你阅读这篇文章的时候,你是在理解前面词语的基础上来理解每个词.你不会丢弃所有已知的信息而从头开始思考.你的思想具有持续性. 传统的神经网络不能做到这 ...
随机推荐
- linux性能分析之平均负载
平均负载 1,执行 top 或者 uptime 命令 来了解系统负载 uptime 分析显示 当前时间,系统运行时间,正在登录用户数 平均负载是指单位时间内,系统处于可运行状态和不可中断状态的平均进程 ...
- 安卓之Android.mk编写
题记:编译环境可以参考https://www.cnblogs.com/ywjfx/p/9960817.html 不管是写C还是java,我想所有的程序员都经历过HelloWorld程序的编写,现在让我 ...
- lucene 快速入门
日常开发中,相信大家经常会用like去匹配一些数据,同时我们也知道,like往往会导致全表扫描,当数据量越来越大的时候,我们会纠结于 数据库的龟速查找,此时我们必须另寻蹊跷,这时lucene就可以大显 ...
- 搭建Git服务器及本机克隆提交
前文 Git是什么? Git是目前世界上最先进的分布式版本控制系统. SVN与Git的最主要的区别? SVN是集中式版本控制系统,版本库是集中放在中央服务器的,而干活的时候,用的都是自己的电脑,所以首 ...
- 阶段3 3.SpringMVC·_05.文件上传_3 文件上传之Springmvc方式上传原理分析
需要配置文件解析器这个对象 id配置时候必须叫做mutipartResolver 最终
- asp.net core mvc View Component 应用
ViewComponent 1.View 组件介绍 在ASP.NET CORE MVC中,View组件有点类似于partial views,但是他们更强大,View组件不能使用model bindin ...
- 关于springmvc的包含list提交的格式
<%-- Created by IntelliJ IDEA. User: jh Date: 2017/7/12 Time: 14:31 To change this template use F ...
- Servlet(3):Cookie
概念 Cookie是存储在客户端计算机上的文本文件,并保留了各种跟踪信息.Java Servlet支持HTTP Cookie. 识别返回用户包括三个步骤: (1) 服务器脚本向浏览器发送一组Cooki ...
- Python爬虫学习==>第十一章:分析Ajax请求-抓取今日头条信息
学习目的: 解决AJAX请求的爬虫,网页解析库的学习,MongoDB的简单应用 正式步骤 Step1:流程分析 抓取单页内容:利用requests请求目标站点,得到单个页面的html代码,返回结果: ...
- 【HANA系列】SAP HANA SQL从给定日期中获取年份
公众号:SAP Technical 本文作者:matinal 原文出处:http://www.cnblogs.com/SAPmatinal/ 原文链接:[HANA系列]SAP HANA SQL从给定日 ...