
Erlang/Elixir: 使用 OpenCV, Python 搭建图片缩略图服务器
这篇文章是在OSX上测试和运行的的, Ubuntu下的安装和配置请移步到这里
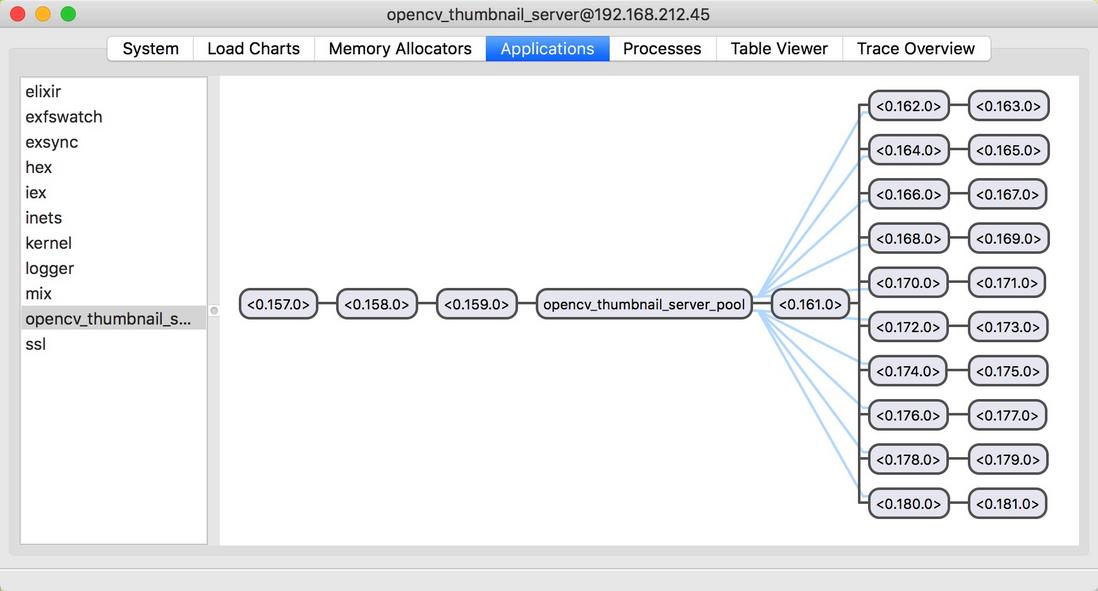
应用程序进程树, 默认 Poolboy 中初始化10个用于处理图片的 Python 工作进程(Worker)
首先安装OpenCV需要的工具包
|
1
2
3
4
5
6
|
ruby -e "$(curl -fsSL https://raw.githubusercontent.com/Homebrew/install/master/install)"
brew install python
brew tap homebrew/science
brew install opencv
sudo pip install numpy
sudo pip install matplotlib
|
使用 Homebrew 的 Python 版本, 而不是 Mac OS X 系统自带的 Python
|
1
|
alias python='/usr/local/bin/python'
|
创建 Elixir 项目
|
1
2
3
4
5
6
7
8
9
10
11
12
13
14
15
16
17
18
19
|
➜ mix new opencv_thumbnail_server --sup
* creating README.md
* creating .gitignore
* creating mix.exs
* creating config
* creating config/config.exs
* creating lib
* creating lib/opencv_thumbnail_server.ex
* creating test
* creating test/test_helper.exs
* creating test/opencv_thumbnail_server_test.exs
Your Mix project was created successfully.
You can use "mix" to compile it, test it, and more:
cd opencv_thumbnail_server
mix test
Run "mix help" for more commands.
|
Elixir 模块
|
1
2
3
4
5
6
7
8
|
require Logger
defmodule OpencvThumbnailServer do
use Application
def start(_type, _args) do
Logger.info "Start opencv thumbnail server"
OpencvThumbnailServer.Supervisor.start_link()
end
end
|
|
1
2
3
4
5
6
7
8
9
10
11
12
13
14
15
16
17
18
|
defmodule OpencvThumbnailServer.Supervisor do
use Supervisor
<a href="http://www.jobbole.com/members/chkconfig">@config</a> Application.get_env :opencv_thumbnail_server, :settings
def start_link() do
Supervisor.start_link(__MODULE__, [], name: {:global,__MODULE__})
end
def init([]) do
pool_options = @config[:poolboy]
{_, name} = pool_options[:name]
children = [
:poolboy.child_spec(name, pool_options, @config[:module_name])
]
supervise(children, strategy: :one_for_all, max_restarts: 1000, max_seconds: 3600)
end
end
|
|
1
2
3
4
5
6
7
8
9
10
11
12
13
14
15
16
17
18
19
20
21
22
23
24
25
26
27
28
29
30
31
32
33
34
35
36
37
38
39
40
41
42
|
defmodule OpencvThumbnailServer.Worker do
use GenServer
<a href="http://www.jobbole.com/members/chkconfig">@config</a> Application.get_env(:opencv_thumbnail_server, :settings)
def start_link(python_module) do
GenServer.start_link(__MODULE__, python_module, [])
end
def call_python(worker, function, args) do
GenServer.call(worker, {:call_python, function, args}, 10_000)
end
def init(python_module) do
IO.puts "Start worker"
{:ok, pid} = :python.start_link([
{:python_path, @config[:python_path]},
{:python, @config[:python]}
])
state = {python_module, pid}
{:ok, state}
end
def handle_call({:call_python, function, args}, _from, state) do
{module, pid} = state
result = :python.call(pid, module, function, args)
reply = {:ok, result}
{:reply, reply, state}
end
def handle_call(_request, _from, state) do
{:stop, :error, :bad_call, state}
end
def handle_info(_msg, {module,py_pid}) do
{:stop, :error, {module,py_pid}}
end
def terminate(_reason, {_, py_pid}) do
:python.stop(py_pid)
:ok
end
end
|
图像处理
获取宽高
|
1
2
3
4
5
6
7
8
9
10
11
12
13
14
15
16
17
18
19
20
21
22
23
24
25
26
27
28
29
30
31
32
33
34
35
36
37
38
39
40
41
42
43
44
45
46
47
48
49
50
51
52
53
54
55
56
57
58
59
60
61
62
63
64
65
66
|
# -*- coding: utf-8 -*-
import urllib2 as urllib
import numpy as np
import cv2
def load_image_url(url):
resp = urllib.urlopen(url)
buf = resp.read()
return buf
def load_image_file(filename):
image = cv2.imdecode(filename, cv2.IMREAD_COLOR)
return image
def get_photo_sizes():
return [
[160, 160],
[320, 320],
[640, 640],
[1060, 1060],
[1280, 1280]
]
def show(buf):
# print buf
# x = cv2.imdecode(image, cv2.IMREAD_COLOR)
# d = cv2.cvtColor(c, cv2.COLOR_RGB2BGR)
np_ndarray = np.fromstring(buf, dtype=np.uint8)
x = cv2.imdecode(np_ndarray, cv2.IMREAD_UNCHANGED)
return cv2.imshow('NBA Image', x)
def write(buf):
nparray = np.fromstring(buf, dtype=np.uint8)
img = cv2.imdecode(nparray, cv2.IMREAD_UNCHANGED)
return cv2.imwrite('/tmp/imwrite.png', img)
# def get_dimension():
# url = 'http://img1.gtimg.com/16/1601/160106/16010642_1200x1000_0.jpg'
# resp = urllib.urlopen(url)
# buf = resp.read()
# x = np.fromstring(buf, dtype=np.uint8)
# img = cv2.imdecode(x, cv2.IMREAD_UNCHANGED)
# # height = np.size(img, 0)
# # width = np.size(img, 1)
# height, width = image.shape[:2]
# return (width, height)
def get_dimension(buffer):
# 把原始的二进制图片数据转换为NpArray
nparray = np.fromstring(buffer, dtype=np.uint8)
# 把 nparray 转换为 opencv 的图像格式
image = cv2.imdecode(nparray, cv2.IMREAD_UNCHANGED)
height, width = image.shape[:2]
return (width, height)
def convert_color():
url = 'http://ww3.sinaimg.cn/mw690/6941baebgw1epzcuv9vmxj20me0hy0u1.jpg'
resp = urllib.urlopen(url)
buf = resp.read()
x = np.fromstring(buf, dtype=np.uint8)
img = cv2.imdecode(x, cv2.IMREAD_UNCHANGED)
if __name__ == '__main__':
get_dimension()
|
在 Erlang 和 Python 之间传输二进制数据
Erlang 的binary()数据类型和 Python 之间的映射关系, 在Python 2.x 中二进制数据类型为 str() 表示, Python 3.x 中为 bytes()
buf = resp.read(), 其中变量 buf 的类型为
在 Elixir 我们看的如下的值
Python
|
1
2
3
|
{:ok, <<255, 216, 255, 224, 0, 16, 74, 70, 73, 70, 0, 1, 1, 1, 0, 72,
0, 72, 0, 0, 255, 219, 0, 67, 0, 8, 6, 6, 7, 6, 5, 8, 7, 7, 7,
9, 9, 8, 10, 12, 20, 13, 12, 11, 11, 12, 25, 18, 19, ...>>}
|
调用 Python 函数
|
1
2
3
|
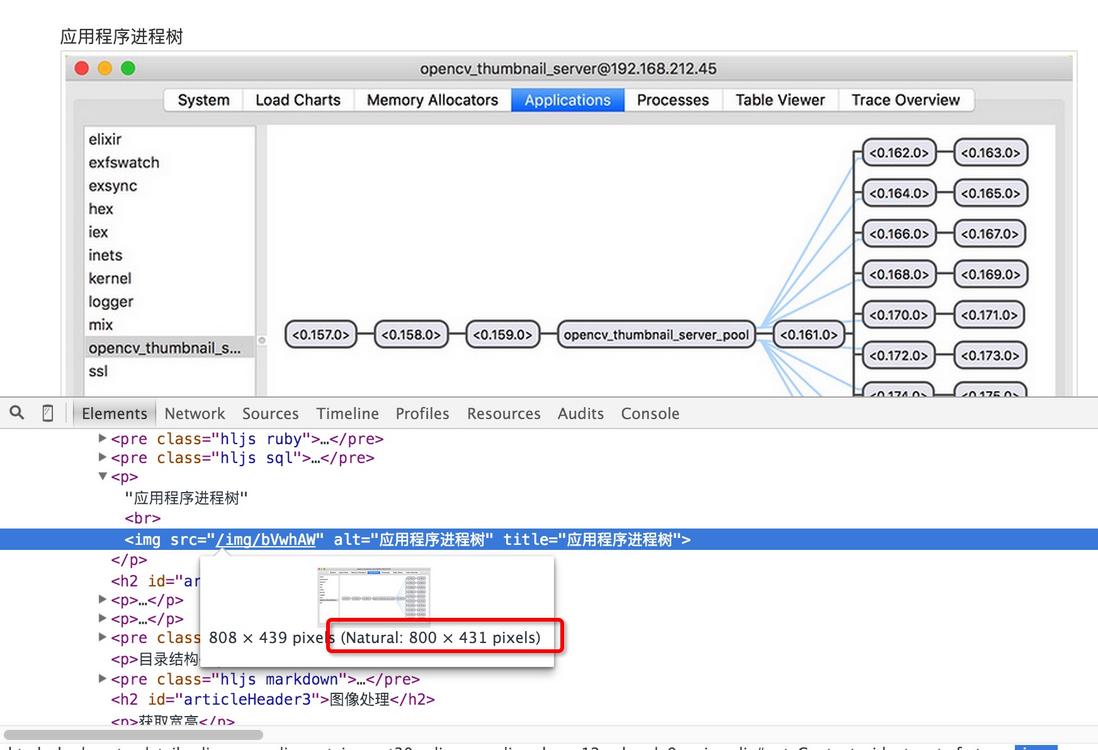
{:ok, data} = OpencvThumbnailServer.Api.load_image_url("https://segmentfault.com/img/bVwhAW")
OpencvThumbnailServer.Api.get_dimension(data)
{:ok, {800, 431}}
|
创建 Python 模块
之前的 Python 图像处理模块可以组织到一个项目中单独维护. 这里使用工具 cookiecutter创建 Python 一个基本的项目骨架, 用于实现缩略图的功能
cookiecutter 可以通过多种方式安装, 包括pip, easy_install, conda, brew 厦门电动叉车
|
1
2
3
4
|
pip install cookiecutter
easy_install cookiecutter
conda install -c https://conda.binstar.org/pydanny cookiecutter
brew install cookiecutter(Mac OS X)
|
目录结构
|
1
2
3
4
5
6
7
8
9
10
11
12
13
14
15
16
17
18
19
20
21
22
23
24
25
26
27
28
29
30
31
32
33
34
35
36
37
38
39
40
41
42
43
44
45
46
47
48
49
|
➜ opencv_thumbnail git:(master) tree
.
├── AUTHORS.rst
├── CONTRIBUTING.rst
├── HISTORY.rst
├── LICENSE
├── MANIFEST.in
├── Makefile
├── README.rst
├── build
│ ├── bdist.macosx-10.11-x86_64
│ └── lib
│ └── opencv_thumbnail
│ ├── __init__.py
│ └── opencv_thumbnail.py
├── dist
│ └── opencv_thumbnail-0.1.0-py2.7.egg
├── docs
│ ├── Makefile
│ ├── authors.rst
│ ├── conf.py
│ ├── contributing.rst
│ ├── history.rst
│ ├── index.rst
│ ├── installation.rst
│ ├── make.bat
│ ├── readme.rst
│ └── usage.rst
├── opencv_thumbnail
│ ├── __init__.py
│ ├── __init__.pyc
│ ├── opencv_thumbnail.py
│ └── opencv_thumbnail.pyc
├── opencv_thumbnail.egg-info
│ ├── PKG-INFO
│ ├── SOURCES.txt
│ ├── dependency_links.txt
│ ├── not-zip-safe
│ └── top_level.txt
├── requirements_dev.txt
├── setup.cfg
├── setup.py
├── tests
│ ├── __init__.py
│ └── test_opencv_thumbnail.py
├── tox.ini
└── travis_pypi_setup.py
9 directories, 36 files
|
API实现
调用需要从 Poolboy 池中取出一个工作进程, 并调用工作进程的call_python, 进程使用完成后返回 Poolboy 进程池, 这里封装一下以简化调用
|
1
2
3
4
5
6
7
8
9
10
11
12
13
14
15
16
17
|
defmodule OpencvThumbnailServer.Api do
alias OpencvThumbnailServer.Worker
def get_dimension(data) do
worker = :poolboy.checkout(:opencv_thumbnail_server_pool)
{w, h} = Worker.call_python(worker, :get_dimension, [data])
:poolboy.checkin(:opencv_thumbnail_server_pool, worker)
{w, h}
end
def load_image_url(url) do
worker = :poolboy.checkout(:opencv_thumbnail_server_pool)
image_bin = Worker.call_python(worker, :load_image_url, [url])
:poolboy.checkin(:opencv_thumbnail_server_pool, worker)
image_bin
end
end
|
源码
https://github.com/developerworks/opencv_thumbnail_server
参考资料
利用Python和OpenCV将URL直接转换成OpenCV格式
How to read raw png from an array in python opencv?
Install OpenCV for Python on Mac OS X
Installing scikit-image
How can i read an image from an internet url in python cv2 , scikit image and mahotas
Using Elixir, erlport with Python 2.7.9, receiving an arity error
How to read image from in memory buffer (StringIO) or from url with opencv python library
Python OpenCV convert image to byte string?
Erlang/Elixir: 使用 OpenCV, Python 搭建图片缩略图服务器的更多相关文章
- python搭建本地共享文件服务器
1.安装python 去官网下载python最新版,然后安装配置好环境 2.运行命令 在终端上输入以下命令 python3 -m http.server 当你执行完这个命令的时候,你的电脑会监听 80 ...
- Nginx 搭建图片缓存服务器-转
文章:https://waver.me/2019/04/11/Nginx-Cache-Server/ 参考: Nginx 配置详解Nginx 简易教程Nginx 配置总结
- 用C自撸apache简易模块,搭建图片处理服务器。
写C是个撸sir /* ** mod_acthumb.c -- Apache sample acthumb module ** [Autogenerated via ``apxs -n acthumb ...
- 针对于Python的OpenCV环境搭建
OpenCV 依赖 下载OpenCV 配置 总结 给Python搭建opencv的环境还真是略嫌麻烦,于是做下笔记,以备不时之需. OpenCV 依赖 opencv有些依赖,我们必须安装一下,否则接下 ...
- python接收图片变成缩略图
python图像处理库:Pillow初级教程 Image类 Pillow中最重要的类就是Image,该类存在于同名的模块中.可以通过以下几种方式实例化:从文件中读取图片,处理其他图片得到,或者直接创建 ...
- Python cv2 OpenCV 中传统图片格式与 base64 转换
Base64是网络上最常见的用于传输8Bit字节码的编码方式之一,是一种基于64个可打印字符来表示二进制数据的方法.通过http传输图片常常将图片数据转换成base64之后再进行传输. Base64简 ...
- OpenCV环境搭建
前言 我在上本科时候曾经用过opencv,那时候还是1.x版本,还必须在linux下自己编译. 时过境迁,最近突然想起来写个小程序来分析图片,就又想起了opencv.现在已然是2.4的版本. 环境搭建 ...
- OpenCV + Python 人脸检测
必备知识 Haar-like opencv api 读取图片 灰度转换 画图 显示图像 获取人脸识别训练数据 探测人脸 处理人脸探测的结果 实例 图片素材 人脸检测代码 人脸检测结果 总结 下午的时候 ...
- 使用nodejs搭建图片服务器(一)
背景 当我们开发一个Web项目的时候,为了将图片管理与web服务分离开,通常都会搭建一个图片服务器. 之所以选择nodejs是因为使用nodejs来搭建web项目相当简单而且快速,虽然这个图片服务器很 ...
随机推荐
- Mvc+Hui+SqlSugar+Autofac+NLog+T4 架构设计(一)
一.前言 作为小菜鸟第一次写博客的我还有点小激动,最近开始打算着手写一个属于自己架构.算下来差不多最近花一周多的下班时间了来写这个框架,本来想整体架构开发完成测试完成后才写博客,怕自己没时间或失去动力 ...
- Oracle 11G 隐含参数“_controlfile_autobackup_delay”
RMAN设置控制文件自动备份,当发生数据库备份时,或建表空间,删除log文件等物理结构发生改变时,oracle会自动备份控制文件. Oracle 10g会立刻备份,Oracle 11g会有几分钟的延迟 ...
- Java编程基础知识总结大全(Ⅰ)
Java是一门面向对象编程语言,不仅吸收了C++语言的各种优点,还摒弃了C++里难以理解的多继承.指针等概念,因此Java语言具有功能强大和简单易用两个特征.Java语言作为静态面向对象编程语言的代表 ...
- 『C++』Temp_2019_03_14 不同类的循环引用
#include <iostream> #include <string> #include <regex> using namespace std; //提前声明 ...
- 【Linux】Linux中VIM编辑器的使用
vim编辑器是我们在Linux中不可或缺的一部分,我们通常会使用它去自定义编辑文本已达到我们的需求,那么vim文本编辑器具体要怎么使用呢.今天跟大家分享一下vim编辑器的使用: vim编辑器模式介绍 ...
- js实现table合并相同列单元格
/** * Created with JetBrains WebStorm. * User: Johnny * Date: 18-3-26 * Time: 下午4:48 * Table td 相同值合 ...
- 一张图一个表——CSS选择器总结
CSS选择器总结: (这些表是一张图片^_^) 看底部 完整思维导图图片和表格的下载地址:https://download.csdn.net/download/denlnyyr/10597820 (我 ...
- centos7 远程连接mongodb时,27017端口连接不上的解决办法
一.问题描述:centos 7 上安装mongogdb,然后通过另外一台电脑用pymongo连接mongodb时,报错:连接拒绝 解决过程: 1.修改mongo.conf文件 命令:sudo vi ...
- urllib库使用方法 3 get html
import urllib.requestimport urllib.parse #https://www.baidu.com/s?ie=UTF-8&wd=中国#将上面的中国部分内容,可以动态 ...
- C++中的函数
1.函数的定义和调用 函数的定义形式 返回类型 函数名(形式参数) { 语句序列: } 函数的调用 调用:声明函数原型,函数调用 声明函数原型:类型说明符 被调函数名(含类型说明的形参表) 函数调用: ...