
nginx部署(普通用户)
$ sudo yum install pcre pcre-devel openssl-devel perl gcc make -y
$ wget http://nginx.org/download/nginx-1.6.2.tar.gz

$ tar xzvf nginx-1.6.2.tar.gz
# chown -R youaijj:youaijj /home/youaijj
$ mkdir /home/youaijj/etc
$ mkdir /home/youaijj/usr
$ mkdir /home/youaijj/var
$ cd nginx-1.6.2
$ ./configure --prefix=/home/youaijj/etc/nginx --sbin-path=/home/youaijj/usr/sbin/nginx --conf-path=/home/youaijj/etc/nginx/nginx.conf --error-log-path=/home/youaijj/var/log/nginx/error.log --http-log-path=/home/youaijj/var/log/nginx/access.log --pid-path=/home/youaijj/var/run/nginx.pid --lock-path=/home/youaijj/var/run/nginx.lock --http-client-body-temp-path=/home/youaijj/var/cache/nginx/client_temp --http-proxy-temp-path=/home/youaijj/var/cache/nginx/proxy_temp --http-fastcgi-temp-path=/home/youaijj/var/cache/nginx/fastcgi_temp --http-uwsgi-temp-path=/home/youaijj/var/cache/nginx/uwsgi_temp --http-scgi-temp-path=/home/youaijj/var/cache/nginx/scgi_temp --user=youaijj --group=youaijj--with-http_ssl_module --with-http_ssl_module --with-http_realip_module --with-http_addition_module --with-http_sub_module --with-http_dav_module --with-http_flv_module --with-http_mp4_module --with-http_gunzip_module --with-http_gzip_static_module --with-http_random_index_module --with-http_secure_link_module --with-http_stub_status_module --with-http_auth_request_module --with-mail --with-mail_ssl_module --with-file-aio --with-ipv6 --with-http_spdy_module --with-cc-opt='-O2 -g -pipe -Wp,-D_FORTIFY_SOURCE=2 -fexceptions -fstack-protector --param=ssp-buffer-size=4 -m64 -mtune=generic'
$ ./configure \

--prefix=/home/youaijj/etc/nginx \

--sbin-path=/home/youaijj/usr/sbin/nginx \

--conf-path=/home/youaijj/etc/nginx/nginx.conf \

--error-log-path=/home/youaijj/var/log/nginx/error.log --http-log-path=/home/youaijj/var/log/nginx/access.log \

...

...
$ make && make install

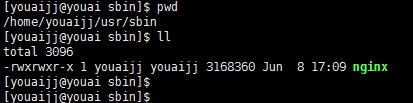
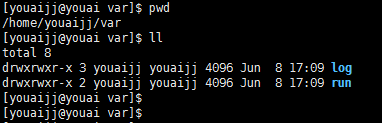
...

# another virtual host using mix of IP-, name-, and port-based configuration

#

 server {

  listen 8031;

  server_name cjj.test.dev;

  access_log /home/youaijj/var/log/nginx/access.test.log;

  location / {

   root html;

   index index.html index.htm;

  }

 }

...
$ cd /home/youaijj/usr/sbin

$ ./nginx
[youaijj@youai ~]$ curl localhost:8031

<!DOCTYPE html>

<html>

<head>

<title>Welcome to nginx!</title>

<style>

    body {

        width: 35em;

        margin: 0 auto;

        font-family: Tahoma, Verdana, Arial, sans-serif;

    }

</style>

</head>

<body>

<h1>Welcome to nginx!</h1>

<p>If you see this page, the nginx web server is successfully installed and

working. Further configuration is required.</p>

<p>For online documentation and support please refer to

<a href="http://nginx.org/">nginx.org</a>.<br/>

Commercial support is available at

<a href="http://nginx.com/">nginx.com</a>.</p>

<p><em>Thank you for using nginx.</em></p>

</body>

</html>

[youaijj@youai ~]$

nginx部署(普通用户)的更多相关文章
- vue+uwsgi+nginx部署路飞学城
vue+uwsgi+nginx部署路飞学城 有一天,老男孩的苑日天给我发来了两个神秘代码,听说是和mjj的结晶 超哥将这两个代码,放到了一个网站上,大家可以自行下载 路飞学城django代码 ht ...
- linux vue uwsgi nginx 部署路飞学城 安装 vue
vue+uwsgi+nginx部署路飞学城 有一天,老男孩的苑日天给我发来了两个神秘代码,听说是和mjj的结晶 超哥将这两个代码,放到了一个网站上,大家可以自行下载 路飞学城django代码#这个代码 ...
- Nginx部署部分https与部分http【转】
转自 Nginx部署部分https与部分http - na_tion的专栏 - 博客频道 - CSDN.NEThttp://blog.csdn.net/na_tion/article/details/ ...
- 转:在 Ubuntu 上使用 Nginx 部署 Flask 应用
转:http://Python.jobbole.com/84286/ 原文出处: Vladik 译文出处:开源中国 我职业生涯的大部分都在使用微软的架构,最近我决定走出技术的舒适区,步入开源 ...
- Django + Gunicorn + Nginx 部署 Ubuntu 服务器
Django + Gunicorn + Nginx 部署服务器 获取腾讯云 root权限 本人的服务器使用的是腾讯云,腾讯云默认是没有开放 root 用户的,我们来创建 root 用户. 创建 roo ...
- Flask采用Virtualenv+Supervisor+Nginx部署应用
Flask采用Virtualenv+Supervisor+Nginx部署应用 -- 首先是概念解释 WSGI服务器,负责我们的app与服务器的交互,常用的有Gunicorn Web服务器,是个HTTP ...
- SpringBoot电商项目实战 — 前后端分离后的优雅部署及Nginx部署实现
在如今的SpringBoot微服务项目中,前后端分离已成为业界标准使用方式,通过使用nginx等代理方式有效的进行解耦,并且前后端分离会为以后的大型分布式架构.弹性计算架构.微服务架构.多端化服务(多 ...
- Linux 集群概念 , wsgi , Nginx负载均衡实验 , 部署CRM(Django+uwsgi+nginx), 部署学城项目(vue+uwsgi+nginx)
Linux 集群概念 , wsgi , Nginx负载均衡实验 , 部署CRM(Django+uwsgi+nginx), 部署学城项目(vue+uwsgi+nginx) 一丶集群和Nginx反向代理 ...
- [技术博客]nginx 部署 apt 源
[技术博客] nginx 部署 apt 源 出于各种各样的原因, 有时需要自己配置apt源, 比如发布自己编写的debian软件包, 内网中只有一台电脑可以访问外网,或者在本地配置自己的apt源.我们 ...
- centosflask+uWSGI+nginx部署
centosflask+uWSGI+nginx部署 1. 概念 Flask自带webserver--Werkzeug,可以搭建服务,运行网站.但在开发时,一般会用专业的--uWSGI. 另外 ...
随机推荐
- 在jenkins和sonar中集成jacoco(一)--使用jacoco收集单元测试的覆盖率
之前系统的持续集成覆盖率工具使用的是cobetura,使用的过程中虽然没什么问题,但感觉配置比较麻烦,现在准备改用jacoco这个覆盖率工具来代替它.接下来我介绍一下jenkins配置jacoco,并 ...
- BootStrap使用
BootStrap简单使用 <深入理解BootStrap>这本书对BootStrap进行了全面的讲解包括设计思想以及源码解析对没有接触过的很有帮助 BootStrap可以说是最简单的一类框 ...
- Vue2.0 less全局配置
前言 再一次vue2.0的开发中,遇到这样的一个问题,使用less与处理器,封装了一套关于项目的主题,但是使用的时候,main.js中引入后依然不能直接使用定义的@theme-bg等less定义的颜色 ...
- asp.net core microservices 架构之分布式自动计算(三)-kafka日志同步至elasticsearch和kibana展示
一 kafka consumer准备 前面的章节进行了分布式job的自动计算的概念讲解以及实践.上次分布式日志说过日志写进kafka,是需要进行处理,以便合理的进行展示,分布式日志的量和我们对日志的重 ...
- DesignPattern(六)行为型模式(下)
状态模式 每个对象都有其对应的状态,而每个状态又对应一些相应的行为,如果某个对象有多个状态时,那么就会对应很多的行为.那么对这些状态的判断和根据状态完成的行为,就会导致多重条件语句,并且如果添加一种新 ...
- 第01章-欢迎学习VTK
[译者:这个系列教程是以Kitware公司出版的<VTK User's Guide -11th edition>一书作的中文翻译(出版时间2010年,ISBN: 978-1-930934- ...
- FastAdmin 的 url 有一个 ref=addtabs 是怎么添加的?
FastAdmin 的 url 有一个 ref=addtabs 是怎么添加的? 在使用 FastAdmin 时你会发现 url 中有一个 ref=addtabs . 以下是 Karson 的解释 这个 ...
- Spring 部署Tomcat 404 错误解决方案
将Spring项目部署到tomcat后,访问网页出现404错误 HTTP Status 404 – Not Found The origin server did not find a current ...
- kettle环境变量的设置和获取
1. 变量的类型Kettle 的早期版本中的变量只有系统环境变量目前版本中(3.1) 变量包括系统环境变量, "Kettle变量" 和内部变量三种 系统环境变量的影响范围很广,凡是 ...
- storyboard貌似不错
冷静下来看了下,貌似聽简单,蛋疼,忙完才发现,弄的时候咋没发现,靠 push,present等可以全部用下面这个api搞定 - (void)performSegueWithIdentifier:(NS ...