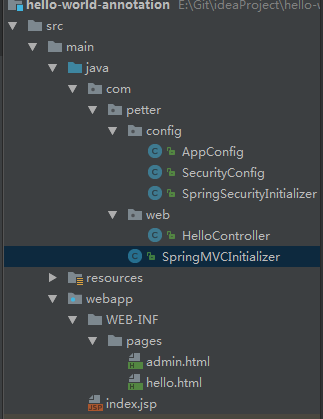
采用注解方式实现security
采用注解方式使用security,首先我们需要用注解方式实现Spring MVC,新建一个Maven项目
<project xmlns="http://maven.apache.org/POM/4.0.0" xmlns:xsi="http://www.w3.org/2001/XMLSchema-instance"

  xsi:schemaLocation="http://maven.apache.org/POM/4.0.0 http://maven.apache.org/maven-v4_0_0.xsd">

  <modelVersion>4.0.0</modelVersion>

  <groupId>com.petter</groupId>

  <artifactId>hello-world-annotation</artifactId>

  <packaging>war</packaging>

  <version>1.0-SNAPSHOT</version>

  <name>hello-world-annotation Maven Webapp</name>

  <url>http://maven.apache.org</url>

  <properties>

    <project.build.sourceEncoding>UTF-8</project.build.sourceEncoding>

    <project.reporting.outputEncoding>UTF-8</project.reporting.outputEncoding>

    <java.version>1.8</java.version>

    <spring.version>4.3.5.RELEASE</spring.version>

    <spring.security.version>4.2.1.RELEASE</spring.security.version>

  </properties>

  <dependencies>

    <dependency>

      <groupId>org.springframework</groupId>

      <artifactId>spring-core</artifactId>

      <version>${spring.version}</version>

    </dependency>

    <dependency>

      <groupId>org.springframework</groupId>

      <artifactId>spring-web</artifactId>

      <version>${spring.version}</version>

    </dependency>

    <dependency>

      <groupId>org.springframework</groupId>

      <artifactId>spring-webmvc</artifactId>

      <version>${spring.version}</version>

    </dependency>

    <dependency>

      <groupId>org.thymeleaf</groupId>

      <artifactId>thymeleaf-spring4</artifactId>

      <version>3.0.2.RELEASE</version>

    </dependency>

    <!-- Spring Security -->

    <dependency>

      <groupId>org.springframework.security</groupId>

      <artifactId>spring-security-web</artifactId>

      <version>${spring.security.version}</version>

    </dependency>

    <dependency>

      <groupId>org.springframework.security</groupId>

      <artifactId>spring-security-config</artifactId>

      <version>${spring.security.version}</version>

    </dependency>

  </dependencies>

  <build>

    <plugins>

      <plugin>

        <groupId>org.apache.maven.plugins</groupId>

        <artifactId>maven-compiler-plugin</artifactId>

        <version>3.3</version>

        <configuration>

          <source>1.8</source>

          <target>1.8</target>

          <encoding>utf8</encoding>

        </configuration>

      </plugin>

    </plugins>

  </build>

</project>
二、配置SpringMVC项目
package com.petter.config;

import org.springframework.context.annotation.Bean;

import org.springframework.context.annotation.ComponentScan;

import org.springframework.context.annotation.Configuration;

import org.springframework.web.servlet.config.annotation.EnableWebMvc;

import org.thymeleaf.spring4.SpringTemplateEngine;

import org.thymeleaf.spring4.templateresolver.SpringResourceTemplateResolver;

import org.thymeleaf.spring4.view.ThymeleafViewResolver;

/**

 * 相当于spring的xml配置文件

 * @author hongxf

 * @since 2017-03-08 10:11

 */

@EnableWebMvc

@Configuration

@ComponentScan({"com.petter.*"})

public class AppConfig {

    @Bean

    public SpringResourceTemplateResolver springResourceTemplateResolver() {

        SpringResourceTemplateResolver springResourceTemplateResolver = new SpringResourceTemplateResolver();

        springResourceTemplateResolver.setPrefix("/WEB-INF/pages/");

        springResourceTemplateResolver.setSuffix(".html");

        springResourceTemplateResolver.setTemplateMode("HTML");

        springResourceTemplateResolver.setCacheable(false);

        springResourceTemplateResolver.setCharacterEncoding("UTF-8");

        return springResourceTemplateResolver;

    }

    @Bean

    public SpringTemplateEngine springTemplateEngine() {

        SpringTemplateEngine springTemplateEngine = new SpringTemplateEngine();

        springTemplateEngine.setTemplateResolver(springResourceTemplateResolver());

        return springTemplateEngine;

    }

    @Bean

    public ThymeleafViewResolver thymeleafViewResolver() {

        ThymeleafViewResolver thymeleafViewResolver = new ThymeleafViewResolver();

        thymeleafViewResolver.setTemplateEngine(springTemplateEngine());

        thymeleafViewResolver.setCharacterEncoding("UTF-8");

        return thymeleafViewResolver;

    }

}
2、编写SpringMVCInitiallizer类文件,继承AbstractAnnotationConfigDispatcherServletInitializer,其相当于没有了的web.xml文件,代码如下:
package com.petter;

import com.petter.config.AppConfig;

import org.springframework.web.servlet.support.AbstractAnnotationConfigDispatcherServletInitializer;

/**

 * 相当于web.xml文件

 * @author hongxf

 * @since 2017-03-08 10:17

 */

public class SpringMVCInitializer extends AbstractAnnotationConfigDispatcherServletInitializer {

    /**

     * 应用程序上下文配置文件,可以是多个,即相当于多个xml文件配置

     * @return

     */

    @Override

    protected Class<?>[] getRootConfigClasses() {

        return new Class<?>[]{AppConfig.class};

    }

    /**

     * 获取应用程序上下文配置文件

     * 如果所有配置已经在AppConfig中配置,则可以设为null

     * @return

     */

    @Override

    protected Class<?>[] getServletConfigClasses() {

        return null;

    }

    /**

     * 指定拦截路径

     * @return

     */

    @Override

    protected String[] getServletMappings() {

        return new String[]{"/"};

    }

}
3、编写admin.html和hello.html文件,内容一致
<!DOCTYPE html>

<html xmlns="http://www.w3.org/1999/xhtml"

      xmlns:th="http://www.thymeleaf.org">

<head>

    <meta charset="UTF-8">

    <title>admin</title>

</head>

<body>

    <h1 th:text="|标题: ${title}|">Title : XXX</h1>

    <h1 th:text="|信息: ${message}|">Message : XXX</h1>

</body>

</html>
4、编写HelloController
package com.petter.web;

import org.springframework.stereotype.Controller;

import org.springframework.web.bind.annotation.RequestMapping;

import org.springframework.web.bind.annotation.RequestMethod;

import org.springframework.web.servlet.ModelAndView;

/**

 * @author hongxf

 * @since 2017-03-08 9:29

 */

@Controller

public class HelloController {

    @RequestMapping(value = { "/", "/welcome" }, method = RequestMethod.GET)

    public ModelAndView welcomePage() {

        ModelAndView model = new ModelAndView();

        model.addObject("title", "Spring Security Hello World");

        model.addObject("message", "This is welcome page!");

        model.setViewName("hello");

        return model;

    }

    @RequestMapping(value = "/admin", method = RequestMethod.GET)

    public ModelAndView adminPage() {

        ModelAndView model = new ModelAndView();

        model.addObject("title", "Spring Security Hello World");

        model.addObject("message", "This is protected page - Admin Page!");

        model.setViewName("admin");

        return model;

    }

    @RequestMapping(value = "/dba", method = RequestMethod.GET)

    public ModelAndView dbaPage() {

        ModelAndView model = new ModelAndView();

        model.addObject("title", "Spring Security Hello World");

        model.addObject("message", "This is protected page - Database Page!");

        model.setViewName("admin");

        return model;

    }

}
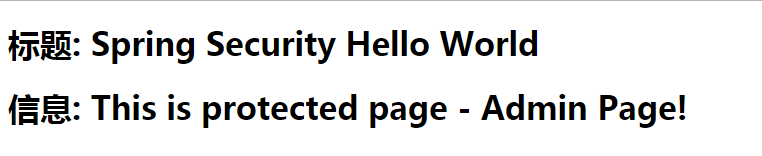
启动程序,访问http://localhost:8080/admin 结果如下:
package com.petter.config;

import org.springframework.security.web.context.AbstractSecurityWebApplicationInitializer;

/**

 * 相当于在web.xml中配置spring security的filter

 * @author hongxf

 * @since 2017-03-08 10:10

 */

public class SpringSecurityInitializer extends AbstractSecurityWebApplicationInitializer {

    //do nothing

}
相当于在web.xml文件中配置的filter,即
<filter>

    <filter-name>springSecurityFilterChain</filter-name>

    <filter-class>org.springframework.web.filter.DelegatingFilterProxy</filter-class>

</filter>

<filter-mapping>

    <filter-name>springSecurityFilterChain</filter-name>

    <url-pattern>/*</url-pattern>

</filter-mapping>
2、配置security的过滤配置,编写文件SecurityConfig,代码如下:
package com.petter.config;

import org.springframework.beans.factory.annotation.Autowired;

import org.springframework.context.annotation.Configuration;

import org.springframework.security.config.annotation.authentication.builders.AuthenticationManagerBuilder;

import org.springframework.security.config.annotation.web.builders.HttpSecurity;

import org.springframework.security.config.annotation.web.configuration.EnableWebSecurity;

import org.springframework.security.config.annotation.web.configuration.WebSecurityConfigurerAdapter;

/**

 * 相当于spring-security.xml中的配置

 * @author hongxf

 * @since 2017-03-08 9:30

 */

@Configuration

@EnableWebSecurity

public class SecurityConfig extends WebSecurityConfigurerAdapter {

    /**

     * 在内存中设置三个用户

     * @param auth

     * @throws Exception

     */

    @Autowired

    public void configureGlobal(AuthenticationManagerBuilder auth) throws Exception {

        auth.inMemoryAuthentication().withUser("hongxf").password("123456").roles("USER");

        auth.inMemoryAuthentication().withUser("admin").password("123456").roles("ADMIN");

        auth.inMemoryAuthentication().withUser("dba").password("123456").roles("DBA");

    }

    /**

     * 配置权限要求

     * @param http

     * @throws Exception

     */

    @Override

    protected void configure(HttpSecurity http) throws Exception {

        http.authorizeRequests()

                .antMatchers("/admin/**").access("hasRole('ROLE_ADMIN')")

                .antMatchers("/dba/**").access("hasRole('ROLE_ADMIN') or hasRole('ROLE_DBA')")

                .and().formLogin();

    }

}
相当于xml配置文件如下所示:
<http auto-config="true">

        <intercept-url pattern="/admin**" access="hasRole('ROLE_ADMIN')" />

        <intercept-url pattern="/dba**" access="hasRole('ROLE_ADMIN') or hasRole('ROLE_DBA')" />

    </http>

    <authentication-manager>

      <authentication-provider>

        <user-service>

        <user name="hongxf" password="123456" authorities="ROLE_USER" />

        <user name="admin" password="123456" authorities="ROLE_ADMIN" />

        <user name="dba" password="123456" authorities="ROLE_DBA" />

        </user-service>

      </authentication-provider>

    </authentication-manager>
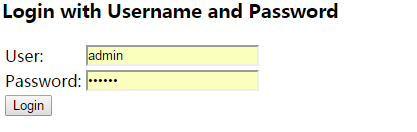
启动程序,访问http://localhost:8080/dba 会跳转到默认登录页:

采用注解方式实现security的更多相关文章
- Spring MVC 中采用注解方式 Action中跳转到另一个Action的写法
Spring MVC 中采用注解方式 Action中跳转到另一个Action的写法 在Action中方法的返回值都是字符串行,一般情况是返回某个JSP,如: return "xx" ...
- spring security结合数据库验证用户-注解方式
项目目录结构如下: 首先数据库的建立和数据导入,以及一些类的依赖参考XML配置方式,需要修改一些配置. 一.在AppConfig文件中添加DataSource的配置 @Bean(name = &quo ...
- Spring学习5-Spring整合JDBC及其事务处理(注解方式)
一.整合的步骤 1.步骤一:首先要获得DataSource连接池(推荐使用B方式): 要对数据库执行任何的JDBC操作,需要有一个Connection.在Spring中,Connection对象是 ...
- Spring注解方式配置说明
1.<context:annotation-config/>与<context:component-scan base-package=”XX.XX”/> 在基于主机方式配置S ...
- Spring Boot2.0之注解方式启动Springmvc
回顾下springmvc原理图: DispatcherServlet是Spring MVC的核心,每当应用接受一个HTTP请求,由DispatcherServlet负责将请求分发给应用的其他组件. 在 ...
- 使用注解方式搭建SpringMVC
1.以前搭建Spring MVC 框架一般都使用配置文件的方式进行,相对比较繁琐.spring 提供了使用注解方式搭建Spring MVC 框架的方式,方便简洁.使用Spring IOC 作为根容器管 ...
- ActiveMQ学习总结(10)——ActiveMQ采用Spring注解方式发送和监听
对于ActiveMQ消息的发送,原声的api操作繁琐,而且如果不进行二次封装,打开关闭会话以及各种创建操作也是够够的了.那么,Spring提供了一个很方便的去收发消息的框架,spring jms.整合 ...
- spring IOC装配Bean(注解方式)
1 Spring的注解装配Bean (1) Spring2.5 引入使用注解去定义Bean @Component 描述Spring框架中Bean (2) Spring的框架中提供了与@Componen ...
- Shiro启用注解方式
shiro验证权限方式一种是基于url配置文件: 例如: <bean id="shiroFilter" class="org.apache.shiro.spring ...
随机推荐
- linux下一些常用命令和访问目录
1. 目录 ls 列出目录文件名 ll 列出所有目录文件的访问权限等相关信息,包括 . .. ls -a 列出所有目录文件名,包括 . .. ls - ...
- poj3744 Scout YYF I[概率dp+矩阵优化]
Scout YYF I Time Limit: 1000MS Memory Limit: 65536K Total Submissions: 8598 Accepted: 2521 Descr ...
- NodeJS收发GET和POST请求
目录: 一 express框架接收 二 接收Get 三 发送Get 四 接收Post 五 发送Post 一 express框架接收 app.get('/',function(req,res) { va ...
- 【BZOJ4372】烁烁的游戏 动态树分治+线段树
[BZOJ4372]烁烁的游戏 Description 背景:烁烁很喜欢爬树,这吓坏了树上的皮皮鼠.题意:给定一颗n个节点的树,边权均为1,初始树上没有皮皮鼠.烁烁他每次会跳到一个节点u,把周围与他距 ...
- 如何获取e.printStackTrace()的内容
e.printStackTrace()通常是打印在控制台的,但是,有时候程序上线了需要看这个堆栈的内容就不容易了,一来生产环境打印的东西很多或者很少,二来有时候无法直接查看到,这个时候就需要把这些内容 ...
- java启动3个线程轮流打印数字
转自:http://blog.csdn.net/u014011112/article/details/50988769 http://blog.csdn.net/perrywork/article/d ...
- thinkphp---定义前台视图模板
具体可以参考: http://document.thinkphp.cn/manual_3_2.html#template_define 方法一:在入口文件中定义 // 定义模板路径 define(&q ...
- vue中封装axios方法
axios基本配置 使用方法 import axios from 'axios' // 创建axios实例 const service = axios.create({ baseURL: proces ...
- 徐州网络赛J-Maze Designer【最小生成树】【LCA】
After the long vacation, the maze designer master has to do his job. A tour company gives him a map ...
- Oracle卸载之正确卸载rac数据库的方法(MOS卸载方法)
一.关闭数据库和资源 1.节点1 [root@node1 bin]# pwd /u01/app/11.2.0/grid/bin [root@node1 bin]# ./crsctl stop crs ...