Intellij IDEA的Hibernate简单应用


package com.yyq.dao;

import javax.persistence.*;

@Entity

@Table(name = "user", schema = "", catalog = "demo")

public class UserEntity {

    private int id;

    private String username;

    private String password;

    private String email;

    @Id

    @Column(name = "id", nullable = false, insertable = true, updatable = true, length = 10, precision = 0)

    public int getId() {

        return id;

    }

    public void setId(int id) {

        this.id = id;

    }

    @Basic

    @Column(name = "username", nullable = true, insertable = true, updatable = true, length = 50, precision = 0)

    public String getUsername() {

        return username;

    }

    public void setUsername(String username) {

        this.username = username;

    }

    @Basic

    @Column(name = "password", nullable = true, insertable = true, updatable = true, length = 50, precision = 0)

    public String getPassword() {

        return password;

    }

    public void setPassword(String password) {

        this.password = password;

    }

    @Basic

    @Column(name = "email", nullable = true, insertable = true, updatable = true, length = 50, precision = 0)

    public String getEmail() {

        return email;

    }

    public void setEmail(String email) {

        this.email = email;

    }

    @Override

    public boolean equals(Object o) {

        if (this == o) return true;

        if (o == null || getClass() != o.getClass()) return false;

        UserEntity that = (UserEntity) o;

        if (id != that.id) return false;

        if (email != null ? !email.equals(that.email) : that.email != null) return false;

        if (password != null ? !password.equals(that.password) : that.password != null) return false;

        if (username != null ? !username.equals(that.username) : that.username != null) return false;

        return true;

    }

    @Override

    public int hashCode() {

        int result = id;

        result = 31 * result + (username != null ? username.hashCode() : 0);

        result = 31 * result + (password != null ? password.hashCode() : 0);

        result = 31 * result + (email != null ? email.hashCode() : 0);

        return result;

    }

}
7)配置hibernate.cfg.xml 如下。
<?xml version='1.0' encoding='utf-8'?>

<!DOCTYPE hibernate-configuration PUBLIC

        "-//Hibernate/Hibernate Configuration DTD//EN"

        "http://www.hibernate.org/dtd/hibernate-configuration-3.0.dtd">

<hibernate-configuration>

    <session-factory>

        <property name="connection.url">jdbc:mysql://localhost:3306/demo</property>

        <property name="connection.driver_class">com.mysql.jdbc.Driver</property>

        <property name="connection.username">root</property>

        <property name="connection.password">123456</property>

        <property name="current_session_context_class">thread</property>

        <property name="show_sql">true</property>

        <property name="hbm2ddl.auto">update</property>

        <!-- DB schema will be updated if needed -->

        <!-- <property name="hbm2ddl.auto">update</property> -->

        <property name="dialect">org.hibernate.dialect.MySQLDialect</property>

        <mapping class="com.yyq.dao.UserEntity"/>

    </session-factory>

</hibernate-configuration>
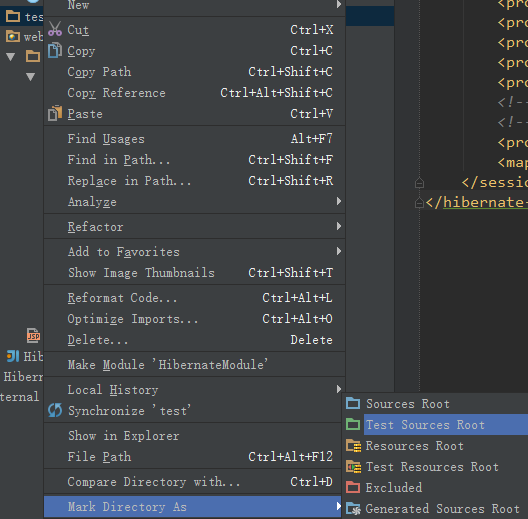
8)生成测试路径。在Module路径下生成一个文件夹,与src同级,名为test,点击文件夹test,右键,选择Mark Directory As - > Test Sources Root。
package com.yyq;

import com.yyq.dao.UserEntity;

import org.hibernate.Session;

import org.hibernate.SessionFactory;

import org.hibernate.Transaction;

import org.hibernate.cfg.Configuration;

import org.junit.Before;

import org.junit.Test;

public class DAOTest {

    Configuration config = null;

    SessionFactory sessionFactory = null;

    Session session = null;

    Transaction tx = null;

    @Before

    public void init() {

        config = new Configuration().configure("/hibernate.cfg.xml");

        sessionFactory = config.buildSessionFactory();

        session = sessionFactory.openSession();

        tx = session.beginTransaction();

    }

    //增加

    @Test

    public void insert() {

        UserEntity ue = new UserEntity();

        ue.setUsername("Anny");

        ue.setPassword("123");

        ue.setEmail("Anny@163.com");

        session.save(ue);

        tx.commit();

    }

    //修改

    @Test

    public void update() {

        UserEntity user = (UserEntity) session.get(UserEntity.class, new Integer(2));

        user.setUsername("Penny");

        session.update(user);

        tx.commit();

        session.close();

    }

    //查找

    @Test

    public void getById() {

        UserEntity user = (UserEntity) session.get(UserEntity.class, new Integer(8));

        tx.commit();

        session.close();

        System.out.println("ID号:" + user.getId() + ";用户名:" + user.getUsername() +

                ";密码:" + user.getPassword() + ";邮件:" + user.getEmail());

    }

    //删除

    @Test

    public void delete() {

        UserEntity user = (UserEntity) session.get(UserEntity.class, new Integer(6));

        session.delete(user);

        tx.commit();

        session.close();

    }

}
10)运行测试类,可以一个一个方法的进行运行,也可以在类名处将所有的测试方法都一起运行。全部运行成功!


<?xml version="1.0" encoding="UTF-8"?>

<web-app xmlns="http://java.sun.com/xml/ns/javaee"

           xmlns:xsi="http://www.w3.org/2001/XMLSchema-instance"

           xsi:schemaLocation="http://java.sun.com/xml/ns/javaee

          http://java.sun.com/xml/ns/javaee/web-app_3_0.xsd"

           version="3.0">

    <display-name>Struts2AndHibernate</display-name>

    <filter>

        <filter-name>struts2</filter-name>

        <filter-class>org.apache.struts2.dispatcher.ng.filter.StrutsPrepareAndExecuteFilter</filter-class>

    </filter>

    <filter-mapping>

        <filter-name>struts2</filter-name>

        <url-pattern>/*</url-pattern>

    </filter-mapping>

    <welcome-file-list>

        <welcome-file>index.jsp</welcome-file>

    </welcome-file-list>

</web-app>
2)将相关的Jar包复制到lib文件夹下。

3)创建一个名为ListAllAction.java文件。
package com.yyq.action;

import com.googlecode.s2hibernate.struts2.plugin.annotations.SessionTarget;

import com.googlecode.s2hibernate.struts2.plugin.annotations.TransactionTarget;

import com.opensymphony.xwork2.ActionSupport;

import com.yyq.dao.UserEntity;

import org.hibernate.Session;

import org.hibernate.Transaction;

import java.util.List;

public class ListAllAction extends ActionSupport {

    //使用@SessionTarget标注得到Hibernate Session

    @SessionTarget

    private Session session = null;

    //使用@TransactionTarget标注得到Hibernate Transaction

    @TransactionTarget

    private Transaction transaction = null;

    private List<UserEntity> users;

    public String list(){

        try{

            //得到user表中的所有记录

            users = session.createCriteria(UserEntity.class).list();

            transaction.commit();

            session.close();

            return SUCCESS;

        }catch (Exception e){

            e.printStackTrace();

            return ERROR;

        }

    }

    public List<UserEntity> getUsers(){

        return users;

    }

    public void setUsers(List<UserEntity> users){

        this.users = users;

    }

}
4)修改index.jsp文件以显示后台数据库的数据获取情况。
<%@ taglib prefix="s" uri="/struts-tags" %>

<%@ page contentType="text/html;charset=UTF-8" language="java" %>

<html>

<head>

    <title>显示数据</title>

</head>

<body>

<table>

    <tr>

        <th>ID</th>

        <th>用户名</th>

        <th>密码</th>

        <th>邮箱</th>

    </tr>

    <s:iterator value="users" var="obj">

        <tr>

            <td><s:property value="id"/></td>

            <td><s:property value="username"/></td>

            <td><s:property value="password"/></td>

            <td><s:property value="email"/></td>

        </tr>

    </s:iterator>

</table>

</body>

</html>
5)配置struts.xml文件。
<?xml version="1.0" encoding="UTF-8"?>

<!DOCTYPE struts PUBLIC

        "-//Apache Software Foundation//DTD Struts Configuration 2.1.7//EN"

        "http://struts.apache.org/dtds/struts-2.1.7.dtd">

<struts>

    <!--s2hibernate插件里面有一个叫hibernate-default的package,

    它里面的拦截器用于实现struts2+hibernate整合-->

    <package name="default" extends="hibernate-default">

        <!--defaultStackHibernate里面的拦截器会识别出@SessionTarget,@TransactionTarget等标注,

        然后将hibernate注入进去-->

        <default-interceptor-ref name="defaultStackHibernate"/>

        <default-class-ref class="com.yyq.action.ListAllAction"/>

        <action name="listAll" method="list">

            <result>index.jsp</result>

        </action>

    </package>

</struts>
6)启动Tomcat,输入:http://localhost:8080/listAll.action

7)项目结构图。

Intellij IDEA的Hibernate简单应用的更多相关文章
- 【转载】Intellij IDEA的Hibernate简单应用
转载自: https://www.cnblogs.com/yangyquin/p/5438248.html 1.创建数据库及其表 create database demo; use demo ...
- 菜鸟学习Hibernate——简单的增、删、改、查操作
上篇博客利用Hibernate搭建起一个简单的例子,把数据库的映射显示了出来在上一篇的博客基础上这篇博客讲述如何利用Hinbernate框架实现简单的数据库操作. 1.加入junit.jar 2.新建 ...
- *IntelliJ IDEA配置Hibernate
为IntelliJ IDEA安装Hibernate插件
- 新秀学习Hibernate——简单的增加、删、更改、检查操作
部分博客使用Hibernate单的样例,把数据库的映射显示了出来在上一篇的博客基础上这篇博客讲述怎样利用Hinbernate框架实现简单的数据库操作. 1.增加junit.jar 2.新建一个工具类H ...
- 【笔记】IntelliJ IDEA配置Hibernate
参考:imooc:http://www.imooc.com/video/7706 1.创建Hibernate的配置文件. 将依赖包导入项目.http://blog.csdn.net/a15337525 ...
- Hibernate二次学习一----------Hibernate简单搭建
因为博客园自带的markdown不太好用,因此所有markdown笔记都使用cmd_markdown发布 Hibernate二次学习一----------Hibernate简单搭建: https:// ...
- Spring+SpringMVC+Hibernate简单整合(转)
SpringMVC又一个漂亮的web框架,他与Struts2并驾齐驱,Struts出世早而占据了一定优势,下面同样做一个简单的应用实例,介绍SpringMVC的基本用法,接下来的博客也将梳理一下Str ...
- Intellij IDEA 配置最简单的maven-struts2环境的web项目
在idea里搭建maven项目 看着网上大神发的各种博客,然后自己搭建出来一个最简单的maven-strtus2项目,供初学者学习 新建project
- 【hibernate】<第一节>hibernate简单入门
所需工具: ide:eclipse or myeclipse jdk:1.7 jar包:hibernate-distribution-3.6.0.Final 和对应mysql的驱动类(对应jar包如图 ...
随机推荐
- ueditor:原谅我这一生不羁放纵爱独特
客户指明道姓需要使用百度编辑器,好吧,虽然自从李彦宏把一个好好的千千静听搞得节操尽碎之后,我就对百度的东西毫无好感,但是客户是上帝嘛,不就一个文本编辑器嘛,弄之,始料未及的是,就是这样一个简单的文本编 ...
- POSIX 线程详解 一种支持内存共享的简捷工具
线程是有趣的 了解如何正确运用线程是每一个优秀程序员必备的素质.线程类似于进程.如同进程,线程由内核按时间分片进行管理.在单处理器系统中,内核使用时间分片来模拟线程的并发执行,这种方式和进程的相同.而 ...
- 【BZOJ】【3163】【HEOI2013】Eden的新背包问题
多重背包/思路题 多次询问,每次从所有物品中忽略一件,问最大收益…… 这题我用的zyf的一个“暴力”做法,就是先预处理出来g1[i][j]表示1~i号物品花了j块钱的最大价值,g2[i][j]表示i~ ...
- Leetcode#117 Populating Next Right Pointers in Each Node II
原题地址 二叉树的层次遍历. 对于每一层,依次把各节点连起来即可. 代码: void connect(TreeLinkNode *root) { if (!root) return; queue< ...
- angularJs 问题
1. IE不能渲染指令中的 style="background-color",而chrome和firefox可以 <!DOCTYPE html> <html ng ...
- Linux --windows vs
我其实并不是很清楚我在做什么....希望做完之后可以解答....... 在看了一堆GNU, Clang, GCC, QT, MinGW, CygWin, POSIX 这些概念之后,我觉得我在做的事情就 ...
- 阻止浏览器关闭 区分刷新和关闭 自试IE可用
window.onbeforeunload = onbeforeunload_handler; function onbeforeunload_handler(){ if(event.clientX& ...
- PowerDesigner(一)-PowerDesigner概述(系统分析与建模)(转)
PowerDesigner概述 PowerDesigner是Sybase公司推出的一个集成了企业架构,UML(统一建模语言)和数据库的CASE(计算机辅助软件工程)工具.它不仅可以用于系统设计和开发的 ...
- HDU4542 小明系列故事——未知剩余系
大赞的数论题: 大致思路: 对于TYPE=1的情况,认为 X 中有 X-K个约数,求最小的X,X-K>0 那么化为B+K的约数为B, 我们知道(B+K)的约数<=2*SQRT(B+K);这 ...
- 用dedecms自定义表单创建简易自助预约系统
建站往往需要根据客户的需求来增加相应的功能,比如预约.平时用比较多的是织梦系统,那么如何用dedecms自定义表单创建简易自助预约系统呢? 进入dedecms后台,左侧菜单中依次点击“核心” - 频道 ...