微服务网关从零搭建——(三)Ocelot网关 + identity4
增加验证服务
1.创建名为AuthService 的core 空项目
2.修改startup文件
using System;

using System.Collections.Generic;

using System.Linq;

using System.Threading.Tasks;

using ConsulRegisterHelper;

using Microsoft.AspNetCore.Builder;

using Microsoft.AspNetCore.Hosting;

using Microsoft.AspNetCore.Http;

using Microsoft.Extensions.Configuration;

using Microsoft.Extensions.DependencyInjection;

namespace AuthService

{

    public class Startup

    {

        public Startup(IConfiguration configuration)

        {

            Configuration = configuration;

        }

        public IConfiguration Configuration { get; }

        // This method gets called by the runtime. Use this method to add services to the container.

        // For more information on how to configure your application, visit https://go.microsoft.com/fwlink/?LinkID=398940

        public void ConfigureServices(IServiceCollection services)

        {

            //注入IdentityServer服务

            services.AddIdentityServer()

                .AddDeveloperSigningCredential()//开发临时证书

                .AddInMemoryClients(ApiConfig.GetClients())

                .AddInMemoryApiResources(ApiConfig.GetApiResources())

                .AddResourceOwnerValidator<ResourceOwnerPasswordValidator>()//添加自定义验证

                .AddProfileService<ProfileService>(); ;

        }

        // This method gets called by the runtime. Use this method to configure the HTTP request pipeline.

        public void Configure(IApplicationBuilder app, IHostingEnvironment env, IApplicationLifetime lifetime)

        {

            if (env.IsDevelopment())

            {

                app.UseDeveloperExceptionPage();

            }

            app.UseIdentityServer();

            app.RegisterConsul(lifetime, new ServiceEntity

            {

                IP = NetworkHelper.LocalIPAddress,

                Port = Convert.ToInt32(Configuration.GetSection("Setting")["Port"]),

                ServiceName = Configuration.GetSection("Setting")["ServiceName"],

                ConsulIP = Configuration.GetSection("Setting")["ConsulIP"],

                ConsulPort = Convert.ToInt32(Configuration.GetSection("Setting")["ConsulPort"])

            });

            app.Run(async (context) =>

            {

                await context.Response.WriteAsync("身份验证服务启动成功!");

            });

        }

    }

}
Startup
3.修改Program
using System;

using System.Collections.Generic;

using System.IO;

using System.Linq;

using System.Threading.Tasks;

using Microsoft.AspNetCore;

using Microsoft.AspNetCore.Hosting;

using Microsoft.Extensions.Configuration;

using Microsoft.Extensions.Logging;

namespace AuthService

{

    public class Program

    {

        public static string StartPort;

        public static void Main(string[] args)

        {

            var config = new ConfigurationBuilder()

.SetBasePath(Directory.GetCurrentDirectory())

.AddJsonFile("appsettings.json", optional: true)

.Build();

            StartPort = config.GetSection("Setting")["Port"];

            CreateWebHostBuilder(args).Build().Run();

        }

        public static IWebHostBuilder CreateWebHostBuilder(string[] args) =>

            WebHost.CreateDefaultBuilder(args)

             .UseUrls($"http://*:{StartPort}")

                .UseStartup<Startup>();

    }

}
Program
4.增加setting文件节点
"Setting": {
"Port": "7500",
"ServiceName": "authService",
"ConsulIP": "localhost",
"ConsulPort": "8500"
}
5.增加身份验证自定义用户验证相关
using IdentityServer4.Models;

using IdentityServer4.Services;

using System;

using System.Collections.Generic;

using System.Linq;

using System.Threading.Tasks;

namespace AuthService

{

    public class ProfileService : IProfileService

    {

        public async Task GetProfileDataAsync(ProfileDataRequestContext context)

        {

            var claims = context.Subject.Claims.ToList();

            context.IssuedClaims = claims.ToList();

        }

        public async Task IsActiveAsync(IsActiveContext context)

        {

            context.IsActive = true;

        }

    }

}
ProfileService.cs
using IdentityServer4.Models;

using IdentityServer4.Validation;

using System;

using System.Collections.Generic;

using System.Linq;

using System.Security.Claims;

using System.Threading.Tasks;

namespace AuthService

{

    public class ResourceOwnerPasswordValidator : IResourceOwnerPasswordValidator

    {

        public Task ValidateAsync(ResourceOwnerPasswordValidationContext context)

        {

            //ToDo:验证自定义用户

            //LoginUser loginUser = null;

            bool isAuthenticated = context.UserName=="aaa"&&context.Password==""? true :false; //loginUserService.Authenticate(context.UserName, context.Password, out loginUser);

            if (!isAuthenticated)

            {

                context.Result = new GrantValidationResult(TokenRequestErrors.InvalidGrant, "账户名密码错误");

            }

            else

            {

                context.Result = new GrantValidationResult(

                    subject: context.UserName,

                    authenticationMethod: "custom",

                    claims: new Claim[] {

                        new Claim("Name", context.UserName),

                        new Claim("Id", ""),

                        new Claim("RealName", ""),

                        new Claim("Email", "")

                    }

                );

            }

            return Task.CompletedTask;

        }

    }

}
ResourceOwnerPasswordValidator.cs
6.增加示例数据
using IdentityServer4.Models;

using System;

using System.Collections.Generic;

using System.Linq;

using System.Threading.Tasks;

namespace AuthService

{

    /// <summary>

    /// 因为此处采用in-memory,所以硬编码一些api,以及client

    /// </summary>

    public class ApiConfig

    {

        /// <summary>

        /// 定义ApiResource   这里的资源(Resources)指的就是我们的API

        /// </summary>

        /// <returns>ApiResource枚举</returns>

        public static IEnumerable<ApiResource> GetApiResources()

        {

            return new[]

            {

                new ApiResource("demoAPi", "测试API"),

            };

        }

        /// <summary>

        /// 定义受信任的客户端 Client

        /// </summary>

        /// <returns></returns>

        public static IEnumerable<Client> GetClients()

        {

            return new[]

            {

                new Client

                {

                    ClientId = "OcelotDemo",//客户端的标识,要是惟一的

                    ClientSecrets = new [] { new Secret("".Sha256()) },//客户端密码,进行了加密

                    AllowedGrantTypes = GrantTypes.ClientCredentials,//授权方式,这里采用的是客户端认证模式,只要ClientId,以及ClientSecrets正确即可访问对应的AllowedScopes里面的api资源

                    AllowedScopes = new [] { "demoAPi"}//定义这个客户端可以访问的APi资源数组

                }

            };

        }

    }

}
ApiConfig.cs
改变网关
1.修改Startup.cs
增加节点
 services.AddAuthentication()

               .AddIdentityServerAuthentication(Configuration.GetSection("Setting")["AuthScheme"], options => {

                   options.Authority = Configuration.GetSection("Setting")["AuthUrl"];

                   options.ApiName = Configuration.GetSection("Setting")["AuthApiName"];

                   options.SupportedTokens = SupportedTokens.Both;

                   options.RequireHttpsMetadata = false;

               });
ConfigureServices内容
2.修改网关配置
 //添加身份验证

      "AuthenticationOptions": {

        "AuthenticationProviderKey": "OcelotKey",

        "AllowedScopes": [ "demoAPi"]

      }
configuration.json

3.修改配置文件appsettings.json
 "Setting": {

    "Port": "",

    "AuthScheme": "OcelotKey", //需要和ReRoutes中的AuthenticationProviderKey一致

    "AuthUrl": "http://192.168.66.241:7500", // 验证服务地址 注意 必须带有http

    "AuthApiName": "demoAPi" //和 需要被验证服务的服务名称一致

  }
增加节点内容
注:
AuthUrl 中的 http:// 必填 不然会出现500异常
AuthApiName 需要被验证服务的服务名称一致 即 需要和scopename 一致

注释部分 错误会造成网关转发跳转出错
测试demoAPI无需改动
测试步骤:
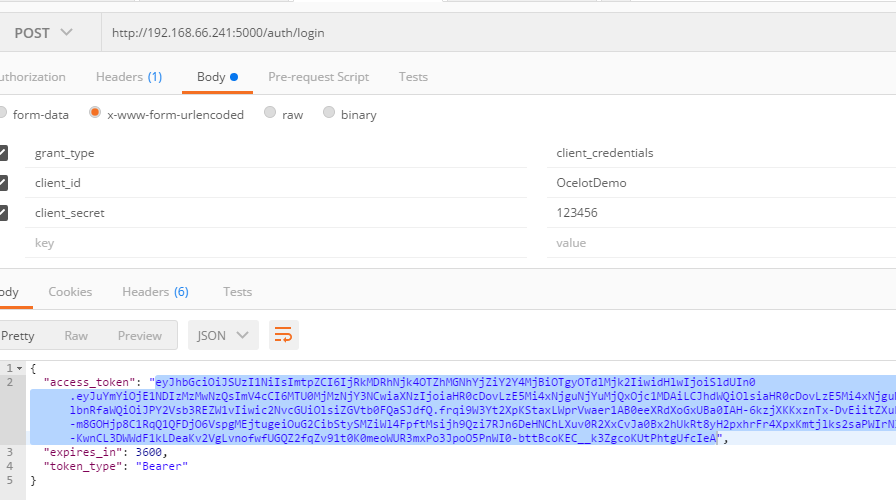
1.token获取
post
请求url: http://192.168.66.241:5000/auth/login
参数 :
grant_type:client_credentials
client_id:OcelotDemo
client_secret:123456
如图:
2.测试访问
get
url:192.168.66.241:5000/demo1/values
参数 :
Authorization:Bearer eyJhbGciOiJSUzI1NiIsImtpZCI6IjRkMDRhNjk4OTZhMGNhYjZiY2Y4MjBiOTgyOTdlMjk2IiwidHlwIjoiSldUIn0.eyJuYmYiOjE1NDIzMzMwNzQsImV4cCI6MTU0MjMzNjY3NCwiaXNzIjoiaHR0cDovLzE5Mi4xNjguNjYuMjQxOjc1MDAiLCJhdWQiOlsiaHR0cDovLzE5Mi4xNjguNjYuMjQxOjc1MDAvcmVzb3VyY2VzIiwiZGVtb0FQaSJdLCJjbGllbnRfaWQiOiJPY2Vsb3REZW1vIiwic2NvcGUiOlsiZGVtb0FQaSJdfQ.frqi9W3Yt2XpKStaxLWprVwaer1AB0eeXRdXoGxUBa0IAH-6kzjXKKxznTx-DvEiitZXuF9QBetcbe-otHFG0sHWhQstbD-m8GOHjp8C1RqQ1QFDjO6VspgMEjtugeiOuG2CibStySMZiWl4FpftMsijh9Qzi7RJn6DeHNChLXuv0R2XxCvJa0Bx2hUkRt8yH2pxhrFr4XpxKmtjlks2saPWIrN3D3JWYYcILMcQK-1GDRgc7v-q-KwnCL3DWWdF1kLDeaKv2VgLvnofwfUGQZ2fqZv91t0K0meoWUR3mxPo3JpoO5PnWI0-bttBcoKEC__k3ZgcoKUtPhtgUfcIeA
Content-Type:application/json
如图:

再次引用参考链接:
微服务系列教程
https://www.cnblogs.com/edisonchou/p/dotnetcore_microservice_foundation_blogs_index_final.html
微服务网关从零搭建——(三)Ocelot网关 + identity4的更多相关文章
- 庐山真面目之六微服务架构Consul集群、Ocelot网关集群和Nginx版本实现
庐山真面目之六微服务架构Consul集群.Ocelot网关集群和Nginx版本实现 一.简介 在上一篇文章<庐山真面目之五微服务架构Consul集群.Ocelot网关和Nginx版本实 ...
- 庐山真面目之七微服务架构Consul集群、Ocelot网关集群和IdentityServer4版本实现
庐山真面目之七微服务架构Consul集群.Ocelot网关集群和IdentityServer4版本实现 一.简介 在上一篇文章<庐山真面目之六微服务架构Consul集群.Ocelot网 ...
- 微服务之:从零搭建ocelot网关和consul集群
介绍 微服务中有关键的几项技术,其中网关和服务服务发现,服务注册相辅相成. 首先解释几个本次教程中需要的术语 网关 Gateway(API GW / API 网关),顾名思义,是企业 IT 在系统边界 ...
- 微服务之十四如何在 Ocelot 网关中配置多实例 Swagger 访问
一.介绍 当我们开发基于微服务的应用程序的时候,有一个环节总是跳不过去的,那就是要创建 WebApi,然后,我们的应用程序基于 WebApi 接口去访问.在没有 Swagger 以前,我们开发好了 W ...
- 庐山真面目之十二微服务架构基于Docker搭建Consul集群、Ocelot网关集群和IdentityServer版本实现
庐山真面目之十二微服务架构基于Docker搭建Consul集群.Ocelot网关集群和IdentityServer版本实现 一.简介 在第七篇文章<庐山真面目之七微服务架构Consul ...
- 微服务指南走北(三):Restful API 设计简述
API的定义取决于选择的IPC通信方式,假设是消息机制(如 AMQP 或者 STOMP).API则由消息频道(channel)和消息类型.假设是使用HTTP机制,则是基于请求/响应(调用http的ur ...
- 微服务网关从零搭建——(八)Ocelot网关中加入skywalking APM
准备工作 一.下载skywalking 本例使用的是 注: 1.解压后执行完2,3步骤后运行\bin\startup.bat 2.默认后台端口为8080 如需修改则修改\webapp\webapp.y ...
- 微服务网关从零搭建——(一)创建测试api以及api自动注入consul
本系列编写目的纯属个人开发记录 以下代码均为demo级 如有需要 请自行优化 代码完整包由于公司电脑加密 无法上传整包的demo文件 consul 开发环境简易处理 consul 下载地址 : ht ...
- 微服务网关从零搭建——(七)更改存储方式为oracle
资源准备: 下载开源项目 新建oracle表: -- ---------------------------- -- Table structure for OcelotGlobalConfigura ...
随机推荐
- react 中的 setState
语法:setState(newState [,callback]) 1.只要有入门基础的同学都知道 setState({...}) 是更新组件中的 state 内容 2.但是,setState 是异步 ...
- Python获取CPU、内存使用率以及网络使用状态代码
Python获取CPU.内存使用率以及网络使用状态代码_python_脚本之家 http://www.jb51.net/article/134714.htm
- 【Silverlight】Bing Maps学习系列(六):使用扩展模式(Extended Modes)(转)
[Silverlight]Bing Maps学习系列(六):使用扩展模式(Extended Modes) 微软Bing Maps推出有有段时间了,通过不断的改进和新的地图更新,现在已经基本上形成了一套 ...
- go语言---reflect
go语言---reflect https://blog.csdn.net/cyk2396/article/details/78902953 一.reflect的使用: import ( "f ...
- 【JSOI 2011】 分特产
[题目链接] 点击打开链接 [算法] 考虑求每个人可以不分的方案 那么,对于每件物品,我们把它分成n份,每一份对应分给每一个人,有C(a[i]+n-1,m-1)种方案,而总方案数就是每种 物品方案数的 ...
- 24. [Ext JS 4] 实战之Load Mask(加载遮罩)的显示与隐藏
转自:https://blog.csdn.net/oscar999/article/details/27176791
- 【转载】Cookie/Session机制详解
[本文转自]http://blog.csdn.net/fangaoxin/article/details/6952954/ 会话(Session)跟踪是Web程序中常用的技术,用来跟踪用户的整个会话. ...
- MySQL 循环分支语法
---恢复内容开始--- Loop循环 label: LOOP statement_list IF exit_condition THEN LEAVE label; END IF; END LOOP ...
- E20170531-hm
passage n. 通路; 通道 discrete adj. 分离的,不相关联的; 分立式; 非连续; alternative 替代的; 另类的; 备选的; 其他的; intent ...
- 最优贸易 2009年NOIP全国联赛提高组(最短路)
最优贸易 2009年NOIP全国联赛提高组 时间限制: 1 s 空间限制: 128000 KB 题目等级 : 钻石 Diamond 题目描述 Description [问题描述]C ...