angular cli, vs code liveserver, vs 2019 iis express 10, vs code kestrel 使用 https + ip
更新: 2022-03-20
修订版: Vs Code, Visual Studio 2022, Angular and Live Server Running Through Https and IP Address
更新: 2021-08-21
之前一直没有讲到手机端如果 trust 证书, 因为我都是 unsafe 访问的.
最近遇到一个问题就是游览器的 address bar 一直不会消失,原因就是不信任 https 导致的.
于是我就尝试让它 trust 一下,结果发现没有那么简单...直接安装 .crt 是不 ok 的, pfx 也不可以.
research 了许多方案
https://aboutssl.org/how-to-create-and-import-self-signed-certificate-to-android-device/
https://stackoverflow.com/questions/58500892/install-self-signed-certificates-no-longer-working-in-android-q
https://stackoverflow.com/questions/58500892/install-self-signed-certificates-no-longer-working-in-android-q
https://stackoverflow.com/questions/37281958/how-to-trust-self-signed-certificate-on-android
https://android.stackexchange.com/questions/4053/how-do-you-import-ca-certificates-onto-an-android-phone
都不行
幸好最后尝试了其中一个,自己又改了一些东西才可以跑
https://stackoverflow.com/questions/57565665/one-self-signed-cert-to-rule-them-all-chrome-android-and-ios
openssl.cnf
[ req ]

default_bits        = 2048

default_keyfile     = ca.key

default_md          = sha256

default_days        = 825

encrypt_key         = no

distinguished_name  = subject

req_extensions      = req_ext

x509_extensions     = x509_ext

string_mask         = utf8only

prompt              = no

# The Subject DN can be formed using X501 or RFC 4514 (see RFC 4519 for a description).

#   Its sort of a mashup. For example, RFC 4514 does not provide emailAddress.

[ subject ]

countryName                 = MY

stateOrProvinceName         = Johor

localityName                = Skudai

organizationName            = Stooges

OU                          = Engineering

# Use a friendly name here because it's presented to the user. The server's DNS

#   names are placed in Subject Alternate Names. Plus, DNS names here is deprecated

#   by both IETF and CA/Browser Forums. If you place a DNS name here, then you

#   must include the DNS name in the SAN too (otherwise, Chrome and others that

#   strictly follow the CA/Browser Baseline Requirements will fail).

commonName              = 192.168.1.153

emailAddress            = hengkeat87@gmail.com

# Section x509_ext is used when generating a self-signed certificate. I.e., openssl req -x509 ...

[ x509_ext ]

subjectKeyIdentifier      = hash

authorityKeyIdentifier    = keyid:always,issuer

# You only need digitalSignature below. *If* you don't allow

#   RSA Key transport (i.e., you use ephemeral cipher suites), then

#   omit keyEncipherment because that's key transport.

basicConstraints        = critical, CA:TRUE

keyUsage            = critical, digitalSignature, keyEncipherment, cRLSign, keyCertSign

subjectAltName          = @alternate_names

extendedKeyUsage = serverAuth

# RFC 5280, Section 4.2.1.12 makes EKU optional

#   CA/Browser Baseline Requirements, Appendix (B)(3)(G) makes me confused

#   In either case, you probably only need serverAuth.

#extendedKeyUsage    = TLS Web Server Authentication

# Section req_ext is used when generating a certificate signing request. I.e., openssl req ...

[ req_ext ]

subjectKeyIdentifier        = hash

basicConstraints        = CA:FALSE

keyUsage            = digitalSignature, keyEncipherment

subjectAltName          = @alternate_names

nsComment           = "OpenSSL Generated Certificate"

# RFC 5280, Section 4.2.1.12 makes EKU optional

#   CA/Browser Baseline Requirements, Appendix (B)(3)(G) makes me confused

#   In either case, you probably only need serverAuth.

# extendedKeyUsage    = serverAuth, clientAuth

[ alternate_names ]

IP.1 = 192.168.1.153

DNS.1 = *.192.168.1.153

DNS.2 = 192.168.1.153
配上 cmd
openssl req -config openssl.cnf -new -x509 -days 825 -out ca.crt
最后是 iphone 安装
https://support.n4l.co.nz/s/article/Installing-an-SSL-Certificate-on-an-iOS-Device-Manually
android 的是 setting > security > more settings > encryption and credentials > intsall from storage > 去 google drive 选 .crt > 输入手机密码 > 安装成功后可以去 user credentials 和 trusted credentials 看到.
这样就可以了
更新: 2021-05-30
vscode + kestrel + https + ip
refer : https://solrevdev.com/2020/03/06/localhost-https-subdomains-with-a-kestrel-ssl-certificate.html
它和 iis 一样只认 pfx, 在 program.cs 里面做配置
需要判断一下是不是 development 环境, 还有 pfx password 要放入 secret 哦
    public static IHostBuilder CreateHostBuilder(string[] args) =>

        Host.CreateDefaultBuilder(args)

            .ConfigureWebHostDefaults(webBuilder =>

            {

              webBuilder.UseStartup<Startup>();

              if (Environment.GetEnvironmentVariable("ASPNETCORE_ENVIRONMENT") == Environments.Development)

              {

                var configuration = new ConfigurationBuilder()

                                        .AddUserSecrets<Program>()

                                        .Build();

                webBuilder.ConfigureKestrel((context, serverOptions) =>

                {

                  serverOptions.ConfigureHttpsDefaults(options =>

                  {

                    options.ServerCertificate = new System.Security.Cryptography.X509Certificates.X509Certificate2(

                      "C:\\self-signed-certificate\\192.168.1.152.pfx",

                      configuration.GetValue<string>("KestrelPfxPassword")

                    );

                  });

                });

              }

            });
早年做开发只是用 http://localhost
近年 SSL 免费了,再加上 PWA和大公司的 API都强制 https。
为了更贴近生产环境,本地开发也一律换成了 https
随着 web app, mobile first 概念普及了, 开发时经常需要手机链接测试, localhost 也转成了 ip 访问.
之前本地开发我都没有使用 https,本想说应该也不是很难的事儿. 谁知道当 https + ip 的时候难度就大了许多.
https + localhost 就简单多了.
这里做一些基本的记入.
先说说 angular
angular cli 要 serve as ip 非常简单
在 angular.json 里面添加 host 和 post 就可以了
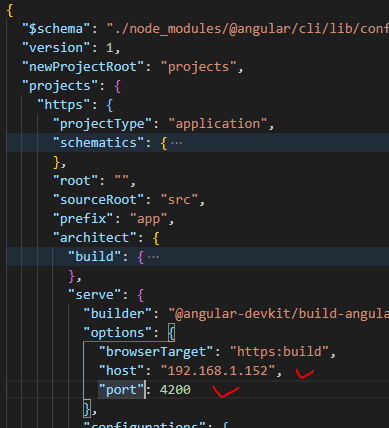
要使用 https 也很简单, package.json, 运行时

链接证书和 key 就可以了。
比较难搞的应该是证书.
这里来讲解一下怎样在 windows 10 下制作证书. self signed certificate
有 2 种方式, 一种是用 power shell
https://www.cnblogs.com/keatkeat/p/9326389.html 之前有写过了.
今天教的是用 linux 的方式 open SSL
windows 要跑 open SSL, 比较好的方式是安装 git
git 里面有个叫 bash 的东西可以使用 open ssl
https://github.com/RubenVermeulen/generate-trusted-ssl-certificate (招数这里学来的)
做 2 个 file, 一个 generate.sh, 一个是 config
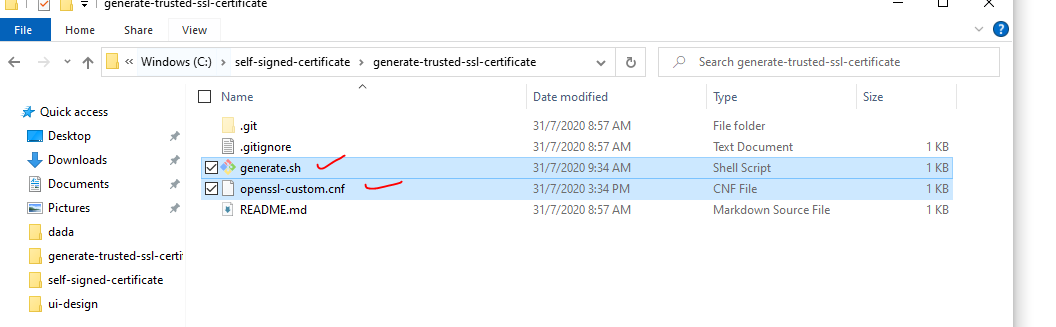
config file 内容:
[req]

default_bits = 2048

prompt = no

default_md = sha256

x509_extensions = v3_req

distinguished_name = dn

[dn]

C = MY

ST = Johor

L = Johor Bahru

O = Stooges Web Design

OU = IT Department

emailAddress = hengkeat87@gmail.com

CN = 192.168.1.152

[v3_req]

subjectAltName = @alt_names

[alt_names]

IP.1 = 192.168.1.152

DNS.1 = *.192.168.1.152

DNS.2 = 192.168.1.152
generate.sh 内容
#!/bin/bash

openssl req \

    -newkey rsa:2048 \

    -x509 \

    -nodes \

    -keyout server.key \

    -new \

    -out server.crt \

    -config ./openssl-custom.cnf \

    -sha256 \

    -days 36500
运行的方式是打开 git bash
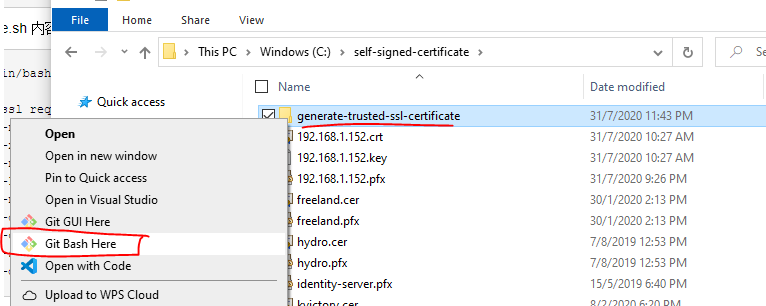
然后就是输入 bash generate.sh
会生产 2 个 file, server.crt, server.key, 然后可以改名一下. 我的命名通常就是 base on ip address. 所以就是 192.168.1.152.crt 咯
这样就 ok 了
刚才 ng serve 用到的就是这 2 个 file
有了这个以后, ng serve 就会使用 https 了.
下一步就是让游览器相信这个证书. trust certificate.
因为我们这个证书是 self signed 游览器自然是不认可的咯.
在 windows 我们要让游览器 trust 就要做一些 setting
打开 start -> mmc

file -> add/remove snap-in

把 certificate add 出来, my user account 和 computer account 都 add 出来. (我不是很清楚这 2 个的区别, 但是我知道 iis 会用到 computer account)

然后就去 trusted root import 我们的证书 .crt 就可以了.

记得要重启 chrome 才有效果哦.
这样 angular 就有 ip + https 了.
下一个是 liveserver, 有时候只是写点单元测试, 没有 ng, 只有 webpack + liveserver
那么我们也要弄 ip + https 的话就需要这样 setting
打开 vs code setting json
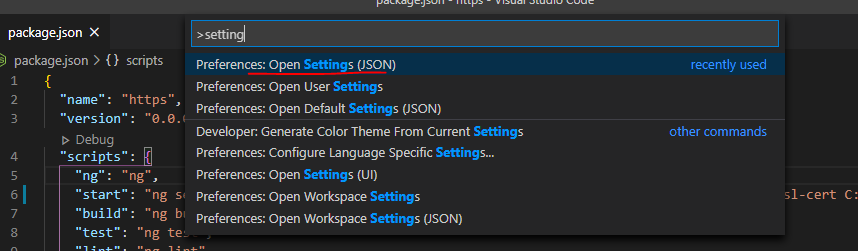
和 ng 的 setting 差不多
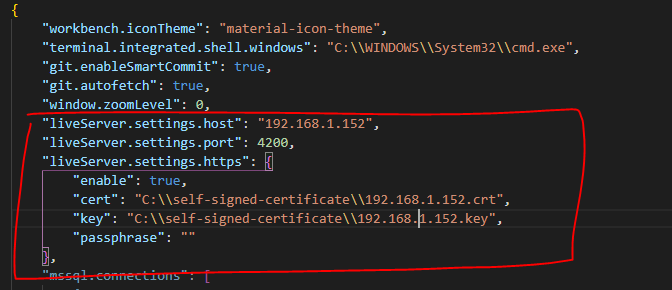
这样就可以了.
总结 ng 和 liveserver setting 方式
step 1. 用 git bash open ssl 做出证书 .crt 和 .key
step 2: 通过 config 去配置 ng 和 liveserver
step 3: 通过 start -> mmc 去 setting trust (这一步是为了让 chrome 相信证书)
下面来说说 vs 2019 + iis express 去 setting ip + https (这个比上面麻烦很多哦)
先说一下怎样使用 ip
vs 2019 run as admin (一定要哦)
然后去调 firewall -> advanced setting -> New rules..
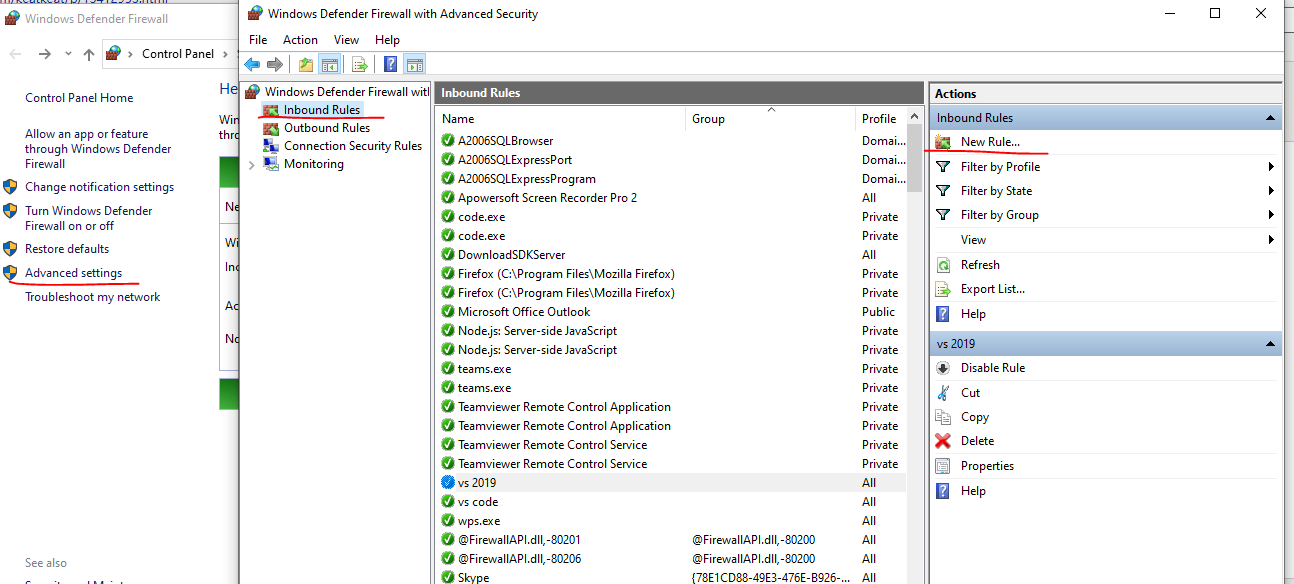
然后选 port -> next -> 输入一个 port
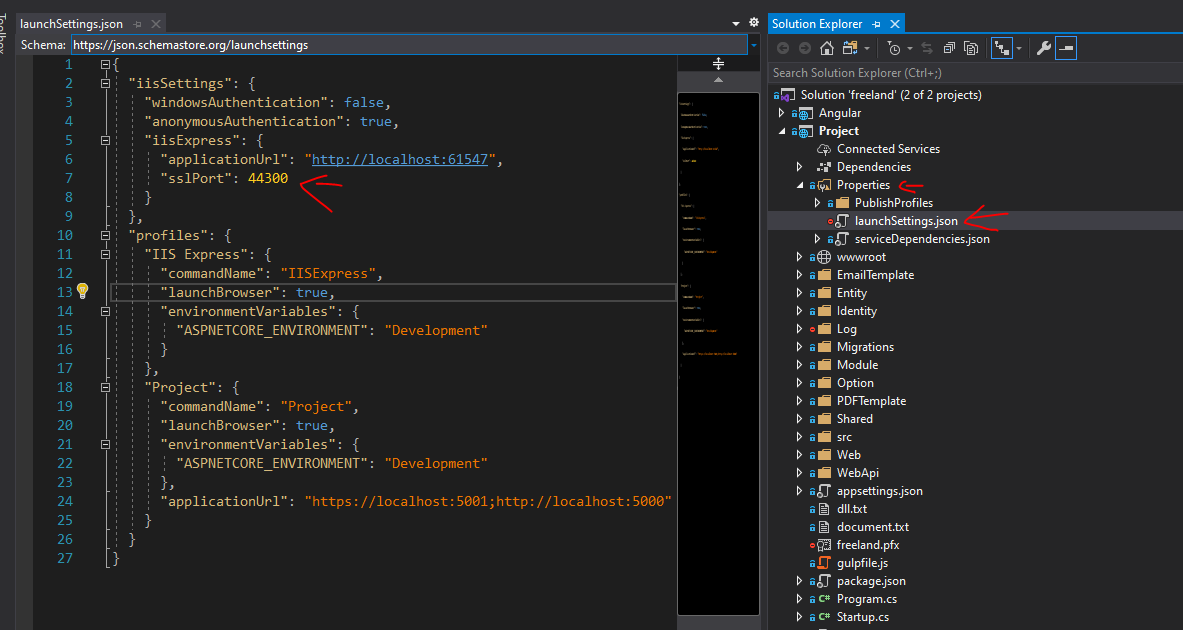
ng 通常是 4200, vs2019 通常是 44300 (https 的), 61547 (http 的)
然后去 vs 2019
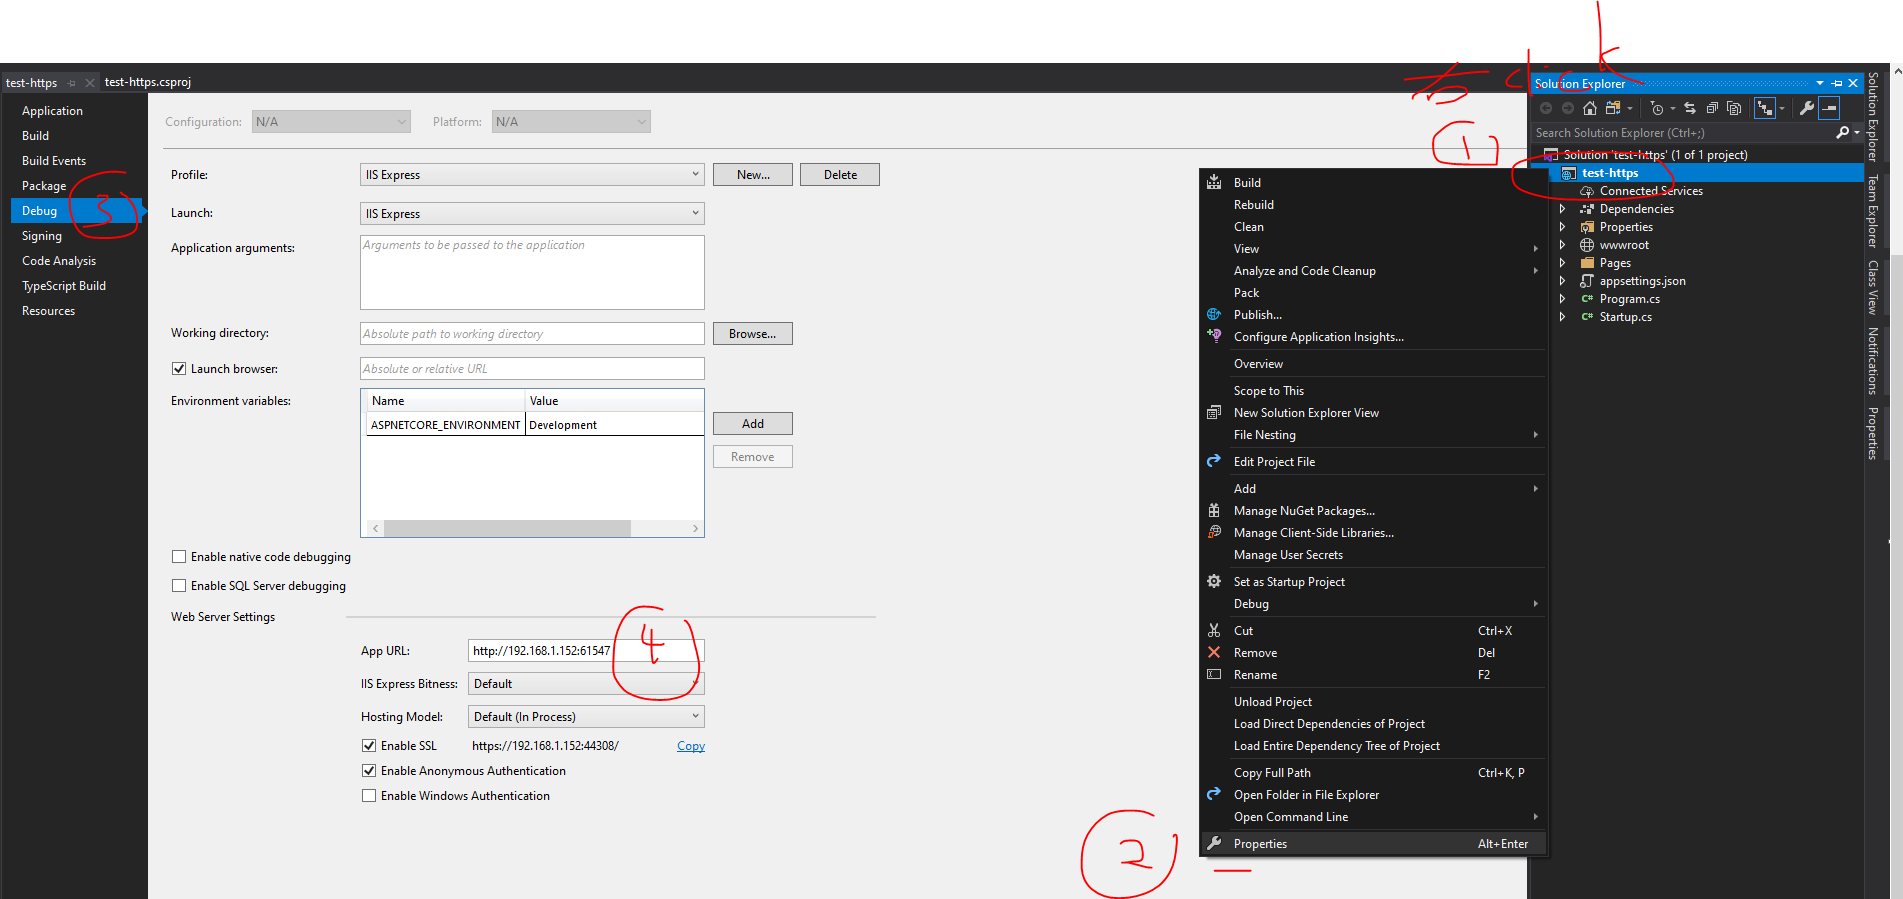
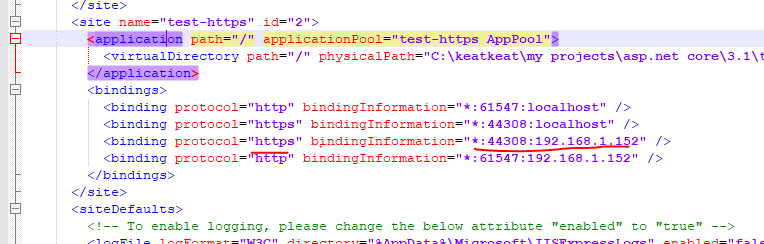
这里做了以后有一个 file 就会变化
内容是这样的
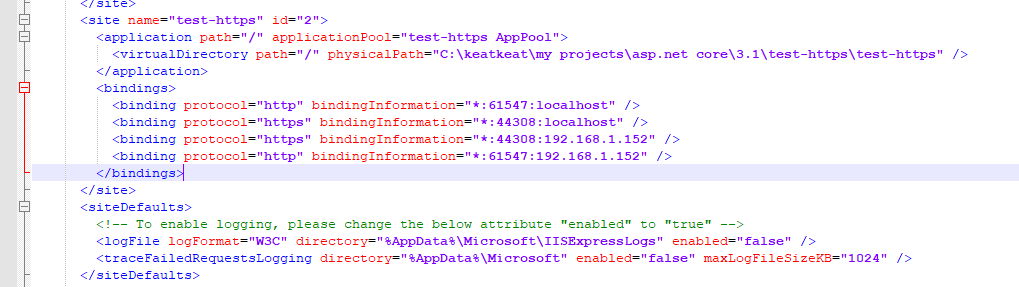
这个是完整版,可以先不要看 https 的部分.
有了这个以后就可以 run as ip address 了
有时候 F5 会有 iis error
如果遇到通常是忘记 run as admin
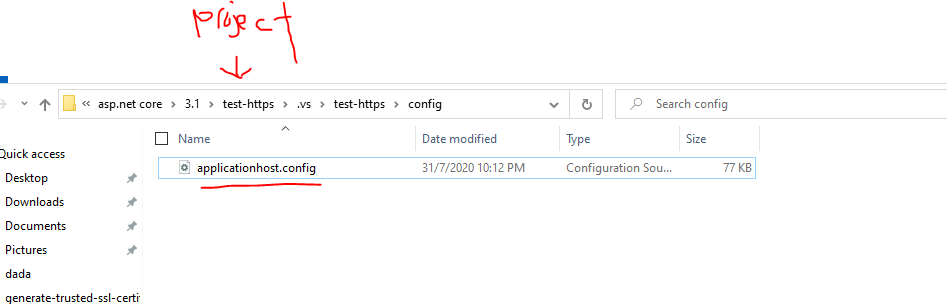
如果已经是 admin 了还是不行就 follow 这个 step
1. vs 2019 change back to localhost
2. close vs 2019
3. delete applicationhost.config (不用怕,等下 vs 2019 会自动做的出来的)
4. open vs 2019
5. F5 run as localhost
6. edit to ip
7. F5 run as ip
这样就可以了,现在说说怎样弄 https
localhost + https 非常简单, vs 2019 基本就是自带的, 我这里说一下就好了
iis express 在安装的时候就会在 windows 的证书 store 里面放了 localhost https 的证书.
如果你不小心洗掉了,可以通过 control panel -> programs -> iis express -> repair 来修复 (注意是 control panel 而不是 add/remove 哦)
这样就解决了证书的问题,下一个是游览器相信的问题
dotnet 是通过
dotnet dev-certs https --trust 来实现的.
dotnet dev-certs https --clean 这样是清空
refer : https://www.hanselman.com/blog/DevelopingLocallyWithASPNETCoreUnderHTTPSSSLAndSelfSignedCerts.aspx
上面这个只是正对 localhost 而已哦.
那好, 现在说说 ip 的情况.
ip 就麻烦多了, 刚才说到 localhost 的证书是装 iis 的时候自带的.
ip 就要靠自己了. 上面我们已经会做出证书了 .crt and .key 所以没有问题.
但是 iis 是不接受 crt + key 的, 它要的是 pfx
所以这里需要一个 convert, crt + key = pfx
找到那个装 crt 和 key 的 folder, 然后进入 git bash cmd
运行 open ssl 指令 :
openssl pkcs12 -export -out 192.168.1.152.pfx -inkey 192.168.1.152.key -in 192.168.1.152.crt
这样呢, 就有了 pfx 了.
下一个步骤就是让 iis 链接上这个证书.
我们需要先把这个证书 import to Computer account (local machine)

没有 import to store 那么 iis 就用不到这个证书了,这里和 ng 区别蛮大的, ng 是直接对着 crt 和 key file.
iis 则需要将 crt and key 转成 pfx 然后放进 windows 证书 store 里面.
然后呢, 要去 run iis command.
打开普通 cmd,run as admin
先去到 iis express 的 folder
cd C:\Program Files (x86)\IIS Express
然后执行 setup ssi uri, CertHash 是证书指纹
IisExpressAdminCmd.exe setupsslUrl -url:https://192.168.1.152:44300/ -CertHash:00c3c0bbd89d011e0750e3497bfa4bac39d1ccb6
证书指纹这里获取:

这个运行之后, iis 就知道说, 这个 ip port 的情况下需要用我们指定的证书了.
下一个环境是添加 trust 和之前的做法是一样的 (如果之前添加了就不需要了, ng, liveserver, vs2019 可以用同一个证书)
最后一个步骤手动的去修改
applicationhost.config 添加上 https ip,它不会自动的哦,要自己来哦. 不然就会出现 503 service unavailable
到这里就完毕咯.
这里做一些总结:
要搞 https 就要做证书
使用 open ssl (windows 下是用 git bash 来实现的)
有了证书, server 就要链接证书
然后游览器需要相信证书.
就这 2 个过程.
iis 比较麻烦. server 要链接证书, 只能使用 pfx 然后需要放进 store 通过指纹来链接.
要 setting 要使用 iis express 的 command
vs 2019 需要配置好 application.config 才能联通 ip + https
对比起来, ng 和 liveserver 这个简单多了.
server 只要放 crt 和 key 路径就可以了。
游览器 trust ng 和 iis 就没有什么区别了
以上
tips :
setup https port in vs 2019
angular cli, vs code liveserver, vs 2019 iis express 10, vs code kestrel 使用 https + ip的更多相关文章
- ASP: VS2015 + IIS Express 10 学习笔记
首先搞清楚 ASP 与 ASP.NET 的区别(.asp与.aspx). https://msdn.microsoft.com/en-us/library/ms973813.aspx 环境配置: ht ...
- Visual Studio 2015 + IIS Express 10.0 调试 ASP.NET 项目
参考资料: https://msdn.microsoft.com/zh-cn/library/58wxa9w5(v=vs.120).aspx 首先搭建环境, 也就是用 IIS Express 配置一个 ...
- IIS Express总结
IIS Express可以说是.NET web开发者必用的服务器,日日夜夜都和它打交道.一直以来,除了遇到什么点什么问题,很少会去关注过它. 今天看到以前转载的一篇博客,就再次温故下,主要包含IIS ...
- iis express添加网站,并启动
1.查看网站列表 C:\Program Files (x86)\Microsoft Visual Studio 12.0>"C:\Program Files\IIS Express\a ...
- IIS Express配置多站点同时运行
环境:Win10 Pro.Visual Studio 2015 Community.IIS Express 10 VS2015集成IIS Express,所以无需单独下载, 默认安装位置:C:\Pro ...
- Visual Studio Code作为Angular开发工具常用插件安装、json-server安装与使用、angular/cli安装失败问题
前提准备: 搭建好Angular开发环境 1 安装Visual Studio Code 教程简单,不会的去问度娘 2 安装Chrome浏览器 教程简单,不会的趣闻度娘 3 Visual Studio ...
- Angular14 Visual Studio Code作为Angular开发工具常用插件安装、json-server安装与使用、angular/cli安装失败问题、emmet安装
前提准备: 搭建好Angular开发环境 1 安装Visual Studio Code 教程简单,不会的去问度娘 2 安装Chrome浏览器 教程简单,不会的趣闻度娘 3 Visual Studio ...
- 使用Angular CLI生成 Angular 5项目
如果您正在使用angular, 但是没有好好利用angular cli的话, 那么可以看看本文. Angular CLI 官网: https://github.com/angular/angular- ...
- angular2 学习笔记 ( angular cli & npm version manage npm 版本管理 )
更新 : 2017-05-05 现在流行 Yarn ! 它是 facebook google 推出的东西. 算是补助 npm 做的不够好的地方. 源码依然是发布去 npm,只是下载接口换掉罢了哦. n ...
- Using Sass with the Angular CLI
https://www.tuicool.com/articles/mauiMzY One of the first things you'll usually do in a project is t ...
随机推荐
- 外部网关协议BGP
不能全部使用RIP与OSPF的原因有二:互联网规模太大,自治系统间路由选择困难:自治系统间路由选择必须考虑有关策略. 在每一个自治系统中有两种不同功能的路由器,边界路由器和内部路由器. BGP四种报文 ...
- oeasy 教您玩转 linux 010215 随机谚语 fortune
我们来回顾一下 上一部分我们都讲了什么? 把图像转化为了ascii️字符画 并且修改了cowsay的图像素材的位置 我们想要让牛讲一个随机的笑话 首先我们要有个说笑话的软件包 # 下载fortune ...
- Odoo 基于Win10搭建基于Win10搭建odoo14开发环境搭建
实践环境 win10 Python 3.6.2 odoo_14.0.latest.tar.gz 下载地址: https://download.odoocdn.com/download/14/src?p ...
- ffmpeg一些笔记: 代码调试数据
1.AAC,MP3他的解码数据格式不支持,程序中给的是这个AV_SAMPLE_FMT_FLTP, Screen-Cpature-Recoder的codec-id为AV_CODEC_RAW_VIDEO ...
- Java工具库——Hutool的常用方法
Hutool-All(或简称Hutool)是一个功能强大的Java编程工具库,旨在简化Java应用程序的开发. 它提供了大量的工具类和方法,涵盖了各种常见任务,包括字符串处理.日期时间操作.文件操作. ...
- 使用maven搭建父工程与子工程
父/子工程的作用: 1.依赖管理 2.配置信息共享 3.模块化 4.版本控制 5.提高重用性可维护性 什么是dependencyManagement: maven中的一个元素,用于集中管理项目中的依赖 ...
- python raise异常处理
python raise异常处理 一般最简单的异常处理是try except: try: f = open('test.txt') except Exception as e: print(e) f ...
- Java解压rar5兼容rar4
RAR文件格式由WinRAR开发,广泛用于文件压缩和归档.随着技术的发展,RAR5作为更新的版本,引入了多项改进以提高压缩效率和数据安全性. 压缩效率:RAR5通过增大字典大小至32MB,相较于RAR ...
- Label Studio数据标注--通过源码安装
Label Studio是Heartex公司开发的一款在线数据标注工具,分为社区版(开源)和企业版(云服务,收费),企业版提供了增强的安全性(单点登录.角色基于访问控制.SOC2).团队管理.分析和报 ...
- NVIDIA的ROS项目 —— Isaac ROS
文档地址: https://nvidia-isaac-ros.github.io/index.html Github地址: https://github.com/NVIDIA-ISAAC-ROS