CSS & JS Effect – sticky horizontal scrollbar
需求

这个是 Google Ads 里的 table。
那个 horizontal scrollbar 可以 sticky bottom。
我们知道 scrollbar 是游览器原生的,我们能做的 styling 少之又少,挺多只能调 size, color 而已。要让它 sticky bottom 根本不可能。
实现思路
首先要弄一个假的 scrollbar 出来。
怎么理解,怎么弄?
做一个 div1 > div2
div1 设置 max-width, overflow auto
div2 设置 width。
这样一个 horizontal scrollbar 就出来的。
这个 div 里只有一个 scrollbar 没有其它内容,所以它看上去就是一个 scrollbar。
而 div 是可以 sticky bottom 的 (当然上面这个例子,使用的不是 CSS 原生的 sticky 功能,而是模拟的)。
这样我们就有了一个可以 sticky bottom 的 scrollbar。
接着我们把原生的 horizontal scrollbar hide 起来,这样看上去就 ok 了。
看是没有问题了,但是交互还需要搞一搞。
监听假 scrollbar 同步 scrollLeft 给 container,反过来也需要,监听 container scroll 同步 scrollLeft 给假 scrollbar。
这样就大功告成了。
破坏性
但凡 “假的 / 模拟的” 都是旁门左道,一定会引起一些 bug 之类的。所以一定要控制好范围,避免失控。
下图是我们常见的盒子 container
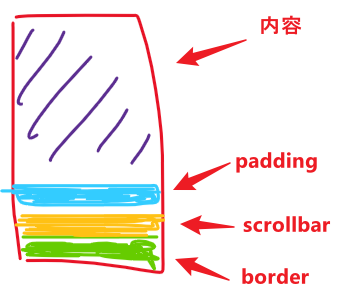
offsetHeight 的计算是 border to border (border + scrollbar + padding + content)
clientHeight 的计算是 padding to padding (padding + content, 没有 border 和 scrollbar)
问题来了,我们的假 scrollbar 要放在 container 里面还是外面?
如果放在里面,那么它会在 padding 之上 (因为它算是内容丫),而不是取代 native scrollbar 的位置 (padding 之下)。
于是我们需要 remove container 的 padding-bottom 然后在假 scrollbar 补回 padding-bottom。
即便看上去没问题,但是 clientHeight 的计算肯定就错了,因为假 scrollbar 被当成了内容,而 clientHeight 是不应该计算 scrollbar height 的。
把假 scrollbar 放到 container 外面也有类似的问题,我们需要 remove container 的 border-bottom,然后在假 scrollbar 补回 border-bottom。
这回 clientHeight 对了,但是 offsetHeight 计算却错了,少算了一个 border-bottom。
所以不管放哪一边总会影响到某些地方,这就是旁门左道的代价。
下面例子我选择放外面,因为放里面还需要用上 sticky left 会更麻烦。
Step by Step
搭环境
index.html
<div class="vertical-container">

  <div class="horizontal-container">

    <div class="my-content"></div>

  </div>

</div>
index.scss
.vertical-container {

  width: max-content;

  margin-inline: auto;

  max-height: 512px;

  overflow-y: auto;

}

.horizontal-container {

  max-width: 768px;

  overflow: auto;

  &.hide-scrollbar {

    &::-webkit-scrollbar {

      height: 0;

    }

    scrollbar-width: none;

  }

}

.my-content {

  width: 500px;

  height: 10px;

  background-color: pink;

}
注意那个 class hide-scrollbar
由于 JS 无法 querySelector 伪元素,所以 hide scrollbar 只能让 CSS 负责了。
index.ts
首先 query container
const container = document.querySelector<HTMLElement>('.horizontal-container')!;
然后做一些 first time setup
// 创捷 scrollbar

const scrollbar = document.createElement('div');

// 创建 scrollbar content

const scrollbarContent = document.createElement('div');

// 把 scrollbar content 插入到 scrollbar

scrollbar.appendChild(scrollbarContent);

// 把 scrollbar 插入到 container next sibling

container.parentElement!.insertBefore(scrollbar, container.nextElementSibling);

// 设置 scrollbar 一些 style

scrollbar.style.overflowX = 'auto';

scrollbar.style.overflowY = 'hidden';

// 监听 scroll 同步 container 和 scrollbar 的 scrollLeft

scrollbar.addEventListener('scroll', () => {

  container.scrollLeft = scrollbar.scrollLeft;

});

container.addEventListener('scroll', () => {

  scrollbar.scrollLeft = container.scrollLeft;

});
因为我们需要监听 container resize,所以特别区分 first time setup。
接着,封装一个 getContainerInfo 函数
// container info 接口

interface ContainerInfo {

  clientWidth: number;

  scrollWidth: number;

  hasScrollbar: boolean;

  scrollbarHeight: number;

}

// 记入最后一次的 scrollbar height

let lastScrollbarHeight = 0;

function getContainerInfo(container: HTMLElement): ContainerInfo {

  // getElementSize 是一个方便拿 element size 的功能,把它当作是 getComputedStyle 就可以了

  const containerSize = getElementSize(container);

  const containerClientWidth = containerSize.client.width;

  const containerScrollWidth = containerSize.scroll.size.width;

  // 判断有没有 scrollbar 出现

  const hasScrollbar = containerClientWidth !== containerScrollWidth;

  // 计算 native scrollbar 的 height

  let scrollbarHeight = containerSize.offset.height - containerSize.border.block - containerSize.client.height;

  // 因为我们会 hide native scrollbar,

  // 所以第一次可以拿到 scrollbar height 但是第二次可能就拿不到了

  // 所以我们需要把 scrollbar height 存起来

  if (hasScrollbar && scrollbarHeight !== 0) {

    lastScrollbarHeight = scrollbarHeight;

  }

  // 第二次拿不到 scrollbar height 的时候,我们拿存起来的来用

  if (hasScrollbar && scrollbarHeight === 0) {

    scrollbarHeight = lastScrollbarHeight;

    // Firefox 是永远拿不到 scrollbar height 的,给它一个默认 12 就好。

    if (scrollbarHeight === 0) scrollbarHeight = 12;

  }

  return {

    clientWidth: containerClientWidth,

    scrollWidth: containerScrollWidth,

    hasScrollbar,

    scrollbarHeight,

  };

}
在 first setup 之前 getContainerInfo

必须提前读取 container information,如果在 first setup 后才读取会导致游览器立刻 repaint / reflow。
接着,封装一个 updateSize 函数
function updateSize(

  container: HTMLElement,

  scrollbar: HTMLElement,

  scrollbarContent: HTMLElement,

  containerInfo: ContainerInfo,

) {

  const { clientWidth, scrollWidth, hasScrollbar, scrollbarHeight } = containerInfo;

  // 如果需求 scrollbar 那就 hide native scrollbar

  container.classList[hasScrollbar ? 'add' : 'remove']('hide-scrollbar');

  // 如果不需要 scrollbar 就 display none 假 scrollbar

  if (!hasScrollbar) scrollbar.style.display = 'none';

  if (hasScrollbar) {

    // 如果需要 scrollbar 就 update scrollbar 和 scrollbar content 的 size

    scrollbar.style.removeProperty('display');

    scrollbar.style.maxWidth = `${clientWidth}px`;

    scrollbar.style.maxHeight = `${scrollbarHeight}px`;

    scrollbarContent.style.height = `${scrollbarHeight}px`;

    scrollbarContent.style.width = `${scrollWidth}px`;

  }

}
在 first setup 之后调用 updateSize for firstload

做一个 resize 监听
// StgResizeObserver 是一个基于 RxJS 的 ResizeObserver

// 把它当作 native 的 ResizeObserver 看待就可以了

const ro = new StgResizeObserver();

// 注意监听的是 container 的所有 child elements

// 因为 container 已经 overflow 了,它是不会 resize 的, resize 的是它的 children

merge(...Array.from(container.children).map(el => ro.observe(el))).subscribe(() => {

  // 每当 resize 就重新 getContainerInfo + updateSize

  const containerInfo = getContainerInfo(container);

  updateSize(container, scrollbar, scrollbarContent, containerInfo);

});
这样就大功告成了。
提醒:container 不支持放 border 哦,因为我选择的是把假 scrollbar 放到 container 之外,如果是放在 container 里面的话就支持 border 但不支持 padding,同时需要 sticky left 比较麻烦。有兴趣的可以自己玩一玩。
至于如何让假 scrollbar sticky bottom,请参考:CSS & JS Effect – Simulation Position Sticky (用 JavaScript 实现 position sticky)
CSS & JS Effect – sticky horizontal scrollbar的更多相关文章
- 前端工程师面试问题归纳(一、问答类html/css/js基础)
一.参考资源 1.前端面试题及答案整理(一) 2.2017年前端面试题整理汇总100题 3.2018最新Web前端经典面试试题及答案 4.[javascript常见面试题]常见前端面试题及答案 5.W ...
- CSS & JS 制作滚动幻灯片
==================纯CSS方式==================== <!DOCTYPE html> <html> <head> <met ...
- 【转】Maven Jetty 插件的问题(css/js等目录死锁)的解决
Maven Jetty 插件的问题(css/js等目录死锁,不能自动刷新)的解决: 1. 打开下面的目录:C:\Users\用户名\.m2\repository\org\eclipse\jetty ...
- Css Js Loader For Zencart
Css Js Loader 描述:这个插件很早就出来了,可能知道人非常少 这个插件的功能是整合所有的网站的CSS和JS内容到一个文件里边. 因为CSS和JS文件到了一个文件,加快了程序的运行 在配合其 ...
- 购物车数字加减按钮HTML+CSS+JS(有需要嫌麻烦的小伙伴拿走不谢)
之前在写详情页的时候,如下图 因为自己嫌麻烦,就去看其他网站是怎么写的,想直接拿来用,后来看来看去觉得写得很麻烦,于是最后还是决定自己写,附上HTML+CSS+JS代码,一条龙一站式贴心服务2333 ...
- vs合并压缩css,js插件——Bundler & Minifier
之前做了一个大转盘的抽奖活动,因为比较火,部分用户反馈看不到页面的情况,我怀疑js加载请求过慢导致,所以今天针对之前的一个页面进行调试优化. 首先想到的是对页面的js和css进行压缩优化,百度了下vs ...
- nginx资源定向 css js路径问题
今天玩玩项目,学学nginx发现还不错,速度还可以,但是CSS JS确无法使用,原来Iginx配置时需要对不同类型的文件配置规则,真是很郁闷,不过想想也还是很有道理.闲暇之际,把配置贴上来.#user ...
- IIS7的集成模式下如何让自定义的HttpModule不处理静态文件(.html .css .js .jpeg等)请求
今天将开发好的ASP.NET站点部署到客户的服务器上后,发现了一个非常头疼的问题,那么就是IIS7的应用程序池是集成模式的话,ASP.NET项目中自定义的HttpModule会处理静态文件(.html ...
- 网站加载css/js/img等静态文件失败
网站加载css/js/img等静态文件失败,报网站http服务器内部500错误.而服务器中静态文件存在且权限正常. 从浏览器中直接访问文件,出来乱码.这种问题原因在于iis中该网站mime配置报错,不 ...
- 【前端】Sublime text3 插件HTML/CSS/JS prettify 格式化代码
1.首先安装插件 菜单的preference->packages control,然后输入install .. 回车,再输入HTML/CSS/JS prettify 再回车,重启后就可以了. 2 ...
随机推荐
- TypeScript 学习笔记 — 接口的使用(六)
目录 一.函数接口参数 二.函数类型接口 三.函数混合类型 四.对象接口(最常用) 确定属性 可选属性 任意属性 只读属性 可索引接口 索引访问符 类接口 接口继承 构造函数类型 type 和 int ...
- [oeasy]python020在游戏中体验数值自由_勇闯地下城_终端文字游戏
继续运行 回忆上次内容 上次使用shell环境中的命令 命令 作用 cd 改变文件夹 pwd 显示当前文件夹 ls 列出当前文件夹下的内容 最终 进入 目录 找到 游戏 如果git clone 根 ...
- [oeasy]python0085_[趣味拓展]字体样式_下划线_中划线_闪动效果_反相_取消效果
字体样式 回忆上次内容 \033 xm 可以改变字体样式 0m - 10m 之间设置的 都是字体效果 0m 复原 1m 变亮 2m 变暗 添加图片注释,不超过 140 字(可选) ...
- ABC361-C题解
背景 昨天打比赛的时候查了中考分,心快停跳了. 题意 从 \(n\) 个数字中删除 \(k\) 个数字,问剩下的数字中极差的最小值. 分析 首先把这 \(n\) 个数字排序,然后问题就可以转化为求这 ...
- ComfyUI进阶:Comfyroll插件 (四)
ComfyUI进阶:Comfyroll插件 (四) 前言: 学习ComfyUI是一场持久战,而Comfyroll 是一款功能强大的自定义节点集合,专为 ComfyUI 用户打造,旨在提供更加丰富和专业 ...
- 使用 useLazyFetch 进行异步数据获取
title: 使用 useLazyFetch 进行异步数据获取 date: 2024/7/20 updated: 2024/7/20 author: cmdragon excerpt: 摘要:&quo ...
- 【干货】流量录制回放工具:jvm-sandbox-repeater
在软件开发和测试过程中,我们经常会遇到需要对网络请求进行录制和回放的需求,以便进行调试.测试和分析.为了模拟真实的用户请求,我们通常会使用各种流量录制回放工具来记录并重放网络请求. 其中,jvm-sa ...
- windows生成苹果私钥证书p12证书和profile文件的方法
hbuilderx出现已经有差不多10年时间了,现在越来越多的企业,开始使用跨平台性更优秀的uniapp来开发ios app. 开发ios app的时候,打包需要苹果的私钥证书和证书profile文件 ...
- MyBatis-Plus删除操作的几种基本方法
delete删除的三种方法 一.根据 id 删除 @Test void deleteById(Integer id) { empMapper.deleteById(new Emp().getId()) ...
- SmolLM: 一个超快速、超高性能的小模型集合
简介 本文将介绍 SmolLM.它集合了一系列最尖端的 135M.360M.1.7B 参数量的小模型,这些模型均在一个全新的高质量数据集上训练.本文将介绍数据整理.模型评测.使用方法等相关过程. 引言 ...