SSH整合(Struts2+hibernate+spring)
1、创建表
create table t_user(

  id int primary key auto_increment,

  username varchar(50),

  password varchar(32),

  age int

);
2、导入jar包
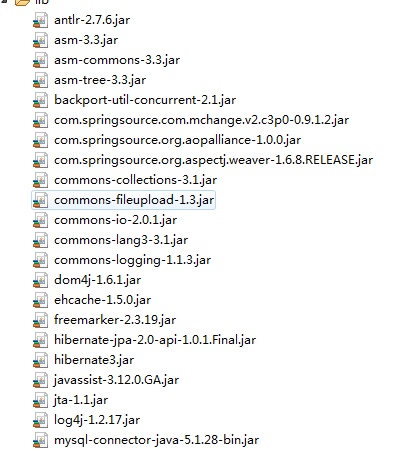
2.1 struts包
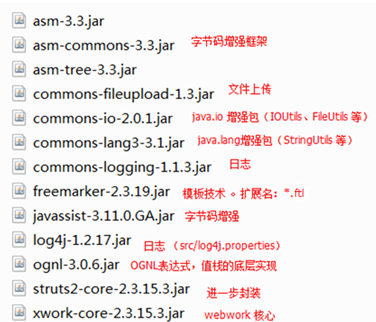
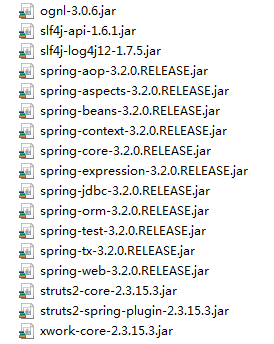
2.2 spring包
1 基础:4+1 , beans、core、context、expression , commons-logging (struts已经导入)
2 AOP:aop联盟、spring aop 、aspect规范、spring aspect
3 db:jdbc、tx
4 测试:test
5 web开发:spring web
6 驱动:mysql
7 连接池:c3p0
8 整合hibernate:spring orm
2.3 hibernate
hibernate3.jar 核心
\lib\required 必须
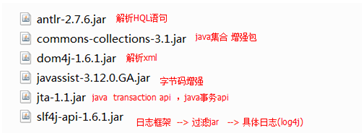
2.4 log日志整合
l 整合log4j
导入 log4j...jar (struts已经导入)
整合(过渡):slf4j-log4j12-1.7.5.jar
2.5 二级缓存
核心:ehcache-1.5.0.jar
依赖:
backport-util-concurrent-2.1.jar
commons-logging (存在)
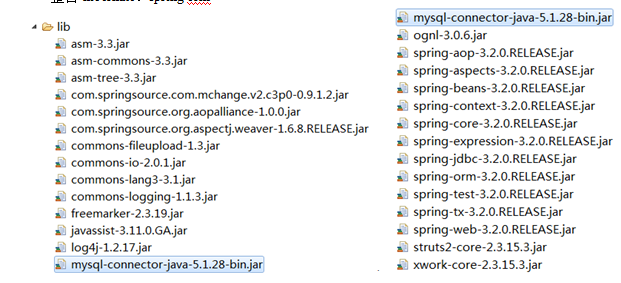
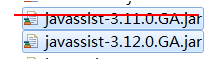
删除重复jar包:版本较低的
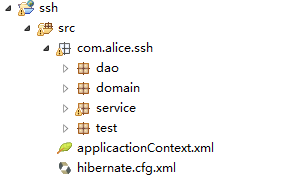
整个项目:

3.spring整合hibernate
3.1 po类

package com.alice.ssh.domain;

public class User {

    private Integer id;

    private String username;

    private String password;

    private Integer age;

    public Integer getId() {

        return id;

    }

    public void setId(Integer id) {

        this.id = id;

    }

    public String getUsername() {

        return username;

    }

    public void setUsername(String username) {

        this.username = username;

    }

    public String getPassword() {

        return password;

    }

    public void setPassword(String password) {

        this.password = password;

    }

    public Integer getAge() {

        return age;

    }

    public void setAge(Integer age) {

        this.age = age;

    }

    @Override

    public String toString() {

        return "User [id=" + id + ", username=" + username + ", password="

                + password + ", age=" + age + "]";

    }

}
<?xml version="1.0" encoding="UTF-8"?>

<!DOCTYPE hibernate-mapping PUBLIC

    "-//Hibernate/Hibernate Mapping DTD 3.0//EN"

    "http://www.hibernate.org/dtd/hibernate-mapping-3.0.dtd">

    <hibernate-mapping package="com.alice.ssh.domain">

       <class name="User" table="t_user">

          <id name="id">

             <generator class="native"></generator>

          </id>

          <property name="username" type="string"></property>

           <property name="password" type="string"></property>

            <property name="age" ></property>

       </class>

    </hibernate-mapping>
3.2 dao层
spring提供 HibernateTemplate 用于操作PO对象,类似Hibernate Session对象
package com.alice.ssh.dao;

import com.alice.ssh.domain.User;

public interface IUserDao {

    public void save(User user);

}
package com.alice.ssh.dao.impl;

import org.springframework.orm.hibernate3.support.HibernateDaoSupport;

import com.alice.ssh.dao.IUserDao;

import com.alice.ssh.domain.User;

//底层需要SessionFactory,自动创建HibernateTemplate模板

public class UserDaoImpl extends HibernateDaoSupport implements IUserDao{

//    private HibernateTemplate hibernateTemplate;

//    public void setHibernateTemplate(HibernateTemplate hibernateTemplate) {

//        this.hibernateTemplate = hibernateTemplate;

//    }

    public void save(User user) {

        this.getHibernateTemplate().save(user);

        System.out.println("dao+"+user);

    }

}
3.3 service层
package com.alice.ssh.service;

import com.alice.ssh.domain.User;

public interface UserService {

   public void register(User user);

}
package com.alice.ssh.service.impl;

import com.alice.ssh.dao.IUserDao;

import com.alice.ssh.domain.User;

import com.alice.ssh.service.UserService;

public class UserServiceImpl implements UserService{

    private IUserDao userDao;

    public void setUserDao(IUserDao userDao) {

        this.userDao = userDao;

    }

    public void register(User user) {

         userDao.save(user);

         System.out.println("service+"+user);

    }

}
spring整合hibernate分两种情况:
一种是有hibernate.cfg.xml
一种没有hibernate.cfg.xml
先说有hibernate配置文件的:
hibernate.cfg.xml文件为:
<?xml version="1.0" encoding="UTF-8"?>

<!DOCTYPE hibernate-configuration PUBLIC

    "-//Hibernate/Hibernate Configuration DTD 3.0//EN"

    "http://www.hibernate.org/dtd/hibernate-configuration-3.0.dtd">

    <hibernate-configuration>

       <session-factory>

         <!-- 基本四项 -->

         <property name="hibernate.connection.driver_class">com.mysql.jdbc.Driver</property>

         <property name="hibernate.connection.url">jdbc:mysql://localhost:3306/spring</property>

         <property name="hibernate.connection.username">root</property>

         <property name="hibernate.connection.password">alice</property>

         <!-- 配置方言 -->

         <property name="hibernate.dialect">org.hibernate.dialect.MySQL5Dialect</property>

         <!-- sql输出 -->

         <property name="hibernate.show_sql">true</property>

         <property name="hibernate.format_sql">true</property>

         <!-- 自生成表格 -->

         <property name="hibernate.hbm2ddl.auto">update</property>

         <!-- 绑定线程 -->

         <property name="hibernate.current_session_context_class">thread</property>

         <!-- 导入映射文件 -->

         <mapping resource="com/alice/ssh/domain/User.hbm.xml"/>

       </session-factory>

    </hibernate-configuration>
这种情况下,spring配置文件写成如下:
<?xml version="1.0" encoding="UTF-8"?>

<beans xmlns="http://www.springframework.org/schema/beans"

       xmlns:xsi="http://www.w3.org/2001/XMLSchema-instance"

       xmlns:aop="http://www.springframework.org/schema/aop"

       xmlns:tx="http://www.springframework.org/schema/tx"

       xmlns:context="http://www.springframework.org/schema/context"

       xsi:schemaLocation="http://www.springframework.org/schema/beans

                              http://www.springframework.org/schema/beans/spring-beans.xsd

                              http://www.springframework.org/schema/tx

                              http://www.springframework.org/schema/tx/spring-tx.xsd

                              http://www.springframework.org/schema/aop

                              http://www.springframework.org/schema/aop/spring-aop.xsd

                              http://www.springframework.org/schema/context

                              http://www.springframework.org/schema/context/spring-context.xsd">

<!--  1.加载hibenrate.cfg.xml 获得SessionFactory

        * configLocation确定配置文件位置

 -->

<bean id="sessionFactory" class="org.springframework.orm.hibernate3.LocalSessionFactoryBean">

   <property name="configLocation" value="classpath:hibernate.cfg.xml"></property>

</bean>

<!-- 2.创建模板

        * 底层使用session,session 有sessionFactory获得

-->

<bean id="hibernateTemplate" class="org.springframework.orm.hibernate3.HibernateTemplate">

   <property name="sessionFactory" ref="sessionFactory"></property>

</bean>

<!-- 3.dao层 -->

<bean id="userDao" class="com.alice.ssh.dao.impl.UserDaoImpl">

    <property name="hibernateTemplate" ref="hibernateTemplate"></property>

</bean>

<!--4.service层  -->

<bean id="userService" class="com.alice.ssh.service.impl.UserServiceImpl">

    <property name="userDao" ref="userDao"></property>

</bean>

<!-- 5.事务管理 -->

<!-- 5.1 事务管理器 :HibernateTransactionManager -->

<bean id="txManager" class="org.springframework.orm.hibernate3.HibernateTransactionManager">

     <property name="sessionFactory" ref="sessionFactory"></property>

</bean>

<!-- 5.2 事务详情 ,给ABC进行具体事务设置 -->

<tx:advice id="txAdvice" transaction-manager="txManager">

     <tx:attributes>

        <tx:method name="register"/>

     </tx:attributes>

</tx:advice>

<!-- 5.3 AOP编程,ABCD 筛选 ABC -->

<aop:config>

   <aop:advisor advice-ref="txAdvice" pointcut="execution(* com.alice.ssh.service..*.*(..))"/>

</aop:config>

</beans>
无hibernate配置文件的,现在比较常用,这种情况如下配置:
删除hibernate.cfg.xml
在applicationContext.xml中配置相应的文件
<?xml version="1.0" encoding="UTF-8"?>

<beans xmlns="http://www.springframework.org/schema/beans"

       xmlns:xsi="http://www.w3.org/2001/XMLSchema-instance"

       xmlns:aop="http://www.springframework.org/schema/aop"

       xmlns:tx="http://www.springframework.org/schema/tx"

       xmlns:context="http://www.springframework.org/schema/context"

       xsi:schemaLocation="http://www.springframework.org/schema/beans

                              http://www.springframework.org/schema/beans/spring-beans.xsd

                              http://www.springframework.org/schema/tx

                              http://www.springframework.org/schema/tx/spring-tx.xsd

                              http://www.springframework.org/schema/aop

                              http://www.springframework.org/schema/aop/spring-aop.xsd

                              http://www.springframework.org/schema/context

                              http://www.springframework.org/schema/context/spring-context.xsd">

<!-- 配置数据源 -->

<bean id="dataSource" class="com.mchange.v2.c3p0.ComboPooledDataSource">

   <property name="driverClass" value="com.mysql.jdbc.Driver"></property>

   <property name="jdbcUrl" value="jdbc:mysql://localhost:3306/spring"></property>

   <property name="user" value="root"></property>

   <property name="password" value="alice"></property>

</bean>

<!-- 1.3配置 LocalSessionFactoryBean,获得SessionFactory

        * configLocation确定配置文件位置

            <property name="configLocation" value="classpath:hibernate.cfg.xml"></property>

        1)dataSource 数据源

        2)hibernateProperties hibernate其他配置项

        3) 导入映射文件

            mappingLocations ,确定映射文件位置,需要“classpath:” ,支持通配符 【】

                <property name="mappingLocations" value="classpath:com/itheima/domain/User.hbm.xml"></property>

                <property name="mappingLocations" value="classpath:com/itheima/domain/*.hbm.xml"></property>

            mappingResources ,加载执行映射文件,从src下开始 。不支持通配符*

                <property name="mappingResources" value="com/itheima/domain/User.hbm.xml"></property>

            mappingDirectoryLocations ,加载指定目录下的,所有配置文件

                <property name="mappingDirectoryLocations" value="classpath:com/itheima/domain/"></property>

            mappingJarLocations , 从jar包中获得映射文件

-->

<bean id="sessionFactory" class="org.springframework.orm.hibernate3.LocalSessionFactoryBean">

   <property name="dataSource" ref="dataSource"></property>

   <property name="hibernateProperties">

      <props>

         <prop key="hibernate.dialec">org.hibernate.dialect.MySQL5Dialect</prop>

         <prop key="hibernate.show_sql">true</prop>

         <prop key="hibernate.format_sql">true</prop>

         <prop key="hibernate.hbm2ddl.auto">update</prop>

         <prop key="hibernate.current_session_context_class">thread</prop>

      </props>

   </property>

   <property name="mappingLocations" value="com/alice/ssh/domain/User.hbm.xml"></property>

</bean>

<!-- 3.dao层 -->

<bean id="userDao" class="com.alice.ssh.dao.impl.UserDaoImpl">

    <property name="sessionFactory" ref="sessionFactory"></property>

</bean>

<!--4.service层  -->

<bean id="userService" class="com.alice.ssh.service.impl.UserServiceImpl">

    <property name="userDao" ref="userDao"></property>

</bean>

<!-- 5.事务管理 -->

<!-- 5.1 事务管理器 :HibernateTransactionManager -->

<bean id="txManager" class="org.springframework.orm.hibernate3.HibernateTransactionManager">

     <property name="sessionFactory" ref="sessionFactory"></property>

</bean>

<!-- 5.2 事务详情 ,给ABC进行具体事务设置 -->

<tx:advice id="txAdvice" transaction-manager="txManager">

     <tx:attributes>

        <tx:method name="register"/>

     </tx:attributes>

</tx:advice>

<!-- 5.3 AOP编程,ABCD 筛选 ABC -->

<aop:config>

   <aop:advisor advice-ref="txAdvice" pointcut="execution(* com.alice.ssh.service..*.*(..))"/>

</aop:config>

</beans>
修改dao,使用HibernateDaoSupport
// 底层需要SessionFactory,自动创建HibernateTemplate模板

public class UserDaoImpl extends HibernateDaoSupport implements UserDao {

    @Override

    public void save(User user) {

        this.getHibernateTemplate().save(user);

    }
测试用例:
package com.alice.ssh.test;

import org.junit.Test;

import org.junit.runner.RunWith;

import org.springframework.beans.factory.annotation.Autowired;

import org.springframework.test.context.ContextConfiguration;

import org.springframework.test.context.junit4.SpringJUnit4ClassRunner;

import com.alice.ssh.domain.User;

import com.alice.ssh.service.UserService;

@RunWith(SpringJUnit4ClassRunner.class)

@ContextConfiguration(locations="classpath:applicactionContext.xml")

public class UserTest {

    @Autowired

    private UserService userService;

    @Test

    public void test(){

        User user = new User();

        user.setUsername("llili");

        user.setPassword("124354");

        user.setAge(18);

        userService.register(user);

    }

}
4、 struts整合spring
4.1 spring创建action
1.编写action类,并将其配置给spring ,spring可以注入service
package com.alice.ssh.web.action;

import com.alice.ssh.domain.User;

import com.alice.ssh.service.UserService;

import com.opensymphony.xwork2.ActionSupport;

import com.opensymphony.xwork2.ModelDriven;

public class UserAction extends ActionSupport implements ModelDriven<User>{

    /**

     *

     */

    private static final long serialVersionUID = 1L;

    //1 封装数据

        private User user = new User();

        public User getModel() {

            return user;

        }

        //2 service

        private UserService userService;

        public void setUserService(UserService userService) {

            this.userService = userService;

        }

        /**

         * 注册

         * @return

         */

        public String register(){

            userService.register(user);

            return "success";

        }

}
applicationContex.xml中注入action

2.编写struts.xml
<?xml version="1.0" encoding="UTF-8" ?>

<!DOCTYPE struts PUBLIC

    "-//Apache Software Foundation//DTD Struts Configuration 2.3//EN"

    "http://struts.apache.org/dtds/struts-2.3.dtd">

<struts>

  <!-- 开发模式 -->

    <constant name="struts.devMode" value="true" />

    <package name="default" namespace="/" extends="struts-default">

        <!-- 底层自动从spring容器中通过名称获得内容, getBean("userAction") -->

        <action name="userAction_*" class="userAction" method="register">

            <result name="success">/success.jsp</result>

        </action>

    </package>

</struts>
3.表单jsp页面
<form action="${pageContext.request.contextPath}/userAction_register" method="post">

        用户名:<input type="text" name="username"/> <br/>

        密码:<input type="password" name="password"/> <br/>

        年龄:<input type="text" name="age"/> <br/>

        <input type="submit" />

    </form>
4.web.xml 配置
1.确定配置文件contextConfigLocation
2.配置监听器 ContextLoaderListener
3.配置前端控制器 StrutsPrepareAndExecuteFitler
<?xml version="1.0" encoding="UTF-8"?>

<web-app version="2.5"

    xmlns="http://java.sun.com/xml/ns/javaee"

    xmlns:xsi="http://www.w3.org/2001/XMLSchema-instance"

    xsi:schemaLocation="http://java.sun.com/xml/ns/javaee

    http://java.sun.com/xml/ns/javaee/web-app_2_5.xsd">

  <display-name></display-name>

   <!-- 1 确定spring xml位置 -->

  <context-param>

      <param-name>contextConfigLocation</param-name>

      <param-value>classpath:applicactionContext.xml</param-value>

  </context-param>

  <!-- 2 spring监听器 -->

  <listener>

      <listener-class>org.springframework.web.context.ContextLoaderListener</listener-class>

  </listener>

  <!-- 3 struts 前端控制器 -->

  <filter>

      <filter-name>struts2</filter-name>

      <filter-class>org.apache.struts2.dispatcher.ng.filter.StrutsPrepareAndExecuteFilter</filter-class>

  </filter>

  <filter-mapping>

      <filter-name>struts2</filter-name>

      <url-pattern>/*</url-pattern>

  </filter-mapping>

    <welcome-file-list>

    <welcome-file>index.jsp</welcome-file>

  </welcome-file-list>

</web-app>
4.2 struts创建action
1 删除spring action配置

2 struts <action class="全限定类名">
<struts>

  <!-- 开发模式 -->

    <constant name="struts.devMode" value="true" />

    <package name="default" namespace="/" extends="struts-default">

        <!-- 底层自动从spring容器中通过名称获得内容, getBean("userAction") -->

        <action name="userAction_*" class="com.alice.ssh.web.action.UserAction" method="register">

            <result name="success">/success.jsp</result>

        </action>

    </package>

</struts>
SSH整合(Struts2+hibernate+spring)的更多相关文章
- SSH(struts2+hibernate+spring)总结
1 前三个文章 是我对ssh的具体实现 虽然没有真的写一个ssh的例子出来 但是 意思应该传达到了 主要还是注解注入的ssh太模块化了 感觉写出来意义不大 个人水平有限 说不清 2 我一开是写的是st ...
- 重新学习之spring第四个程序,整合struts2+hibernate+spring
第一步:导入三大框架的jar包(struts2.3.16.1+hibernate3.2+spring3.2.4) 第二步:编写web.xml 和struts.xml和applicationContex ...
- SSH(Struts2 + Hibernate + Spring)嵌入 KindEditor(KE)
1. kindeditor 灌水 (下载地址,demo) 经过两天的折磨,又源代码,又官网学习,又网络搜索的,终于成功的嵌入KindEditor了. KindEditor确 ...
- struts2+hibernate+spring简单整合且java.sql.SQLException: No suitable driver 问题解决
最近上j2ee的课,老师要求整合struts2+hibernate+spring,我自己其实早早地有准备弄的,现在都第9个项目了,无奈自己的思路和头绪把自己带坑了,当然也是经验问题,其实只是用myec ...
- 工作笔记3.手把手教你搭建SSH(struts2+hibernate+spring)环境
上文中我们介绍<工作笔记2.软件开发经常使用工具> 从今天開始本文将教大家怎样进行开发?本文以搭建SSH(struts2+hibernate+spring)框架为例,共分为3步: 1)3个 ...
- Struts2+Hibernate+Spring 整合示例
转自:https://blog.csdn.net/tkd03072010/article/details/7468769 Struts2+Hibernate+Spring 整合示例 Spring整合S ...
- 基于注解整合struts2与spring的时候如果不引入struts2-spring-plugin包自动装配无效
基于注解整合struts2与spring的时候如果不引入struts2-spring-plugin包,自动装配将无效,需要spring注入的对象使用时将抛出空指针异常(NullPointerExcep ...
- Struts2+hibernate+spring 配置事物
今天自信看了看hibernate的事物配置问题,转载了其他人的日志,仅用来学习. struts+hibernate+spring事务配置 (2009-01-14 21:49:47) 转载▼ 标签: i ...
- Spring整合Struts2,Hibernate的xml方式
作为一个学习中的码农,一直学习才是我们的常态,所以最近学习了SSH(Spring,Struts2,Hibernate)整合,数据库用的MySQL. 写了一个简单的例子,用的工具是IntelliJ Id ...
- Struts2+Hibernate+Spring 整合示例[转]
原文 http://blog.csdn.net/tkd03072010/article/details/7468769 Spring整合Struts2.Hibernate原理概述: 从用户角度来看,用 ...
随机推荐
- MongoDB C Driver使用教程
MongoDB C Driver使用教程 转载请注明出处http://www.cnblogs.com/oloroso/ 本指南提供简介 MongoDB C 驱动程序. 在 C API 的详细信息,请参 ...
- p2p音视频通信
今年音频没事干了,根据业务需求,调研音视频p2p通信,减小服务器压力,一切从0开始. 需要信令服务器,打洞服务器,帮助链接打通双方,实现p2p音视频通信. 服务器和客服端交互等都需要实现. 谷歌web ...
- Unity3D LuaBundleLoader(基于cslua)
说明:异步加载lua的bundle,会优先加载cache目录下bundle(一般更新的资源都在cache下) using System; using UnityEngine; using System ...
- Python之模块,迭代器与生成器
本节涉及内容: 1. 迭代器和生成器 2. 递归 3. 字符串格式化 4. 模块 内置模块 自定义模块 第三方模块 5. 序列化的模块 json pickle (一). 迭代器和生成器: 迭代器: ...
- Scrapy001-框架初窥
Scrapy001-框架初窥 @(Spider)[POSTS] 1.Scrapy简介 Scrapy是一个应用于抓取.提取.处理.存储等网站数据的框架(类似Django). 应用: 数据挖掘 信息处理 ...
- python之OS模块详解
python之OS模块详解 ^_^,步入第二个模块世界----->OS 常见函数列表 os.sep:取代操作系统特定的路径分隔符 os.name:指示你正在使用的工作平台.比如对于Windows ...
- 深入Java核心 Java中多态的实现机制(1)
在疯狂java中,多态是这样解释的: 多态:相同类型的变量,调用同一个方法时,呈现出多中不同的行为特征, 这就是多态. 加上下面的解释:(多态四小类:强制的,重载的,参数的和包含的) 同时, 还用人这 ...
- 在注册表中无Python3.5安装路径的情况下安装pywin32-
当安装pywin32出现Python Version 3.5 required which was not found in the registry的时候表面注册表中没有Python3.5的安装路径 ...
- oracle 12c中的隐含列
Invisible Columns 使用select * from ,desc 等看不到该列, DROP TABLE tab1 PURGE; CREATE TABLE tab1 ( id NUMB ...
- jsf初学解决GlassFish Server 无法启动
由于公司需要用JSF开发项目.公司同事都不熟悉,本人C# 转JSf.开发工具 netbeans GlassFish. 遇到GlassFish 非常 纠结的问题.搞了好一段时间,, 装好GlassFis ...