Yii2+Swagger搭建RESTful风格的API项目
在现有的Advanced Template上搭建RESTful API项目的步骤:
本案例前提说明:
- 本例中不使用\yii\rest\ActiveController自动创建的API,而是自定义一个API
- 使用Auth2.0的Bearer模式进行身份验证
- 使用MongoDB作为数据库,关于如何在Yii2中使用mongodb,请参考其他资料
- 本例中将使用Yii2的RESTful Rate Limiting功能对API进行访问频率控制
- 本例使用Swagger-UI生成公开的接口文档
- 本例中,API的请求将使用秘钥对请求参数进行签名,签名参数sign将作为url的最后一部分,服务端将使用相同的签名方式进行签名并匹配sign的值,以确定访问是否被伪造
创建新项目myapi以及模块v1的步骤:
Step 1 - 添加一个新的API项目,名为myapi: 参考教程
Step 2 - 创建一个名为v1的Module,创建之后项目结构如下:
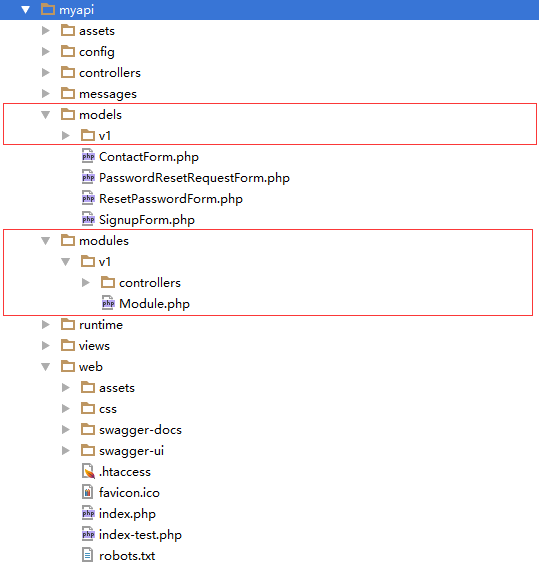
注: 本例中models均放在myapi/models/v1下,也可以直接将models放在myapi/modules/v1/models下
Step 3 - 将创建的Module v1 添加到配置文件myapi/config/main.php中:
return [

    ...

    'modules' => [

        'v1' => [

            'class' => 'myapi\modules\v1\Module'

        ],

    ]

    ...

];
创建数据库以及ActiveRecord:
本例中,数据库包含以下两张表external_api_users(API的用户表)、external_api_settings(Rate Limiting设置表):
external_api_users数据结构如下:
{

    "_id" : ObjectId("57ac16a3c05b39f9f6bf06a0"),

    "userName" : "danielfu",

    "avatar" : "http://www.xxx.com/avatar/default.png",

    "authTokens" : [

        "abcde",  // token可以同时存在多个

        "12345"

    ],

    "apiKeyInfos" : {

        "apiKey" : "apikey-123",

        "publicKey" : "publickey-123",

        "secreteKey" : "secreteKey-123" // 用来对sign进行签名

    },

    "status" : "active",

    "isDeleted" : false

}
external_api_settings数据结构如下:
{

    "_id" : ObjectId("57ac16a81c35b1a5603c9869"),

    "userID" : "57ac16a3c05b39f9f6bf06a0", // 关联到external_api_users._id字段

    "apiURL" : "/v1/delivery/order-sheet",

    "rateLimit" : NumberLong(2), // 只能访问2次

    "duration" : NumberLong(10), // rateLimit的限制是10秒之内

    "allowance" : NumberLong(1), // 当前在固定时间内剩余的可访问次数为1次

    "allowanceLastUpdateTime" : NumberLong(1470896430) // 最后一次访问时间

}
注意:本例使用的是Mongodb作为数据库,因此表结构表示为json格式
Step 1 - 创建ExternalApiUser类:
use yii\mongodb\ActiveRecord;

use yii\filters\RateLimitInterface;

use yii\web\IdentityInterface;

// 要实现Rate Limiting功能,就需要实现 \yii\filters\RateLimitInterface 接口

class ExternalApiUser extends ActiveRecord implements RateLimitInterface, IdentityInterface

{

    ...

    public function getRateLimit($request, $action)

    {

        return \myapi\models\v1\ExternalApiSettings::getRateLimit((string)$this->_id, $action->controller->module->module->requestedRoute);

    }

    public function loadAllowance($request, $action)

    {

        return \myapi\models\v1\ExternalApiSettings::loadAllowance((string)$this->_id, $action->controller->module->module->requestedRoute);

    }

    public function saveAllowance($request, $action, $allowance, $timestamp)

    {

        return \myapi\models\v1\ExternalApiSettings::saveAllowance((string)$this->_id, $action->controller->module->module->requestedRoute, $allowance, $timestamp);

    }

    ...

}
Step 2 - 创建ExternalApiSettings类:
class ExternalApiSettings extends \yii\mongodb\ActiveRecord

{

    ...

    public static function getRateLimit($userID, $apiUrl)

    {

        if (empty($userID) || empty($apiUrl)) {

            throw  new InvalidParamException('Parameter UserID and ApiURL is required!');

        }

        $setting = self::findOne(['userID' => $userID, 'apiURL' => $apiUrl]);

        if ($setting == null) {

            $setting = new self();

            $setting->userID = $userID;

            $setting->apiURL = $apiUrl;

            $setting->rateLimit = \Yii::$app->params['rateLimiting']['rateLimit'];

            $setting->duration = \Yii::$app->params['rateLimiting']['duration'];

            $setting->allowance = \Yii::$app->params['rateLimiting']['rateLimit'];

            $setting->save();

        }

        return [$setting->rateLimit, $setting->duration];

    }

    public static function loadAllowance($userID, $apiUrl)

    {

        if (empty($userID) || empty($apiUrl)) {

            throw  new InvalidParamException('Parameter UserID and ApiURL is required!');

        }

        $setting = self::findOne(['userID' => $userID, 'apiURL' => $apiUrl]);

        if ($setting != null) {

            return [$setting->allowance, $setting->allowanceLastUpdateTime];

        }

    }

    public static function saveAllowance($userID, $apiUrl, $allowance, $allowanceLastUpdateTime)

    {

        if (empty($userID) || empty($apiUrl)) {

            throw  new InvalidParamException('Parameter UserID and ApiURL is required!');

        }

        $setting = self::findOne(['userID' => $userID, 'apiURL' => $apiUrl]);

        if ($setting != null) {

            $setting->allowance = $allowance;

            $setting->allowanceLastUpdateTime = $allowanceLastUpdateTime;

            $setting->save();

        }

    }

    ...

}
Step 3 - 在 \myapi\config\main.php 文件中配置用户身份认证类为刚才创建的ExternalApiUser类:
return [

    ...

    'components' => [

        ...

        'user' => [

            'identityClass' => 'myapi\models\v1\ExternalApiUser',

            'enableAutoLogin' => true,

        ]

        ...

    ]

    ...

];
创建RESTful API:
Step 1 - 在myapi/modules/v1/controllers下创建controller,名为DeliveryController:
// 特别注意的是需要将\yii\web\ActiveController改为\yii\rest\ActiveController

class DeliveryController extends \yii\rest\ActiveController

{

    // $modelClass是\yii\rest\ActiveController必须配置的属性,但是本例中我们不需要使用基于ActiveRecord快速生成的API接口,因此对应$modelClass属性的设置并没什么用处

    public $modelClass = 'myapi\models\v1\request\delivery\OrderSheetRequest';

    /*

    \yii\rest\ActiveController会对应于$modelClass绑定的ActiveRecord快速生成如下API:

        GET /deliveries: list all deliveries page by page;

        HEAD /deliveries: show the overview information of deliveries listing;

        POST /deliveries: create a new delivery;

        GET /deliveries/123: return the details of the delivery 123;

        HEAD /deliveries/123: show the overview information of delivery 123;

        PATCH /deliveries/123 and PUT /users/123: update the delivery 123;

        DELETE /deliveries/123: delete the delivery 123;

        OPTIONS /deliveries: show the supported verbs regarding endpoint /deliveries;

        OPTIONS /deliveries/123: show the supported verbs regarding endpoint /deliveries/123.

    */

    ...

}
Step 2 - 将DeliveryController的身份验证模式改为Auth2.0的Bearer模式,并开启RESTful Rate Limiting功能:
class DeliveryController extends \yii\rest\ActiveController

{

    ...

    public function behaviors()

    {

        $behaviors = parent::behaviors();

        // 身份验证模式改为Auth2.0的Bearer模式

        $behaviors['authenticator'] = [

            'class' => \yii\filters\auth\HttpBearerAuth::className(),

        ];

        // 开启RESTful Rate Limiting功能

        $behaviors['rateLimiter']['enableRateLimitHeaders'] = true;

        ...

        return $behaviors;

    }

    ...

}
Step 3 - 创建自定义action,名为actionOrderSheet:
public function actionOrderSheet()

{

    ...

}
Step 4 - 在 \myapi\config\main.php 文件中配置自定义路由:
return [

    ...

    'components' => [

            'urlManager' => [

            'enablePrettyUrl' => true,

            'enableStrictParsing' => true,

            'showScriptName' => false,

            'rules' => [

                // 这一条配置是为了生成Swagger.json文档所预留的API,使用的还是基本的\yii\web\UrlRule

                [

                    'class' => 'yii\web\UrlRule',

                    'pattern' => 'site/gen-swg',

                    'route' => 'site/gen-swg'

                ],

                /* 这一条配置是配置自定义的RESTful API路由

                 本例中,我们的url将会是如下格式: http://www.xxx.com/v1/delivery/order-sheet/sn1001/c0bb9cfe4fdcc5ee0a4237b6601d1df4

                 其中,sn1001为shipping-number参数,c0bb9cfe4fdcc5ee0a4237b6601d1df4为sign参数

                */

                [

                    'class' => 'yii\rest\UrlRule',

                    'controller' => 'v1/delivery',

                    'pluralize' => false, // 不需要将delivery自动转换成deliveries

                    'tokens' => [

                        '{shipping-number}' => '<shipping-number:\\w+>',

                        '{sign}' => '<sign:\\w+>'

                    ],

                    'extraPatterns' => [

                        'POST order-sheet/{shipping-number}/{sign}' => 'order-sheet',

                    ],

                ]

            ],

        ],

    ],

    ...

];
到这里为止,http://www.xxx.com/v1/delivery/order-sheet/sn1001/c0bb9cfe4fdcc5ee0a4237b6601d1df4 已经可以被请求了,接下来我们通过Swagger将API接口公布出来,以便给他人调用。
集成Swagger:
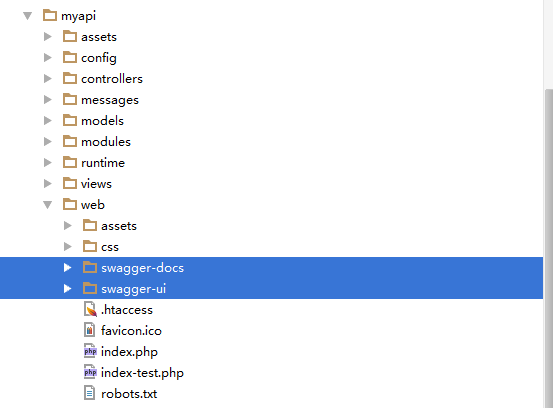
Step 1 - 从https://github.com/swagger-api/swagger-ui/releases 下载Swagger-UI,并放到项目web目录下,同时可以创建一个swagger-docs目录用以存放swagger.json文件:
Step 2 - 在composer.json的required节点中添加zircote/swagger-php配置:
"requried": {

...

"zircote/swagger-php": "*", // 添加之后应该执行composer update命令安装该组件

...

}
Step 3 - 用Annotation语法标注actionOrderSheet方法,部分代码如下:
/**

     * @SWG\Post(path="/delivery/order-sheet/{shippingNumber}/{sign}",

     *   tags={"Delivery"},

     *   summary="Sync order sheet result from warehouse to Glitzhome",

     *   description="从仓库同步发货结果",

     *   operationId="delivery/order-sheet",

     *   produces={"application/xml", "application/json"},

     *   @SWG\Parameter(

     *     name="shippingNumber",

     *     in="path",

     *     description="Shipping Number",

     *     required=true,

     *     type="string"

     *   ),

     *   @SWG\Parameter(

     *     name="sign",

     *     in="path",

     *     description="Sign of request parameters",

     *     required=true,

     *     type="string"

     *   ),

     *   @SWG\Parameter(

     *     name="Authorization",

     *     in="header",

     *     description="授权Token,Bearer模式",

     *     required=true,

     *     type="string"

     *   ),

     *   @SWG\Parameter(

     *     in="body",

     *     name="orderSheet",

     *     description="仓库反馈的Order sheet的结果",

     *     required=true,

     *     type="array",

     *     @SWG\Schema(ref="#/definitions/OrderSheetRequest")

     *   ),

     *

     *   @SWG\Response(response=200, @SWG\Schema(ref="#/definitions/OrderSheetResponse"), description="successful operation"),

     *   @SWG\Response(response=400,description="Bad request"),

     *   @SWG\Response(response=401,description="Not authorized"),

     *   @SWG\Response(response=404,description="Method not found"),

     *   @SWG\Response(response=405,description="Method not allowed"),

     *   @SWG\Response(response=426,description="Upgrade required"),

     *   @SWG\Response(response=429,description="Rate limit exceeded"),

     *   @SWG\Response(response=499,description="Customized business errors"),

     *   @SWG\Response(response=500,description="Internal Server Error"),

     *   security={

     *     {"Authorization": {}},

     *   }

     * )

     *

     */

    public function actionOrderSheet()

    {

        ...

    }
实际使用中,需要通过Swagger Annotation生成完整的swagger.json文件,否则swagger-ui在解析时会出错而导致无法生成API文档。
Step 4 - 在SiteController中增加actionGenSwg方法,用来解析Swagger Annotation并生成swagger.json文件:
public function actionGenSwg()

{

    $projectRoot = Yii::getAlias('@myapiroot') . '/myapi';

    $swagger = \Swagger\scan($projectRoot);

    $json_file = $projectRoot . '/web/swagger-docs/swagger.json';

    $is_write = file_put_contents($json_file, $swagger);

    if ($is_write == true) {

        $this->redirect('/swagger-ui/dist/index.html');

    }

}
Step 5 - 在文件 /myapi/config/bootstrap.php 中定义 ‘@myapiroot’:
...

Yii::setAlias('myapiroot', dirname(dirname(__DIR__)));

...
通过Swagger-UI查看并测试API:
Step 1 - 在浏览器中打开 http://www.xxx.com/site/gen-swg
页面,Swagger-UI将会根据swagger-json文件生成如下界面:

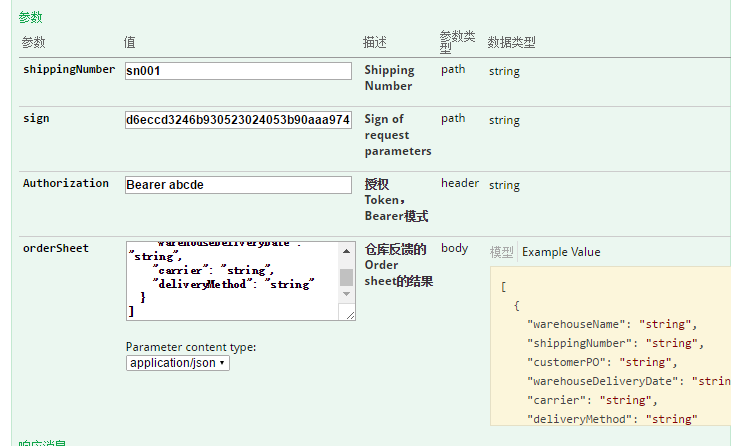
Step 2 - 在参数位置按要求填写参数,点击"试一下!"按钮:
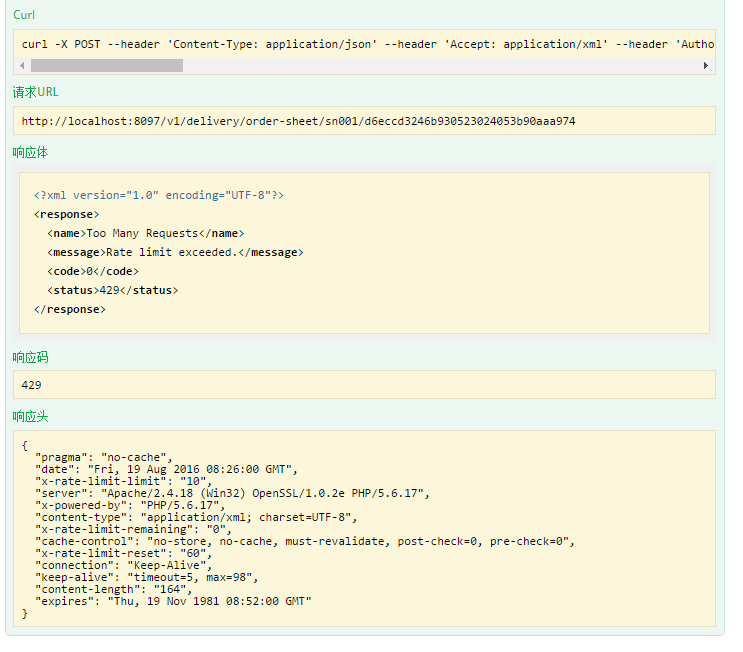
Step 3 - 返回调用结果:

我们本例中使用Rate Limiting进行访问频率的限制,假设设置了该API每10秒之内最多访问2次,如果我们连续点击"试一下!"按钮,则会返回429 Rate limit exceeded错误:
注:由于代码是在正式项目中的,因此无法直接提供完整的源码,请见谅。
最后附上签名的算法:
public static function validateSign($parameters, $secretCode)

{

    if (is_array($parameters) && !empty($secretCode)) {

        // 顺序排序

        ksort($parameters);

        // 将 sign 添加到最后

        $paramsWithSecret = array_merge($parameters, ["secret" => $secretCode]);

        // 连接成 key1=value&key2=value2....keyN=valueN&secret=secretCode 这样的格式

        $str = implode('&', array_map(

            function ($v, $k) {

                return sprintf("%s=%s", $k, json_encode($v));

            },

            $paramsWithSecret,

            array_keys($paramsWithSecret)

        ));

        // 计算MD5的值

        return md5($str);

    }

    return '';

}
在线参考文档
- http://budiirawan.com/setup-restful-api-yii2/
- Yii2 RESTful Rate Limiting
- Swagger UI
- Swagger在线语法解释器
- Swagger在线语法验证工具
- Swagger Annotations语法
- Swagger for PHP Demo
Yii2+Swagger搭建RESTful风格的API项目的更多相关文章
- 用LoopBack搭建RESTful 风格的API
1.安装node.NPM 2.安装strongloop npm install -g --unsafe-perm install strongloop 3.创建工作目录并且配置loopback应用 m ...
- Dubbo 03 Restful风格的API
目录 Dubbo03 restful风格的API 根路径 协议 版本 用HTTP协议里的动词来实现资源的增删改查 用例 swagger(丝袜哥) OpenAPI 资源 编写API文档 整合Spring ...
- 测开大佬告诉你:如何5分钟快速创建restful风格的API接口-使用django restframework框架
一.思考❓❔ 1.创建API接口难吗? 软件测试工程师: 只测过API接口, 从没创建过 应该需要掌握一门后端开发语言和后端开发框架吧!? 脑容量有限,想想就可怕 2.如何创建API接口呢? 使用Dj ...
- PHP实现RESTful风格的API实例(三)
接前一篇PHP实现RESTful风格的API实例(二) .htaccess :重写URL,使URL以 /restful/class/1 形式访问文件 Options +FollowSymlinks R ...
- PHP实现RESTful风格的API实例(一)
最近看了一些关于RESTful的资料,自己动手也写了一个RESTful实例,以下是源码 目录详情: restful/ Request.php 数据操作类 Response.php 输出类 index. ...
- Gin实战:Gin+Mysql简单的Restful风格的API(二)
上一篇介绍了Gin+Mysql简单的Restful风格的API,但代码放在一个文件中,还不属于restful风格,接下来将进行进一步的封装. 目录结构 ☁ gin_restful2 tree . ├─ ...
- Gin实战:Gin+Mysql简单的Restful风格的API
我们已经了解了Golang的Gin框架.对于Webservice服务,restful风格几乎一统天下.Gin也天然的支持restful.下面就使用gin写一个简单的服务,麻雀虽小,五脏俱全.我们先以一 ...
- springMvc中restful风格的api路径中把小数点当参数,SpringMvc中url有小数点
在springMvc web项目中restful风格的api路径中有小数点会被过滤后台拿不到最后一个小数点的问题, 有两种解决方案: 1:在api路径中加入:.+ @RequestMapping(&q ...
- PHP实现RESTful风格的API实例(二)
接前一篇PHP实现RESTful风格的API实例(一) Response.php :包含一个Request类,即输出类.根据接收到的Content-Type,将Request类返回的数组拼接成对应的格 ...
随机推荐
- Spring Boot 入门实践
一.Eclipse配置Spring Boot环境 1.查看eclipse版本信息: 2.登录:http://spring.io/tools/sts/all 看eclipse对应的插件版本对应的ecli ...
- c# devexpress学习绘图
用字典方式存储数据并绘图:http://www.xuebuyuan.com/465384.html 数据库存储数据,并对图形作各种设置:http://www.cnblogs.com/xuhaibiao ...
- mysql学习之路_外键
回顾4 连接查询: 连接多张表到一起,不管记录数如何,字段数一定会增加. 分类:内连接,外连接.自然连接,交叉连接, 交叉连接:cross join (笛卡尔积) 内连接:inner join,左右两 ...
- celery 4.1下报kombu.exceptions.EncodeError: Object of type 'bytes' is not JSON serializable 处理方式
#python代码如下 from celery import Celeryimport subprocess app = Celery('tasks', broker='redis://localho ...
- 使用函数的列 group by 分组需要别名
问题描述 使用如下截图的SQL统计数据,报1105错误,提示all columns in group by clause should be in the selected column. 给格式化 ...
- java http大文件断点续传上传
因为需要研究下断点上传的问题.找了很久终于找到一个比较好的项目. 效果: 上传中,显示进度,时间,百分比. 点击[Pause]暂停,点击[Resume]继续. 2,代码分析 项目进行了封装使用最简单的 ...
- python爬虫之一:requests库
目录 安装requtests requests库的连接异常 HTTP协议 HTTP协议对资源的操作 requests库的7个主要方法 request方法 get方法 网络爬虫引发的问题 robots协 ...
- 20145232 韩文浩 《Java程序设计》第6周学习总结
教材学习内容总结 Java是以串流(Stream)的方式来处理输入与输出. 串流是一种抽象观念,从键盘输入资料,将处理结果输入档案,以及读取档案的内容等动作皆视为串流的处理. 输入串流代表对象为jav ...
- mapnik渲染原理
https://bbs.csdn.net/topics/390853826
- spring启动component-scan类扫描加载,以及@Resource,postConstruct等等注解的解析生效源码
spring里IOC的原理就不详细写了, 如果想要搞清楚自动扫描组件是如何实现的,还有@Resouce @PostConstruct等注解的工作原理,最好可以先搞清楚整个IOC容器的运作原理再来分析这 ...