
OpenResty(nginx+lua) 入门
OpenResty 官网:http://openresty.org/
OpenResty 是一个nginx和它的各种三方模块的一个打包而成的软件平台。最重要的一点是它将lua/luajit打包了进来,使得我们可以使用lua脚本来进行web的开发。有了lua,我们可以借助于nginx的异步非阻塞的功能,达到使用 lua 异步并发访问后端的 MySQL, PostgreSQL, Memcached, Redis等等服务。特别是特有的 ngx.location.capture_multi 功能让人印象深刻,其可以达到极大的减少浏览器的http连接数量,并且可以异步并发的访问后台 Java/PHP/Python 等等接口。OpenResty 架构的web可以轻松超越Node.js的性能,并且对后端语言没有限制,你可以使用Java/PHP/Python等等各种语言。OpenResty(nginx+lua)可以替代node.js的前端渲染的功能。
OpenResty (aka. ngx_openresty) is a full-fledged web application server by bundling the standard Nginx core, lots of 3rd-party Nginx modules, as well as most of their external dependencies.
By taking advantage of various well-designed Nginx modules, OpenResty
effectively turns the nginx server into a powerful web app server, in
which the web developers can use the Lua programming language to script
various existing nginx C modules and Lua modules and construct extremely
high-performance web applications that are capable to handle 10K+
connections.
OpenResty aims to run your server-side web app
completely in the Nginx server, leveraging Nginx's event model to do
non-blocking I/O not only with the HTTP clients, but also with remote
backends like MySQL, PostgreSQL, Memcached, and Redis.
1. 安装OpenResty
先安装依赖:yum install readline-devel pcre-devel openssl-devel gcc
解压: tar zxvf ngx_openresty-1.9.3.1.tar.gz
建立一个软连接:ln -s ngx_openresty-1.9.3.1 openresty
进入目录:cd openresty
编译:
./configure \

             --with-cc-opt="-I/usr/local/include" \

             --with-ld-opt="-L/usr/local/lib" \

             --prefix=/opt/openresty

... ...
Configuration summary
  + using system PCRE library
  + using system OpenSSL library
  + md5: using OpenSSL library
  + sha1: using OpenSSL library
  + using system zlib library

  nginx path prefix: "/opt/openresty/nginx"
  nginx binary file: "/opt/openresty/nginx/sbin/nginx"
  nginx configuration prefix: "/opt/openresty/nginx/conf"
  nginx configuration file: "/opt/openresty/nginx/conf/nginx.conf"
  nginx pid file: "/opt/openresty/nginx/logs/nginx.pid"
  nginx error log file: "/opt/openresty/nginx/logs/error.log"
  nginx http access log file: "/opt/openresty/nginx/logs/access.log"
  nginx http client request body temporary files: "client_body_temp"
  nginx http proxy temporary files: "proxy_temp"
  nginx http fastcgi temporary files: "fastcgi_temp"
  nginx http uwsgi temporary files: "uwsgi_temp"
  nginx http scgi temporary files: "scgi_temp"
其中 --prefix=/opt/openresty 指定了安装目录,不指定的话默认会安装到 /usr/local/openresty 目录下。
编译安装: make && make install
[root@localhost src]# cd /opt/openresty/

[root@localhost openresty]# ls

bin  luajit  lualib  nginx
可以看到 /opt/openresty 目录下四个文件夹,其中包括了 luajit,nginx。
启动openresty: /opt/openresty/nginx/sbin/nginx -c /opt/openresty/nginx/conf/nginx.conf -p /opt/openresty/nginx/
[root@localhost src]# ps -elf|grep nginx

 S root                   -  -      : ?        :: nginx: master process /opt/openresty/nginx/sbin/nginx -c /opt/openresty/nginx/conf/nginx.conf -p /opt/openresty/nginx/

 S nobody              -  -      : ?        :: nginx: worker process

 S root                -   -      : pts/    :: grep nginx
验证可以访问: curl 127.0.0.1
2. content_by_lua 和 content_by_lua_file
nginx 如何嵌入 lua 脚本。方法就是在nginx的配置文件nginx.conf 中使用 content_by_lua 或者 cotent_by_lua_file 指令:
1) content_by_lua 一般在很简单的lua脚本时使用:
        location /lua {

                set $test "hello, world.";

                content_by_lua '

                        ngx.header.content_type = "text/plain";

                        ngx.say(ngx.var.test);

                ';

        }
访问 http://localhost/lua 可以看到输出到页面的 hello, world.
2)cotent_by_lua_file 适应于复杂的 lua 脚本,专门放入一个文件中:
        location /lua2 {

            #lua_code_cache off;

            content_by_lua_file lua/hello.lua;

        }
路径相对于 /opt/openresty/nginx
[root@localhost lua]# pwd

/opt/openresty/nginx/lua

[root@localhost lua]# cat hello.lua

ngx.say('hello ngx_lua!!!!');
本例子中 hello.lua 只包含一句: ngx.say('hello ngx_lua!!!!');
访问 /lua2 :
[root@localhost lua]# curl localhost/lua

hello ngx_lua!!!!
可以看到访问成功。
在 nginx.conf 文件的 server {.. ...} 中加入 lua_code_cache off; 可以方便调试lua脚本,修改lua脚本之后,不需要 reload nginx.
openresty 中的 nginx 嵌入 luajit 的原理:
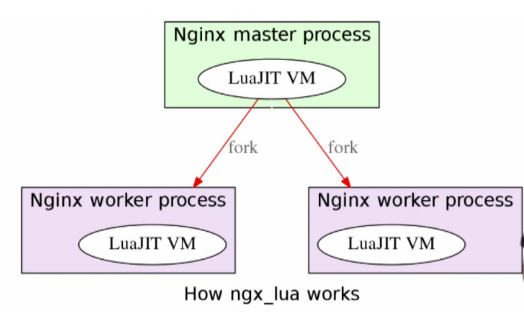
每一个nginx的进程中都嵌入了一个 luajit的虚拟机,来执行lua脚本。nginx将lua脚本的执行交给了luajit vm.
3. ngx_lua 的指令 和 API
上面我们说到 nginx 嵌入 lua 脚本可以使用 content_by_lua 和 content_by_lua_file,它们其实是指令(Directives),类似的指令还有很多,
具体参见:https://www.nginx.com/resources/wiki/modules/lua/#directives
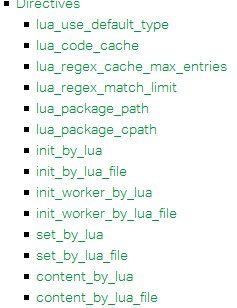
这些指令都是 nginx 访问 lua 脚本的入口。
ngx_lua API:
指令是 nginx 访问 lua 脚本的入口。那么lua脚本如何调用nginx中的函数呢?就是通过 ngx_lua 的API 。
具体介绍参见:https://www.nginx.com/resources/wiki/modules/lua/#nginx-api-for-lua
The various *_by_lua and *_by_lua_file configuration directives serve as gateways to the Lua API within the nginx.conf file. The NGINX Lua API described below can only be called within the user Lua code run in the context of these configuration directives.
The API is exposed to Lua in the form of two standard packages ngx and ndk. These packages are in the default global scope within ngx_lua and are always available within ngx_lua directives.
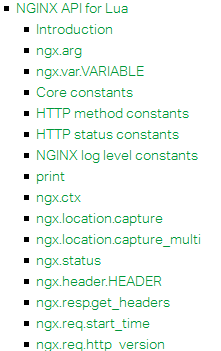
其实nginx和Lua的交互开发主要就是指令和API,当然还有lua脚本的语法。指令是nginx访问lua的入口,API是lua调用nginx的函数,lua是脚本编程语言。
指令其实很简单,所以主要就是熟悉ngx_lua的 API 和Lua语法。
4. lua 访问 redis
lua-resty-redis 模块:https://github.com/openresty/lua-resty-redis (有文档可以参考)
在nginx.conf中加入:
        location /redis_test{

            content_by_lua_file lua/redis_test.lua;

        }
redis_test.lua 内容:
[root@localhost lua]# cat redis_test.lua

local redis = require "resty.redis"

local red = redis:new()

red:set_timeout()

local ok, err = red:connect("127.0.0.1", )

if not ok then

        ngx.say("failed to connect: ", err)

        return

end

ngx.say("set result: ", ok)

local res, err = red:get("dog")

if not res then

        ngx.say("failed to get doy: ", err)

        return

end

if res == ngx.null then

        ngx.say("dog not found.")

        return

end

ngx.say("dog: ", res)

[root@localhost lua]#
访问:
[root@localhost lua]# curl localhost/redis_test

set result:

dog: an animal

[root@localhost lua]#
我们看到访问成功。
5. lua 访问mysql
openresty的mysql模块:lua-resty-mysql :https://github.com/openresty/lua-resty-mysql(有文档可以参考)
在nginx.conf加入如下配置:
        location /mysql_test {

            content_by_lua_file lua/mysql_test.lua;

        }
mysql_test.lua脚本内容:
[root@localhost lua]# pwd

/opt/openresty/nginx/lua

[root@localhost lua]# cat mysql_test.lua

local mysql = require "resty.mysql"

local db, err = mysql:new()

if not db then

        ngx.say("failed to instantiate mysql: ", err)

        return

end

db:set_timeout()

local ok, err, errno, sqlstate = db:connect{

        host = "127.0.0.1",

        port = ,

        database = "ngx_lua",

        user = "root",

        password="digdeep",

        max_packet_size =  *

}

if not ok then

        ngx.say("failed to connect: ", err, ": ", errno, " ", sqlstate)

        return

end

ngx.say("connected to mysql.")

local res, err, errno, sqlstate = db:query("drop table if exists cats")

if not res then

        ngx.say("bad result: ", err, ": ", errno, ": ", sqlstate, ".")

        return

end

res, err, errno, sqlstate = db:query("create table cats " .. "(id int not null primary key auto_increment, "

                                        .. "name varchar(30))")

if not res then

        ngx.say("bad result: ", err, ": ", errno, ": ", sqlstate, ".")

        return

end

ngx.say("table cats created.")

res, err, errno, sqlstate = db:query("insert into cats(name) " .. "values (\'Bob\'),(\'\'),(null)")

if not res then

        ngx.say("bad request: ", err, ": ", errno, ": ", sqlstate, ".")

        return

end

ngx.say(res.affected_rows, " rows inserted into table cats ", "(last insert id: ", res.insert_id, ")")

res, err, errno, sqlstate = db:query("select * from cats order by id asc", )

if not res then

        ngx.say("bad result ", err, ": ", errno, ": ", sqlstate, ".")

        return

end

local cjson = require "cjson"

ngx.say("result: ", cjson.encode(res))

local ok, err = db:set_keepalive(, )

if not ok then

        ngx.say("failed to set keepalive: ", err)

        return

end
测试:
[root@localhost lua]# curl localhost/mysql_test

connected to mysql.

table cats created.

 rows inserted into table cats (last insert id: )

result: [{"name":"Bob","id":},{"name":"","id":},{"name":null,"id":}]
测试通过。
5. lua 的 capture 和 capture_multi(子查询)
capture_multi 是 openresty 一个十分强大的功能。它能极大的减少前端浏览器发送的http请求的数量,突破了浏览器对于同一个服务器并发请求数量的限制,因为他可以将前端的多个http请求减少为只要一个http请求到nginx,然后nginx使用capture_multi特性,对后端发起多个异步并发请求,然后统一将结果返回给前端。下面看一个例子:
首先在nginx.conf中加入下面的 location 配置,并且配置好 nginx 访问 php 的配置:
        location /capture {

            content_by_lua_file lua/capture.lua;

            #access_by_lua_file lua/capture.lua;

        }

        location ~ \.php$ {

            root           html;

            fastcgi_pass   127.0.0.1:;

            fastcgi_index  index.php;

            fastcgi_param  SCRIPT_FILENAME  $document_root$fastcgi_script_name;

            include        fastcgi_params;

        }
capture.lua 的代码如下:
[root@localhost lua]# pwd

/opt/openresty/nginx/lua

[root@localhost lua]# cat capture.lua

local res1,res2,res3,res4 = ngx.location.capture_multi{

        {"/mysql_test", {args="t=1&id=1"}},

        {"/redis_test", {args="t=2&id=2"}},

        {"/lua", {args="t=3&id=3"}},

        {"/index.php", {args="t=3&id=3"}},

}

ngx.header.content_type="text/plain"

ngx.say(res1.body)

ngx.say(res2.body)

ngx.say(res3.body)

ngx.say(res4.truncated)

ngx.say(res4.status)

ngx.say(res4.header["Set-Cookie"])

--ngx.say(res4.body)
index.php 代码:
[root@localhost html]# pwd

/opt/openresty/nginx/html

[root@localhost html]# cat index.php

<?php

        echo phpinfo();

?>
访问:
[root@localhost html]# curl localhost/capture

connected to mysql.

table cats created.

 rows inserted into table cats (last insert id: )

result: [{"name":"Bob","id":},{"name":"","id":},{"name":null,"id":}]

set result:

dog: an animal

hello ngx_lua!!!!

false

nil
可以看到访问成功了。/mysql_test,/redis_test, /lua, /index.php 四个请求的结果都输出了。
注意:
ngx.location.capture_multi{... ...} 中的多个异步并发请求可以是 nginx.conf 中配置的 location(比如 /mysql_test, /redis_test, /lua),也可以不是 location配置的路径,比如 index.php 就不是。index.php 就是一个简单的后台php 脚本。当然也可以是一个 java 实现的后台接口。
6. openresty的缓存 lua_shared_dict
定义一个缓存:
在nginx的配置文件 nginx.conf 的 http 端下面加入指令:
lua_shared_dict ngx_cache 128m;
就定义了一个 名称为 ngx_cache 大小为128m的内存用于缓存,注意该缓存是所有nginx work process所共享的。
在lua脚本中访问缓存:
local ngx_cache = ngx.shared.ngx_cache

local value = ngx_cache:get(key)

local succ, err, forcible = ngx_cache:set(key, value, exptime)
下面测试一下,首先在 nginx.conf的server端中加入:
        location /cache {

            content_by_lua_file lua/cache.lua;

        }
然后编写 cache.lua 脚本:
[root@localhost lua]# cat cache.lua

local redis = require "resty.redis"

local red = redis:new()

function set_to_cache(key, value, exptime)

        if not exptime then

                exptime =

        end

        local ngx_cache = ngx.shared.ngx_cache

        local succ, err, forcible = ngx_cache:set(key, value, exptime)

        return succ

end

function get_from_cache(key)

        local ngx_cache = ngx.shared.ngx_cache;

        local value = ngx_cache:get(key)

        if not value then

                value = get_from_redis(key)

                set_to_cache(key, value)

                return value

        end

        ngx.say("get from cache.")

        return value

end

function get_from_redis(key)

        red:set_timeout()

        local ok, err = red:connect("127.0.0.1", )

        if not ok then

                ngx.say("failed to connect: ", err)

                return

        end

        local res, err = red:get(key)

        if not res then

                ngx.say("failed to get doy: ", err)

                return ngx.null

        end

        ngx.say("get from redis.")

        return res

end

function set_to_redis(key, value)

        red:set_timeout()

        local ok, err = red:connect("127.0.0.1", )

        if not ok then

                ngx.say("failed to connect: ", err)

                return

        end

        local ok, err = red:set(key, value)

        if not ok then

                ngx.say("failed to set to redis: ", err)

                return

        end

        return ok

end

set_to_redis('dog', "Bob")

local rs = get_from_cache('dog')

ngx.say(rs)
测试:
[root@localhost ~]# curl localhost/cache

get from redis.

Bob

[root@localhost ~]# curl localhost/cache

get from cache.

Bob

[root@localhost ~]# curl localhost/cache

get from cache.

Bob
第一次从 redis中获取,以后每次都从cache中获取。
可以使用 ab 测试一下rps(Requests per second):
ab -n -c -k http://127.0.0.1/cache
7. 解决缓存失效风暴 lua-resty-lock
缓存失效风暴是指缓存因为时间过期而失效时,会导致所有的请求都去访问 后台的redis或者mysql,而导致CPU性能即刻增长的现象。所以关键是当缓存失效时,用lock保证只有一个线程去访问后台的redis或者mysql,然后更新缓存。需要使用到 lua-resty-lock 模块的加锁、解锁功能。
lua-resty-lock 文档:https://github.com/openresty/lua-resty-lock
首先在nginx.conf 的 http 端下面加入指令:
lua_shared_dict ngx_cache 128m;     # cache

lua_shared_dict cache_lock 100k;    # lock for cache
然后在nginx.conf的server端中加入:
        location /cache_lock {

            content_by_lua_file lua/cache_lock.lua;

        }
cache_lock.lua代码:
[root@localhost lua]# cat cache_lock.lua

local redis = require "resty.redis"

local red = redis:new()

local resty_lock = require "resty.lock"

local ngx_cache = ngx.shared.ngx_cache

function set_to_cache(key, value, exptime)

        if not exptime then

                exptime =

        end

        local succ, err, forcible = ngx_cache:set(key, value, exptime)

        return succ

end

function get_from_cache(key)

        local ngx_cache = ngx.shared.ngx_cache;

        local value = ngx_cache:get(key)

        if not value then       -- cache miss

                local lock = resty_lock:new("cache_lock")

                local elapsed, err = lock:lock(key)

                if not elapsed then

                        return fail("failed to acquire the lock: ", err)

                end

                value = get_from_redis(key)

                if not value then

                        local ok, err = lock:unlock()

                        if not ok then

                                return fail("failed to unlock: ", err)

                        end

                        ngx.say("no value found")

                        return

                end

                local ok, err = ngx_cache:set(key, value, )

                if not ok then

                        local ok, err = lock:unlock()

                        if not ok then

                                return fail("failed to unlock: ", err)

                        end

                        return faile("failed to update ngx_cache: ", err)

                end

                local ok, err = lock:unlock()

                if not ok then

                        return faile("failed to unlock: ", err)

                end

                return value

        end

        ngx.say("get from cache.")

        return value

end

function get_from_redis(key)

        red:set_timeout()

        local ok, err = red:connect("127.0.0.1", )

        if not ok then

                ngx.say("failed to connect: ", err)

                return

        end

        local res, err = red:get(key)

        if not res then

                ngx.say("failed to get doy: ", err)

                return ngx.null

        end

        ngx.say("get from redis.")

        return res

end

function set_to_redis(key, value)

        red:set_timeout()

        local ok, err = red:connect("127.0.0.1", )

        if not ok then

                ngx.say("failed to connect: ", err)

                return

        end

        local ok, err = red:set(key, value)

        if not ok then

                ngx.say("failed to set to redis: ", err)

                return

        end

        return ok

end

set_to_redis('dog', "Bob")

local rs = get_from_cache('dog')

ngx.say(rs)
测试:
[root@localhost lua]# curl localhost/cache_lock

get from cache.

Bob

[root@localhost lua]# curl localhost/cache_lock

get from cache.

Bob
7. openresty 执行阶段
nginx的执行阶段分成了很多个阶段,所以第三方模块就可以在某个适当的阶段加入一些处理。openresty进行了简化成了7个阶段:
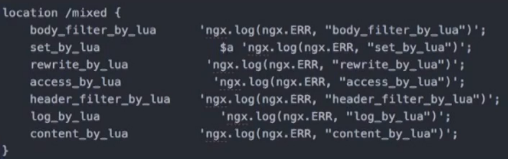
7个阶段的执行顺序如下:
set_by_lua: 流程分支判断,判断变量初始哈
rewrite_by_lua: 用lua脚本实现nginx rewrite
access_by_lua: ip准入,是否能合法性访问,防火墙
content_by_lua: 内存生成
header_filter_by_lua:过滤http头信息,增加头信息
body_filter_by_lua: 内容大小写,内容加密
log_by_lua: 本地/远程记录日志
但是其实我们可以只用 content_by_lua,所有功能都在该阶段完成,也是可以的。
OpenResty(nginx+lua) 入门的更多相关文章
- OpenResty(Nginx+Lua)开发入门
Nginx入门 本文目的是学习Nginx+Lua开发,对于Nginx基本知识可以参考如下文章: nginx启动.关闭.重启 http://www.cnblogs.com/derekchen/archi ...
- (转)OpenResty(nginx+lua) 开发入门
原文:https://blog.csdn.net/enweitech/article/details/78519398 OpenResty 官网:http://openresty.org/ Open ...
- CentOS安装OpenResty(Nginx+Lua)开发环境
一.简介 OpenResty® 是一个基于 Nginx 与 Lua 的高性能 Web 平台,其内部集成了大量精良的 Lua 库.第三方模块以及大多数的依赖项.用于方便地搭建能够处理超高并发.扩展性极高 ...
- 【原创】大叔问题定位分享(36)openresty(nginx+lua)中获取不到post数据,ngx.req.get_body_data返回nil
openresty(nginx+lua)中获取不到post数据,ngx.req.get_body_data返回nil This function returns nil if the request ...
- 搭建OpenResty(Nginx+Lua)
这篇文章是一个多月前写的,当时之所以搭建这个是为了最大程度上发挥Nginx的高并发效率(主要是结合lua脚本),参考的话,主要参考张开涛先生写的跟开涛学Nginx+lua系列文章,地址为:https: ...
- 跟我学OpenResty(Nginx+Lua)开发目录贴 (转)
使用Nginx+Lua开发近一年的时间,学习和实践了一些Nginx+Lua开发的架构,为了让更多人使用Nginx+Lua架构开发,利用春节期间总结了一份基本的学习教程,希望对大家有用.也欢迎谈探讨学习 ...
- 【原创】运维基础之OpenResty(Nginx+Lua)+Kafka
使用docker部署 1 下载 # wget https://github.com/doujiang24/lua-resty-kafka/archive/v0.06.tar.gz# tar xvf v ...
- OpenResty(Nginx)+Lua+GraphicsMagick实现缩略图功能
http://www.hopesoft.org/blog/?p=1188 http://www.imagemagick.org/download/ 2.用法 原始图片是input.jpg,尺寸:160 ...
- OpenResty部署nginx及nginx+lua
因为用nginx+lua去开发,所以会选择用最流行的开源方案,就是用OpenResty nginx+lua打包在一起,而且提供了包括redis客户端,mysql客户端,http客户端在内的大量的组件 ...
随机推荐
- apache tiles 页面模板的使用
jar包maven <!-- Tiles 模板--> <dependency> <groupId>org.apache.tiles</groupId> ...
- 第 21 章 CSS3 文本效果
学习要点: 1.文本阴影 2.文本裁剪 3.文本描边 4.文本填充 主讲教师:李炎恢 本章主要探讨 HTML5 中 CSS3 中文本效果,其中也包含一些之前讲过的 CSS3 文本属性. 一.文本阴影 ...
- Discuz网站建站运营必备插件
Discuz界面功能完善,对开发者友好,拥有丰富的插件资源,能够高度定制属于自己风格的论坛服务.但是在拥有近四千个插件的Discuz应用中心,小白站长该如何挑选合适的插件来优化自己的网站呢? 楼主 ...
- C# 如何实现带消息数的App图标
上次写了一篇博文,但是每次更新图标时,桌面会闪烁(刷新),有博友说人家的图标都不会刷新,还能动画.我想了一下,如果要达到这个效果,可以用Form来实现,就是在Form中嵌入一个图片,然后用一个labe ...
- jQuery Flat Shadow – 轻松实现漂亮的长阴影效果
长阴影其实就是扩展了对象的投影,感觉是一种光线照射下的影子,通常采用角度为 45 度的投影,给对象添加了一份立体感.长阴影快速发展为流行的设计趋势,并经常被应用到扁平设计方案的对象.更详细的介绍可以阅 ...
- 轻松掌握:JavaScript享元模式
享元模式 在JavaScript中,浏览器特别是移动端的浏览器分配的内存很有限,如何节省内存就成了一件非常有意义的事情.节省内存的一个有效方法是减少对象的数量. 享元模式(Flyweight),运行共 ...
- SharePoint 2013 开发文档管理字段小记
前言 最近有这样一个需求,就是要求在列表库里管理文档,需要多文档管理.带版本控制.可以单独授权等基本操作.于是乎,就开发了一个自定义段,这里介绍一下字段的思路,里面有一些遇到的问题,在群友的帮助下已解 ...
- Office 365 - SharePoint 2013 Online 在应用商店中添加应用
1.在使用应用程序商店的时候,先点击配置应用商店设置,如下图: 2.发现SharePoint要求我们创建应用程序目录,用来分发SharePoint App的一个网站,不过不创建的话,依然可以在应用商店 ...
- WCF分分钟入门
近来学习wcf,总结了一下入门的经验,小白的入门篇,也方便以后复习,省的去查质料. 第一步:创建wcf程序,程序初始化有一个接口和一个实现类写个简单的返回方法就可以了: 第二步:创建一个宿主,也就是服 ...
- Python学习01 Hello World
Python学习之Hello World 准备工作 去官网http://www.python.org/ 下载python的安装包: http://www.python.org/download/ 当前 ...