IdentityServer4授权和认证对接数据库
接着上一篇讲:https://www.cnblogs.com/nsky/p/10352678.html
我们之前都是用in-men的方式把数据添加到内存了,目的是为了测试方便,
现在我们把所有配置都添加到数据库中
用IdeneityServer4 + EntityFramework + ASP.NET Identity的方式
上篇已经讲过identity和profile的对接,这里讲讲配置信息
之前都是这样做的

添加包:IdentityServer4.EntityFramework
里面有专门的2个DbContext管理对应的信息
分别是:PersistedGrantDbContext 和 ConfigurationDbContext
如果还记得Identity,里面有个ApplicationDbContext
所以这里总共有3个DbContext
ApplicationDbContext
PersistedGrantDbContext
ConfigurationDbContext
ApplicationDbContext - 负责涉及ASP.NET Identity的用户所以表
dbo.AspNetRoleClaims
dbo.AspNetRoles
dbo.AspNetUserClaims
dbo.AspNetUserLogins
dbo.AspNetUserRoles
dbo.AspNetUsers
dbo.AspNetUserTokens
PersistedGrantDbContext - 负责存储同意,授权代码,刷新令牌和引用令牌
dbo.PersistedGrants
ConfigurationDbContext - 负责数据库中剩余的所有其他内容
所以关于迁移,如果我更新任何AspNet Identity模型(即ApplicationUser),那么我将在ApplicationDbContext上运行迁移。
任何客户端表或其他范围都将在ConfigurationDbContext上运行。并且访问entites(或表)将是相应的上下文。
添加包之后,添加依赖注入配置
 .AddConfigurationStore(options =>

            {

                options.ConfigureDbContext = builder =>

                {

                    builder.UseSqlServer(Configuration.GetConnectionString("conn"),

                        sql => sql.MigrationsAssembly(migrationAssembly));

                };

            })

            /*

             这里存储的是,给用户授权的token和一些授权信息

             添加来自数据库的操作数据(codes, tokens, consents)

             */

            .AddOperationalStore(options =>

            {

                options.ConfigureDbContext = builder =>

                {

                    builder.UseSqlServer(Configuration.GetConnectionString("conn"),

                        sql => sql.MigrationsAssembly(migrationAssembly));

                };

            })
migrationAssembly是当前程序集;
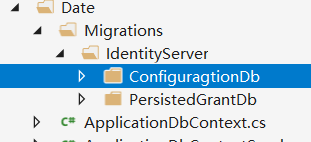
var migrationAssembly = typeof(Startup).GetTypeInfo().Assembly.GetName().Name; 接下来生成migration,在项目的程序包管理控制台输入:
Add-Migration InitConfiguration -Context ConfigurationDbContext -o Date\Migrations\IdentityServer\ConfiguragtionDb
Add-Migration InitConfiguration -Context PersistedGrantDbContext -o Date\Migrations\IdentityServer\PersistedGrantDb
这样就添加了两个migration
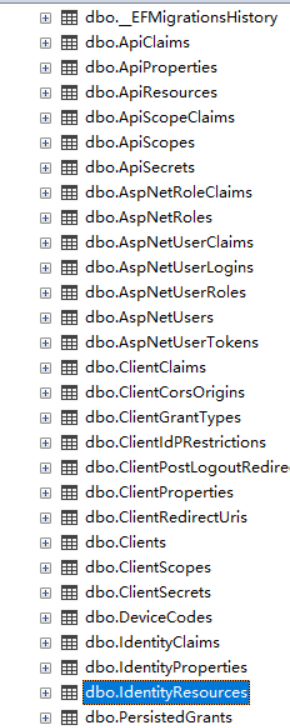
执行update-database生成表
update-database -context ConfigurationDbContext

Update-Database -Context PersistedGrantDbContext
这样就生成了表
因为现在还没有界面录入,可以先手动初始化配置文件 到数据库,因为之前有config.cs
可以直接映射到model写入数据库
  /// <summary>

        /// 因为现在没有通过UI去录入api,client等信息

        /// 所有可以先init一些默认信息写入数据库

        /// </summary>

        /// <param name="app"></param>

        public void InitIdentityServerDataBase(IApplicationBuilder app)

        {

            //ApplicationServices返回的就是IServiceProvider,依赖注入的容器

            using (var scope = app.ApplicationServices.CreateScope())

            {

                //Update-Database

                scope.ServiceProvider.GetService<PersistedGrantDbContext>().Database.Migrate();

                //var provide = scope.ServiceProvider.GetService<PersistedGrantDbContext>();

                //ckk.PersistedGrants.Add(new IdentityServer4.EntityFramework.Entities.PersistedGrant {

                //});

                var configurationDbContext = scope.ServiceProvider.GetRequiredService<ConfigurationDbContext>();

                /*

                 如果不走这个,

                 那么应该手动执行 Update-Database -Context PersistedGrantDbContext

                 */

                configurationDbContext.Database.Migrate();

                if (!configurationDbContext.Clients.Any())

                {

                    foreach (var client in Config.GetClients())

                    {

                        //client.ToEntity() 会把当前实体映射到EF实体

                        configurationDbContext.Clients.Add(client.ToEntity());

                    }

                    configurationDbContext.SaveChanges();

                }

                if (!configurationDbContext.ApiResources.Any())

                {

                    foreach (var api in Config.GetApiResources())

                    {

                        configurationDbContext.ApiResources.Add(api.ToEntity());

                    }

                    configurationDbContext.SaveChanges();

                }

                if (!configurationDbContext.IdentityResources.Any())

                {

                    foreach (var identity in Config.GetIdentityResource())

                    {

                        configurationDbContext.IdentityResources.Add(identity.ToEntity());

                    }

                    configurationDbContext.SaveChanges();

                }

            }

        }
在Configure中调用
InitIdentityServerDataBase(app);
dotnet run就有数据了
客户端不用配置,
获取refresh_token,混合模式是支持refresh_token的
详情:https://www.cnblogs.com/jesse2013/p/oidc-in-aspnetcore-with-identity-server.html
IdentityResource新增offline_access身份
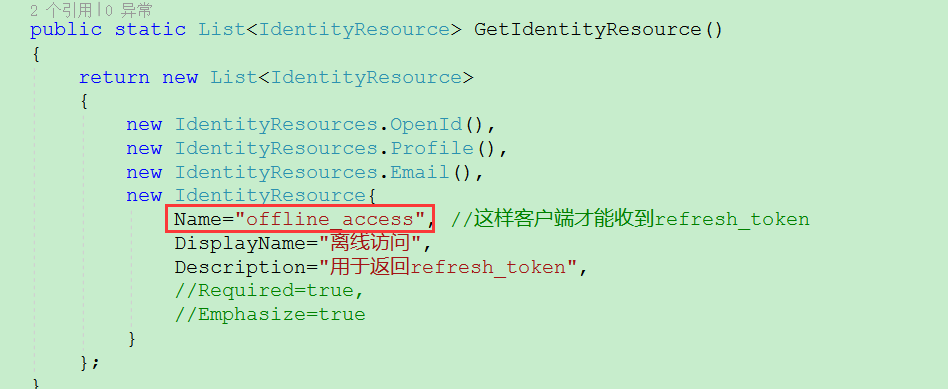
AllowedScopes可以不用加: IdentityServerConstants.StandardScopes.OfflineAccess
服务端Client设置允许: AllowOfflineAccess = true,
客户端配置:options.Scope.Add("offline_access");
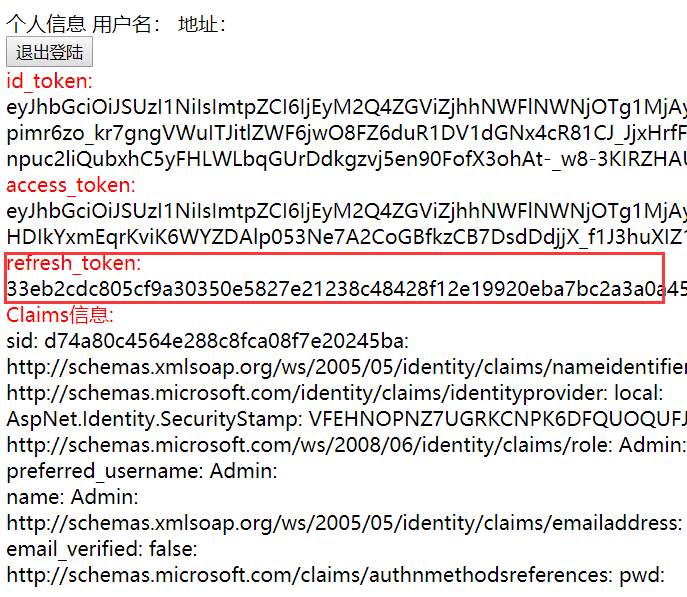
拿到这个refresh_token,可以刷新access_token

一个refresh_token只能用一次,否则:

通过这个access_token就看访问资源api了
但就算授权了。也只能访问授权的api
identityResurce是资源信息,AllowedScopes设置了
IdentityServerConstants.StandardScopes.OpenId,
IdentityServerConstants.StandardScopes.Email,
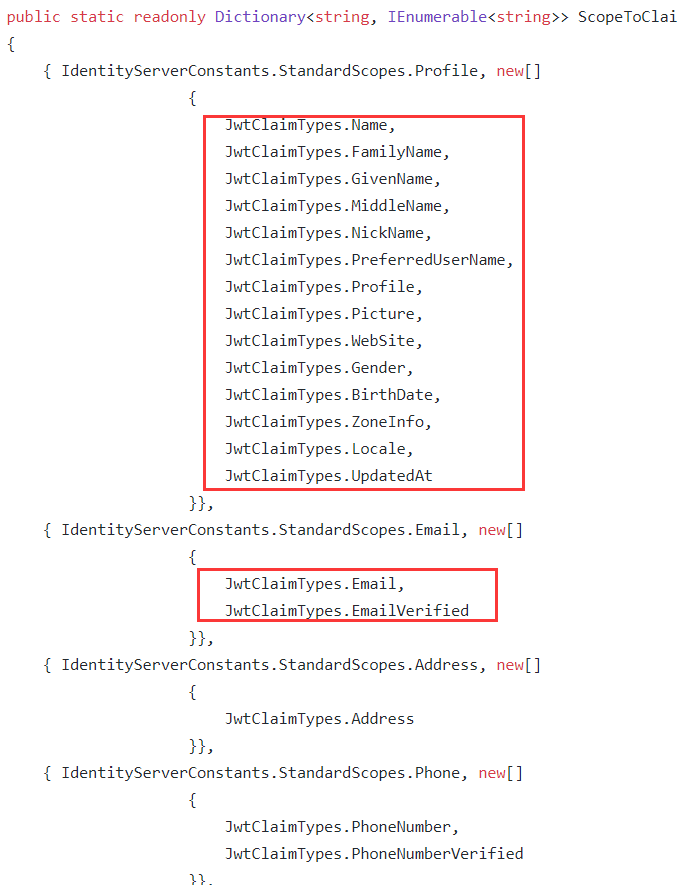
IdentityServerConstants.StandardScopes.Profile, 就会返回这些信息,
OpenId是必须要的,因为OIDC要通过openid确认身份

Profile是可选的,只是客户端默认是传了Profile的,
因为oidc就是为了返回用信息而来的

Profile包含了一些基本的信息
name
family_name
given_name
middle_name
nickname
preferred_username
profile
picture
website
gender
birthdate
zoneinfo
locale
updated_at
Email包含了email 和 email_verified
这些从源码可以看到:
https://github.com/IdentityServer/IdentityServer4/blob/63a50d7838af25896fbf836ea4e4f37b5e179cd8/src/Constants.cs
所以客户端获取的cliams是这些
因为profile是在我们的ProfileServices类返回的
那么如果用户没有选择
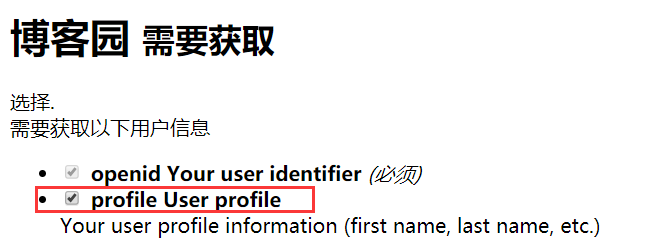
是不是应该不返回profile信息呢?

GetProfileDataAsync方法的context可以拿到当前请求的IdentityResources和ApiResource

好像通过 var claimTypes = context.RequestedClaimTypes;也可以判断,选择了profile,那么RequestedClaimTypes是有值的
当然除了了一些基本信息外,客户端还想获取其他资源,这也是可以的
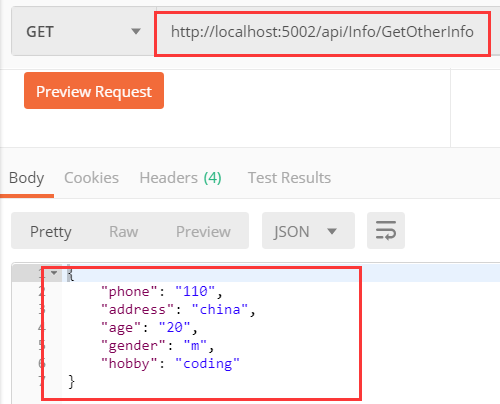
比如资源服务器有个接口,获取额外的信息,scope叫:OtherInfo
客户端请求scope:options.Scope.Add("OtherInfo");
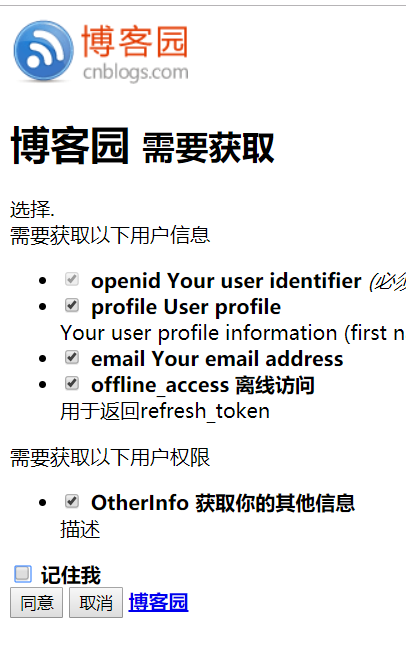
可以看到上面是身份信息,就是会返回的的用户信息
下面是权限,就是可以去资源服务器获取的那些权限,因为:access toke管的是权限
1:先不选择,拿到的access_token里面的scope是没有OtherInfo的
这里为啥有两个offline_access?我也不知道
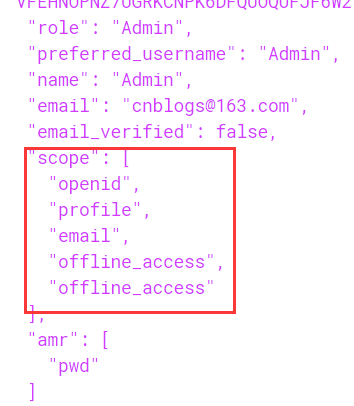
2:如果选择的话。如果不出错的话是有的

那么资源服务器就可以根据当前这个scope来判断了
[HttpGet]
public ActionResult GetOtherInfo()
{
//判断是否授权
var scope = User.Claims.FirstOrDefault(f => f.Type == "scope" && f.Value == "OtherInfo");
if (scope != null)
{
return new JsonResult(
new
{
phone = "",
address = "china",
age = "",
gender = "m",
hobby = "coding"
}
);
}
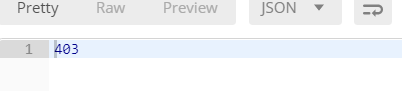
else //禁止访问
{
return BadRequest(StatusCodes.Status403Forbidden);
}
}
如果授权请求了OtherInfo请求是成功了
当没有授权OtherInfo的时候,当然,返回什么信息你可以自己定义
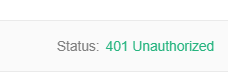
这说明你只有权限访问资源服务器,授权了的api。
如果你的access_token是错误的。就说明你没有授权,你都没有机会进入api,会提示401
或者写一个过滤器,弄个接口规范,获取某些参数进行判断
目前我想到的方法就是这样,也许不是最好的
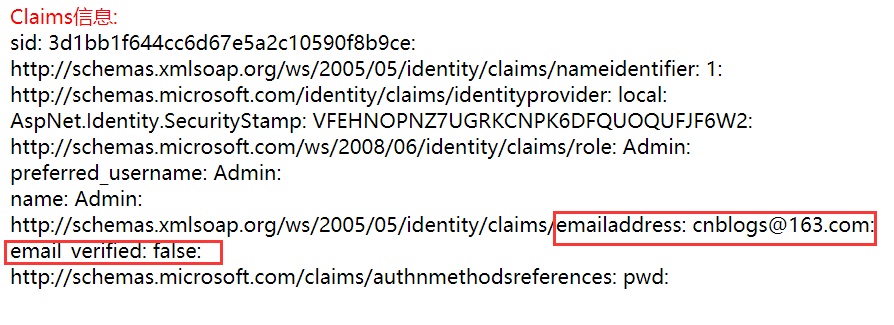
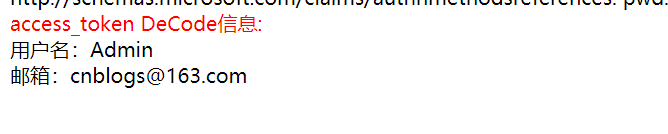
既然access_token包含profile信息,它又是JWT类型,那是不是可以DeCode呢?
答案是可以的:
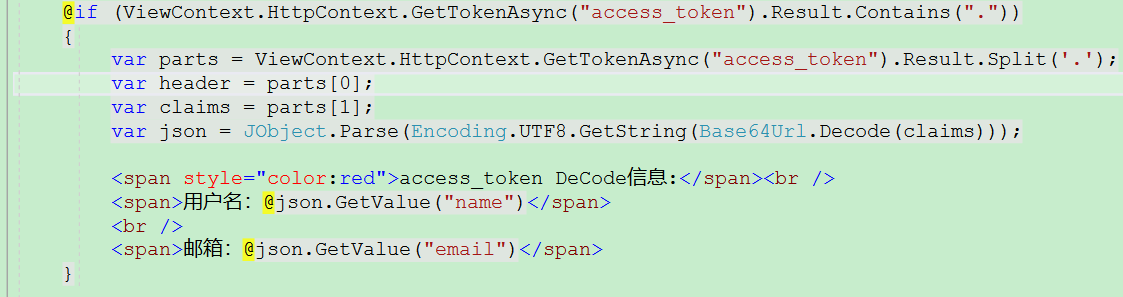
界面输出
源码:https://github.com/byniqing/OAuth2Authorization
参考:https://cloud.tencent.com/developer/article/1048128
IdentityServer4授权和认证对接数据库的更多相关文章
- IdentityServer4授权和认证集成Identity和profile
identiyt的使用可以看之前的文章:https://www.cnblogs.com/nsky/p/10323415.html 之前的ids4授权服务器都是用的in-men方式把数据添加到内存, 现 ...
- IdentityServer4授权和认证
IdentityServer4 简称ids4 oidc了解:http://www.jessetalk.cn/2018/04/04/oidc-asp-net-core/ 是一个去中心化的网上身份认证系统 ...
- Angular SPA基于Ocelot API网关与IdentityServer4的身份认证与授权(四)
在上一讲中,我们已经完成了一个完整的案例,在这个案例中,我们可以通过Angular单页面应用(SPA)进行登录,然后通过后端的Ocelot API网关整合IdentityServer4完成身份认证.在 ...
- Angular SPA基于Ocelot API网关与IdentityServer4的身份认证与授权(一)
好吧,这个题目我也想了很久,不知道如何用最简单的几个字来概括这篇文章,原本打算取名<Angular单页面应用基于Ocelot API网关与IdentityServer4+ASP.NET Iden ...
- Angular SPA基于Ocelot API网关与IdentityServer4的身份认证与授权(二)
上文已经介绍了Identity Service的实现过程.今天我们继续,实现一个简单的Weather API和一个基于Ocelot的API网关. 回顾 <Angular SPA基于Ocelot ...
- Angular SPA基于Ocelot API网关与IdentityServer4的身份认证与授权(三)
在前面两篇文章中,我介绍了基于IdentityServer4的一个Identity Service的实现,并且实现了一个Weather API和基于Ocelot的API网关,然后实现了通过Ocelot ...
- Asp.Net Core 中IdentityServer4 授权中心之应用实战
一.前言 查阅了大多数相关资料,查阅到的IdentityServer4 的相关文章大多是比较简单并且多是翻译官网的文档编写的,我这里在 Asp.Net Core 中IdentityServer4 的应 ...
- Asp.Net Core 中IdentityServer4 授权中心之自定义授权模式
一.前言 上一篇我分享了一篇关于 Asp.Net Core 中IdentityServer4 授权中心之应用实战 的文章,其中有不少博友给我提了问题,其中有一个博友问我的一个场景,我给他解答的还不够完 ...
- Asp.Net Core 中IdentityServer4 授权原理及刷新Token的应用
一.前言 上面分享了IdentityServer4 两篇系列文章,核心主题主要是密码授权模式及自定义授权模式,但是仅仅是分享了这两种模式的使用,这篇文章进一步来分享IdentityServer4的授权 ...
随机推荐
- 深度学习基础(CNN详解以及训练过程1)
深度学习是一个框架,包含多个重要算法: Convolutional Neural Networks(CNN)卷积神经网络 AutoEncoder自动编码器 Sparse Coding稀疏编码 Rest ...
- Spark基本架构及原理
Hadoop 和 Spark 的关系 Spark 运算比 Hadoop 的 MapReduce 框架快的原因是因为 Hadoop 在一次 MapReduce 运算之后,会将数据的运算结果从内存写入到磁 ...
- git clone 后误删除了分离出来的文件怎么恢复?
git clone 后,会分离出项目的文件. 误删除了,可以使用以下命令恢复: #先检查一下git状态 git status #通过如下命令重新分离出文件 git checkout -f HEAD
- python faker 生成随机类型字符串
以前生成测试字符时,用random模块拼来拼去来生成随机串,如姓名,手机,身份证等,还是费一些功夫,不过有了faker模块,一切变得简单起来 基本使用: from faker import Faker ...
- Kafka原理总结
Kafka Kafka是最初由Linkedin公司开发,是一个分布式.支持分区的(partition).多副本的(replica),基于zookeeper协调的分布式消息系统,它的最大的特性就是可以实 ...
- IntelJ idea下lombok 不生效的问题(@Builder等注解不生效的问题)解决,lombok Plugin插件安装
插件安装方式,在设置setting 中找到plugins.在检索框中检索lom,没有的话点击红框内的search in repositories. 点击install进行安装. 记得安装好了重启ide ...
- idea创建maven SSM项目
maven配置 ➜ ~ cd /Applications/IntelliJ IDEA.app/Contents/plugins/maven/lib/maven3/conf ➜ conf vim set ...
- java多线程的3种写法
1.Thread /** * */ package testJava2.thread; /** * @author xxx.sjtu * @function * @date 2017年5月17日 * ...
- 如何建立nfs网络文件系统
建立网络文件系统的前提:windows与linux虚拟机及开发板三者之间能够互相ping 通. 三者互ping通IP设置举例: 1. 首先,关闭windows的防火墙,然后通过:ufw disab ...
- 130、 Android OkHttp完全解析(转载)
完全解析:http://blog.csdn.net/lmj623565791/article/details/47911083 从原理角度解析http文件上传 http://blog.csdn.net ...