
Android 串口蓝牙通信开发Java版本
Android串口BLE蓝牙通信Java版
0. 导语
我们都知道,在物联网中,BLE蓝牙是通信设备的关键设备。在传统的物联网应用中,无线WIFI、蓝牙和Zigbee,还有一些其他的2.4GHz的无线网卡等。对于一个面向物联网的嵌入式工程师来讲,不单单是要学会底层硬件嵌入式或者是嵌入式Linux驱动的开发,还要掌握上层应用,以理解开发流程,方便未来和软件应用工程师协作开发。“也只有穿别人的鞋子,才知道别人的感觉”似乎就是这个道理吧。
16年的时候,我尝试做过Qt版本的Android,使用的是C++语言,搭建完环境之后开发出了基于Qt的蓝牙通信demo。虽然Qt在不断的完善对于Android的支持,但终究C++向Java转变的时候,效率是一方面的问题,库同样是一方面的问题。Qt的定位也只能是临时应付,或者说应用内的C++算法繁琐的时候,选择C++开发Android才是一个上上策。
对于面向物联网的嵌入式工程师,对于Android不需要掌握太深刻,重头戏不在这里,但是必须要有了解,也要会开发,我猜Android工程师的精髓在于业务逻辑处理上,而对于我们嵌入式工程师来讲,我们只在乎功能的实现,也只是Android工程师掌握的一个边角而已。后继,我们还会开发基于Java Android的Socket编程和服务器通信,还有Wifi编程。
本文的功能和Qt on Android 蓝牙通信开发一样,只是使用Java进行重写。也不得不说,Java的UI比Qt好多了,(在没有专业的UI制作下),在物联网通信中BLE蓝牙适合传输一些控制命令,或者一些家居数据包括温度湿度等等。
1. 蓝牙通信组成
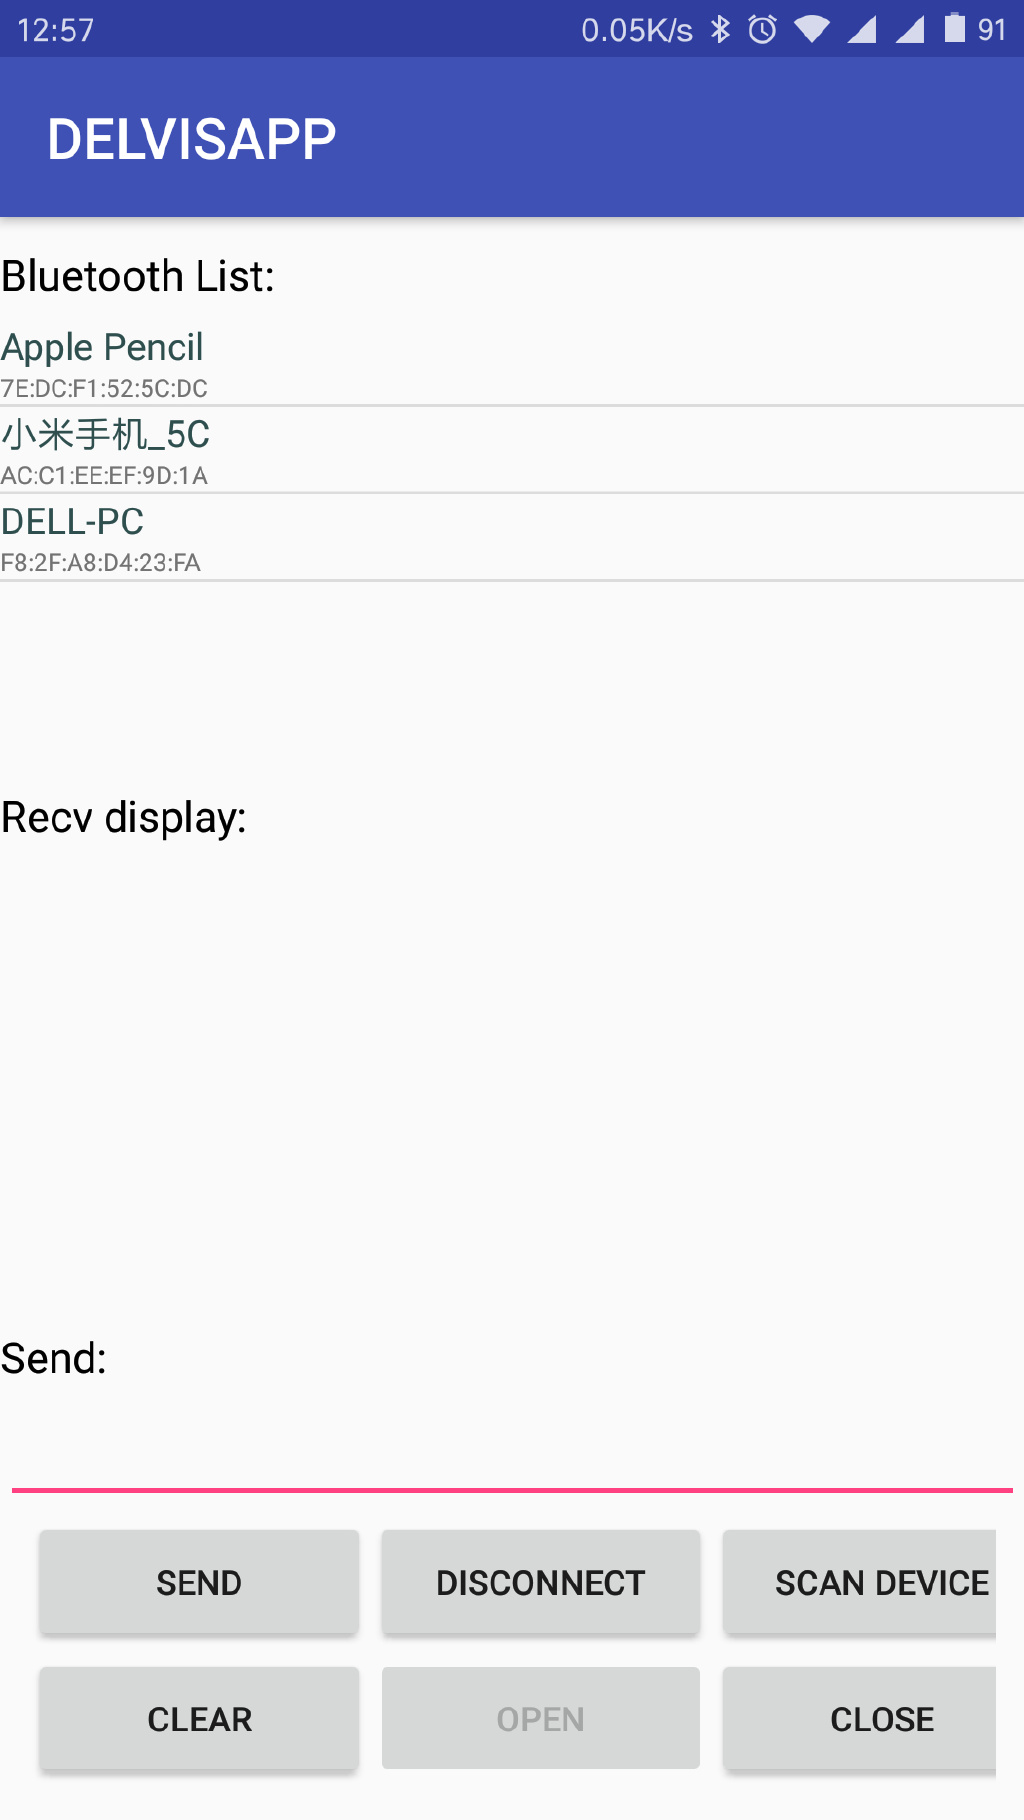
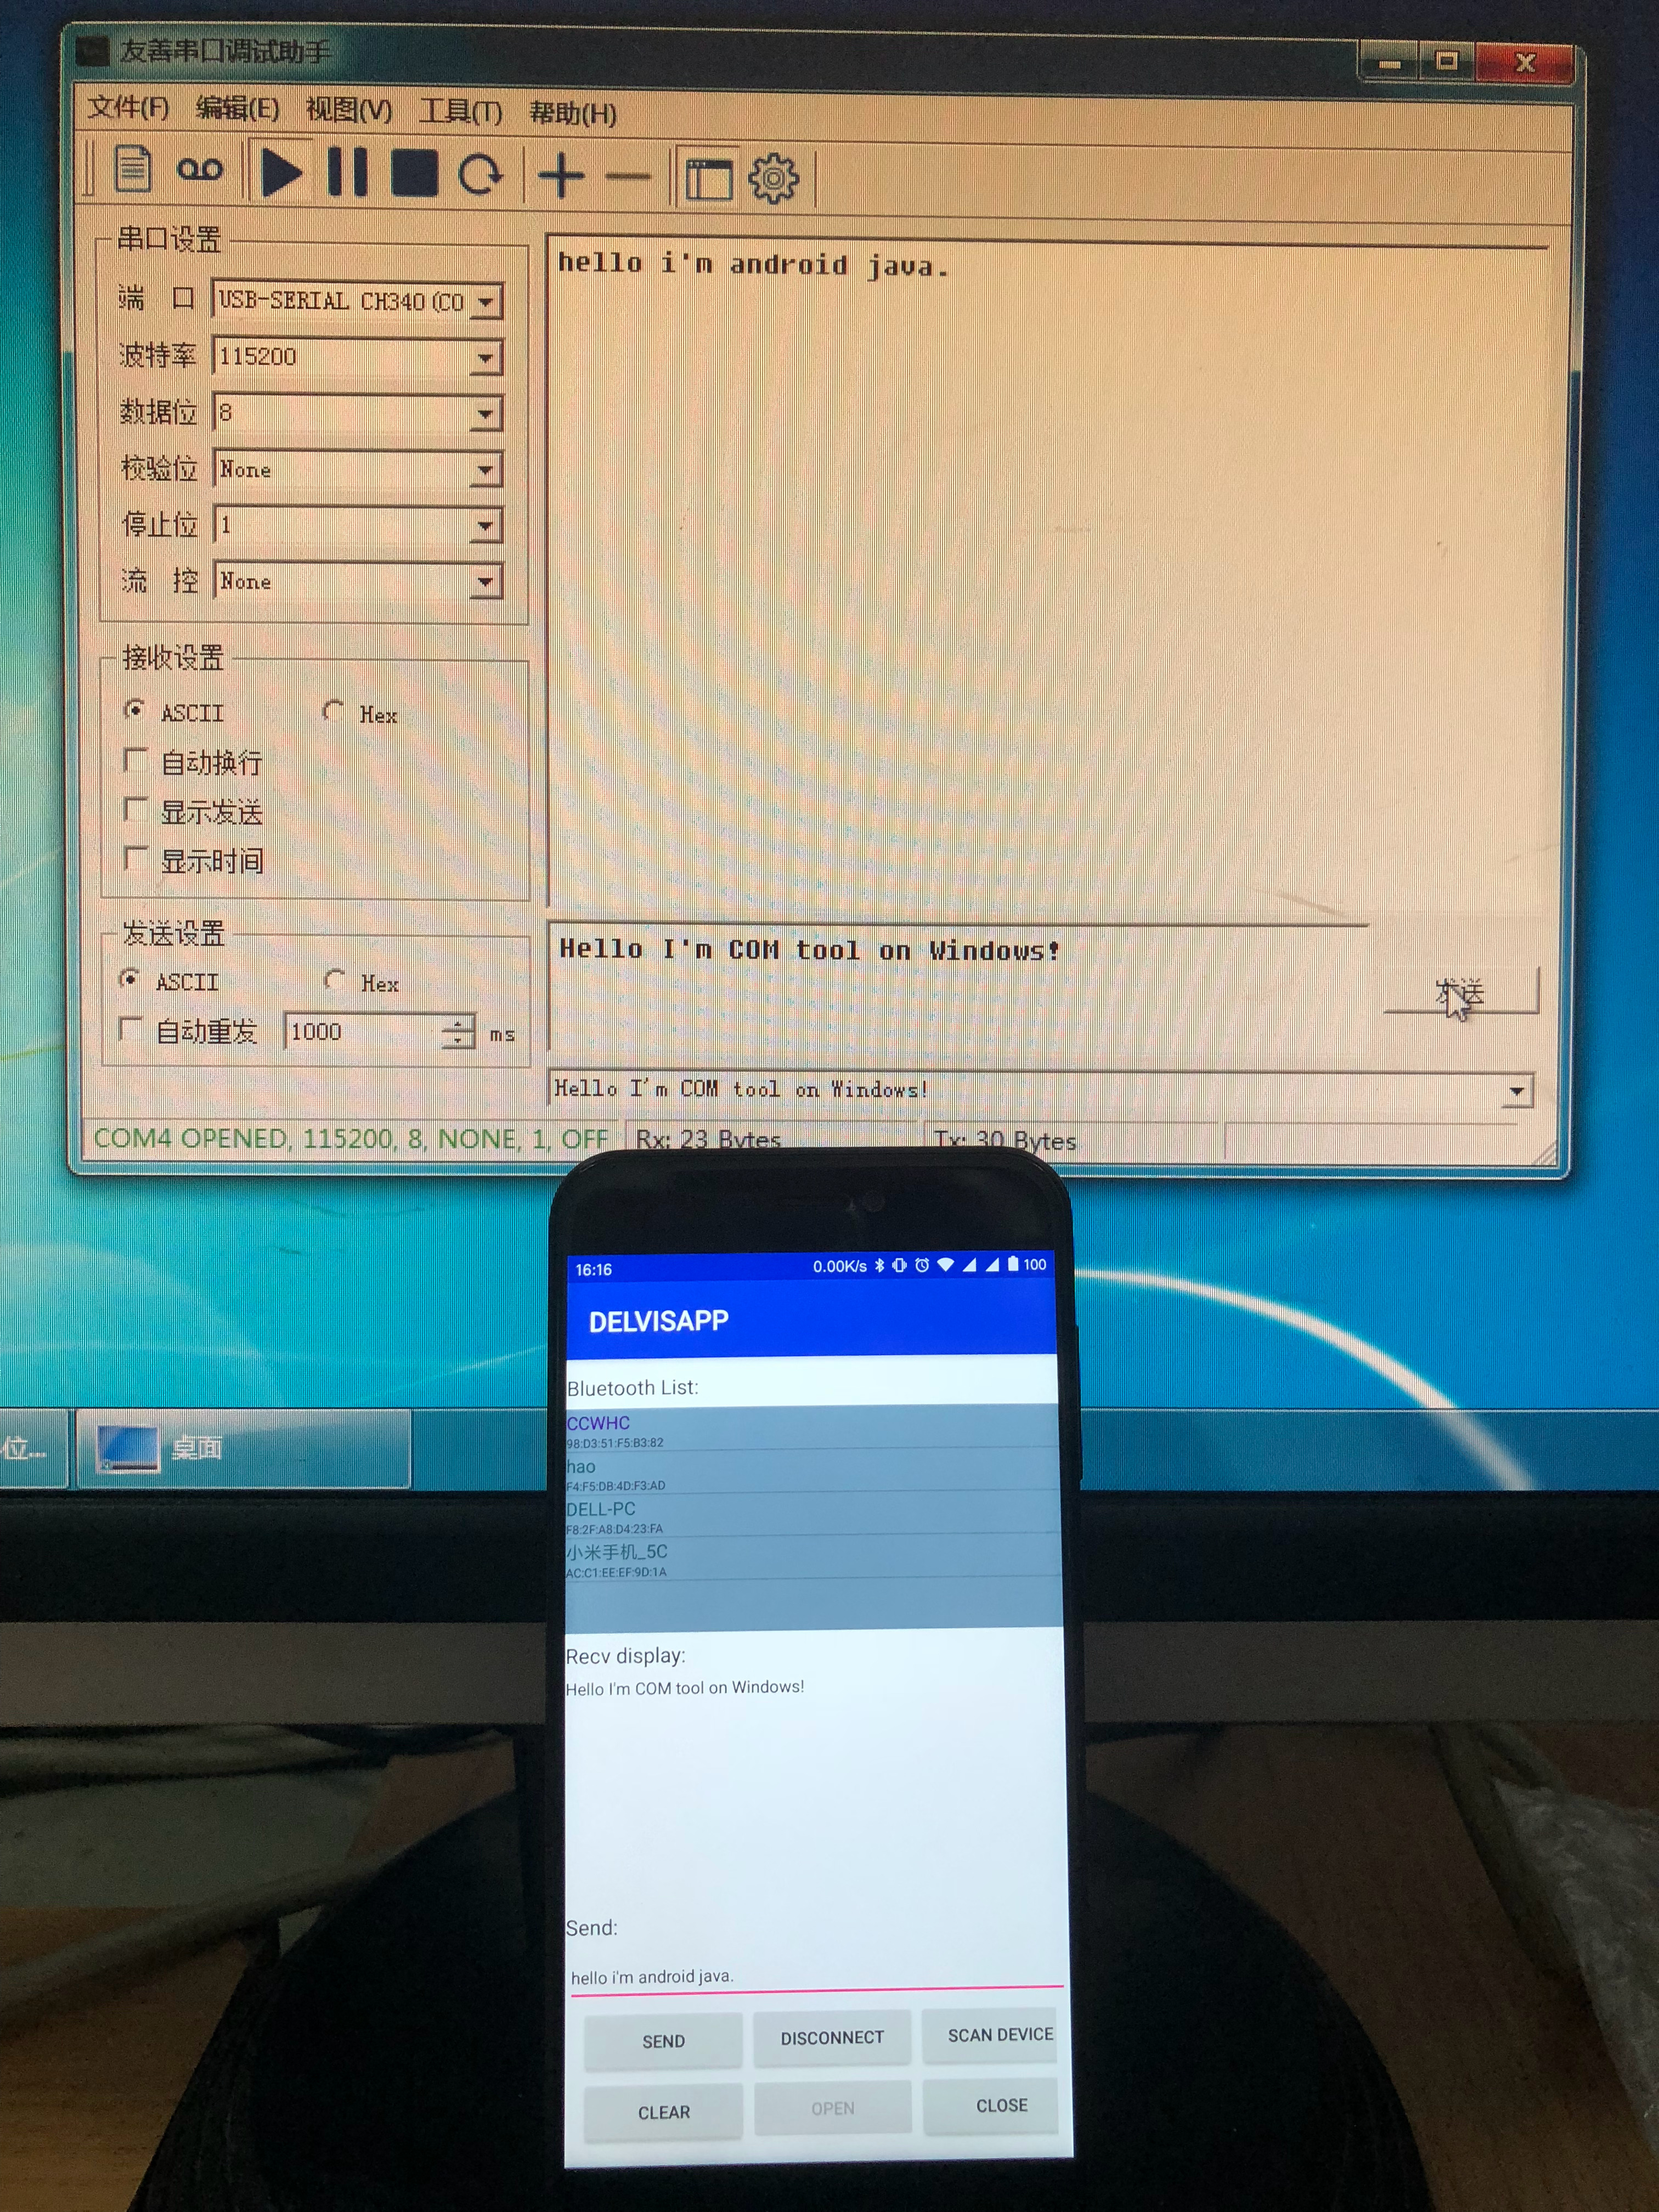
我们将使用蓝牙功能按顺序分成三个部分。第一个部分,蓝牙的控制,对于蓝牙的开启和关闭;第二部分,对于蓝牙的搜索,并且可以增加到UI列表里面;第三部分,蓝牙数据传输和通信,可以发送数据,可以接收数据。如图所示,为整个蓝牙demo区域,实现了最基本的功能,同Qt on Android蓝牙通信开发一样,有蓝牙列表显示+接收和发送和蓝牙控制的基本功能。下一步就进行蓝牙通信的开发介绍。
1.1 蓝牙开发架构
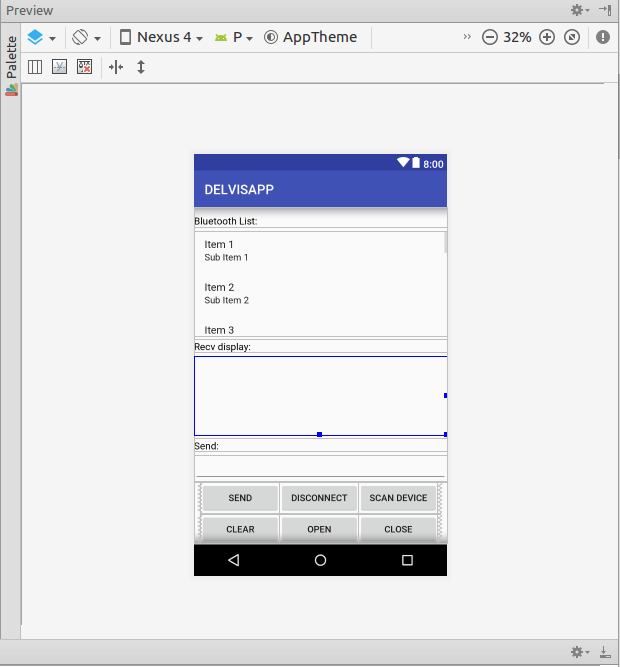
如图所示,为蓝牙Activity的界面,里面包含了,TextView,ListView,LineEdit,和一些按钮,使用的是相对布局,为该蓝牙开发提供最基本的功能控制。
XML布局代码如下:
<?xml version="1.0" encoding="utf-8"?>

<RelativeLayout xmlns:android="http://schemas.android.com/apk/res/android"

    android:layout_height="match_parent"

    android:layout_width="match_parent">

    <LinearLayout

        android:layout_width="match_parent"

        android:layout_height="match_parent"

        android:orientation="vertical" >

        <TextView

            android:id="@+id/tv_bluelist"

            android:layout_width="match_parent"

            android:layout_height="wrap_content"

            android:paddingTop="10dp"

            android:text="Bluetooth List:"

            android:textColor="#000"

            android:textSize="15dp"

            />

        <ListView

            android:id="@+id/lv_bluelist"

            android:layout_width="match_parent"

            android:layout_height="160dp"

            android:paddingTop="1dp"

            android:layout_marginTop="5dp">

        </ListView>

        <TextView

            android:layout_width="match_parent"

            android:layout_height="wrap_content"

            android:text="Recv display:"

            android:textColor="#000"

            android:textSize="15dp"

            android:layout_marginTop="5dp"

            />

        <TextView

            android:id="@+id/tv_recv"

            android:layout_width="match_parent"

            android:layout_height="160dp"

            android:layout_marginTop="5dp"

            android:textColor="#000"

            />

        <TextView

            android:layout_width="match_parent"

            android:layout_height="wrap_content"

            android:text="Send:"

            android:textColor="#000"

            android:textSize="15dp"

            android:layout_marginTop="5dp"

            />

        <EditText

            android:id="@+id/et_send"

            android:layout_width="match_parent"

            android:layout_height="40dp"

            android:layout_marginTop="5dp"

            android:textColor="#000"

            android:textSize="12dp"

            />

        <TableLayout

            android:layout_width="match_parent"

            android:layout_height="wrap_content"

            >

            <TableRow

                android:layout_width="match_parent"

                android:layout_marginHorizontal="10dp"

                >

                <Button

                    android:id="@+id/btn_send"

                    android:layout_width="120dp"

                    android:layout_height="wrap_content"

                    android:text="Send" />

                <Button

                    android:id="@+id/btn_disconnect"

                    android:layout_width="120dp"

                    android:layout_height="wrap_content"

                    android:text="Disconnect" />

                <Button

                    android:id="@+id/btn_scan"

                    android:layout_width="120dp"

                    android:layout_height="wrap_content"

                    android:text="Scan Device" />

            </TableRow>

            <TableRow

                android:layout_width="match_parent"

                android:layout_marginHorizontal="10dp"

                >

                <Button

                    android:id="@+id/btn_clear"

                    android:layout_width="wrap_content"

                    android:layout_height="wrap_content"

                    android:text="Clear" />

                <Button

                    android:id="@+id/btn_open"

                    android:layout_width="wrap_content"

                    android:layout_height="wrap_content"

                    android:text="Open" />

                <Button

                    android:id="@+id/btn_close"

                    android:layout_width="wrap_content"

                    android:layout_height="wrap_content"

                    android:text="Close" />

            </TableRow>

        </TableLayout>

    </LinearLayout>

</RelativeLayout>
值得注意的是,按钮使用的是TableLayout进行布局,里面请注意观察TableRow对按钮进行划分。
1.2 权限申请
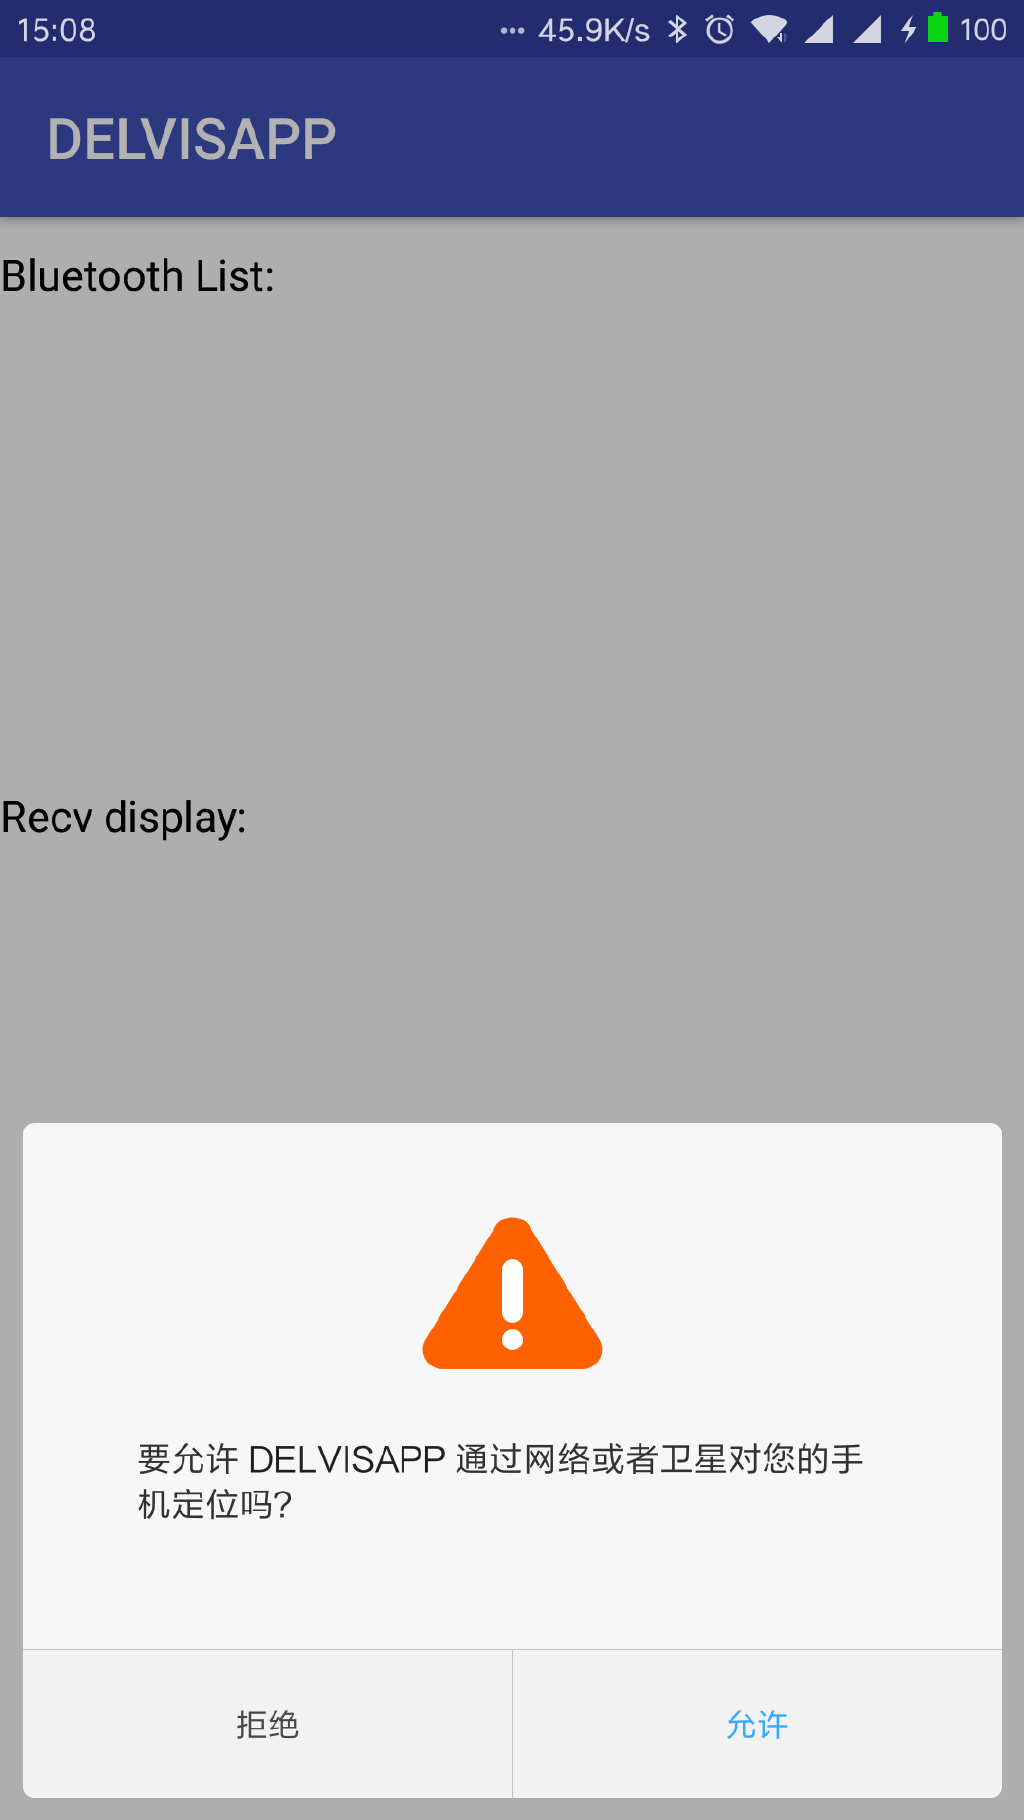
在Android 6.0 以前,申请蓝牙的控制权限只需在mainfest.xml中加入permission项目即可,但是Android 6.0系统需要动态申请权限,而且使用蓝牙搜索需要申请位置权限,否则无法申请蓝牙的权限。
- AndroidManifest.xml文件中
    <uses-permission android:name="android.permission.BLUETOOTH" />

    <uses-permission android:name="android.permission.BLUETOOTH_ADMIN" />

    <uses-permission android:name="android.permission.ACCESS_FINE_LOCATION" />

    <uses-permission android:name="android.permission.ACCESS_COARSE_LOCATION" />
分别是蓝牙权限和定位权限。
- 在蓝牙的activity oncreate中动态申请定位权限
        /*

        * GPS COARSE LOCATION permission checked.

        *

        * */

        if (ContextCompat.checkSelfPermission(this,

                Manifest.permission.ACCESS_COARSE_LOCATION) != PackageManager.PERMISSION_GRANTED) {

            ActivityCompat.requestPermissions(this, new String[]{Manifest.permission.ACCESS_COARSE_LOCATION},

                    MY_PERMISSIONS_REQUEST_ACCESS_COARSE_LOCATION);

            if(ActivityCompat.shouldShowRequestPermissionRationale(this,

                    Manifest.permission.READ_CONTACTS)) {

                Toast.makeText(this, "shouldShowRequestPermissionRationale", Toast.LENGTH_SHORT).show();

            }

        }
在运行蓝牙的activity中会执行权限扫描,确认用户是否具备定位申请的权限。
2 蓝牙操作
2.1 蓝牙的开启和关闭
在demo中提供了蓝牙打开和关闭的功能,通过控制类来完成对于蓝牙的开启关闭。
import android.bluetooth.BluetoothAdapter;
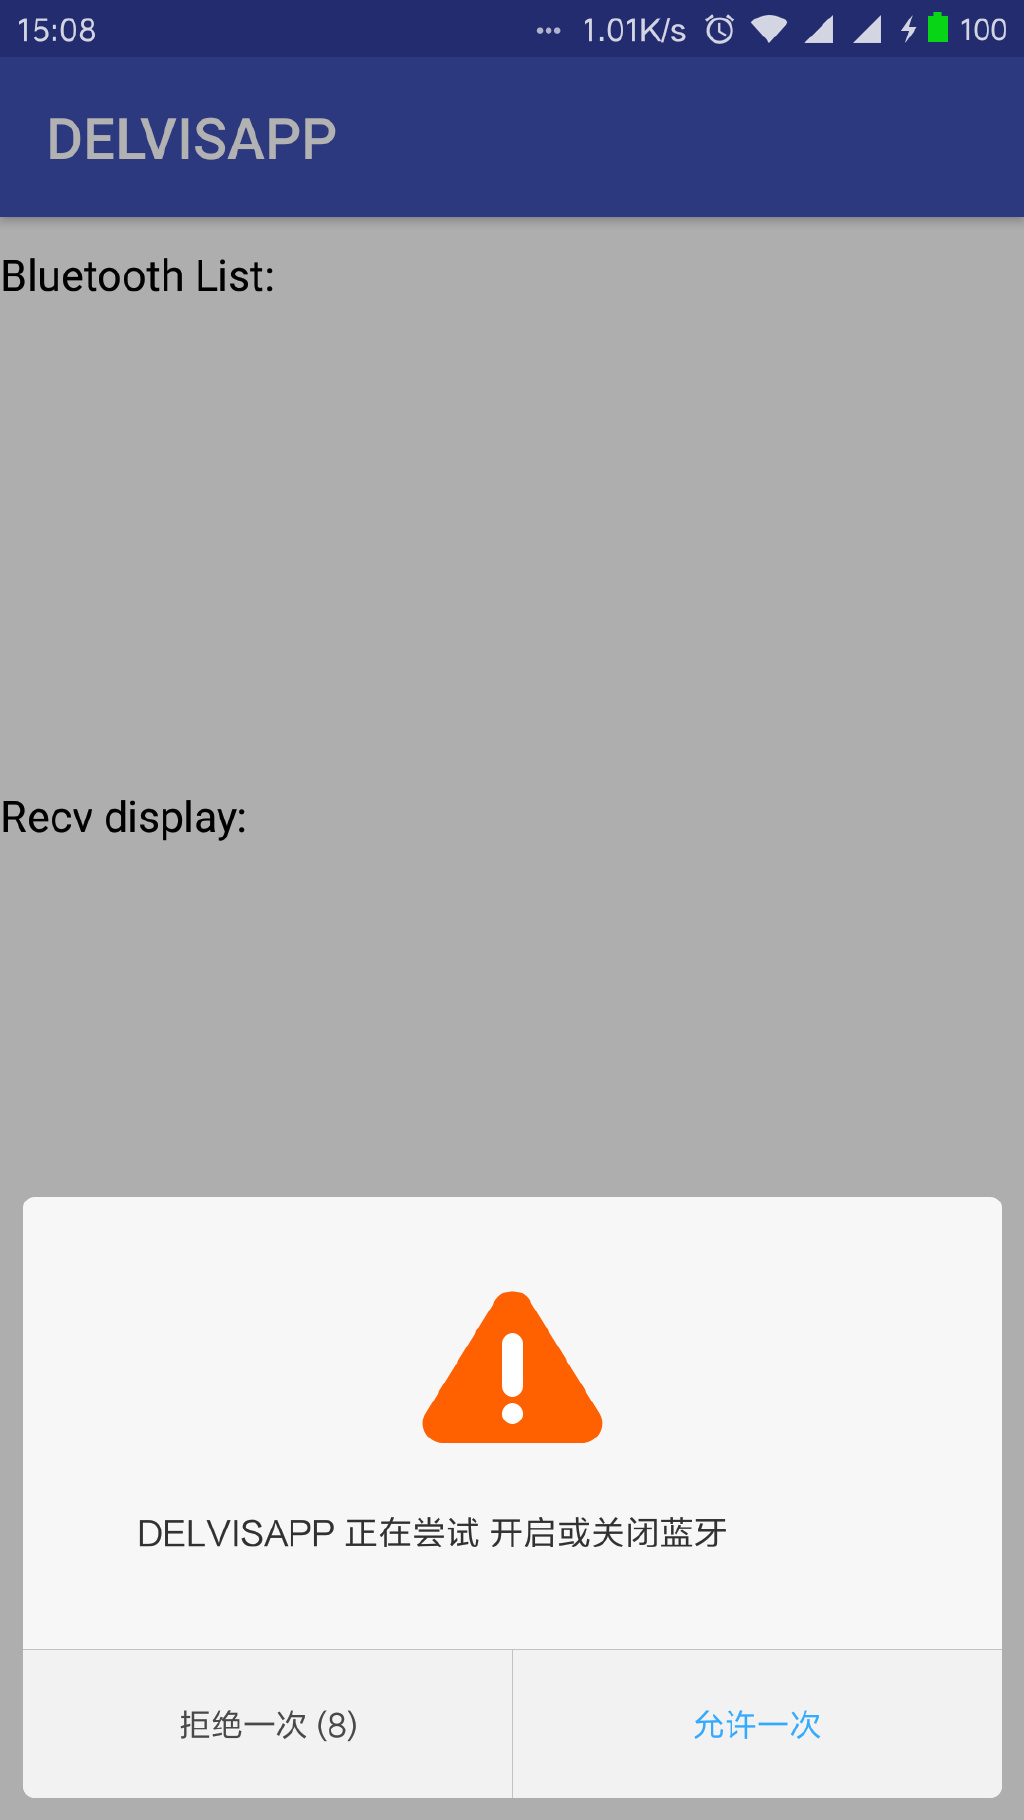
BluetoothAdapter类就是对蓝牙实行开启和控制的类,包括打开蓝牙,关闭蓝牙,查看蓝牙开启关闭状态。如下代码为开机对于蓝牙设备的开启和关闭检测。
        /*

        *  Check bluetooth state.

        * */

		BluetoothAdapter mBluetoothAdapter = new BluetoothAdapter();

        mBluetoothAdapter =   BluetoothAdapter.getDefaultAdapter();

        if( mBluetoothAdapter == null ) {

            Toast.makeText(this, "Bluetooth is not available.", Toast.LENGTH_LONG).show();

            finish();

            return;

        }

        if( !mBluetoothAdapter.isEnabled() ) {

            //Toast.makeText(this, "Please enable your Bluetooth and re-run this program.", Toast.LENGTH_LONG).show();

            mBtnOpen.setEnabled(true);

            mBtnClose.setEnabled(false);

            System.out.println("is enable");

        }else{

            mBtnOpen.setEnabled(false);

            mBtnClose.setEnabled(true);

            System.out.println("is not enable");

        }
蓝牙的打开:mBluetoothAdapter.enable();
蓝牙的关闭:mBluetoothAdapter.disable();
把他们相应的放在按钮的点击事件即可。
2.2 蓝牙的搜索
蓝牙搜索的功能需要使用安卓的广播功能在UI上还要创建一个ListView将搜索到的周边蓝牙设备加入到设备列表,在demo中就是这样实现的,还能通过ListView的点击事件和该蓝牙设备进行配对连接。
2.2.1 创建Listview列表
新建一个Activity类:
public class BluetoothDeviceAdapter extends BaseAdapter
专门来处理搜寻到的设备然后加入到Listview列表里面。
package com.mltbns.root.delvisapp;

import android.app.Activity;

import android.bluetooth.BluetoothDevice;

import android.content.res.ColorStateList;

import android.graphics.Color;

import android.support.v7.app.AppCompatActivity;

import android.os.Bundle;

import java.util.ArrayList;

import android.app.Activity;

import android.bluetooth.BluetoothDevice;

import android.view.LayoutInflater;

import android.view.View;

import android.view.ViewGroup;

import android.widget.BaseAdapter;

import android.widget.TextView;

public class BluetoothDeviceAdapter extends BaseAdapter {

    private ArrayList<BluetoothDevice> mLeDevices;

    //LayoutInflater是用来找res/layout/下的xml布局文件,并且实例化

    //它的作用类似于findViewById()

    private LayoutInflater mInflator;

    private Activity mContext;//获得 LayoutInflater 实例的一种方法就是使用Activity;

    public BluetoothDeviceAdapter(Activity c) {

        super();

        mContext = c;

        mLeDevices = new ArrayList<BluetoothDevice>();

        mInflator = mContext.getLayoutInflater();

    }

    public void addDevice(BluetoothDevice device) {

        if (!mLeDevices.contains(device)) {

            mLeDevices.add(device);

            System.out.println(device.getName() + "  " + device.getAddress());

        }

    }

    // 获取子项中对应的设备

    public BluetoothDevice getDevice(int position) {

        return mLeDevices.get(position);

    }

    // 清空列表的数据

    public void clear() {

        mLeDevices.clear();

    }

    @Override

    public int getCount() {

        return mLeDevices.size();

    }

    @Override

    public Object getItem(int position) {

        return mLeDevices.get(position);

    }

    @Override

    public long getItemId(int position) {

        return position;

    }

    @Override

    public View getView(int position, View view, ViewGroup parent) {

        ViewHolder viewHolder;

        // General ListView optimization code.

        if (view == null) {

            view = mInflator.inflate(R.layout.activity_bluetooth_device_adapter, null);//实例化这个控件

            viewHolder = new ViewHolder();

            viewHolder.deviceAddress = (TextView) view.findViewById(R.id.Address);

            viewHolder.deviceName = (TextView) view.findViewById(R.id.Name);

            view.setTag(viewHolder);

        } else {

            viewHolder = (ViewHolder) view.getTag();

            //the Object stored in this view as a tag

        }

        // 对应的设备进行处理

        BluetoothDevice device = mLeDevices.get(position);

        final String deviceName = device.getName();

        if (deviceName != null && deviceName.length() > 0) {

            viewHolder.deviceName.setText(deviceName);

        } else {

            viewHolder.deviceName.setText("未知设备");

        }

        if( device.getBondState() == BluetoothDevice.BOND_BONDED ) {

            viewHolder.deviceName.setTextColor(Color.rgb(75,0,130));

        }else{

            viewHolder.deviceName.setTextColor(Color.rgb(47,79,79));

        }

        viewHolder.deviceAddress.setText(device.getAddress());

        return view;

    }

    final class ViewHolder {

        TextView deviceName;

        TextView deviceAddress;

    }

}
2.2.2 创建BluetoothReceiver
public class BluetoothReceiver extends BroadcastReceiver {}
该类集成BroadcastReceiver类,里面有个onReceive的事件,当搜索到蓝牙的时候,就会将该蓝牙的设备信息传送进来。
    public class BluetoothReceiver extends BroadcastReceiver {

        private String pair_info;

        private String unpair_info;

        private String state_info;

        @Override

        public void onReceive(Context context, Intent intent ) {

            String action = intent.getAction();

            System.out.println ( "SYSTEM: action triggered: " + action  );

            if(BluetoothDevice.ACTION_FOUND.equals(action)) {

                BluetoothDevice device = intent.getParcelableExtra( BluetoothDevice.EXTRA_DEVICE );

                mLvDeviceList.setAdapter(mBluetoothDeviceAdapter);

                System.out.println ( "SYSTEM: Find a device : " + device.getName() + " : " + device.getAddress()  );

                // Scanned a device add to List

                mBluetoothDeviceAdapter.addDevice(device);

                // 数据改变并更新列表

                mBluetoothDeviceAdapter.notifyDataSetChanged();

                if( device.getBondState() == BluetoothDevice.BOND_BONDED ) {

                    pair_info = device.getAddress();

                }else {

                    unpair_info = device.getAddress();

                }

            }else if(BluetoothAdapter.ACTION_DISCOVERY_FINISHED.equals(action)){

                System.out.println ( "SYSTEM: Discovery finished..."  );

            }

        }

        public void set_pairInfo( String val ) {

            pair_info = val;

        }

        public String get_pairInfo() {

            return pair_info;

        }

        public void set_unpairInfo( String val ) {

            unpair_info = val;

        }

        public String get_unpairInfo() {

            return unpair_info;

        }

        public void set_stateInfo( String val ) {

            state_info = val;

        }

        public String get_stateInfo() {

            return state_info;

        }

    }
当搜索到了信息之后就将该设备传入BluetoothDeviceAdapter中,然后该设备的信息都显示。搜索到的信息调入这个方法mBluetoothDeviceAdapter.addDevice(device);就完成了设备的添加,然后刷新显示:mBluetoothDeviceAdapter.notifyDataSetChanged();这样就完成了最终的显示。
使用mBluetoothAdapter.startDiscovery();开始对蓝牙进行查找。
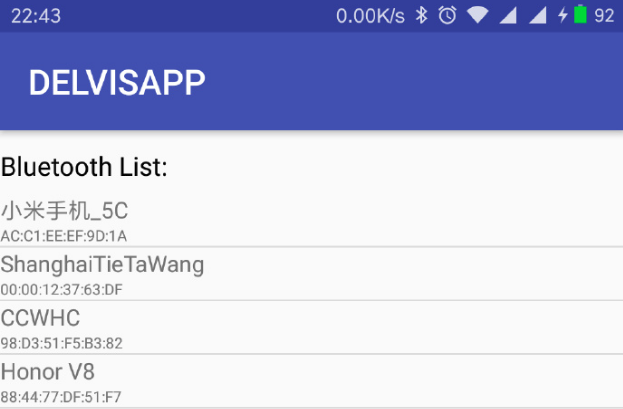
如图所示,上面显示的是蓝牙的名字,下面显示的MAC地址,对于已经配对的设备可以用if( device.getBondState() == BluetoothDevice.BOND_BONDED ) 来进行判断,然后设定已配对蓝牙的名字为更鲜艳的颜色区分未配对设备。
2.3 连接设备
本demo在listview增加点击事件,当点击设备的时候激发对于该device的连接。这个连接的过程我们需要新建立一个线程进行连接,连接成功之后使用回调函数的方法通知主线程已经连接了,可以进行操作了。在主线程(我们的蓝牙主activity中新建handler函数专门处理其他线程回调信息的)
2.3.1 constant常量类
相当于C++的#include 里面定义一些通信协议的常量,我们在主线程和一会儿创建的搜索线程中会使用该信息。
public class Constant {

    public static final String CONNECTTION_UUID = "00001101-0000-1000-8000-00805F9B34FB";

    /**

     * 开始监听

     */

    public static final int MSG_START_LISTENING = 1;

    /**

     * 结束监听

     */

    public static final int MSG_FINISH_LISTENING = 2;

    /**

     * 有客户端连接

     */

    public static final int MSG_GOT_A_CLINET = 3;

    /**

     * 连接到服务器

     */

    public static final int MSG_CONNECTED_TO_SERVER = 4;

    /**

     * 获取到数据

     */

    public static final int MSG_GOT_DATA = 5;

    /**

     * 出错

     */

    public static final int MSG_ERROR = -1;

}
2.3.2 connect线程
package com.mltbns.root.delvisapp;

import android.bluetooth.BluetoothAdapter;

import android.bluetooth.BluetoothDevice;

import android.bluetooth.BluetoothSocket;

import android.os.Handler;

import java.io.IOException;

import java.util.UUID;

/**

 * 客户端连接线程

 */

public class ConnectThread extends Thread {

    private static final UUID MY_UUID = UUID.fromString("00001101-0000-1000-8000-00805F9B34FB");

    private final BluetoothSocket mmSocket;

    private final BluetoothDevice mmDevice;

    private BluetoothAdapter mBluetoothAdapter;

    private final Handler mHandler;

    private ConnectedThread mConnectedThread;

    public ConnectThread(BluetoothDevice device, BluetoothAdapter adapter, Handler handler) {

        BluetoothSocket tmp = null;

        mmDevice = device;

        mBluetoothAdapter = adapter;

        mHandler = handler;

        //根据给定的设备获取一个BluetoothSocket对象

        try {

            // 和服务器端使用相同的UUID

            tmp = device.createRfcommSocketToServiceRecord(MY_UUID);

        } catch (IOException e) { }

        mmSocket = tmp;

    }

    public void run() {

        // 取消搜索设备因为会关闭连接

        System.out.println(" Connect +: "+ mmDevice.getName());

        mBluetoothAdapter.cancelDiscovery();

        try {

            // Connect the device through the socket. This will block

            // until it succeeds or throws an exception

            mmSocket.connect();

            System.out.println("Connecting.... ");

        } catch (Exception connectException) {

            mHandler.sendMessage(mHandler.obtainMessage(Constant.MSG_ERROR, connectException));

            // Unable to connect; close the socket and get out

            try {

                mmSocket.close();

            } catch (IOException closeException) { }

            return;

        }

        // Do work to manage the connection (in a separate thread)

        manageConnectedSocket(mmSocket);

    }

    private void manageConnectedSocket(BluetoothSocket mmSocket) {

        mHandler.sendEmptyMessage(Constant.MSG_CONNECTED_TO_SERVER);

        mConnectedThread = new ConnectedThread(mmSocket, mHandler);

        mConnectedThread.start();

        System.out.println("Connected thread start... ");

    }

    /** Will cancel an in-progress connection, and close the socket */

    public void cancel() {

        try {

            mmSocket.close();

        } catch (IOException e) { }

    }

    public void sendData(byte[] data) {

        if( mConnectedThread!=null){

            mConnectedThread.write(data);

        }

    }

}
我们在对listview里面有点击事件的函数,点击的项目索引编号和device的信息进行了绑定,然后进行了连接。通过该线程就完成了对于蓝牙设备的连接。
2.4 蓝牙数据传输
2.4.1 connected线程
连接完成之后,进入的线程,主要是进行收发消息的。
package com.mltbns.root.delvisapp;

import android.bluetooth.BluetoothSocket;

import android.os.Handler;

import android.os.Message;

import android.util.Log;

import java.io.IOException;

import java.io.InputStream;

import java.io.OutputStream;

/**

 * Created by Rex on 2015/5/30.

 */

public class ConnectedThread extends Thread {

    private final BluetoothSocket mmSocket;

    private final InputStream mmInStream;

    private final OutputStream mmOutStream;

    private final Handler mHandler;

    public ConnectedThread(BluetoothSocket socket, Handler handler) {

        mmSocket = socket;

        InputStream tmpIn = null;

        OutputStream tmpOut = null;

        mHandler = handler;

        // 获取输入输出流

        try {

            tmpIn = socket.getInputStream();

            tmpOut = socket.getOutputStream();

        } catch (IOException e) { }

        mmInStream = tmpIn;

        mmOutStream = tmpOut;

    }

    public void run() {

        byte[] buffer = new byte[1024];  // buffer store for the stream

        int bytes;

        // Keep listening to the InputStream until an exception occurs

        while (true) {

            try {

                // 从输入流读取数据

                bytes = mmInStream.read(buffer);

                // Send the obtained bytes to the UI activity

                if( bytes >0) {

                    Message message = mHandler.obtainMessage(Constant.MSG_GOT_DATA, new String(buffer, 0, bytes, "utf-8"));

                    mHandler.sendMessage(message);

                }

                Log.d("GOTMSG", "message size" + bytes);

            } catch (IOException e) {

                mHandler.sendMessage(mHandler.obtainMessage(Constant.MSG_ERROR, e));

                break;

            }

        }

    }

    /* 发送数据岛远程设备*/

    public void write(byte[] bytes) {

        try {

            mmOutStream.write(bytes);

        } catch (IOException e) { }

    }

    /* 关闭连接 */

    public void cancel() {

        try {

            mmSocket.close();

        } catch (IOException e) { }

    }

}
2.4.2 主线程的handler
private void showToast(String text) {

    if( mToast == null) {

        mToast = Toast.makeText(this, text, Toast.LENGTH_LONG);

    }

    else {

        mToast.setText(text);

    }

    mToast.show();

}

/**

 * 处理消息

 */

private class MyHandler extends Handler {

    @Override

    public void handleMessage(Message msg) {

        super.handleMessage(msg);

        switch (msg.what) {

            case Constant.MSG_START_LISTENING:

                setProgressBarIndeterminateVisibility(true);

                System.out.println("Start to listener...");

                break;

            case Constant.MSG_FINISH_LISTENING:

                setProgressBarIndeterminateVisibility(false);

                System.out.println("stop listenner");

                break;

            case Constant.MSG_GOT_DATA:

                mTextView.append(String.valueOf(msg.obj));

                System.out.println("data: "+String.valueOf(msg.obj));

                break;

            case Constant.MSG_ERROR:

                System.out.println("error: "+String.valueOf(msg.obj));

                break;

            case Constant.MSG_CONNECTED_TO_SERVER:

                System.out.println("Connected to Server");

                mLvDeviceList.setEnabled(false);

                mLvDeviceList.setBackgroundColor(Color.rgb(119,136,153));

                showToast("Bluetooth connection has been set up!");

                break;

            case Constant.MSG_GOT_A_CLINET:

                System.out.println("Got a Client");

                break;

        }

    }

}
在开始搜索设备线程的时候我们将handler也传递给了线程,线程在执行完搜索完成之后就会进入handler的函数按照回调信息进入case里面,输出相关信息。
这里有收到信息,信息错误,连接成功的事件,我们在相应的事件里面进行进行执行函数就好了。
2.4.3 函数的发送
String text = mEditText.getText().toString();

connectThread.sendData( text.getBytes() );
我们获取editText组件的字符串,然后用connectThread的send函数就能将数据发送出去。
2.4.4 函数的接收
mTextView.append(String.valueOf(msg.obj));

System.out.println("data: "+String.valueOf(msg.obj));
该函数在handler函数体内,是case Constant.MSG_GOT_DATA:里面的。
3 源代码下载
Github链接:https://github.com/lifimlt/android-study.git
4 参考文献
[1] zw1996, 安卓——蓝牙listView搜索以及点击事件, csdn, 2017年7月15日
[2] qq_22252423, Android串口蓝牙开发实战, csdn, 2017年07月18日
[3] MetalSeed, Android蓝牙串口通信模板及demo,trick, csdn, 2012年9月17日
[4] Keep Do It, 蓝牙搜索显示结果到ListView(十分精简), csdn, 2016年11月26日
[5] Small_Lee, 蓝牙实战(三), csdn, 2016年3月15日
Android 串口蓝牙通信开发Java版本的更多相关文章
- 崔用志-微信开发-java版本
崔用志-微信开发-java版本 今天看到一些关于微信开发的知识蛮好的博客,分享给大家,希望对大家有帮助. 微信开发准备(一)--Maven仓库管理新建WEB项目 微信开发准备(二)--springmv ...
- Qt on Android 蓝牙通信开发
版权声明:本文为MULTIBEANS ORG研发跟随文章,未经MLT ORG允许不得转载. 最近做项目,需要开发安卓应用,实现串口的收发,目测CH340G在安卓手机上非常麻烦,而且驱动都是Java版本 ...
- Android 低功耗蓝牙BLE 开发注意事项
基本概念和问题 1.蓝牙设计范式? 当手机通过扫描低功耗蓝牙设备并连接上后,手机与蓝牙设备构成了客户端-服务端架构.手机通过连接蓝牙设备,可以读取蓝牙设备上的信息.手机就是客户端,蓝牙设备是服务端. ...
- Android USB转串口通信开发基本流程
好久没有写文章了,年前公司新开了一个项目,是和usb转串口通信相关的,需求是用安卓平板通过usb转接后与好几个外设进行通信.一直忙到近期,才慢慢闲下来,趁着这个周末不忙.记录下usb转串口通信开发的基 ...
- android的Binder通信机制java层浅谈-android学习之旅(88)
1.Service Manager的Java代理对象 在Java层中,Service Manager的代理对象类型为ServiceManagerProxy.它继承并且实现了IServiceManage ...
- 【转】Android低功耗蓝牙应用开发获取的服务UUID
原文网址:http://blog.csdn.net/zhangjs0322/article/details/39048939 Android低功耗蓝牙应用程序开始时获取到的蓝牙血压计所有服务的UUID ...
- Android低功耗蓝牙(BLE)开发的一点感受
最近一段时间,因为产品的需要我做了一个基于低功耗蓝牙设备的Android应用,其中碰到了一些困难,使我深深体会到Android开发的难处:不同品牌,不同型号和不同版本之间的差异使得Android应用适 ...
- Android蓝牙通信
Android为蓝牙设备之间的通信封装好了一些调用接口,使得实现Android的蓝牙通信功能并不困难.可通过UUID使两个设备直接建立连接. 具体步骤: 1. 获取BluetoothAdapter实例 ...
- android 串口开发第二篇:利用jni实现android和串口通信
一:串口通信简介 由于串口开发涉及到jni,所以开发环境需要支持ndk开发,如果未配置ndk配置的朋友,或者对jni不熟悉的朋友,请查看上一篇文章,android 串口开发第一篇:搭建ndk开发环境以 ...
随机推荐
- Redis 缓存穿透
Redis 缓存穿透 https://www.cnblogs.com/jiekzou/p/9212114.html 场景描述:我们在项目中使用缓存通常都是先检查缓存中是否存在,如果存在直接返回缓存内容 ...
- 永中Office的ibus输入法问题
我在永中Office下无法调用ibus输入法,但是在其他窗口中都没有问题,如:gVIM,LeafPad,OpenOffice等等.我按照网上的方法在.bashrc文件中也添加了以下内容,可是还是不行. ...
- Linux汉化(Cent Os汉化)
在腾讯云上购买了Cent Os7.1的云服务器,是英文版啊,有没有?对于我这种英文的渣渣啊,所以我要用中文版,我就是这么low,怎么着呢? Ok ,在汉化之前,先查看系统的语言环境, echo $LA ...
- [转]java中的Static class
转自:http://www.cnblogs.com/kissazi2/p/3971065.html Java中的类可以是static吗?答案是可以.在java中我们可以有静态实例变量.静态方法.静态块 ...
- BZOJ4337:[BJOI2015]树的同构(树hash)
Description 树是一种很常见的数据结构. 我们把N个点,N-1条边的连通无向图称为树. 若将某个点作为根,从根开始遍历,则其它的点都有一个前驱,这个树就成为有根树. 对于两个树T1和T2,如 ...
- WMIC常用
显示详细的进程信息 查找进程的具体路径 通过比较严查可疑文件 显示本机安装的软件
- 如何调试在OJ中的代码
在OJ上的原始程序: class Solution { public: ) return; ; ; while(*str != '\0'){ if(*str == ' '){ blank++; len ...
- 如何创建.gitignore文件
为什么要创建.gitignore文件? 因为.gitignore可以排除提交时携带的不必要文件,比如Java中的.class文件.同时还可以排除其他不想提交或者提交没这个必要的文件等等. 创建步骤如下 ...
- centos7 yum安装mysql后启动不起来问题
[root@localhost ~]# systemctl start mysqld 启动失败 Job for mysqld.service failed because the cont ...
- IP Addressing
IP Addressing(处理) Each host on Internet has unique 32 bit IP address Each address has two parts: net ...