
java:编写jar包加密工具,防止反编译
懒人方案
网盘:
链接:https://pan.baidu.com/s/1x4OB1IF2HZGgtLhd1Kr_AQ
提取码:glx7
网盘内是已生成可用工具,下载可以直接使用,使用前看一下READ.txt文件。
注意:此加密工具会把Class完全加密,jd-gui-1.4.0只能反编译出jar结构,但是看不到class文件源码!
Maven依赖
<?xml version="1.0" encoding="UTF-8"?>

<project xmlns="http://maven.apache.org/POM/4.0.0"

         xmlns:xsi="http://www.w3.org/2001/XMLSchema-instance"

         xsi:schemaLocation="http://maven.apache.org/POM/4.0.0 http://maven.apache.org/xsd/maven-4.0.0.xsd">

    <modelVersion>4.0.0</modelVersion>

    <groupId>com.zy.java</groupId>

    <artifactId>Util</artifactId>

    <version>1.0-SNAPSHOT</version>

    <parent>

        <groupId>org.springframework.boot</groupId>

        <artifactId>spring-boot-starter-parent</artifactId>

        <version>1.5.6.RELEASE</version>

    </parent>

    <properties>

        <java.version>1.8</java.version>

    </properties>

    <dependencies>

        <dependency>

            <groupId>com.github.core-lib</groupId>

            <artifactId>xjar</artifactId>

            <version>v1.1.4</version>

        </dependency>

        <dependency>

            <groupId>org.apache.commons</groupId>

            <artifactId>commons-compress</artifactId>

            <version>1.18</version>

        </dependency>

        <dependency>

            <groupId>com.github.core-lib</groupId>

            <artifactId>loadkit</artifactId>

            <version>v1.0.0</version>

        </dependency>

    </dependencies>

    <build>

        <plugins>

            <plugin>

                <groupId>org.springframework.boot</groupId>

                <artifactId>spring-boot-maven-plugin</artifactId>

                <version>1.5.6.RELEASE</version>

                <configuration>

                    <fork>true</fork>

                </configuration>

            </plugin>

        </plugins>

    </build>

</project>
java代码
package com.zy.java;

import io.xjar.XConstants;

import io.xjar.XKit;

import io.xjar.boot.XBoot;

import io.xjar.key.XKey;

import java.awt.*;

import javax.swing.*;

import java.awt.event.*;

import java.io.*;

import java.security.NoSuchAlgorithmException;

public class Practice{

    private static String password = "你的加密密码";

    private static JButton openItem, saveItem;

    private static FileDialog openDia, saveDia;// 定义“打开、保存”对话框

    private static String filePathOld;//旧文件路径

    private static String filePathNew;//新文件路径

    private static String fileName;//文件名

    static JFrame f = null;

    static JTextField locationText, typeText;

    public static void main(String[] args) {

        int gap = 5;

        f = new JFrame("加密程序");

        ImageIcon icon = new ImageIcon("src\\images\\2.ico");

        f.setIconImage(icon.getImage());// 给窗体设置图标方法

        f.setSize(550, 310);

        f.setLocation(200, 200);

        f.setLayout(null);

        JPanel pInput = new JPanel();

        pInput.setBounds(gap, gap, 520, 60);

        pInput.setLayout(new GridLayout(2, 3, gap, gap));

        JLabel location = new JLabel("JAR路径:");

        locationText = new JTextField(10);

        openItem = new JButton("选取");// 创建“打开"菜单项

        JLabel type = new JLabel("保存路径:");

        typeText = new JTextField(10);

        saveItem = new JButton("选取");// 创建“保存"菜单项

        openDia = new FileDialog(f, "打开", FileDialog.LOAD);

        saveDia = new FileDialog(f, "保存", FileDialog.SAVE);

        JButton b = new JButton("生成");

        pInput.add(location);

        pInput.add(locationText);

        pInput.add(openItem);

        pInput.add(type);

        pInput.add(typeText);

        pInput.add(saveItem);

        //文本域

        final JTextArea ta = new JTextArea();

        ta.setLineWrap(true);

        b.setBounds(220, 60 + 30, 80, 30);

        ta.setBounds(gap, 80 + 60, 523, 120);

        f.add(pInput);

        f.add(b);

        f.add(ta);

        f.setDefaultCloseOperation(JFrame.EXIT_ON_CLOSE);

        f.setVisible(true);

        myEvent();

        //鼠标监听

        b.addActionListener(new ActionListener() {

            boolean checkedpass = true;

            public void actionPerformed(ActionEvent e) {

                XKey xKey = null;

                System.out.println(" --- : "+fileName);

                String newPath = filePathNew+"\\"+fileName+"-xjar.jar";

                String oldPath = filePathOld;

                try {

                    xKey = XKit.key(password);

                    XBoot.encrypt(oldPath, newPath, xKey, XConstants.MODE_DANGER);

                    ta.append(" Success! ");

                } catch (NoSuchAlgorithmException eg) {

                    eg.printStackTrace();

                } catch (Exception eg) {

                    eg.printStackTrace();

                }

                checkedpass = true;

                checkEmpty(locationText, "JAR路径");

                checkEmpty(typeText, "保存路径");

                if (checkedpass) {

                    String model = "加密jar包保存路径 :%s";

                    String result = String.format(model, newPath);

                    ta.setText("");

                    ta.append(result);

                }

            }

            //检验是否为空

            private void checkEmpty(JTextField tf, String msg) {

                if (!checkedpass)

                    return;

                String value = tf.getText();

                if (value.length() == 0) {

                    JOptionPane.showMessageDialog(f, msg + " 不能为空");

                    tf.grabFocus();

                    checkedpass = false;

                }

            }

        });

    }

    //选取按钮监听

    private static void myEvent() {

        // 选取监听

        openItem.addActionListener(new ActionListener() {

            public void actionPerformed(ActionEvent e) {

                openDia.setVisible(true);//显示打开文件对话框

                String dirpath = openDia.getDirectory();//获取打开文件路径并保存到字符串中。

                String Name = openDia.getFile();//获取打开文件名称并保存到字符串中

                System.out.println(" --- : " + Name.split(".jar")[0]);

                fileName = Name.split(".jar")[0];

                filePathOld = dirpath+Name;

                if (dirpath == null || Name == null)//判断路径和文件是否为空

                    return;

                locationText.setText(dirpath+Name);

            }

        });

        // 选取监听

        saveItem.addActionListener(new ActionListener() {

            public void actionPerformed(ActionEvent e) {

                JFileChooser chooser = new JFileChooser();

                chooser.setFileSelectionMode(JFileChooser.FILES_AND_DIRECTORIES);

                chooser.showDialog(new JLabel(), "选择");

                File file = chooser.getSelectedFile();

                if (file == null) {

                    System.out.println(" 路径 :"+file.getAbsoluteFile().toString());

                    typeText.setText(file.getAbsoluteFile().toString());

                    filePathNew = file.getAbsoluteFile().toString();

                }else{

                    System.out.println(" 路径 :"+file.getAbsoluteFile().toString());

                    typeText.setText(file.getAbsoluteFile().toString());

                    filePathNew = file.getAbsoluteFile().toString();

                }

            }

        });

        // 窗体关闭监听

        f.addWindowListener(new WindowAdapter() {

            public void windowClosing(WindowEvent e) {

                System.exit(0);

            }

        });

    }

}
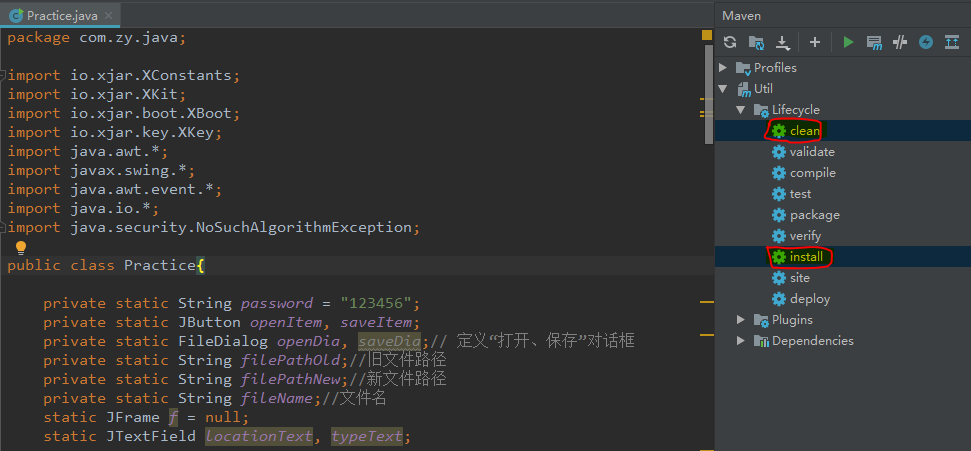
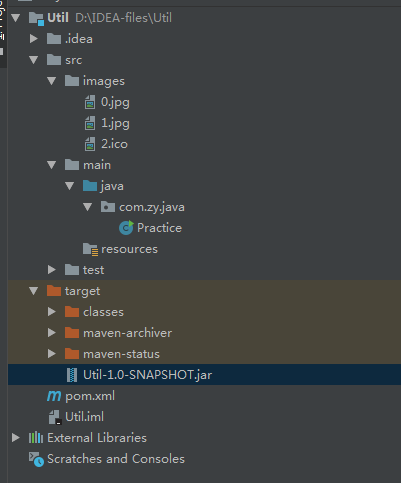
代码先进行打包,Maven ——> clean ——> install
代码运行测试
选择jar文件,保存路径,点击生成即可。

下载exe生成器
1.
exe4j : https://www.apponic.com/phome/download/95409-2-1593674778-a86aa6a3165855674c85c5a9dc7c8dbb/
下载安装完成后,界面如图,

第一步完成注册,Name,Company随便填就是了,注册码:A-XVK258563F-1p4lv7mg7sav (网上很多啊,随便搜一个就行)

2.
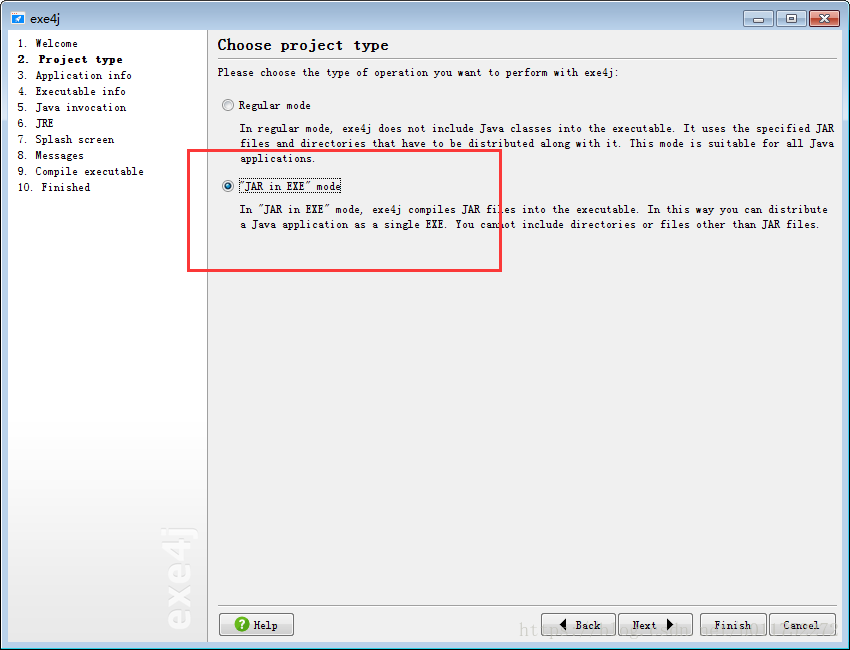
点击 next ,勾选JAR in EXE
3.
点击 next ,填写打包后的 exe程序名称和保存路径

4.
点击 next ,设置程序方式,兼容系统64位


5.
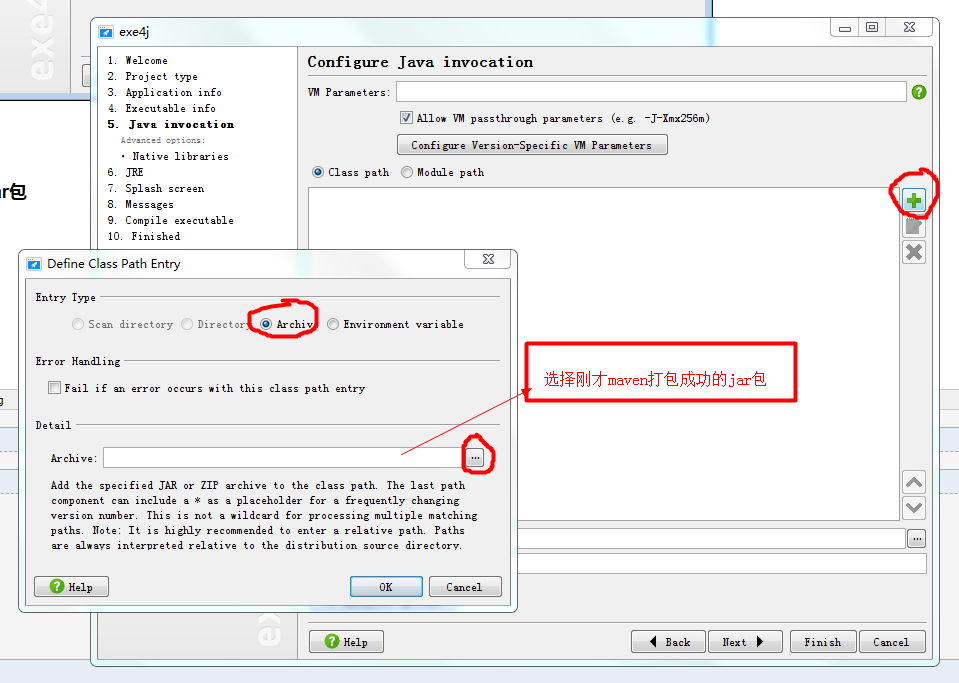
点击 next ,添加jar包,选择运行的主类的main方法
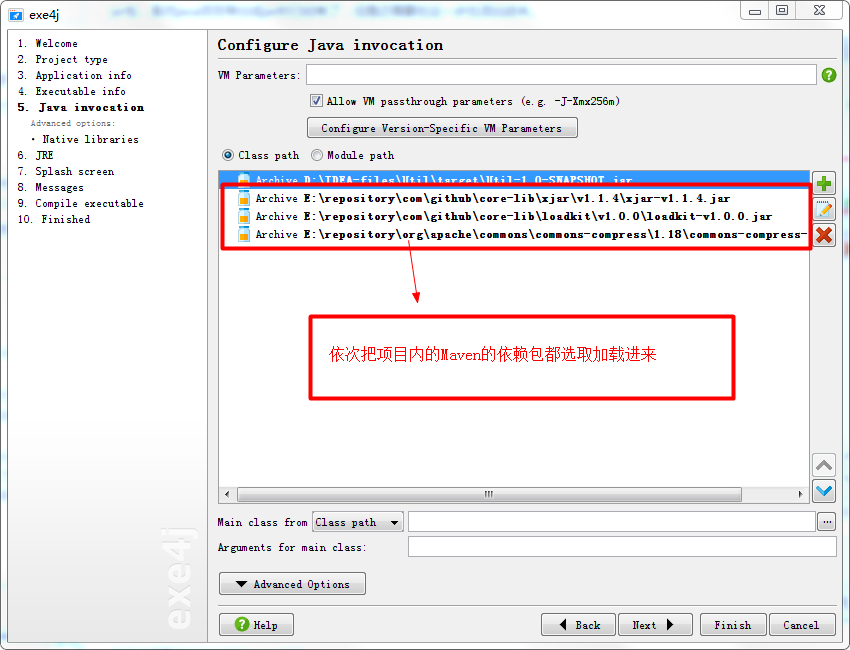

6.
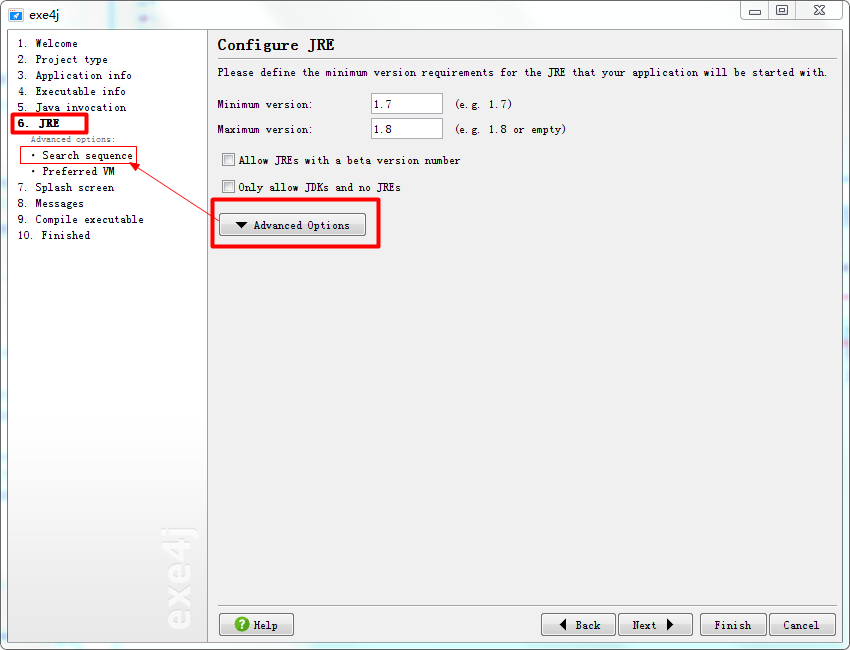
点击 next ,设置JDK运行版本

7.
复制jre,放到jre的空文件夹下:D:/jre/jre


8.
加载jre环境


9.
一直点 next ,等待安装完成。
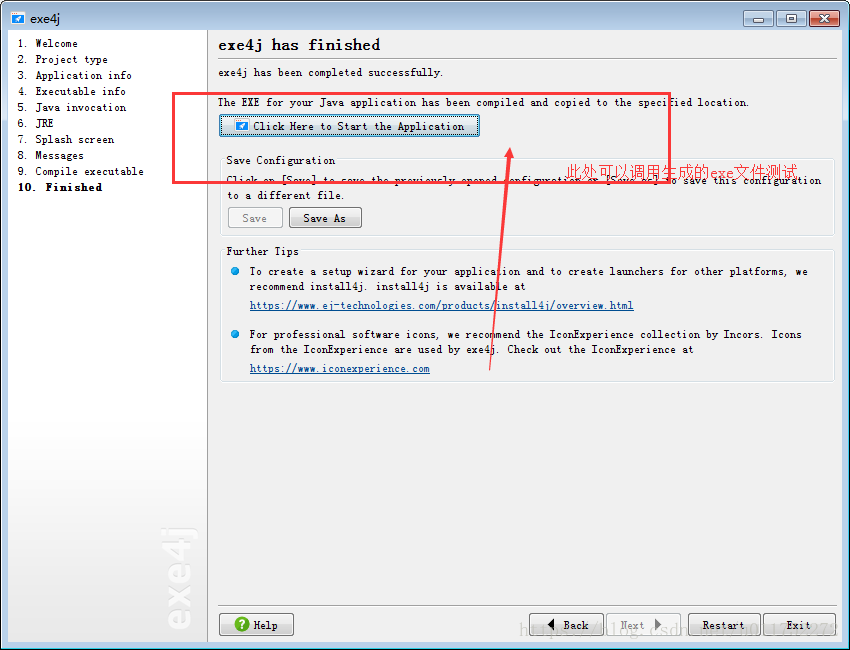
10.
尝试运行exe文件


成功!!
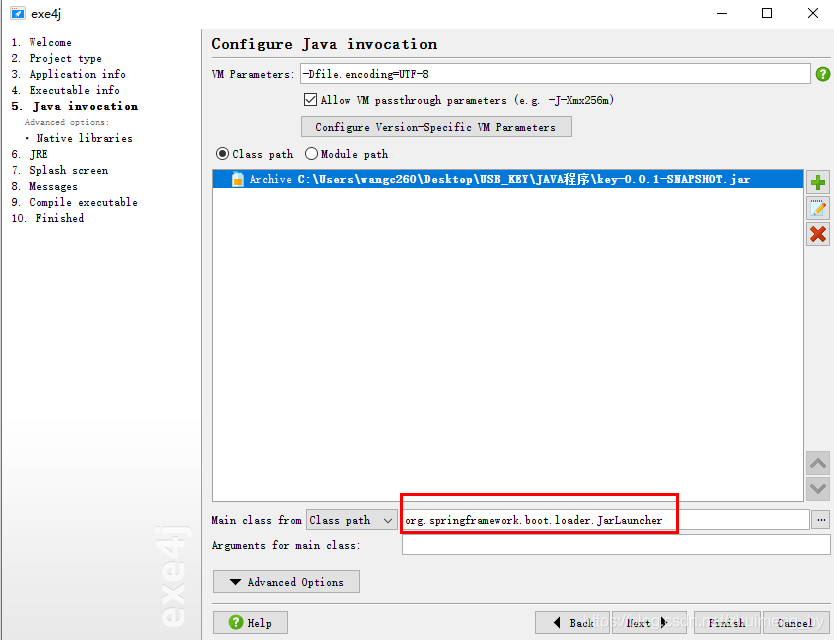
如果报错 java.lang.NoClassDefFoundError: BOOT-INF/classes/com/**/java/**** (wrong name: com/**/java/****) 返回第5步修改启动类进行尝试。
java:编写jar包加密工具,防止反编译的更多相关文章
- Android(java)学习笔记157:使用Dexdump等工具进行反编译
使用Dex等工具进行反编译步骤: (1)首先找到Android软件安装包中的class.dex,把APK文件改名为".zip",然后解压缩其中的class.dex文件,这是Java ...
- Android(java)学习笔记100:使用Dexdump等工具进行反编译
使用Dex等工具进行反编译步骤: (1)首先找到Android软件安装包中的class.dex,把APK文件改名为".zip",然后解压缩其中的class.dex文件,这是Java ...
- java的jar打包工具的使用
java的jar打包工具的使用 java的jar是一个打包工具,用于将我们编译后的class文件打包起来,这里面主要是举一个例子用来说明这个工具的使用. 在C盘下的temp文件夹下面: ...
- java的jar包加密
由于项目要求(虽然我觉得代码没什么机密可言...),写好的jar包需要做一定加密处理 这里提供两种办法,一种奇葩,一种通用 1. 直接修改jar文件: 具体步骤: 在代码中插入一段不会运行的到的代码 ...
- 如何修改可运行Jar包,如何反编译Jar包
将可运行Jar包,反编译成项目,修改代码,再次编译,打包. 需要工具:jd-gui.myeclipse 具体步骤: 1.使用jd-gui打开原始的Jar包,选择File-->Save All ...
- 【转载】关于 .Net 逆向的那些工具:反编译篇
在项目开发过程中,估计也有人和我遇到过同样的经历:生产环境出现了重大Bug亟需解决,而偏偏就在这时仓库中的代码却不是最新的.在这种情况下,我们不能直接在当前的代码中修改这个Bug然后发布,这会导致更严 ...
- Java 操作jar包工具类以及如何快速修改Jar包里的文件内容
需求背景:写了一个实时读取日志文件以及监控的小程序,打包成了Jar包可执行文件,通过我们的web主系统上传到各个服务器,然后调用ssh命令执行.每次上传前都要通过解压缩软件修改或者替换里面的配置文件, ...
- 后端开发工具:反编译工具、VS插件、.NET Framework源码地址
再学习.工作中,开发免不了要使用第三方工具.今天介绍2款反编译工具 一.dnspy 免安装.免费.可调试.可修改重新编译dll 开源项目地址:https://github.com/0xd4d/dnSp ...
- IDEA工具实现反编译操作
1.File - Settings... 2.在搜索框中输入“byte” - 勾选 Java Byte code Decompiler选项 点击 OK 键 3.弹出重启IDEA的选择框 选择“rest ...
随机推荐
- nginx官方源安装-主配置文件详解
HTTP相关术语 PV : Page Visit 页面独立浏览量,查看日志生成条数可以看到PV数量. PV全称Page View,中文翻译即页面浏览.其具体的度量方法是从浏览器发出一个对网络服务器的请 ...
- 详解 WebRTC 高音质低延时的背后 — AGC(自动增益控制)
前面我们介绍了 WebRTC 音频 3A 中的声学回声消除(AEC:Acoustic Echo Cancellation)的基本原理与优化方向,这一章我们接着聊另外一个 "A" - ...
- haproxy env 安装与基础配置
1. 安装 Use docker.package or source installations to install 第三方仓库 https://pkgs.org/download/haproxy ...
- 关于unity贴图压缩
unity官方 https://docs.unity3d.com/Manual/class-TextureImporterOverride.html //后续填充内容
- 在Visual Studio 中使用git——分支管理-上(八)
在Visual Studio 中使用git--什么是Git(一) 在Visual Studio 中使用git--给Visual Studio安装 git插件(二) 在Visual Studio 中使用 ...
- pika详解 (一)
pika详解 (一) 本文链接:https://blog.csdn.net/comprel/article/details/94592316 pika pika处理消息可以简单分为以下几个步骤: 我们 ...
- C# 移除字符串头尾指定字符
1 private void button1_Click(object sender, EventArgs e) 2 {//去掉字符串头尾指定字符 3 string MyInfo= "--中 ...
- Tvm一些基本技术
Tvm一些基本技术 一.总体流程: TVM的工作流程:首先,将网络表示成统一的表示形式(Intermediate Representation),并进行一些可重用的图优化:然后,利用不同的后端生成对应 ...
- gpgpu-sim卡分配程序设计实例分析
gpgpu-sim卡分配程序设计实例分析 运行代码地址:https://github.com/gpgpu-sim/gpgpu-sim_distribution 一.概述 此文件包含有关安装.生成和运行 ...
- NVIDIA GPU卷积网络的自动调谐
NVIDIA GPU卷积网络的自动调谐 针对特定设备和工作负载的自动调整对于获得最佳性能至关重要.这是关于如何为NVIDIA GPU调整整个卷积网络. NVIDIA GPU在TVM中的操作实现是以模板 ...