anaconda+pytorch安装
环境配置说明:
因项目需要,需要写一个说明文档交付公司人员,指导其进行环境的安装
1. 安装 Anaconda
进入清华开源软件镜像站,其网址如下:https://mirrors.tuna.tsinghua.edu.cn/anaconda/archive/
下载相应的版本:

移动到服务器后,运行
bash Anaconda3-2019.10-Linux-x86_64.sh进行安装;- 根据相应提示回车即可
Welcome to Anaconda3 2019.10

In order to continue the installation process, please review the license

agreement.

Please, press ENTER to continue

   >>>
- 接受许可:yes
Do you accept the license terms? [yes|no]

   >>> yes
- 确定安装路径:回车,选择默认安装路径即可
Anaconda3 will now be installed into this location:

/home/zzq/anaconda3

     - Press ENTER to confirm the location

     - Press CTRL-C to abort the installation

     - Or specify a different location below

[/home/zzq/anaconda3] >>>
- 初始化环境:yes
Do you wish the installer to initialize Anaconda3

by running conda init? [yes|no]

[no] >>> yes
- 等待安装完成
Thank you for installing Anaconda3!
此时,在默认安装路径下出现
anaconda3这个文件夹添加环境变量:
打开用户目录下的
.bashrc文件,在文件的最后添加:export PATH=$PATH:/刚刚安装的路径/anaconda3/bin如:
export PATH=$PATH:/home/zzq/anaconda3/bin运行命令
source ~/.bashrc,更新.bashrc运行成功后,可看到终端如下变化:
zzq@ubuntu-C246-WU4:~$ vim .bashrc

zzq@ubuntu-C246-WU4:~$ source ~/.bashrc

(base) zzq@ubuntu-C246-WU4:~$     # 多了一个base环境,说明安装成功
通过命令
conda --version确定安装的版本信息:(base) zzq@ubuntu-C246-WU4:~$ conda --version
conda 4.7.12
换源:
在终端执行命令:
conda config --set show_channel_urls yes,生成.condarc文件进入文件
.condarc,将其中的内容替换为:channels:
- defaults
show_channel_urls: true
channel_alias: https://mirrors.tuna.tsinghua.edu.cn/anaconda
default_channels:
- https://mirrors.tuna.tsinghua.edu.cn/anaconda/pkgs/main
- https://mirrors.tuna.tsinghua.edu.cn/anaconda/pkgs/free
- https://mirrors.tuna.tsinghua.edu.cn/anaconda/pkgs/r
- https://mirrors.tuna.tsinghua.edu.cn/anaconda/pkgs/pro
- https://mirrors.tuna.tsinghua.edu.cn/anaconda/pkgs/msys2
- https://mirrors.tuna.tsinghua.edu.cn/anaconda/cloud/pytorch
custom_channels:
conda-forge: https://mirrors.tuna.tsinghua.edu.cn/anaconda/cloud
msys2: https://mirrors.tuna.tsinghua.edu.cn/anaconda/cloud
bioconda: https://mirrors.tuna.tsinghua.edu.cn/anaconda/cloud
menpo: https://mirrors.tuna.tsinghua.edu.cn/anaconda/cloud
pytorch: https://mirrors.tuna.tsinghua.edu.cn/anaconda/cloud
simpleitk: https://mirrors.tuna.tsinghua.edu.cn/anaconda/cloud
运行
conda clean -i清除缓存索引
至此Anaconda安装完成
2. 安装 pytorch
在终端中创建一个新的conda环境:
conda create -n pytorch python=3.6根据提示,输入
y,进行安装可能会出现有些包的安装失败的情况,重新输这个命令即可
安装成功后,显示:
# To activate this environment, use

#

#     $ conda activate pytorch

#

# To deactivate an active environment, use

#

#     $ conda deactivate
激活环境:
conda activate pytorch安装pytorch 1.0.0 版本
查看显卡信息:
cat /usr/local/cuda/version.txt(pytorch) zzq@ubuntu-C246-WU4:~$ cat /usr/local/cuda/version.txt
CUDA Version 10.0.130
根据CUDA的版本,从下方选择安装命令
# CUDA 10.0

conda install pytorch==1.0.0 torchvision==0.2.1 cuda100 -c pytorch

# CUDA 9.0

conda install pytorch==1.0.0 torchvision==0.2.1 cuda90 -c pytorch

# CUDA 8.0

conda install pytorch==1.0.0 torchvision==0.2.1 cuda80 -c pytorch

# CPU Only

conda install pytorch-cpu==1.0.0 torchvision-cpu==0.2.1 cpuonly -c pytorch
上述命令是从pytorch官网寻找的:https://pytorch.org/get-started/previous-versions/
注意:上述命令中
-c pytorch是指:-c参数指明了下载pytorch的通道,优先级比之前配置的进行镜像通道高,如想用之前配置的清华源,则删除即可;参考:https://blog.csdn.net/CallMeQiuqiuqiu/article/details/106817612
此处我的CUDA版本为10.0, 因此选择
# CUDA 10.0安装命令:conda install pytorch==1.0.0 torchvision==0.2.1 cuda100进行安装:(pytorch) zzq@ubuntu-C246-WU4:~$ conda install pytorch==1.0.0 torchvision==0.2.1 cuda100
# ...
# 输入y开始安装
当出现有些包安装不上的情况,如下方红框中的两个包装不上的情况,一般网速慢的时候会出现这个情况,若无此情况出现跳过该步至5.即可;
比如我的下载速度不到500k/s,网速可以的情况下出现可以多尝试下载几次
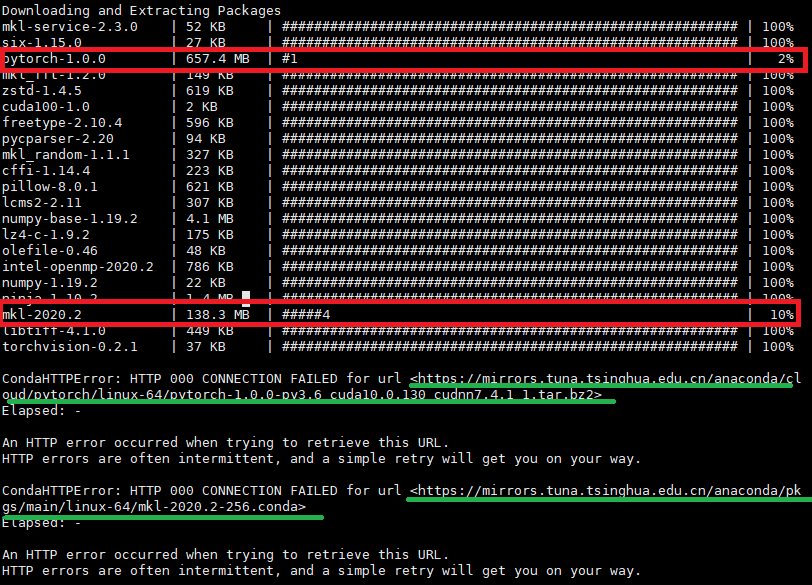
根据URL单独去下载:如上述绿色下划线中的URL地址,下载无法安装成功的包,下载完成后放到服务器中

使用conda进行本地安装:
# 安装:pytorch-1.0.0-py3.6_cuda10.0.130_cudnn7.4.1_1.tar.bz2

(pytorch) zzq@ubuntu-C246-WU4:~$ conda install --use-local pytorch-1.0.0-py3.6_cuda10.0.130_cudnn7.4.1_1.tar.bz2

Downloading and Extracting Packages

######################################################################################################### | 100%

Preparing transaction: done

Verifying transaction: done

Executing transaction: done

# 安装:mkl-2020.2-256.conda

(pytorch) zzq@ubuntu-C246-WU4:~$ conda install --use-local mkl-2020.2-256.conda

Downloading and Extracting Packages

######################################################################################################### | 100%

Preparing transaction: done

Verifying transaction: done

Executing transaction: done
注意:在安装过程中可能会出现"Segment Fault"错误,多尝试几次上述的命令即可即可
安装成功缺失的包后,再次运行
3.中提到的命令:conda install pytorch==1.0.0 torchvision==0.2.1 cuda100 -c pytorch结果如下:
(pytorch) zzq@ubuntu-C246-WU4:~$ conda install pytorch==1.0.0 torchvision==0.2.1 cuda100 -c pytorch

Collecting package metadata (current_repodata.json): done

Solving environment: |

The environment is inconsistent, please check the package plan carefully

The following packages are causing the inconsistency:

- <unknown>/linux-64::pytorch==1.0.0=py3.6_cuda10.0.130_cudnn7.4.1_1

- <unknown>/linux-64::mkl==2020.2=256                                                                        done

==> WARNING: A newer version of conda exists. <==

current version: 4.7.12

latest version: 4.9.2

Please update conda by running

$ conda update -n base -c defaults conda

## Package Plan ##

environment location: /home/zzq/anaconda3/envs/pytorch

added / updated specs:

- cuda100

- pytorch==1.0.0

- torchvision==0.2.1

The following NEW packages will be INSTALLED:

# ...

Proceed ([y]/n)?    		 # 直接回车即可

Preparing transaction: done

Verifying transaction: done

Executing transaction: done  # 安装成功
当没有出现第4步的情况下,安装成功pytorch后,显示如下:
Preparing transaction: done

Verifying transaction: done

Executing transaction: done  # 安装成功
进行测试:
(pytorch) zzq@ubuntu-C246-WU4:~$ python		# 进入python

Python 3.6.12 |Anaconda, Inc.| (default, Sep  8 2020, 23:10:56)

[GCC 7.3.0] on linux

Type "help", "copyright", "credits" or "license" for more information.

>>> import torch	# 导入包

>>> torch.cuda.is_available()	# 是否能找到GPU

True							# 成功
因需要使用pytorch环境,因此需要再次修改环境变量:在上述步骤1.安装Anaconda - 4.添加环境变量:修改了.bashrc文件
此处:再次打开该文件,将之前修改的内容修改如下:
# ~/.bashrc 文件最后位置

# 原先修改的内容为:

export PATH=$PATH:/刚刚安装的路径/anaconda3/bin

# 需要将上述内容修改为:

export PATH="/安装anaconda3的路径/anaconda3/envs/pytorch/bin:$PATH"
再次通过在终端通过命令刷新配置文件
source ~/.bashrc
3. 修改程序配置文件
这部分内容是出于我在C++工程中加入了一些Python的处理函数,因此需要对CMakeLists文件做一些修改
首先,需要注意的是,需要将PROJECT_MULTI_VIDEO文件和DoubleCheck文件放在同一个目录下
PROJECT_MULTI_VIDEO工程修改
打开
PROJECT_MULTI_VIDEO/CMakeLists.txt将
include_directories(/home/zcc/anaconda3/envs/pytorch/include/python3.6m)修改为刚刚安装的anaconda3对应的路径;如刚刚我安装的
anaconda3在:/home/zzq/anaconda3,则将上述修改为:include_directories(/home/zzq/anaconda3/envs/pytorch/include/python3.6m)同理,将
target_link_libraries(PROJECT ${OpenCV_LIBS} ${OpenCV_LIBS} ${CUDA_CUDART_LIBRARY} ${CUDA_INCLUDE_} ${CUDA_INC_PATH} ${BOOST_THREAD_LIBRARY} /home/zcc/anaconda3/envs/pytorch/lib/libpython3.6m.so)这里的/home/zcc/anaconda3/envs/pytorch/lib/libpython3.6m.so也修改为相应的路径;如此处修改为
/home/zzq/anaconda3/envs/pytorch/lib/libpython3.6m.so
进入build文件夹中,运行:
cmake ..进行代码编译(pytorch) zzq@ubuntu-C246-WU4:~/PROJECT_MULTI_VIDEO/build$ cmake ..
-- The C compiler identification is GNU 5.4.0
-- The CXX compiler identification is GNU 5.4.0
-- Check for working C compiler: /usr/bin/cc
-- Check for working C compiler: /usr/bin/cc -- works
-- Detecting C compiler ABI info
-- Detecting C compiler ABI info - done
-- Detecting C compile features
-- Detecting C compile features - done
-- Check for working CXX compiler: /usr/bin/c++
-- Check for working CXX compiler: /usr/bin/c++ -- works
-- Detecting CXX compiler ABI info
-- Detecting CXX compiler ABI info - done
-- Detecting CXX compile features
-- Detecting CXX compile features - done
-- Looking for pthread.h
-- Looking for pthread.h - found
-- Looking for pthread_create
-- Looking for pthread_create - not found
-- Looking for pthread_create in pthreads
-- Looking for pthread_create in pthreads - not found
-- Looking for pthread_create in pthread
-- Looking for pthread_create in pthread - found
-- Found Threads: TRUE
-- Found CUDA: /usr/local/cuda-10.0 (found suitable exact version "10.0")
-- Found OpenCV: /usr/local (found version "3.4.2")
-- Found CUDA: /usr/local/cuda-10.0 (found version "10.0")
-- include path: /usr/local/cuda-10.0/include
-- include path: /usr/local/include;/usr/local/include/opencv
CMake Warning (dev) in CMakeLists.txt:
No cmake_minimum_required command is present. A line of code such as cmake_minimum_required(VERSION 3.5) should be added at the top of the file. The version specified may be lower
if you wish to support older CMake versions for this project. For more
information run "cmake --help-policy CMP0000".
This warning is for project developers. Use -Wno-dev to suppress it. -- Configuring done # 配置成功
-- Generating done # 生成成功
-- Build files have been written to: /home/zzq/PROJECT_MULTI_VIDEO/build
编译完成后,运行
make,结果如下(pytorch) zzq@ubuntu-C246-WU4:~/PROJECT_MULTI_VIDEO/build$ make
Scanning dependencies of target PROJECT
[ 10%] Building CXX object CMakeFiles/PROJECT.dir/main.o
[ 20%] Building CXX object CMakeFiles/PROJECT.dir/src/Blob.o
[ 30%] Building CXX object CMakeFiles/PROJECT.dir/src/kalman.o
[ 40%] Building CXX object CMakeFiles/PROJECT.dir/src/utils.o
[ 50%] Building CXX object CMakeFiles/PROJECT.dir/src/Config.o
[ 60%] Building CXX object CMakeFiles/PROJECT.dir/src/MoGDectector.o
[ 70%] Building CXX object CMakeFiles/PROJECT.dir/src/BlobDetector.o
[ 80%] Building CXX object CMakeFiles/PROJECT.dir/src/DeepModel.o
[ 90%] Building CXX object CMakeFiles/PROJECT.dir/src/objectTrack.o
[100%] Linking CXX executable PROJECT
注意:若在make过程中出现如下错误,这是由于出现了库的冲突问题,
/usr/local/lib/libopencv_imgcodecs.so.3.4.2:对‘TIFFReadRGBAStrip@LIBTIFF_4.0’未定义的引用

/usr/local/lib/libopencv_imgcodecs.so.3.4.2:对‘TIFFReadDirectory@LIBTIFF_4.0’未定义的引用

# ...各种未定义的应用...

collect2: error: ld returned 1 exit status

CMakeFiles/PROJECT.dir/build.make:361: recipe for target 'PROJECT' failed

make[2]: *** [PROJECT] Error 1

CMakeFiles/Makefile2:67: recipe for target 'CMakeFiles/PROJECT.dir/all' failed

make[1]: *** [CMakeFiles/PROJECT.dir/all] Error 2

Makefile:83: recipe for target 'all' failed

make: *** [all] Error 2
解决方式:
(pytorch) zzq@ubuntu-C246-WU4:~/PROJECT_MULTI_VIDEO/build$ conda list | grep libtiff

libtiff                   4.1.0                h2733197_1    defaults
是由于这个包的存在导致的冲突
通过命令:
conda remove --force libtiff强行卸载这个包即可:若在卸载包时出现如下错误:
(pytorch) zzq@ubuntu-C246-WU4:~/PROJECT_MULTI_VIDEO/build$ conda remove --force libtiff

CondaHTTPError: HTTP 000 CONNECTION FAILED for url <https://mirrors.tuna.tsinghua.edu.cn/anaconda/pkgs/free/linux-64/repodata.json>
处理流程:
- 找到1.安装Anaconda 5.换源中的
.condarc文件,将其中的https修改为http,如下
channels:

     - defaults

show_channel_urls: true

channel_alias: https://mirrors.tuna.tsinghua.edu.cn/anaconda

default_channels:

     - http://mirrors.tuna.tsinghua.edu.cn/anaconda/pkgs/main  # https->http

     - http://mirrors.tuna.tsinghua.edu.cn/anaconda/pkgs/free  # https->http

     - http://mirrors.tuna.tsinghua.edu.cn/anaconda/pkgs/r     # https->http

     - http://mirrors.tuna.tsinghua.edu.cn/anaconda/pkgs/pro   # https->http

     - http://mirrors.tuna.tsinghua.edu.cn/anaconda/pkgs/msys2 # https->http

custom_channels:

  conda-forge: https://mirrors.tuna.tsinghua.edu.cn/anaconda/cloud

  msys2: https://mirrors.tuna.tsinghua.edu.cn/anaconda/cloud

  bioconda: https://mirrors.tuna.tsinghua.edu.cn/anaconda/cloud

  menpo: https://mirrors.tuna.tsinghua.edu.cn/anaconda/cloud

  pytorch: https://mirrors.tuna.tsinghua.edu.cn/anaconda/cloud

  simpleitk: https://mirrors.tuna.tsinghua.edu.cn/anaconda/cloud
- 修改完成后,输入命令
conda clean -i清除缓存 - 再次运行命令
conda remove --force libtiff
- 找到1.安装Anaconda 5.换源中的
卸载成功如下:
(pytorch) zzq@ubuntu-C246-WU4:~/PROJECT_MULTI_VIDEO/build$ conda remove --force libtiff

# ...

## Package Plan ##

  environment location: /home/zzq/anaconda3/envs/pytorch

  removed specs:

    - libtiff

The following packages will be REMOVED:

  libtiff-4.1.0-h2733197_1

Proceed ([y]/n)? y

Preparing transaction: done

Verifying transaction: done

Executing transaction: done
卸载完成后,继续编译,即可编译成功
(pytorch) zzq@ubuntu-C246-WU4:~/PROJECT_MULTI_VIDEO/build$ make

[ 10%] Linking CXX executable PROJECT

[100%] Built target PROJECT
修改PROJECT_MULTI_VIDEO工程目录下build文件夹中的
config.txt配置文件将其中的
pythonCodePath =修改为存放PROJECT_MULTI_VIDEO和DoubleCheck的目录,如:pythonCodePath = /home/zzq/
修改完后如下:
#

CameraNum=14

#

numConsecutiveDrop=5

numObjectWithoutMatch=10

maxBlobArea=40000

minBlobArea=20

minCurrentAspectRatio=0.2

maxCurrentAspectRatio=5

minCurrentDiagonalSize=6

minBoxWidth=4

minBoxHeight=4

minContourBoxRatio=0.6

normalFps = 5

collectionOn = 0

pythonCodePath = /home/zcc/桌面/

# 添加需要检测的摄像头

Camera_1_id = 1

Camera_1_Address =

Camera_1_On = 1

Camera_1_SavePath =

Camera_1_IsDebug= 0

Camera_1_MaskArea = 0/0,300/10,400/200,100/400,20/190;500/0,800/10,900/200,600/400,520/190

# .....
配置完成后,直接运行即可
(pytorch) zzq@ubuntu-C246-WU4:~/PROJECT_MULTI_VIDEO/build$ ./PROJECT
anaconda+pytorch安装的更多相关文章
- anaconda+pytorch安装(无GPU版本)
anaconda+pytorch安装(无GPU版本) 待办 https://blog.csdn.net/nnUyi/article/details/78471326
- Pytorch安装(基于anaconda虚拟环境)
Pytorch安装倒腾了一上午终于搞定,记录一下安装过程. 1. 首先尝试官网的安装方式,但是网速太慢了. 除去cudnn100, torchvision和pytorch三个文件,其余可以直接从清华镜 ...
- Anaconda中安装pytorch
Anaconda中安装pytorch 创建一个虚拟环境 conda create --name machinelearning python=3.7 激活虚拟环境 activate machinele ...
- Ubuntu在Anaconda中安装TensorFlow GPU,Keras,Pytorch
安装TensorFlow GPU pip install --ignore-installed --upgrade tensorflow-gpu 安装测试: $ source activate tf ...
- pytorch安装 caffe2 安装:git 慢 caffe2 cannot find -lopencv_dep_cudart ,undefined reference to 'pthread_create'
最开始的问题: caffe2目前已经不维护了.怎么编译都报错,并且有third_party的代码链接已经飞了.下载不全代码了.建议 不要再折腾了,直接安装Pytorch. 首先,基本环境是ubuntu ...
- Pytorch安装教程
一.准备 Window10系统+Ubuntu16.10系统.Anaconda3.5(python3.6) 二.流程 (1)由于墙的问题,用conda安装Pytorch过程中会连接失败,这是因为Anac ...
- Windows10+Anaconda+PyTorch(cpu版本)环境搭建
1.安装Anaconda,具体参考网上相关教程 2.安装PyTorch 2.1 在Anaconda自带的Anaconda Prompt中创建名为PyTorch的虚拟环境[conda create -- ...
- PyTorch安装及试用 基于Anaconda3
设置Torch国内镜像 conda config --add channels https://mirrors.tuna.tsinghua.edu.cn/anaconda/cloud/pytorch/ ...
- anaconda 的安装
进官网下载anaconda, 根据需要下载对应python版本Anaconda软件. https://www.anaconda.com/download/#windows 下载完双击 Anaconda ...
随机推荐
- java线程池-工作队列workQueue
线程池之工作队列 ArrayBlockingQueue 采用数组来实现,并采用可重入锁ReentrantLock来做并发控制,无论是添加还是读取,都先要获得锁才能进行操作 可看出进行读写操作都使用了R ...
- SQL语句之基本使用
1.sql语法 一些重要的SQL命令: SELECT - 从数据库中提取数据 UPDATE - 更新数据库中的数据 DELETE - 从数据库中删除数据 INSERT INTO - 向数据库中插入新数 ...
- Git 初识和使用
目录 目录 目录 概念 工作区/暂存区/版本库 master 版本号 常见命令 环境搭建 Linux 下 Git 和 GitHub 环境的搭建 Git 本地操作 本地仓库的创建和使用 查看信息 查看状 ...
- Linux内核中断顶半部和底半部的理解
文章目录 中断上半部.下半部的概念 实现中断下半部的三种方法 软中断 软中断模版 tasklet tasklet函数模版 工作队列 工作队列函数模版 进程上下文和中断上下文 软中断和硬中断的区别 硬中 ...
- jquery .play()报错is not a function
报错原因:play()方法属于DOM对象方法,$('#audio')为jquery对象解决办法:将jquery对象转换为DOM对象首先打印jquery对象$('#audio') 两种转换方式将一个jQ ...
- 网页兼容最新IE声明meta方法
第三种,总是使用最新版本文档模式. 以下是例子: <meta http-equiv="X-UA-Compatible" content="IE=edge" ...
- jQuery <= 1.11.3 DomXSS漏洞
听团里说WordPress又爆跨站漏洞了:" XSS漏洞在Jetpack和二十五默认主题影响百万WordPress用户 ",分析发现原来是jQuery老版本的DOM XSS漏洞[错 ...
- python风格对象
对象表示形式 python提供了两种获取对象字符串表示形式的标准方式 repr() //便于开发者理解的方式返回对象的字符串表示形式(一般来说满足obj==eval(repr(obj) ...
- Linux服务器时间同步配置
Linux服务器时间同步配置 以CentOS7 做时间服务器,其他服务器(Centos 6.RHEL7)同步该服务器时间 RHEL 7.CentOS 7 默认的网络时间协议 为Chrony 本教程 ...
- 入坑Java的自学之路
# 入坑Java的自学之路 ## 基础知识 - 编程语言:Java python c- 基本算法- 基本网络知识 tcp/ip http/https- 基本的设计模式 ------ ## 工具方面 - ...