【Android】21.3 动画
分类:C#、Android、VS2015;
创建日期:2016-03-21
一、简介
Android 提供了以下三种创建动画的方式:
- Drawable Animations – 画板动画,也叫帧动画(Frame Animations)。
- View Animations - 视图动画,也叫补间动画(Tween Animations)。
- Property Animations – 属性动画。从Android 3.0开始提供。
注意:虽然这三种动画都可用,但只要有可能,都应该优先考虑用属性动画来实现。另外,动画虽然能吸引人,但不要滥用,否则只会适得其反。
1、画板动画(Drawable Animations)
Drawable Animations提供了按帧播放的简单动画API,在其他实现技术中一般将其称为帧动画(Frame Animations)。这种动画的播放效果非常类似电影或卡通(cartoon)漫画。
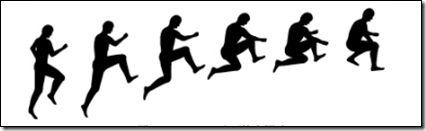
帧动画是通过顺序播放图片来产生动画效果的,下图通过顺序播放6张图片实现一个人跳起来的动画效果:
控制动画序列的画板资源(XML文件)通常保存在应用程序的/Resource/drawable文件夹中,文件中用<animation-list>元素作为根元素,用<item>元素定义每一帧。
例如,在/Resource/drawable/ch2103DrawableAnimDemo.xml文件中定义动画序列:
<animation-list xmlns:android="http://schemas.android.com/apk/res/android">
<item android:drawable="@drawable/a01" android:duration="100" />
<item android:drawable="@drawable/a02" android:duration="100" />
<item android:drawable="@drawable/a03" android:duration="100" />
<item android:drawable="@drawable/a04" android:duration="100" />
<item android:drawable="@drawable/a05" android:duration="100" />
<item android:drawable="@drawable/a06" android:duration="100" />
</animation-list>
此动画包含六个帧。其中,a01~a06是图片文件,android:duration属性声明每个帧显示的时间。定义动画序列以后,只需要在布局文件中指定该文件,Android就会自动按顺序加载和显示动画。
2、视图动画(View Animations)
在Android系统中,视图动画(或者叫补间动画)有4种表现方式:渐变、缩放、平移、旋转。利用View动画能完成一系列诸如位置、大小、不透明度、旋转等简单的变化。例如对程序中的某个ImageView实现动画处理等。
View动画位于Android.View.Animation命名空间中,在代码中可通过下面的方法对View对象进行动画处理:
AlphaAnimation:控制不透明度变化的动画类
Rotate Animation:控制旋转的动画类
ScaleAnimation:控制缩放变化的动画类
TranslateAnimation:控制平移变化的动画类
AnimationSet:控制动画属性的集合类
动画变换文件一般保存在/Resources/anim文件夹中。另外,虽然此API是早期版本提供的,但是由于它的简单性,因此仍然有用。
注意:保存在/Resources/anim文件夹中的XML文件是声明View动画的首选办法,因为这种方式更易于阅读和维护。该XML文件必须用以下元素之一作为根元素:
- alpha -淡入或淡出动画
- rotate -旋转动画
- scale –缩放动画
- translate –平移(水平或垂直运动)
- set - 动画容器,可容纳一个或多个其他动画元素
默认情况下,Android会同时应用该XML文件中的所有动画。要使动画按指定的顺序变化,将android:startOffset属性设置在上面定义的元素之一即可。
也可以内插器改变动画速率,如加速、重复、减速等动画效果:
- AcclerateInterpolator / DecelerateInterpolator –增加或减少动画速率
- BounceInterpolator – 动画结束时反弹
- LinearInterpolator – 恒定速率
具体用法见本节示例中的“视图动画示例”。在这个例子中,动画效果是先将图像沿水平和垂直方向缩放,然后将图像逆时针旋转45度同时缩小图像的大小。
3、属性动画(Property Animations)
这种动画可对任何对象的属性进行处理(包括View),是首选的执行动画的方式,即使动画对象不可见也一样能对其进行处理。
属性动画API的灵活性在于还能将动画封装在不同的类中,使代码共享更加方便。
所有属性动画都是通过Animator子类的实例来创建:
- ValueAnimator – 这是整个属性动画API中最重要的类。它会自动计算需要更改的属性值,该动画并不是直接修改这些值,而是用事件去更新动画对象。
- ObjectAnimator – 对目标对象的某个属性进行动画处理。
- AnimationSet – 此类用于保存动画集合,程序中利用它可以“同时执行、顺序执行、延时执行”这些动画。
使用动画是,可能还需要下面的特殊类:
- IntEvaluator – 计算整数类型的属性值
- FloatEvaluator –计算浮点类型的属性值
- ArgbEvaluator –计算颜色类型的属性值
如果正在进行动画处理的属性不是float、int或Color,可通过实现ITypeEvaluator接口创建他们自己的计算类型。
(1)ValueAnimator
通过调用下面的方法之一,可获取得ValueAnimator的实例:
- ValueAnimator.OfInt
- ValueAnimator.OfFloat
- ValueAnimator.OfObject
下面的代码演示如何将值从 0 到 100进行动画处理,动画持续时间为1000毫秒。
ValueAnimator animator = ValueAnimator.OfInt(0, 100);
animator.SetDuration(1000);
animator.Start();
但是,仅有这些代码还不够,这是因为虽然执行了动画但是并没有将目标更新为新的值,因此还需要引入相关的事件:
MyCustomObject myObj = new MyCustomObject();
myObj.SomeIntegerValue = -1;
animator.Update += (object sender, ValueAnimator.AnimatorUpdateEventArgs e) =>
{
int newValue = (int) e.Animation.AnimatedValue;
// Apply this new value to the object being animated.
myObj.SomeIntegerValue = newValue;
};
(2)ObjectAnimator
ObjectAnimator是ViewAnimator的子类,它将计时引擎和ValueAnimator结合在一起实现动画。例如:
MyCustomObject myObj = new MyCustomObject();
myObj.SomeIntegerValue = -1;
ObjectAnimator animator = ObjectAnimator.OfFloat(myObj, "SomeIntegerValue”, 0, 100);
animator.SetDuration(1000);
animator.Start();
与前面的代码相比,这样做可减少代码量。
二、示例
1、运行截图
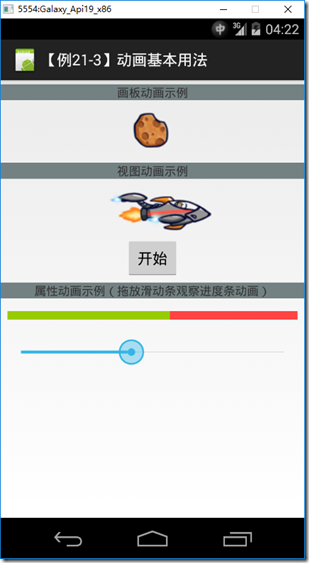
2、设计步骤
(1)添加图片
在Drawable文件夹下添加6个图片(ch2103asteroid01.png~ch2103asteroid06.png),这些图片用于演示帧动画的用法。
然后再添加一个ch2103ship.png图片,该图片用于演示视图动画的用法。
(2)添加ch2103DrawableAnimDemo.xml
在Resources/Drawable文件夹下添加该文件。
<?xml version="1.0" encoding="UTF-8" ?>

<animation-list xmlns:android="http://schemas.android.com/apk/res/android" >

  <item android:drawable="@drawable/ch2103asteroid01" android:duration="100" />

  <item android:drawable="@drawable/ch2103asteroid02" android:duration="100" />

  <item android:drawable="@drawable/ch2103asteroid03" android:duration="100" />

  <item android:drawable="@drawable/ch2103asteroid04" android:duration="100" />

  <item android:drawable="@drawable/ch2103asteroid05" android:duration="100" />

  <item android:drawable="@drawable/ch2103asteroid06" android:duration="100" />

</animation-list>
(3)添加ch2103ViewAnimDemo.xml
在Resources/anim文件夹下添加该文件。
<?xml version="1.0" encoding="utf-8" ?>

<set xmlns:android="http://schemas.android.com/apk/res/android"

     android:shareInterpolator="false">

  <scale android:interpolator="@android:anim/accelerate_decelerate_interpolator"

         android:fromXScale="1.0"

         android:toXScale="1.4"

         android:fromYScale="1.0"

         android:toYScale="0.6"

         android:pivotX="50%"

         android:pivotY="50%"

         android:fillEnabled="true"

         android:fillAfter="false"

         android:duration="700" />

  <set android:interpolator="@android:anim/accelerate_interpolator">

    <scale android:fromXScale="1.4"

           android:toXScale="0.0"

           android:fromYScale="0.6"

           android:toYScale="0.0"

           android:pivotX="50%"

           android:pivotY="50%"

           android:fillEnabled="true"

           android:fillBefore="false"

           android:fillAfter="true"

           android:startOffset="700"

           android:duration="400" />

    <rotate android:fromDegrees="0"

            android:toDegrees="-45"

            android:toYScale="0.0"

            android:pivotX="50%"

            android:pivotY="50%"

            android:fillEnabled="true"

            android:fillBefore="false"

            android:fillAfter="true"

            android:startOffset="700"

            android:duration="400" />

  </set>

</set>
(4)添加ch2103Main.axml
在Resources/layout文件夹下添加该文件。
<?xml version="1.0" encoding="utf-8"?>

<LinearLayout xmlns:android="http://schemas.android.com/apk/res/android"

    android:orientation="vertical"

    android:layout_width="match_parent"

    android:layout_height="match_parent"

    android:minWidth="25px"

    android:minHeight="25px">

    <TextView

        android:text="画板动画示例"

        android:textAppearance="?android:attr/textAppearanceSmall"

        android:layout_width="fill_parent"

        android:layout_height="wrap_content"

        android:gravity="center"

        android:background="@color/myGray"

        android:layout_marginTop="5dp" />

    <ImageView

        android:src="@android:drawable/ic_menu_gallery"

        android:layout_width="match_parent"

        android:layout_height="wrap_content"

        android:id="@+id/ch2103_imageView_DrawableDemo"

        android:layout_marginTop="5dp" />

    <TextView

        android:text="视图动画示例"

        android:textAppearance="?android:attr/textAppearanceSmall"

        android:layout_width="fill_parent"

        android:layout_height="wrap_content"

        android:gravity="center"

        android:background="@color/myGray"

        android:layout_marginTop="5dp" />

    <ImageView

        android:src="@android:drawable/ic_menu_gallery"

        android:layout_width="match_parent"

        android:layout_height="wrap_content"

        android:id="@+id/ch2103_imageView_ViewDemo"

        android:layout_marginLeft="20dp"

        android:layout_marginTop="5dp" />

    <Button

        android:text="开始"

        android:layout_width="wrap_content"

        android:layout_height="wrap_content"

        android:id="@+id/ch2103_btnViewDemoStart"

        android:layout_gravity="center" />

    <TextView

        android:text="属性动画示例(拖放滑动条观察进度条动画)"

        android:textAppearance="?android:attr/textAppearanceSmall"

        android:layout_width="fill_parent"

        android:layout_height="wrap_content"

        android:gravity="center"

        android:background="@color/myGray"

        android:layout_marginTop="5dp" />

    <FrameLayout

        android:minWidth="25px"

        android:minHeight="35px"

        android:layout_width="fill_parent"

        android:layout_height="wrap_content"

        android:id="@+id/frameLayout1"

        android:layout_marginTop="15dp"

        android:layout_marginBottom="5dp">

        <MyDemos.SrcDemos.ch2103MyView

            android:layout_width="fill_parent"

            android:layout_height="wrap_content"

            android:layout_marginLeft="8dp"

            android:layout_marginRight="8dp"

            android:id="@+id/ch2103myview1" />

    </FrameLayout>

    <SeekBar

        android:layout_width="fill_parent"

        android:layout_height="wrap_content"

        android:id="@+id/ch2103seekBar1"

        android:max="100"

        android:progress="50"

        android:layout_marginLeft="8dp"

        android:layout_marginRight="8dp"

        android:layout_marginTop="10dp" />

</LinearLayout>
(5)添加ch2103MyView.cs
using System;

using Android.Content;

using Android.Views;

using Android.Graphics;

using Android.Util;

using Android.Animation;

namespace MyDemos.SrcDemos

{

    /// <summary>

    /// 演示进度条动画控制的基本用法

    /// </summary>

    public class ch2103MyView : View

    {

        private const int DefaultHeight = 20;

        private const int DefaultWidth = 120;

        private Paint mNegativePaint;

        private double mPosition = 0.5;

        private Paint mPositivePaint;

        public ch2103MyView(Context context, IAttributeSet attrs)

            : this(context, attrs, 0)

        {

            Initialize();

        }

        public ch2103MyView(Context context, IAttributeSet attrs, int defStyle)

            : base(context, attrs, defStyle)

        {

            Initialize();

        }

        public double CurrentValue

        {

            get { return mPosition; }

            set

            {

                mPosition = Math.Max(0f, Math.Min(value, 1f));

                Invalidate();

            }

        }

        public void SetCurentValue(double value, bool animate)

        {

            if (!animate)

            {

                CurrentValue = value;

                return;

            }

            ValueAnimator animator = ValueAnimator.OfFloat((float)mPosition, (float)Math.Max(0f, Math.Min(value, 1f)));

            animator.SetDuration(500);

            animator.Update += (sender, e) => CurrentValue = (double)e.Animation.AnimatedValue;

            animator.Start();

        }

        protected override void OnDraw(Canvas canvas)

        {

            base.OnDraw(canvas);

            float middle = canvas.Width * (float)mPosition;

            canvas.DrawPaint(mNegativePaint);

            canvas.DrawRect(0, 0, middle, canvas.Height, mPositivePaint);

        }

        protected override void OnMeasure(int widthMeasureSpec, int heightMeasureSpec)

        {

            int width = MeasureSpec.GetSize(widthMeasureSpec);

            SetMeasuredDimension(width < DefaultWidth ? DefaultWidth : width, DefaultHeight);

        }

        private void Initialize()

        {

            mPositivePaint = new Paint

            {

                AntiAlias = true,

                Color = Color.Rgb(0x99, 0xcc, 0),

            };

            mPositivePaint.SetStyle(Paint.Style.FillAndStroke);

            mNegativePaint = new Paint

            {

                AntiAlias = true,

                Color = Color.Rgb(0xff, 0x44, 0x44)

            };

            mNegativePaint.SetStyle(Paint.Style.FillAndStroke);

        }

    }

}
(6)添加ch2103MainActivity.cs
using Android.App;

using Android.OS;

using Android.Widget;

using Android.Views.Animations;

namespace MyDemos.SrcDemos

{

    [Activity(Label = "【例21-3】动画基本用法")]

    public class ch2103MainActivity : Activity

    {

        protected override void OnCreate(Bundle savedInstanceState)

        {

            base.OnCreate(savedInstanceState);

            SetContentView(Resource.Layout.ch2103Main);

            //画板动画Demo

            var img1 = FindViewById<ImageView>(Resource.Id.ch2103_imageView_DrawableDemo);

            img1.SetImageResource(Resource.Drawable.ch2103DrawableAnimDemo);

            //视图动画Demo

            var btn1 = FindViewById<Button>(Resource.Id.ch2103_btnViewDemoStart);

            btn1.Click += (sender, args) => {

                Animation animation = AnimationUtils.LoadAnimation(this, Resource.Animation.ch2103ViewAnimDemo);

                var img2 = FindViewById<ImageView>(Resource.Id.ch2103_imageView_ViewDemo);

                img2.SetImageResource(Resource.Drawable.ch2103ship);

                img2.StartAnimation(animation);

            };

            //属性动画Demo

            var myView = FindViewById<ch2103MyView>(Resource.Id.ch2103myview1);

            var seekBar = FindViewById<SeekBar>(Resource.Id.ch2103seekBar1);

            seekBar.StopTrackingTouch += (sender, args) =>

            {

                double currentValue = ((double)seekBar.Progress) / seekBar.Max;

                 myView.SetCurentValue(currentValue, true);

            };

        }

    }

}
【Android】21.3 动画的更多相关文章
- Android 三种动画详解
[工匠若水 http://blog.csdn.net/yanbober 转载请注明出处.点我开始Android技术交流] 1 背景 不能只分析源码呀,分析的同时也要整理归纳基础知识,刚好有人微博私信让 ...
- Android传统View动画与Property动画基础及比较
前言:关于动画方面的知识也整理一段时间了,如题,这篇文章简单的介绍了View和Property动画的概念,如何在项目中创建资源文件,以及如何在代码中使用它们,本次整理动画的重点放在了Property动 ...
- Android立体旋转动画实现与封装(支持以X、Y、Z三个轴为轴心旋转)
本文主要介绍Android立体旋转动画,或者3D旋转,下图是我自己实现的一个界面 立体旋转分为以下三种: 1. 以X轴为轴心旋转 2. 以Y轴为轴心旋转 3. 以Z轴为轴心旋转--这种等价于andro ...
- Android中矢量动画
Android中矢量动画 Android中用<path> 标签来创建SVG,就好比控制着一支画笔,从一点到一点,动一条线. <path> 标签 支持一下属性 M = (Mx, ...
- Android Animation(动画)
前言 Android 平台提供实现动画的解决方案(三种) 一.3.0以前,android支持两种动画: (1)Frame Animation:顺序播放事先做好的图像,与gif图片原理类似,是一种逐帧动 ...
- android 补间动画和Animation
介绍: 补间动画是一种设定动画开始状态.结束状态,其中间的变化由系统计算补充.这也是他叫做补间动画的原因. 补间动画由Animation类来实现具体效果,包括平移(TranslateAnimation ...
- Android中过场动画
overridePendingTransition(R.anim.slide_in_right,R.anim.slide_out_left); 第一参数为进入的动画 第二参数为退出的动画 进入的动画 ...
- Android 自定义波浪动画 --"让进度浪起来~"
原文链接:http://www.jianshu.com/p/0e25a10cb9f5 一款效果不错的动画,实现也挺简单的,推荐阅读学习~ -- 由 傻小孩b 分享 waveview <Andro ...
- Android自定义窗口动画
第一步,设置出现和消失的xml 1.在res/anim下创建enter_anim.xml,设置窗口出现的动画 <?xml version="1.0" encoding=&qu ...
随机推荐
- 基于redis分布式锁实现“秒杀”(转载)
转载:http://blog.csdn.net/u010359884/article/details/50310387 最近在项目中遇到了类似“秒杀”的业务场景,在本篇博客中,我将用一个非常简单的de ...
- UVA 10026 Shoemaker's Problem 鞋匠的难题 贪心+排序
题意:鞋匠一口气接到了不少生意,但是做鞋需要时间,鞋匠只能一双一双地做,根据协议每笔生意如果拖延了要罚钱. 给出每笔生意需要的天数和每天的罚钱数,求出最小罚钱的排列顺序. 只要按罚款/天数去从大到小排 ...
- PHP 表单 - 5(完整表单实例)
PHP 完整表单实例 本章节将介绍如何让用户在点击"提交(submit)"按钮提交数据前保证所有字段正确输入. PHP - 在表单中确保输入值 在用户点击提交按钮后,为确保字段值是 ...
- Mapreduce实例-分组排重(group by distinct)
public class GroupComparator implements RawComparator<MyBinaryKey> { @Override public int comp ...
- MySQL 联合索引测试
搭建测试环境 1:创建表 CREATE TABLE tab_index (id int(5), age int(3), dte datetime); 2:插入测试数据 INSERT INTO tab_ ...
- plsql 常用快捷键(自动替换)
plsql 常用快捷键 CreateTime--2018年4月23日17:33:05 Author:Marydon 说明:这里的快捷键,不同于以往的快捷键,输入指定字符,按快捷键,可以自动替换成你 ...
- DIV+CSS布局重新学习之使用A标签和CSS制作按钮
这里主要利用A元素的伪类来实现: a:link {color: #FF0000} /* 未访问的链接 */ a:visited {color: #00FF00} /* 已访问的链接 */ a:hove ...
- 元程序 /如何取test.py中name的值
# -*- coding: utf-8 -*- #python 27 #xiaodeng #Python学习手册 633 #模块是对象:元程序 #因为模块通过内置属性显示了他们的大多数特性,因此很容易 ...
- demo02
class PhoneNumber(): def __init__(self,number): self.a=number[1:4] self.b=number[6:9] self.c=number[ ...
- mybatis标签之——关联映射
关联关系是面向对象分析.面向对象设计最重要的知识.合理的关联映射将大大简化持久层数据的访问.关联关系大致分为以下三类: 一对一 一对多 多对多 1. 一对一 一对一关系推荐使用唯一主外键关联,即两张表 ...