重装上了Fedora8自带的MySQL5.0.45,再试,告捷!!
MySql服务器IP是192.168.0.104,测试连接的笔记本IP为192.168.0.100.
以下命令说明两台机器的网络连接是通畅的:
[root@bogon bin]# ping 192.168.0.100
PING 192.168.0.100 (192.168.0.100) 56(84) bytes of data.
64 bytes from 192.168.0.100: icmp_seq=1 ttl=128 time=9.26 ms
64 bytes from 192.168.0.100: icmp_seq=2 ttl=128 time=3.85 ms
64 bytes from 192.168.0.100: icmp_seq=3 ttl=128 time=6.85 ms
64 bytes from 192.168.0.100: icmp_seq=4 ttl=128 time=4.25 ms
64 bytes from 192.168.0.100: icmp_seq=5 ttl=128 time=10.4 ms
64 bytes from 192.168.0.100: icmp_seq=6 ttl=128 time=8.26 ms
64 bytes from 192.168.0.100: icmp_seq=7 ttl=128 time=3.24 ms
64 bytes from 192.168.0.100: icmp_seq=8 ttl=128 time=4.90 ms
64 bytes from 192.168.0.100: icmp_seq=9 ttl=128 time=3.40 ms
64 bytes from 192.168.0.100: icmp_seq=10 ttl=128 time=4.03 ms
64 bytes from 192.168.0.100: icmp_seq=11 ttl=128 time=9.22 ms
64 bytes from 192.168.0.100: icmp_seq=12 ttl=128 time=4.73 ms
64 bytes from 192.168.0.100: icmp_seq=13 ttl=128 time=6.34 ms
64 bytes from 192.168.0.100: icmp_seq=14 ttl=128 time=4.09 ms
--- 192.168.0.100 ping statistics ---
14 packets transmitted, 14 received, 0% packet loss, time 13000ms
rtt min/avg/max/mdev = 3.241/5.919/10.401/2.370 ms
MySQL的配置文件/etc/my.cnf的内容如下:
[mysqld]
datadir=/var/lib/mysql
socket=/var/lib/mysql/mysql.sock
user=mysql
# Default to using old password format for compatibility with mysql 3.x
# clients (those using the mysqlclient10 compatibility package).
old_passwords=1
[mysqld_safe]
log-error=/var/log/mysqld.log
pid-file=/var/run/mysqld/mysqld.pid
也曾参考网文的做法进行授权,如下
[root@bogon bin]# ./mysql -u root -p
Enter password:
Welcome to the MySQL monitor. Commands end with ; or \g.
Your MySQL connection id is 5
Server version: 5.0.45 Source distribution
Type 'help;' or '\h' for help. Type '\c' to clear the buffer.
mysql> grant all privileges on *.* to root@'%' identified by "root";
Query OK, 0 rows affected (0.00 sec)
mysql> flush privileges;
Query OK, 0 rows affected (0.00 sec)
mysql> exit
Bye
[root@bogon bin]# service mysqld restart
Stopping MySQL: [ OK ]
Starting MySQL: [ OK ]
[root@bogon bin]# ./mysql -u root -p
Enter password:
Welcome to the MySQL monitor. Commands end with ; or \g.
Your MySQL connection id is 4
Server version: 5.0.45 Source distribution
Type 'help;' or '\h' for help. Type '\c' to clear the buffer.
mysql> grant select,update,insert,delete on *.* to root@192.168.0.100 identified by "root";
Query OK, 0 rows affected (0.00 sec)
mysql> flush privileges;
Query OK, 0 rows affected (0.01 sec)
mysql> exit
Bye
授权重启后没有问题。
[root@bogon bin]# service mysqld restart
Stopping MySQL: [ OK ]
Starting MySQL: [ OK ]
再看看数据表里面:
[root@bogon bin]# ./mysql -u root -p
Enter password:
Welcome to the MySQL monitor. Commands end with ; or \g.
Your MySQL connection id is 5
Server version: 5.0.45 Source distribution
Type 'help;' or '\h' for help. Type '\c' to clear the buffer.
mysql> use ,ysql
ERROR 1049 (42000): Unknown database ',ysql'
mysql> use mysql
Reading table information for completion of table and column names
You can turn off this feature to get a quicker startup with -A
Database changed
mysql> select host,user,password from user;
+---------------+------+------------------+
| host | user | password |
+---------------+------+------------------+
| localhost | root | 565491d704013245 |
| bogon | root | |
| 127.0.0.1 | root | |
| % | root | 67457e226a1a15bd |
| 192.168.0.100 | root | 67457e226a1a15bd |
+---------------+------+------------------+
5 rows in set (0.01 sec)
mysql>
这已经把网文提到的步骤都完成了。
/etc/sysconfig/iptables里3306端口已经打开。
重启mysqld服务后,看看端口情况。
[root@bogon bin]# netstat -tlnpu
Active Internet connections (only servers)
Proto Recv-Q Send-Q Local Address Foreign Address State PID/Program name
tcp 0 0 0.0.0.0:40679 0.0.0.0:* LISTEN 1795/rpc.statd
tcp 0 0 0.0.0.0:3306 0.0.0.0:* LISTEN 4107/mysqld
tcp 0 0 0.0.0.0:111 0.0.0.0:* LISTEN 1776/rpcbind
tcp 0 0 127.0.0.1:631 0.0.0.0:* LISTEN 2149/cupsd
tcp 0 0 127.0.0.1:25 0.0.0.0:* LISTEN 2021/sendmail: acce
tcp 0 0 :::22 :::* LISTEN 1997/sshd
udp 0 0 0.0.0.0:32768 0.0.0.0:* 1795/rpc.statd
udp 0 0 0.0.0.0:32769 0.0.0.0:* 2130/avahi-daemon:
udp 0 0 0.0.0.0:679 0.0.0.0:* 1776/rpcbind
udp 0 0 0.0.0.0:703 0.0.0.0:* 1795/rpc.statd
udp 0 0 0.0.0.0:68 0.0.0.0:* 1655/dhclient
udp 0 0 0.0.0.0:5353 0.0.0.0:* 2130/avahi-daemon:
udp 0 0 0.0.0.0:111 0.0.0.0:* 1776/rpcbind
udp 0 0 0.0.0.0:631 0.0.0.0:* 2149/cupsd
3306哪一行说明对外网是有端口监听着的。
可是,通过DbVisualizer连接失败,报错如下:
Product: DbVisualizer Pro 9.0.2
Build: #1912 (2012/12/18 10:21)
Java VM: Java HotSpot(TM) Client VM
Java Version: 1.6.0_23
Java Vendor: Sun Microsystems Inc.
OS Name: Windows 7
OS Arch: x86
OS Version: 6.1
An error occurred while establishing the connection:
Long Message:
Access denied for user 'root'@'192.168.0.100' (using password: YES)
Details:
Type: java.sql.SQLException
Error Code: 1045
SQL State: 28000
MySql-Front的错误消息如下:

Access denied for user 'root'@'192.168.0.100'(using password:YES)
这已经比前几次有进步了,再查。
偶然间看到了以下网页:
http://bbs.csdn.net/topics/320044602 第43楼,里头提到:
===================================================================================
错误信息 :ERROR 1045 (28000): Access denied for user 'usera'@'localhost' (using password:YES)
原因 : 用户账号并未创建
检查 :以管理员ROOT登录后,show grants for 'usera'@'localhost'; 或者 select user from mysql.user; 确认用户账号是否存在。
处理 :创建用户账号。
===================================================================================
然后又看到了这个网页:
http://www.linuxidc.com/Linux/2008-08/15067.htm , 里头提到要重设root密码。
两篇网文言下之意似乎都是说root及密码是不对的。
不管了,拣到篮里就是菜,试试看再说。登录104执行以下命令
[root@bogon ~]# mysql -u root -p
Enter password:
Welcome to the MySQL monitor. Commands end with ; or \g.
Your MySQL connection id is 7
Server version: 5.0.45 Source distribution
Type 'help;' or '\h' for help. Type '\c' to clear the buffer.
mysql> show databases;
+--------------------+
| Database |
+--------------------+
| information_schema |
| mysql |
| test |
+--------------------+
3 rows in set (0.03 sec)
mysql> use mysql;
Reading table information for completion of table and column names
You can turn off this feature to get a quicker startup with -A
Database changed
mysql> select user from user
-> ;
+------+
| user |
+------+
| root |
| root |
| root |
| root |
| root |
+------+
5 rows in set (0.00 sec)
mysql> update user set password=password('12345678') where user='root';
Query OK, 5 rows affected (0.00 sec)
Rows matched: 5 Changed: 5 Warnings: 0
mysql> flush privileges;
Query OK, 0 rows affected (0.00 sec)
mysql> quit
Bye
[root@bogon ~]# mysql -u root -p
Enter password:
Welcome to the MySQL monitor. Commands end with ; or \g.
Your MySQL connection id is 8
Server version: 5.0.45 Source distribution
Type 'help;' or '\h' for help. Type '\c' to clear the buffer.
mysql> quit
Bye
[root@bogon ~]#
然后,没有重启mysqld服务,直接用DBVisualizer,MySQL-Front和SQLToolbox测试,均告成攻。
以下是截图:

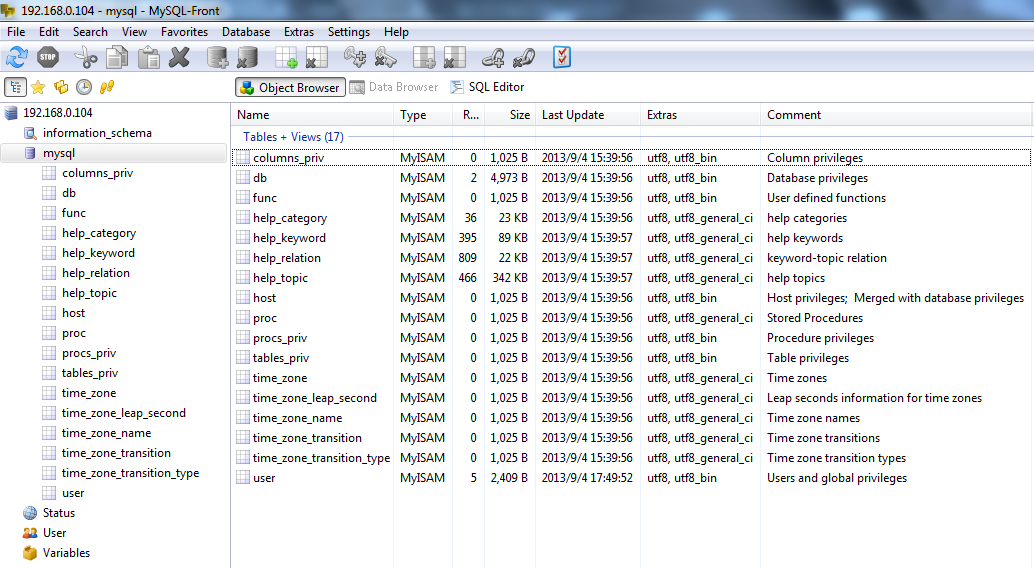
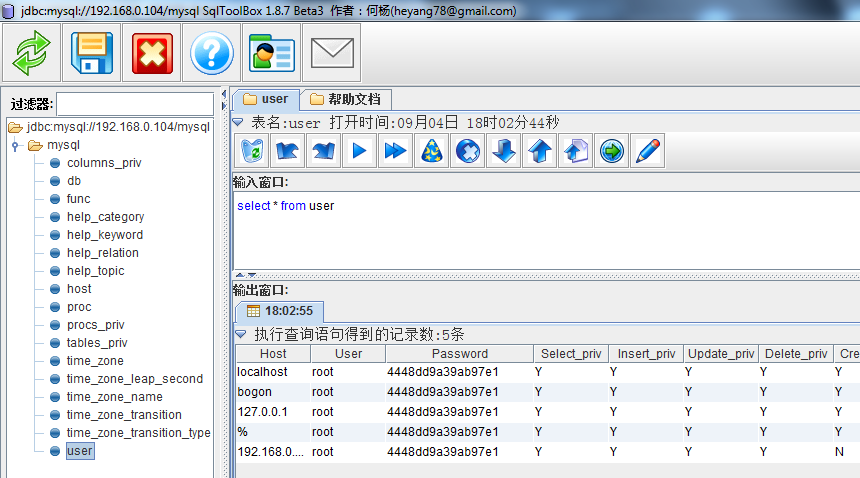
如果不是网文提醒,谁知道需要将root密码从原来的123456换到12345678呢,不换还连不上。换了就好了,这就是开门的钥匙。看来这把钥匙早已存在了,只是不了解它而已,了解了,问题也就解决了。
事后综合来看,正确启动,iptables开放3306端口,授权是必要的,重设密码也是必要的,四者在一起为充要条件,缺一不可。数据库客户端软件原来报的错也是对的,只是让人疑惑不去怀疑root和原有密码有问题,因为毕竟是不久前才设置好的.
于是为文,希望能对遇到同样问题的人有所帮助。
《全文完》
重装上了Fedora8自带的MySQL5.0.45,再试,告捷!!的更多相关文章
- Linux下编译安装mysql-5.0.45.tar.gz
安装环境:VMware9(桥接模式) + Linux bogon 2.6.32-642.3.1.el6.x86_64(查看linux版本信息:uname -a) 先给出MySQL For Linux ...
- 手动安装mysql-5.0.45.tar.gz
Linux下编译安装 安装环境:VMware9(桥接模式) + Linux bogon 2.6.32-642.3.1.el6.x86_64(查看linux版本信息:uname -a) 先给出MySQL ...
- 在Fedora8上安装MySQL5.0.45的过程
本来想安装最新的5.6.13-1版本,下载下来后,依赖的包rpmlib无处下载,无法只得作罢.从Foreda8的安装光盘中找到了以下文件: mysql-5.0.45-4.fc8.i386.rpm my ...
- 开放Fedora10自带的MySQL5.0.67的对外数据库服务
MySQL5.0.67是Fedora10安装时的可选项目. 测试的笔记本IP为192.168.0.100,作为安装Fedora10和MySQL5.0.67的服务器BlackMachine的IP地址为1 ...
- 搭建Eclipse+pydev+python2.7.5+django1.5.1+mysql5.0.45平台
mysqldb 下载地址 http://sourceforge.net/projects/mysql-python/ or https://pypi.python.org/pypi/MySQL-pyt ...
- wordpress 图片上传时发生了错误,请稍后再试 的解决办法
前一天网站还是好好的,仅一天过后就显示图片无法上传,百思不得其解 上下百度,大多数帖子提供的解决办法对我都不适用,继续搜,最后发现一篇帖子中提到是wp-config的编码格式问题 想到昨天刚好修改了下 ...
- 在Fedora10上安装MySQL5.0.18,告捷!
又一次安MySQL了,为什么又呢,因为前面成功那次算配置,即配置Fedora10自带的MySQL,这个还不算自己安装的,所以有必要再安装一次,以后还装也有可能,换操作系统,换MySql版本都可能这样做 ...
- HTML5 jQuery+FormData 异步上传文件,带进度条
<!DOCTYPE html> <html> <head> <meta charset="UTF-8"> <link href ...
- [转]用C#在windows上操控电脑自带蓝牙(入道指南)
本文转自:https://blog.csdn.net/YSSJZ960427031/article/details/50990372 前言如题,如果你也想用C#在windows上操控电脑自带蓝牙,但是 ...
随机推荐
- JAVA基础(一) ——— static 关键字
1. 静态代码块 保证只创建一次,提升属性的级别为类变量.初始化后独自占用一块内存 2. 静态代码块执行触发条件 (1).当创建这个类的实例 (2).当调用这个类的静态变量 (3).当调用这个类的 ...
- python日常碎碎念--PIL
昨天在处理网站相关图片的时候,发现图片都大小不一样,虽然一下就能想起PIL这个库,但是用法却不记得了. 简单记录一下用法. 可以直接用 Image.open 来打开图片,PIL库为这个文件对象提供了各 ...
- UVALive 5059 C - Playing With Stones 博弈论Sg函数
C - Playing With Stones Time Limit:3000MS Memory Limit:0KB 64bit IO Format:%lld & %llu S ...
- Codeforces Round #293 (Div. 2) C. Anya and Smartphone 数学题
C. Anya and Smartphone time limit per test 1 second memory limit per test 256 megabytes input standa ...
- Python学习笔记(八)—集合的学习
集合(set)是一个无序不重复元素的序列. 基本功能是进行成员关系测试和删除重复元素. 1.集合的作用 它可以把一个列表中重复的数据去掉,而不需要你再写判断 可以做关系测试,比如说有两个科目,一个数学 ...
- 推荐一个简洁优雅的博客系统,farbox
这是我用farbox搞的一个博客:http://www.jsnull.com/ 特点: 1.无数据库,数据存在dropbox里,需要自己注册一个dropbox帐号 2.静态文本文件即是文章,可以在任何 ...
- jquery常用写法简单记录
好久不写东西了......话不多说,主要记录一下,最近做的项目中用到的js的记录(虽然特别特别简单) 一 jquery常用写法记录 jQuery(this).addClass("select ...
- CentOS 6.9配置EPEL源
简介: EPEL是一个由特别兴趣小组创建.维护并管理的,针对 红帽企业版 Linux(RHEL)及其衍生发行版(比如 CentOS.Scientific Linux.Oracle Enterprise ...
- ASP.NET MVC中的Session以及处理方式
最近在ASP.NET MVC项目中碰到这样的情况:在一个controller中设置了Session,但在另一个controller的构造函数中无法获取该Session,会报"System.N ...
- xcode找不到真机设备 - 转
先确认证书是否正确 再确认Bundle Indentifier 是否与证书匹配 再确认Deployment Target 为:sdk从6.0改为4.3 如果xcode还无法识别iphone, Xcod ...