5、springcloud整合mybatis注解方式
1、上一篇学习了服务提供者provider,但是并不是单单就学习了服务提供者。中间还穿插使用了Hikari数据源和spring cloud整合mybatis。但是上篇使用mybatis时还是沿用了老的方式,需要配置mapper对应的xml文件。先来看看上篇使用mybatis的主要步骤
一、 pom.xml文件引用
<dependency>
<groupId>org.mybatis</groupId>
<artifactId>mybatis-spring</artifactId>
<version>1.3.2</version>
</dependency>
<dependency>
<groupId>org.mybatis.spring.boot</groupId>
<artifactId>mybatis-spring-boot-starter</artifactId>
<version>1.3.2</version>
</dependency>
二、application.yml配置文件加入mybtias配置项
mybatis:
mapperLocations: classpath:sc/provider/dao/*.xml
#configLocation: classpath:mybatis-config.xml
三、编写mapper文件user-mapper.xml
<?xml version="1.0" encoding="UTF-8" ?>
<!DOCTYPE mapper PUBLIC "-//mybatis.org//DTD Mapper 3.0//EN" "http://mybatis.org/dtd/mybatis-3-mapper.dtd" >
<mapper namespace="sc.provider.dao.UserDao" >
<select id="getUser" parameterType="java.lang.Long" resultType="sc.provider.model.User">
select id, userName, age, position from t_user where id = #{id,jdbcType=INTEGER}
</select>
<select id="listUser" resultType="sc.provider.model.User">
select id, userName, age, position from t_user
</select>
<insert id="addUser" parameterType="sc.provider.model.User">
insert into t_user (
id, userName, age, position
) values (
#{id,jdbcType=INTEGER},
#{userName,jdbcType=VARCHAR},
#{age,jdbcType=INTEGER},
#{position,jdbcType=VARCHAR}
)
</insert>
<update id="updateUser" parameterType="sc.provider.model.User">
update t_user set
userName = #{userName,jdbcType=VARCHAR},
age = #{age,jdbcType=INTEGER},
position = #{position,jdbcType=VARCHAR}
where id = #{id,jdbcType=INTEGER}
</update>
<delete id="deleteUser" parameterType="java.lang.Long">
delete from t_user
where id = #{id,jdbcType=INTEGER}
</delete>
</mapper>
四、编写UserDao.java
package sc.provider.dao;
import java.util.List;
import sc.provider.model.User;
public interface UserDao {
User getUser(Long id);
List<User> listUser();
int addUser(User user);
int updateUser(User user);
int deleteUser(Long id);
}
五、 在ProviderApplication.java添加@MapperScan(basePackages="sc.provider.dao")
经过上面五个步骤才能使用mybatis。本篇将和大家看看不能简化spring cloud 整合mybatis的步骤(在sc-eureka-client-provider工程上改造)
一、 依赖必不可少
<dependency>
<groupId>org.mybatis</groupId>
<artifactId>mybatis-spring</artifactId>
<version>1.3.2</version>
</dependency>
<dependency>
<groupId>org.mybatis.spring.boot</groupId>
<artifactId>mybatis-spring-boot-starter</artifactId>
<version>1.3.2</version>
</dependency>
二、 删除application.yml关于mybatis的配置
三、 删除mapper文件user-mapper.xml文件
四、改造UserDao.java类
package sc.provider.dao;
import java.util.List;
import org.apache.ibatis.annotations.Delete;
import org.apache.ibatis.annotations.Insert;
import org.apache.ibatis.annotations.Mapper;
import org.apache.ibatis.annotations.Select;
import org.apache.ibatis.annotations.Update;
import sc.provider.model.User;
@Mapper
public interface UserDao {
@Select(value="select id, userName, age, position from t_user where id = #{id,jdbcType=INTEGER}")
User getUser(Long id);
@Select(value="select id, userName, age, position from t_user")
List<User> listUser();
@Insert(value="insert into t_user (id, userName, age, position) values ( #{id,jdbcType=INTEGER},#{userName,jdbcType=VARCHAR},#{age,jdbcType=INTEGER},#{position,jdbcType=VARCHAR})")
int addUser(User user);
@Update(value="update t_user set userName = #{userName,jdbcType=VARCHAR},age = #{age,jdbcType=INTEGER},position = #{position,jdbcType=VARCHAR} where id = #{id,jdbcType=INTEGER}")
int updateUser(User user);
@Delete(value=" delete from t_user where id = #{id,jdbcType=INTEGER}")
int deleteUser(Long id);
}
五、 @MapperScan注解必不可少
package sc.provider;
import org.mybatis.spring.annotation.MapperScan;
import org.springframework.boot.SpringApplication;
import org.springframework.boot.autoconfigure.SpringBootApplication;
import org.springframework.cloud.netflix.eureka.EnableEurekaClient;
@SpringBootApplication
@EnableEurekaClient
@MapperScan(basePackages="sc.provider.dao")
public class ProviderApplication {
public static void main(String[] args) {
SpringApplication.run(ProviderApplication.class, args);
}
}
经过以上步骤就把使用xml方式的mybatis改造成使用annotation方式的mybatis了。
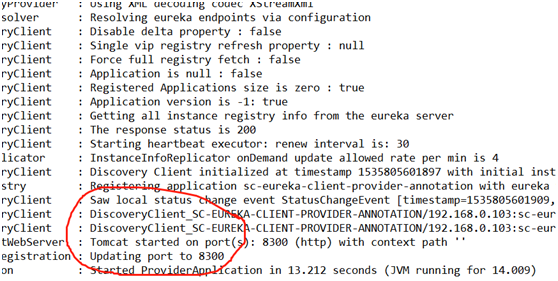
2、启动注册中心sc-eureka-server,启动sc-eureka-client-provider-annotation(使用sc-eureka-client-provider项目改造),验证是否改造成功
方式一:
方式二:
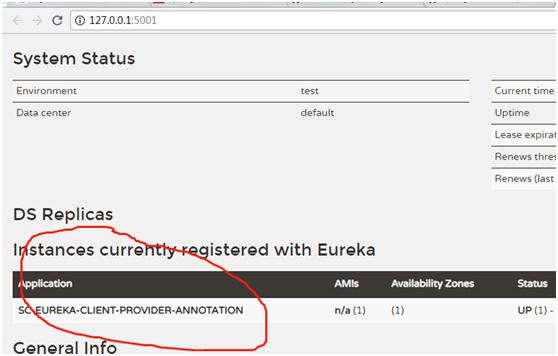
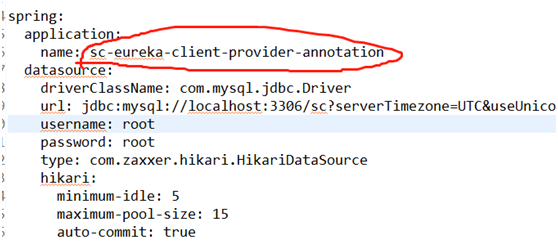
圈住的名字是在application.yml配置的
3、使用postman方法相应restful接口,这里就不一一访问了,可以参考上一篇文章的访问方式
添加:
http://127.0.0.1:8300/user/addUser
查询:
http://127.0.0.1:8300/user/getUser/4
列表:
http://127.0.0.1:8300/user/listUser
更新:
http://127.0.0.1:8300/user/updateUser
删除:
http://127.0.0.1:8300/user/deleteUser/2
5、springcloud整合mybatis注解方式的更多相关文章
- Spring Boot整合Mybatis(注解方式和XML方式)
其实对我个人而言还是不够熟悉JPA.hibernate,所以觉得这两种框架使用起来好麻烦啊. 一直用的Mybatis作为持久层框架, JPA(Hibernate)主张所有的SQL都用Java代码生成, ...
- SpringBoot整合Mybatis注解版---update出现org.apache.ibatis.binding.BindingException: Parameter 'XXX' not found. Available parameters are [arg1, arg0, param1, param2]
SpringBoot整合Mybatis注解版---update时出现的问题 问题描述: 1.sql建表语句 DROP TABLE IF EXISTS `department`; CREATE TABL ...
- MyBatis从入门到精通(第3章):MyBatis注解方式的基本使用
MyBatis 注解方式就是将 SQL 语句直接写在DAO层的接口上. 在黑马录制的2018年双元视频课:\08 SSM整合案例[企业权限管理系统]\07.订单操作 有使用MyBatis注解进行多表 ...
- SpringBoot数据访问之整合mybatis注解版
SpringBoot数据访问之整合mybatis注解版 mybatis注解版: 贴心链接:Github 在网页下方,找到快速开始文档 上述链接方便读者查找. 通过快速开始文档,搭建环境: 创建数据库: ...
- mybatis源码学习--spring+mybatis注解方式为什么mybatis的dao接口不需要实现类
相信大家在刚开始学习mybatis注解方式,或者spring+mybatis注解方式的时候,一定会有一个疑问,为什么mybatis的dao接口只需要一个接口,不需要实现类,就可以正常使用,笔者最开始的 ...
- springboot整合mybatis(注解)
springboot整合mybatis(注解) 1.pom.xml: <?xml version="1.0" encoding="UTF-8"?> ...
- 【spring boot】14.spring boot集成mybatis,注解方式OR映射文件方式AND pagehelper分页插件【Mybatis】pagehelper分页插件分页查询无效解决方法
spring boot集成mybatis,集成使用mybatis拖沓了好久,今天终于可以补起来了. 本篇源码中,同时使用了Spring data JPA 和 Mybatis两种方式. 在使用的过程中一 ...
- SpringBoot 2.x (9):整合Mybatis注解实战
SSM框架再熟悉不过了,不过以前通常是使用XML写SQL语句 这里用SpringBoot整合Mybatis并且使用注解进行开发 依赖: <!-- Mybatis --> <depen ...
- MyBatis从入门到精通(五):MyBatis 注解方式的基本用法
最近在读刘增辉老师所著的<MyBatis从入门到精通>一书,很有收获,于是将自己学习的过程以博客形式输出,如有错误,欢迎指正,如帮助到你,不胜荣幸! 1. @Select 注解 1.1 使 ...
随机推荐
- 超強的Linux指令解釋網站《explainshell.com》,學Linux必備!
ExplainShell 官方網站:http://explainshell.com/ 原始碼下載:https://github.com/idank/explainshell 用瀏覽器打該explain ...
- 57.Queue Reconstruction by Height(按身高重建对列)
Level: Medium 题目描述: Suppose you have a random list of people standing in a queue. Each person is d ...
- 安装gmpy2
本来只想做个RSA的题,结果环境就搭了好久 首先想用 pip install gmpy2 发现缺东西,要安装gmp,mpfr,mpc 安装: mkdir -p $HOME/src mkdir -p $ ...
- LLppdd likes strings
LLppdd's likes strings! Time Limit: 1 s Memory Limit: 256 MB 题目背景 LLppdd 由于实在是太弱了,在 \(ION 2018\) 模拟十 ...
- YUV/RGB与H264之间的编解码
1.源码下载 http://download.videolan.org/x264/snapshots/ 2.编译 ./configure --prefix=./_install --enable-sh ...
- go语言从例子开始之Example25.通道方向
当使用通道作为函数的参数时,你可以指定这个通道是不是只用来发送或者接收值.这个特性提升了程序的类型安全性. Example: package main import "fmt" / ...
- 【转】SQLSERVER磁盘原理
[声明:本篇博客转载自http://www.cnblogs.com/ljhdo/p/5149401.html] 最近一段时间的工作主要是与SQLSERVER数据库打交道,需要对SQLSERVER有一个 ...
- Windows 命令提示符
命令提示符(cmd): 启动:Win+R ,输入cmd回车 切换盘符:盘符名称: 进入文件夹:cd 文件夹名称 进入多级文件夹:cd 文件夹1\文件夹2\文件夹3 返回上一级:cd .. 直接回根路径 ...
- Mysql 数据库默认值选 ''" 、Null和Empty String的区别
两者的查询方式不一样:NULL值查询使用is null/is not null查询,而empty string可以使用=或者!=.<.>等算术运算符,这点算是最主要的区别了. 对于myis ...
- java 读取html字符串替换字符
import org.jsoup.Jsoup; import org.jsoup.nodes.Document; import org.jsoup.nodes.Element; import org. ...