开机流程 模块管理 Loader
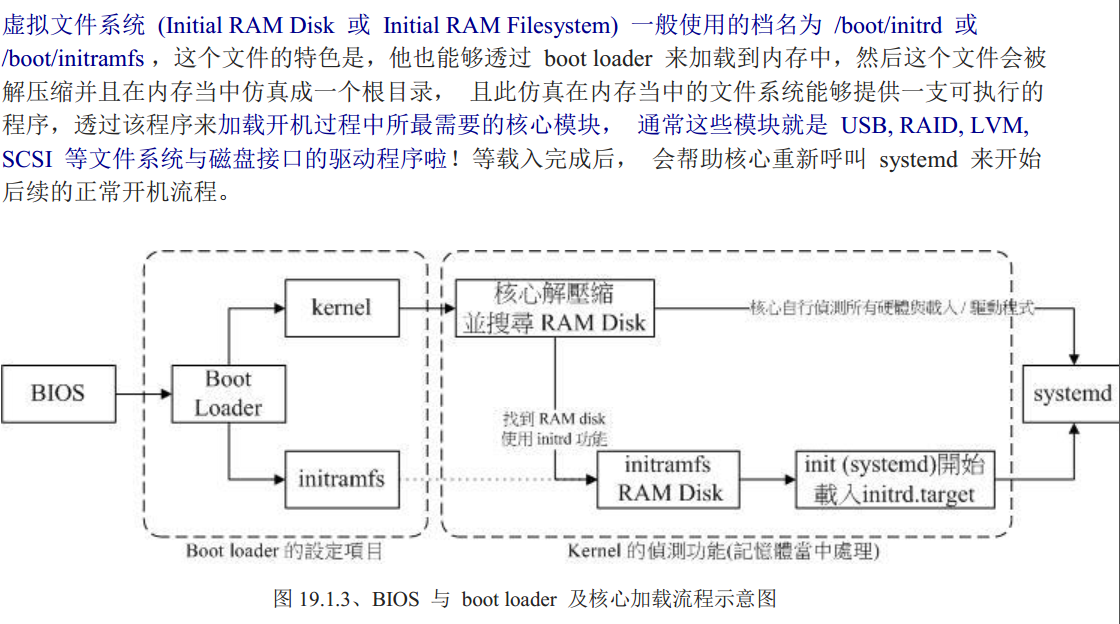
主机系统开机流程

boot loader 主要功能


显示核心模块加载信息

查询模块信息

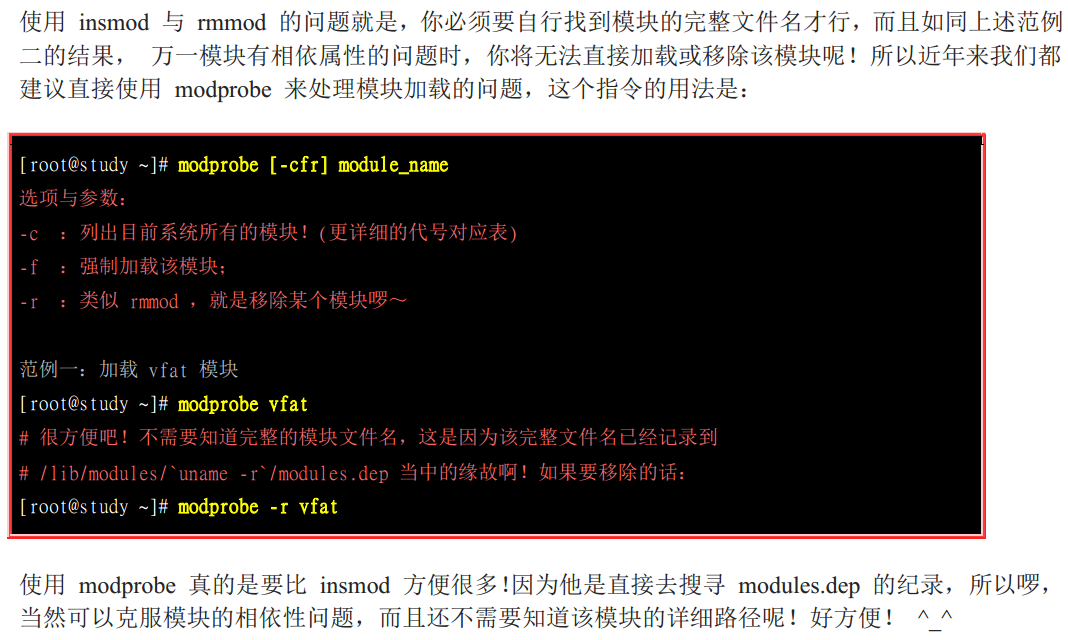
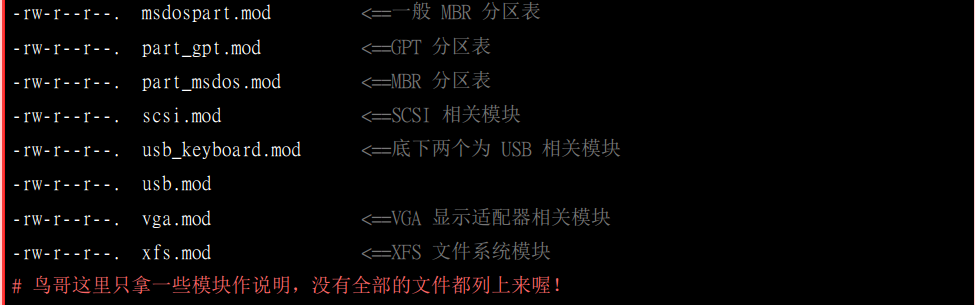
核心模块的加载与移除


boot loader 的两个 stage


grup2配置文件 /boot/grub2/grub.cfg

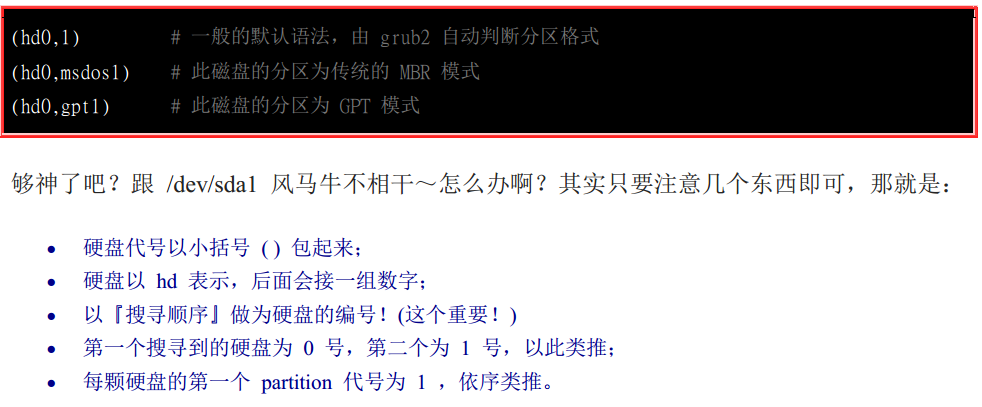
grub2识别磁盘

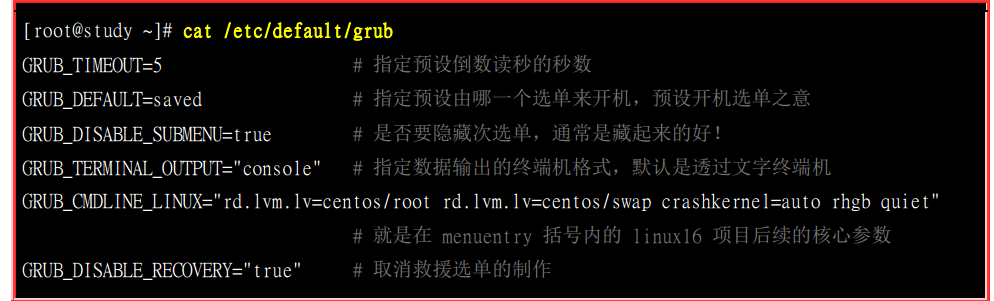
grub2 配置文件 /etc/default/grub 和 /etc/grub.d


[root@localhost grub.d]# cat /boot/grub2/grub.cfg

#

# DO NOT EDIT THIS FILE

#

# It is automatically generated by grub2-mkconfig using templates

# from /etc/grub.d and settings from /etc/default/grub

#

### BEGIN /etc/grub.d/00_header ###

set pager=

if [ -s $prefix/grubenv ]; then

  load_env

fi

if [ "${next_entry}" ] ; then

   set default="${next_entry}"

   set next_entry=

   save_env next_entry

   set boot_once=true

else

   set default="${saved_entry}"

fi

if [ x"${feature_menuentry_id}" = xy ]; then

  menuentry_id_option="--id"

else

  menuentry_id_option=""

fi

export menuentry_id_option

if [ "${prev_saved_entry}" ]; then

  set saved_entry="${prev_saved_entry}"

  save_env saved_entry

  set prev_saved_entry=

  save_env prev_saved_entry

  set boot_once=true

fi

function savedefault {

  if [ -z "${boot_once}" ]; then

    saved_entry="${chosen}"

    save_env saved_entry

  fi

}

function load_video {

  if [ x$feature_all_video_module = xy ]; then

    insmod all_video

  else

    insmod efi_gop

    insmod efi_uga

    insmod ieee1275_fb

    insmod vbe

    insmod vga

    insmod video_bochs

    insmod video_cirrus

  fi

}

terminal_output console

if [ x$feature_timeout_style = xy ] ; then

  set timeout_style=menu

  set timeout=

# Fallback normal timeout code in case the timeout_style feature is

# unavailable.

else

  set timeout=

fi

### END /etc/grub.d/00_header ###

### BEGIN /etc/grub.d/00_tuned ###

set tuned_params=""

set tuned_initrd=""

### END /etc/grub.d/00_tuned ###

### BEGIN /etc/grub.d/01_users ###

if [ -f ${prefix}/user.cfg ]; then

  source ${prefix}/user.cfg

  if [ -n "${GRUB2_PASSWORD}" ]; then

    set superusers="root"

    export superusers

    password_pbkdf2 root ${GRUB2_PASSWORD}

  fi

fi

  # END /etc/grub.d/01_users ###

▽

### BEGIN /etc/grub.d/10_linux ###

menuentry 'CentOS Linux (3.10.0-957.el7.x86_64) 7 (Core)' --class centos --class gnu-linux --class gnu --class os --unrestricted $menuentry_id_option 'gnulinux-3.10.0-957.el7.x86_64-advanced-ccdda529-f59c-4990-9165-b6d1cd522034' {

        load_video

        set gfxpayload=keep

        insmod gzio

        insmod part_msdos

        insmod xfs

        set root='hd0,msdos1'

        if [ x$feature_platform_search_hint = xy ]; then

          search --no-floppy --fs-uuid --set=root --hint-bios=hd0,msdos1 --hint-efi=hd0,msdos1 --hint-baremetal=ahci0,msdos1 --hint='hd0,msdos1'  ba80a371-e434-431e--df4b2827efad

        else

          search --no-floppy --fs-uuid --set=root ba80a371-e434-431e--df4b2827efad

        fi

        linux16 /vmlinuz-3.10.-.el7.x86_64 root=/dev/mapper/centos-root ro crashkernel=auto rd.lvm.lv=centos/root rd.lvm.lv=centos/swap rhgb quiet LANG=zh_CN.UTF-

        initrd16 /initramfs-3.10.-.el7.x86_64.img

}

menuentry 'CentOS Linux (0-rescue-f7819fbfbe0b4074b5dfebfab540afcb) 7 (Core)' --class centos --class gnu-linux --class gnu --class os --unrestricted $menuentry_id_option 'gnulinux-0-rescue-f7819fbfbe0b4074b5dfebfab540afcb-advanced-ccdda529-f59c-4990-9165-b6d1cd522034' {

        load_video

        insmod gzio

        insmod part_msdos

        insmod xfs

        set root='hd0,msdos1'

        if [ x$feature_platform_search_hint = xy ]; then

          search --no-floppy --fs-uuid --set=root --hint-bios=hd0,msdos1 --hint-efi=hd0,msdos1 --hint-baremetal=ahci0,msdos1 --hint='hd0,msdos1'  ba80a371-e434-431e--df4b2827efad

        else

          search --no-floppy --fs-uuid --set=root ba80a371-e434-431e--df4b2827efad

        fi

        linux16 /vmlinuz--rescue-f7819fbfbe0b4074b5dfebfab540afcb root=/dev/mapper/centos-root ro crashkernel=auto rd.lvm.lv=centos/root rd.lvm.lv=centos/swap rhgb quiet

        initrd16 /initramfs--rescue-f7819fbfbe0b4074b5dfebfab540afcb.img

}

### END /etc/grub.d/10_linux ###

### BEGIN /etc/grub.d/20_linux_xen ###

### END /etc/grub.d/20_linux_xen ###

### BEGIN /etc/grub.d/20_ppc_terminfo ###

### END /etc/grub.d/20_ppc_terminfo ###

### BEGIN /etc/grub.d/30_os-prober ###

### END /etc/grub.d/30_os-prober ###

### BEGIN /etc/grub.d/40_custom ###

# This file provides an easy way to add custom menu entries.  Simply type the

# menu entries you want to add after this comment.  Be careful not to change

# the 'exec tail' line above.

### END /etc/grub.d/40_custom ###

### BEGIN /etc/grub.d/41_custom ###

if [ -f  ${config_directory}/custom.cfg ]; then

  source ${config_directory}/custom.cfg

elif [ -z "${config_directory}" -a -f  $prefix/custom.cfg ]; then

  source $prefix/custom.cfg;

fi

### END /etc/grub.d/41_custom ###

[root@localhost grub.d]# vim /etc/grub.d/40_custom

#!/bin/sh

exec tail -n + $

# This file provides an easy way to add custom menu entries.  Simply type the

# menu entries you want to add after this comment.  Be careful not to change

# the 'exec tail' line above.

menuentry 'My graphical Centos' --class centos --class gnu-linux --class gnu --class os --unrestricted --id 'mygraphical' $menuentry_id_option 'gnulinux-3.10.0-957.el7.x86_64-advanced-ccdda529-f59c-4990-9165-b6d1cd522034' {

        load_video

        set gfxpayload=keep

        insmod gzio

        insmod part_msdos

        insmod xfs

        set root='hd0,msdos1'

        if [ x$feature_platform_search_hint = xy ]; then

          search --no-floppy --fs-uuid --set=root --hint-bios=hd0,msdos1 --hint-efi=hd0,msdos1 --hint-baremetal=ahci0,msdos1 --hint='hd0,msdos1'  ba80a371-e434-431e--df4b2827efad

        else

          search --no-floppy --fs-uuid --set=root ba80a371-e434-431e--df4b2827efad

        fi

        linux16 /vmlinuz-3.10.-.el7.x86_64 root=/dev/mapper/centos-root ro crashkernel=auto rd.lvm.lv=centos/root rd.lvm.lv=centos/swap rhgb quiet LANG=zh_CN.UTF- systemd.unit=graphical.target

        initrd16 /initramfs-3.10.-.el7.x86_64.img

}

~

"40_custom" 20L, 1185C 已写入

[root@localhost grub.d]# grub2-mkconfig -o /boot/grub2/grub.cfg

Generating grub configuration file ...

Found linux image: /boot/vmlinuz-3.10.-.el7.x86_64

Found initrd image: /boot/initramfs-3.10.-.el7.x86_64.img

Found linux image: /boot/vmlinuz--rescue-f7819fbfbe0b4074b5dfebfab540afcb

Found initrd image: /boot/initramfs--rescue-f7819fbfbe0b4074b5dfebfab540afcb.img

done

[root@localhost grub.d]# reboot

选择之后就会直接进入我们的图形界面
设置默认开机画面为字符
[root@localhost /]# sudo systemctl set-default multi-user.target

Removed symlink /etc/systemd/system/default.target.

Created symlink from /etc/systemd/system/default.target to /usr/lib/systemd/system/multi-user.target.
以前我们设置的默认开机方式是图形界面,经过上面设置之后,默认设置就变成了命令行模式。
但是当我们选择第三项,我们自己的设置的时候,他还是会进入图形界面。有点意思。
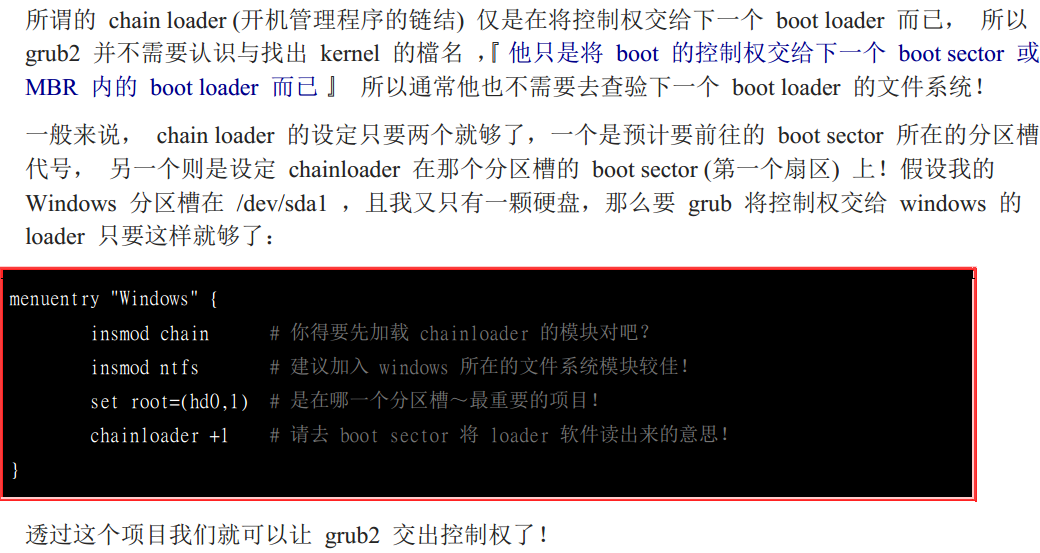
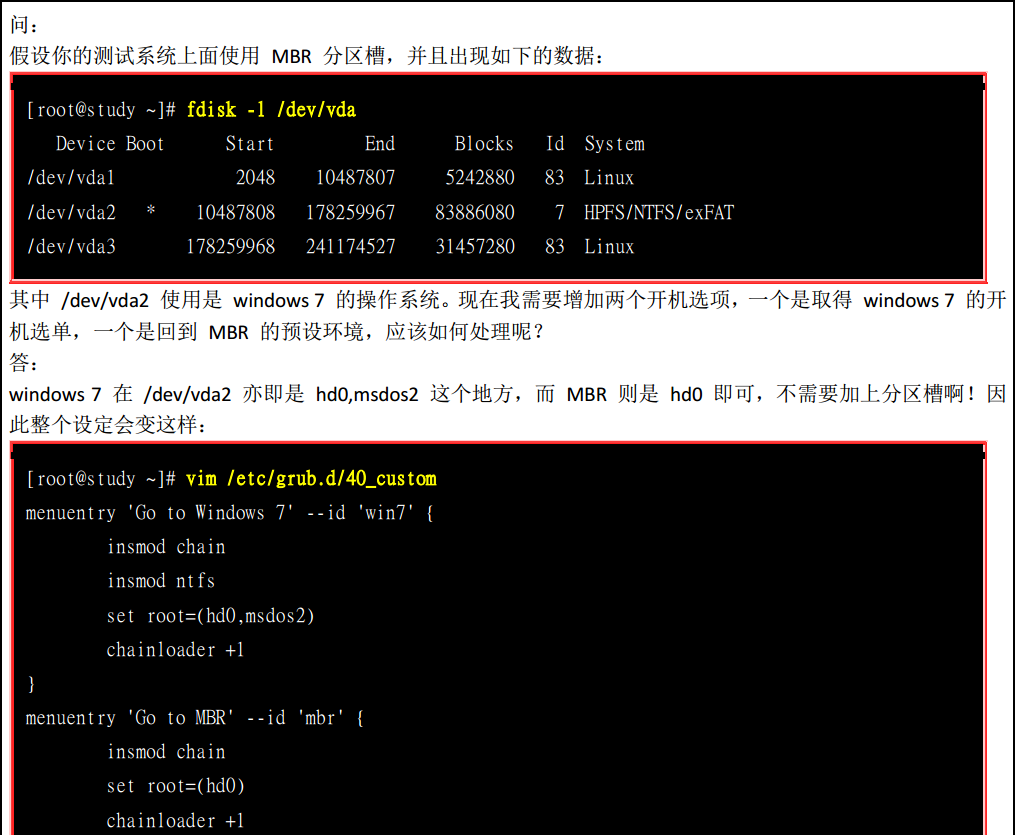
透过chainloader 的方式移交lader 控制权

上面主要介绍的做双系统的相关知识(我觉得),还是需要实践,看是看不会的。。。。下面有时间会找台机器做测试。来做双系统试一下

开机流程 模块管理 Loader的更多相关文章
- Linux入门进阶第六天——登录文件、开机与模块管理
一.登录文件概述 1.什么是登录文件 简单的说,就是记录系统活动信息的几个文件, 例如:何时.何地(来源 IP).何人 (什么服务名称).做了什么动作 (讯息登录啰). 换句话说就是:记录系统在什么时 ...
- liunx 开机流程与模块管理
系统开机的经过可以汇整成底下的流程的: 加载 BIOS 的硬件信息与进行自我测试,并依据设定取得第一个可开机的装置: 读取并执行第一个开机装置内 MBR 的 boot Loader (亦即是 grub ...
- 第五部分 linux系统管理员 开机流程 模组管理 与loader
第五部分 linux系统管理员 开机流程 模组管理 与loader 开机流程分析 cmos保存电脑硬件的参数 bios 基本的输入输出系统 读取硬件的软件 MBR master bo ...
- Linux之RHEL6的开机流程分析
开机——很多人觉得很简单的事情,只要按下电源开关,然后系统就会自然启动,没有什么需要学习的.其实不然,如果系统没有什么问题,可以正常登陆的时候,当然开机很简单.但更多的时候,我们需要知道当机子不能正常 ...
- Linux学习-Linux 的开机流程分析
开机流程一览 系统开机的经过可以汇整成底下的流程的: 加载 BIOS 的硬件信息与进行自我测试,并依据设定取得第一个可开机的装置; 读取并执行第一个开机装置内 MBR 的 boot Loader (亦 ...
- IA-32/centos7开机流程
开机后系统首先在实地址模式下工作(只有1MB的寻址空间) 开机过程中,需要先准备在实模式下的中断向量表和中断服务程序.通常,由固化在主板上一块ROM芯片中的BIOS程序完成 加载BIOS的硬件信息,B ...
- linux系统的开机流程
开机流程: 1)BIOS:开机主动运行的韧体.会认识第一个可开机设备. 2)MBR:第一个可开机设备的第一个扇区内的主引导分区块.当中包括引导载入程序. 3)引导载入程序:一支可读取内核文件来运行的软 ...
- CentOS开机流程详解
一个执着于技术的公众号 开机流程 BIOS: (Basic Input Output System)基本输入输出系统,它是一组固化到计算机内主板上一个ROM芯片上的程序,保存着计算机最重要的基本输入输 ...
- 开机流程与主引导分区(MBR)——鸟哥私房菜
在前篇随笔中,已经谈到了CMOS与BIOS,CMOS是记录各项硬件参数(包括系统时间.设备的I/O地址.CPU的电压和频率等)且嵌入到主板上面的存储器,BIOS是一个写入到主板上的韧体(韧体是写入到硬 ...
随机推荐
- 第五组postmortem报告
为期近半年的软工课程顺利收工了.这一个学期的网站制作中, 憧憬过.懊恼过.兴奋过,回顾整个制作过程,我们按老师的要求来一份验尸报告. 1. 每个成员在beta 阶段的实践和alpha 阶段有何改进? ...
- android中返回数据给上一个活动,可以用来回显数据
(一)who简介:没错,就是startActivityForResult()方法,这个方法用来在活动被销毁的时候返回数据给上一个方法.参数说明: startActivityForResult(inte ...
- 2019牛客多校第七场H Pair 数位DP
题意:给你一个3个数A, B, C问有多少对pair(i, j),1 <= i <= A, 1 <= j <= B, i AND j > C或 i XOR j < ...
- Codeforces 1185G2 Playlist for Polycarp (hard version) 背包,暴力
题意及思路:https://www.cnblogs.com/Als123/p/11061147.html 代码: #include <bits/stdc++.h> #define LL l ...
- (PASS)JAVA数组去重 三种方法 (不用集合)
第一种方法(只学到数组的看): 定义一个新的数组长度和旧数组的长度一样,存储除去重复数据的旧数组的数据和0, package demo01; import java.sql.Array; import ...
- vue学习笔记(五)— 组件通信
关于vue父子组件通信 作者:狐狸家的鱼 本文链接:vue组件通信 GitHub:sueRimn 如果组件是一个单页面,组件之间存在父子关系,数据传递就需要根据父子不同的地位使用不同的办法. 借助新建 ...
- Halo(三)
接口中可以定义方法 1. 定义静态方法(直接调用) public interface Test { public static void method() { /** * 1.定义一个静态的带有方法体 ...
- Vue.js(六)
路由(用 Vue.js + Vue Router 创建单页应用) <script src="https://unpkg.com/vue-router/dist/vue-router.j ...
- c++11的构造函数继承
https://en.cppreference.com/w/cpp/language/using_declaration 在[Inheriting constructors]这一节. 其实叫做"基类的 ...
- MariaDB PHP语法
MariaDB与各种编程语言和框架(如PHP,C#,JavaScript,Ruby on Rails,Django等)合作良好. PHP仍然是所有可用语言中最受欢迎的语言,因为它的简单性和历史足迹. ...