
springboot集成使用rabbitmq笔记(3.基本过程)
1.AMQP协议
AMQP 0-9-1的工作过程如下图:消息(message)被发布者(publisher)发送给交换机(exchange),交换机常常被比喻成邮局或者邮箱。然后交换机将收到的消息根据路由规则分发给绑定的队列(queue)。最后AMQP代理会将消息投递给订阅了此队列的消费者,或者消费者按照需求自行获取。
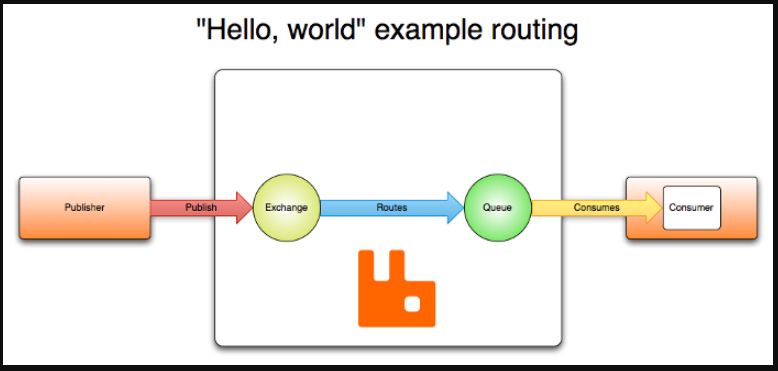
2.相关组件
Connection:用于权限控制的虚拟主机,一个虚拟主机可以包含多个交换机、队列、绑定,可以设置不同账号,不同的权限
Channel:消息通道
Exchange:交换机,生产者将消息发送至交换机
Queue:队列,用于存储消息
Binding:绑定关系,绑定交换机与队列的关系
3.各个组件的创建
spring-boot-autoconfiguer中关于amqp的自动配置
3.1.关于我们自定义组件的初始化
①Exchange的初始
                    public class TopicExchange extends AbstractExchange {

                        //交换机名称,父类AbstractExchange中的属性

                        private final String name;

                        //是否持久化(默认true,重启服务后依然存在),父类AbstractExchange中的属性

                        private final boolean durable;

                        //是否自动删除(默认false,长时间不用自动删除),父类AbstractExchange中的属性

                        private final boolean autoDelete;

                        //参数

                        private final Map<String, Object> arguments;

                        //是否延迟类型,true 发送消息的时候需要额外添加header().

                        //注意可能会报异常( unknown exchange type 'x-delayed-message')异常处理方法

                        private volatile boolean delayed;

                        //是否内部使用,若内部使用则客户端不能发送消息

                        private boolean internal;

                        public TopicExchange(String name, boolean durable, boolean autoDelete, Map<String, Object> arguments) {

                            super(name, durable, autoDelete, arguments);

                        }

                        @Override

                        public final String getType() {

                            return ExchangeTypes.TOPIC;

                        }

                    }
②Queue的初始
                    public class Queue extends AbstractDeclarable {

                        //队列名称

                        private final String name;

                        //是否持久化

                        private final boolean durable;

                        //是否声明该队列是否为连接独占,若为独占,连接关闭后队列即被删除

                        private final boolean exclusive;

                        //是否自动删除,若没有消费者订阅该队列,队列将被删除

                        private final boolean autoDelete;

                        //参数,可以指定队列长度,消息生存时间等队列的设置

                        private final java.util.Map<java.lang.String, java.lang.Object> arguments;

                        public Queue(String name, boolean durable, boolean exclusive, boolean autoDelete, Map<String, Object> arguments) {

                        Assert.notNull(name, "'name' cannot be null");

                        this.name = name;

                        this.durable = durable;

                        this.exclusive = exclusive;

                        this.autoDelete = autoDelete;

                        this.arguments = arguments;

                        }

                    }
③Binding的初始
                    public class Binding extends AbstractDeclarable {

                        //绑定至队列或交换机

                        public enum DestinationType {

                            QUEUE, EXCHANGE;

                        }

                        //队列或交换机名称

                        private final String destination;

                        //交换机名称

                        private final String exchange;

                        //绑定的路由

                        private final String routingKey;

                        //参数

                        private final Map<String, Object> arguments;

                        //绑定至队列或交换机

                        private final DestinationType destinationType;

                        public Binding(String destination, DestinationType destinationType, String exchange, String routingKey,

                                Map<String, Object> arguments) {

                            this.destination = destination;

                            this.destinationType = destinationType;

                            this.exchange = exchange;

                            this.routingKey = routingKey;

                            this.arguments = arguments;

                        }

                    }
3.2.Connection的创建,CachingConnectionFactory定义相关属性及缓存连接
                @Configuration

                @ConditionalOnMissingBean(ConnectionFactory.class)

                protected static class RabbitConnectionFactoryCreator {

                    @Bean

                    public CachingConnectionFactory rabbitConnectionFactory(RabbitProperties config)

                            throws Exception {

                        RabbitConnectionFactoryBean factory = new RabbitConnectionFactoryBean();

                        if (config.determineHost() != null) {

                            factory.setHost(config.determineHost());

                        }

                        factory.setPort(config.determinePort());

                        if (config.determineUsername() != null) {

                            factory.setUsername(config.determineUsername());

                        }

                        if (config.determinePassword() != null) {

                            factory.setPassword(config.determinePassword());

                        }

                        if (config.determineVirtualHost() != null) {

                            factory.setVirtualHost(config.determineVirtualHost());

                        }

                        if (config.getRequestedHeartbeat() != null) {

                            factory.setRequestedHeartbeat(config.getRequestedHeartbeat());

                        }

                        RabbitProperties.Ssl ssl = config.getSsl();

                        if (ssl.isEnabled()) {

                            factory.setUseSSL(true);

                            if (ssl.getAlgorithm() != null) {

                                factory.setSslAlgorithm(ssl.getAlgorithm());

                            }

                            factory.setKeyStore(ssl.getKeyStore());

                            factory.setKeyStorePassphrase(ssl.getKeyStorePassword());

                            factory.setTrustStore(ssl.getTrustStore());

                            factory.setTrustStorePassphrase(ssl.getTrustStorePassword());

                        }

                        if (config.getConnectionTimeout() != null) {

                            factory.setConnectionTimeout(config.getConnectionTimeout());

                        }

                        factory.afterPropertiesSet();

                        CachingConnectionFactory connectionFactory = new CachingConnectionFactory(

                                factory.getObject());

                        connectionFactory.setAddresses(config.determineAddresses());

                        connectionFactory.setPublisherConfirms(config.isPublisherConfirms());

                        connectionFactory.setPublisherReturns(config.isPublisherReturns());

                        //缓存通道数量,若未配置则默认为25

                        if (config.getCache().getChannel().getSize() != null) {

                            connectionFactory

                                    .setChannelCacheSize(config.getCache().getChannel().getSize());

                        }

                        //缓存模式,分为两种,1.缓存连接即connection模式,2.缓存通道即channel模式,未配置的默认模式。

                        //connection模式缓存多个Connection,可以配置缓存连接大小,channel模式只有一个connection,缓存多个channel,可以配置

                        if (config.getCache().getConnection().getMode() != null) {

                            connectionFactory

                                    .setCacheMode(config.getCache().getConnection().getMode());

                        }

                        //连接数,默认一个

                        if (config.getCache().getConnection().getSize() != null) {

                            connectionFactory.setConnectionCacheSize(

                                    config.getCache().getConnection().getSize());

                        }

                        //设置获取通道时(缓存的通道都被使用了)等待的毫秒数,默认为0,为0时创建新的通道

                        if (config.getCache().getChannel().getCheckoutTimeout() != null) {

                            connectionFactory.setChannelCheckoutTimeout(

                                    config.getCache().getChannel().getCheckoutTimeout());

                        }

                        return connectionFactory;

                    }

                }
3.3.RabbitTemplate的创建,用于发送及接受消息,当我们自己需要发送消息及接收消息时可以注入此对象
                @Bean

                @ConditionalOnSingleCandidate(ConnectionFactory.class)

                @ConditionalOnMissingBean(RabbitTemplate.class)

                public RabbitTemplate rabbitTemplate(ConnectionFactory connectionFactory) {

                    RabbitTemplate rabbitTemplate = new RabbitTemplate(connectionFactory);

                    MessageConverter messageConverter = this.messageConverter.getIfUnique();

                    //设置消息转换器,可以自定义

                    if (messageConverter != null) {

                        rabbitTemplate.setMessageConverter(messageConverter);

                    }

                    rabbitTemplate.setMandatory(determineMandatoryFlag());

                    RabbitProperties.Template templateProperties = this.properties.getTemplate();

                    RabbitProperties.Retry retryProperties = templateProperties.getRetry();

                    //是否开启重试,默认false,可配置(spring-retry)

                    if (retryProperties.isEnabled()) {

                        rabbitTemplate.setRetryTemplate(createRetryTemplate(retryProperties));

                    }

                    //接收超时,默认0

                    if (templateProperties.getReceiveTimeout() != null) {

                        rabbitTemplate.setReceiveTimeout(templateProperties.getReceiveTimeout());

                    }

                    //回复超时,默认5000

                    if (templateProperties.getReplyTimeout() != null) {

                        rabbitTemplate.setReplyTimeout(templateProperties.getReplyTimeout());

                    }

                    return rabbitTemplate;

                }
3.4.RabbitAdmin的创建
Spring 容器中获取 exchange、Bingding、routingkey 以及queue 的 @bean 声明,然后使用 rabbitTemplate 的 execute 方法进行执行对应的声明、修改、删除等一系列 rabbitMQ 基础功能操作。例如添加交换机、删除一个绑定、清空一个队列里的消息等等
                @Bean

                @ConditionalOnSingleCandidate(ConnectionFactory.class)

                @ConditionalOnProperty(prefix = "spring.rabbitmq", name = "dynamic", matchIfMissing = true)

                @ConditionalOnMissingBean(AmqpAdmin.class)

                public AmqpAdmin amqpAdmin(ConnectionFactory connectionFactory) {

                    return new RabbitAdmin(connectionFactory);

                }
其实现了诸多借口RabbitAdmin implements AmqpAdmin, ApplicationContextAware, ApplicationEventPublisherAware,InitializingBean
其afterPropertiesSet方法就是在 我们的 bean 加载后进行一些设置,其主要方法为其中的initialize方法
                public void afterPropertiesSet() {

                    synchronized (this.lifecycleMonitor) {

                        //........略...........

                                    initialize();

                            //.......略......................

                }
                public void initialize() {

                    //applicationContext为空直接返回

                    if (this.applicationContext == null) {

                        this.logger.debug("no ApplicationContext has been set, cannot auto-declare Exchanges, Queues, and Bindings");

                        return;

                    }

                    this.logger.debug("Initializing declarations");

                    //从spring容器中获取我们定义的exchange,queue,binding对象

                    Collection<Exchange> contextExchanges = new LinkedList<Exchange>(

                            this.applicationContext.getBeansOfType(Exchange.class).values());

                    Collection<Queue> contextQueues = new LinkedList<Queue>(

                            this.applicationContext.getBeansOfType(Queue.class).values());

                    Collection<Binding> contextBindings = new LinkedList<Binding>(

                            this.applicationContext.getBeansOfType(Binding.class).values());

                    @SuppressWarnings("rawtypes")

                    Collection<Collection> collections = this.applicationContext.getBeansOfType(Collection.class, false, false)

                            .values();

                    for (Collection<?> collection : collections) {

                        if (collection.size() > 0 && collection.iterator().next() instanceof Declarable) {

                            for (Object declarable : collection) {

                                if (declarable instanceof Exchange) {

                                    contextExchanges.add((Exchange) declarable);

                                }

                                else if (declarable instanceof Queue) {

                                    contextQueues.add((Queue) declarable);

                                }

                                else if (declarable instanceof Binding) {

                                    contextBindings.add((Binding) declarable);

                                }

                            }

                        }

                    }

                    //过滤三组件

                    final Collection<Exchange> exchanges = filterDeclarables(contextExchanges);

                    final Collection<Queue> queues = filterDeclarables(contextQueues);

                    final Collection<Binding> bindings = filterDeclarables(contextBindings);

                    //Exchange,Queue为非持久化,自动删除则打印日志

                    for (Exchange exchange : exchanges) {

                        if ((!exchange.isDurable() || exchange.isAutoDelete())  && this.logger.isInfoEnabled()) {

                            this.logger.info("Auto-declaring a non-durable or auto-delete Exchange ("

                                    + exchange.getName()

                                    + ") durable:" + exchange.isDurable() + ", auto-delete:" + exchange.isAutoDelete() + ". "

                                    + "It will be deleted by the broker if it shuts down, and can be redeclared by closing and "

                                    + "reopening the connection.");

                        }

                    }

                    for (Queue queue : queues) {

                        if ((!queue.isDurable() || queue.isAutoDelete() || queue.isExclusive()) && this.logger.isInfoEnabled()) {

                            this.logger.info("Auto-declaring a non-durable, auto-delete, or exclusive Queue ("

                                    + queue.getName()

                                    + ") durable:" + queue.isDurable() + ", auto-delete:" + queue.isAutoDelete() + ", exclusive:"

                                    + queue.isExclusive() + ". "

                                    + "It will be redeclared if the broker stops and is restarted while the connection factory is "

                                    + "alive, but all messages will be lost.");

                        }

                    }

                    //若三组件都没有直接返回

                    if (exchanges.size() == 0 && queues.size() == 0 && bindings.size() == 0) {

                        this.logger.debug("Nothing to declare");

                        return;

                    }

                    //使用rabbitTemplate连接至服务端创建

                    this.rabbitTemplate.execute(new ChannelCallback<Object>() {

                        @Override

                        public Object doInRabbit(Channel channel) throws Exception {

                            declareExchanges(channel, exchanges.toArray(new Exchange[exchanges.size()]));

                            declareQueues(channel, queues.toArray(new Queue[queues.size()]));

                            declareBindings(channel, bindings.toArray(new Binding[bindings.size()]));

                            return null;

                        }

                    });

                    this.logger.debug("Declarations finished");

                }
4.发送消息及接收过程
4.1.rabbitTemplate.send方法
                public void send(final String exchange, final String routingKey,

                        final Message message, final CorrelationData correlationData)

                        throws AmqpException {

                    execute(new ChannelCallback<Object>() {

                        @Override

                        public Object doInRabbit(Channel channel) throws Exception {

                            //此方法中调用channel.basicPublish(exchange, routingKey, mandatory, convertedMessageProperties, messageToUse.getBody());

                            doSend(channel, exchange, routingKey, message, RabbitTemplate.this.returnCallback != null

                                    && RabbitTemplate.this.mandatoryExpression.getValue(

                                            RabbitTemplate.this.evaluationContext, message, Boolean.class),

                                    correlationData);

                            return null;

                        }

                    }, obtainTargetConnectionFactory(this.sendConnectionFactorySelectorExpression, message));

                }

                protected void doSend(Channel channel, String exchange, String routingKey, Message message,

                        //。。。。。。。。略

                    BasicProperties convertedMessageProperties = this.messagePropertiesConverter

                            .fromMessageProperties(messageProperties, this.encoding);

                    channel.basicPublish(exchange, routingKey, mandatory, convertedMessageProperties, messageToUse.getBody());

                    //。。。。。。。。略

                }
4.2.CachingConnectionFactory.CachedChannelInvocationHandler.invoke()。动态代理
                public Object invoke(Object proxy, Method method, Object[] args) throws Throwable {

                    String methodName = method.getName();

                    //if methodName为其他.进行操作后 return。省略。。

                    try {

                        if (this.target == null || !this.target.isOpen()) {

                            if (this.target instanceof PublisherCallbackChannel) {

                                this.target.close();

                                throw new InvocationTargetException(new AmqpException("PublisherCallbackChannel is closed"));

                            }

                            else if (this.txStarted) {

                                this.txStarted = false;

                                throw new IllegalStateException("Channel closed during transaction");

                            }

                            this.target = null;

                        }

                        synchronized (this.targetMonitor) {

                            if (this.target == null) {

                                this.target = createBareChannel(this.theConnection, this.transactional);

                            }

                            Object result = method.invoke(this.target, args);

                            if (this.transactional) {

                                if (txStarts.contains(methodName)) {

                                    this.txStarted = true;

                                }

                                else if (txEnds.contains(methodName)) {

                                    this.txStarted = false;

                                }

                            }

                            return result;

                        }

                    }

                    //异常处理,省略。。

                }
springboot集成使用rabbitmq笔记(3.基本过程)的更多相关文章
- springboot集成使用rabbitmq笔记(1.rabbitmq安装)
使用rabbitmq笔记一 使用rabbitmq笔记二 使用rabbitmq笔记三 1.选择适配的版本,参考---https://www.rabbitmq.com/which-erlang.html ...
- springboot集成使用rabbitmq笔记(2.rabbitmq使用)
使用rabbitmq笔记一 使用rabbitmq笔记二 使用rabbitmq笔记三 1.引入包 <dependencies> <dependency> <groupId& ...
- SpringBoot集成Mybatis配置动态数据源
很多人在项目里边都会用到多个数据源,下面记录一次SpringBoot集成Mybatis配置多数据源的过程. pom.xml <?xml version="1.0" encod ...
- RabbitMQ学习笔记(一):安装及Springboot集成
前言 MQ,即消息队列Message Queue的缩写. RabbitMQ 是MQ的一种,就像招商银行是银行的一种一样.主要是用来实现应用程序的异步和解耦,同时也能起到消息缓冲,消息分发的作用. 消息 ...
- SpringBoot集成rabbitmq(二)
前言 在使用rabbitmq时,我们可以通过消息持久化来解决服务器因异常崩溃而造成的消息丢失.除此之外,我们还会遇到一个问题,当消息生产者发消息发送出去后,消息到底有没有正确到达服务器呢?如果不进行特 ...
- SpringBoot集成RabbitMQ消息队列搭建与ACK消息确认入门
1.RabbitMQ介绍 RabbitMQ是实现AMQP(高级消息队列协议)的消息中间件的一种,最初起源于金融系统,用于在分布式系统中存储转发消息,在易用性.扩展性.高可用性等方面表现不俗.Rabbi ...
- SpringBoot学习笔记(五):SpringBoot集成lombok工具、SpringBoot集成Shiro安全框架
SpringBoot集成lombok工具 什么是lombok? 自动生成setget方法,构造函数,打印日志 官网:http://projectlombok.org/features/index. 平 ...
- SpringBoot学习笔记(三):SpringBoot集成Mybatis、SpringBoot事务管理、SpringBoot多数据源
SpringBoot集成Mybatis 第一步我们需要在pom.xml里面引入mybatis相关的jar包 <dependency> <groupId>org.mybatis. ...
- SpringBoot 集成MQTT配置
目录 1. 前言 2. MQTT介绍 3. SpringBoot 集成MQTT 3.1 导入mqtt库 3.2 配置MQTT订阅者 3.3 配置MQTT发布者 3.4 MQTT消息处理和发送 3.4. ...
随机推荐
- 1、selenium 8大元素定位方式
元素定位方式: id name css class_name tag_name partial_link link_text : driver. find_element_by_link_text(& ...
- SQL BETWEEN运算符
SQL BETWEEN运算符 BETWEEN 操作符用于选取介于两个值之间的数据范围内的值. SQL BETWEEN 运算符 BETWEEN运算符选择给定范围内的值.值可以是数字,文本或日期. BET ...
- 每天一个linux命令:cp(8)
cp cp命令用来将一个或多个源文件或者目录复制到指定的目的文件或目录.它可以将单个源文件复制成一个指定文件名的具体的文件或一个已经存在的目录下.cp命令还支持同时复制多个文件,当一次复制多个文件时, ...
- 微信jssdk安卓机分享QQ好友和QQ空间出现{"errMsg":"shareQQ:fail"}
使用ajax请求appid之类的配置,然后进行wx.config和wx.ready,苹果机上是完全OK的,但是安卓机上十次有九次是失败,只有一次能成功,百度了一下,有人说是参数有空格,有人说是微信bu ...
- Oracle中start with...connect by (prior)子句的用法
connect by 是结构化查询中用到的,基本语法是:select … from tablenamestart with 条件1connect by 条件2where 条件3; 例:select * ...
- API参考文档
Android 中文版:http://www.apiref.com/android-zh/index.html Bootstrap3 教程:http://www.apiref.com/bootstra ...
- CDQ分治&整体二分学习个人小结
目录 小结 CDQ分治 二维LIS 第一道裸题 bzoj1176 Mokia bzoj3262 陌上花开 bzoj 1790 矩形藏宝地 hdu5126四维偏序 P3157 [CQOI2011]动态逆 ...
- 机器学习算法--Elastic Net
1) alpha : float, optional Constant that multiplies the penalty terms. Defaults to 1.0. See the note ...
- 个人笔记 - MATLAB
1.教程 2.基本知识 2.1 帮助文档设置成中文:链接1 2.2 多行注释: 链接1 2.3 MATLAB基本数据类型: 链接1 链接2 2.4 matlab中的 ndims(a).length( ...
- 如何将Vue项目部署到Nginx 服务器中
https://blog.csdn.net/qq_35366269/article/details/91385689