
AutoMapper(六)
返回总目录
List和数组
AutoMapper只要求元素类型的配置而不要求可能会用到的任何数组或者list类型。比如,我们有一个简单的源和目标类型:
public class Source

{

    public int Value { get; set; }

}

public class Destination


{


public int Value { get; set; }


}
支持所有的基本泛型集合,代码如下:
class Program
{
static void Main(string[] args)
{
Mapper.CreateMap<Source, Destination>();
var sources = new[]
{
new Source() {Value = 1},
new Source() {Value = 2},
new Source() {Value = 3},
};
IEnumerable<Destination> iEnumerableDests= Mapper.Map<IEnumerable<Destination>>(sources);
ICollection<Destination> iCollectionDests= Mapper.Map<ICollection<Destination>>(sources);
IList<Destination> iListDests= Mapper.Map<IList<Destination>>(sources);
List<Destination> listDests= Mapper.Map<List<Destination>>(sources);
Destination[] destsArr= Mapper.Map<Destination[]>(sources);
//这里只举两个例子,其他集合同理
foreach (var dest in iCollectionDests)
{
Console.Write(dest.Value+",");
}
Console.WriteLine();
foreach (var dest in destsArr)
{
Console.Write(dest.Value + ",");
}Console.Read();
}
}
以上代码是集合和集合之间的映射,但是映射的配置CreateMap方法中只是配置的是类型之间的映射,而没有设计任何集合类型。
测试结果如下,可见集合之间映射成功:
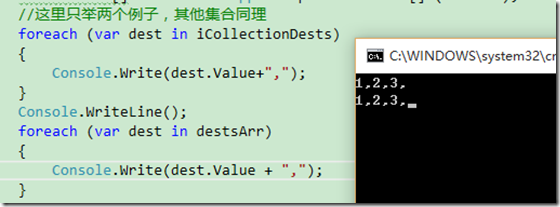
具体来说,支持的源集合类型包括:
- IEnumerable
- IEnumerable<T>
- ICollection
- ICollection<T>
- IList
- IList<T>
- List<T>
- Arrays
集合中的多态元素类型
很多时候,在我们的源和目标类型中可能有一个类型层次关系。AutoMapper支持多态数组和集合,因此如果发现派生的源或者目标类型,就会使用它们。
public class ParentSource

{

    public int Value1 { get; set; }

}

public class ChildSource : ParentSource


{


public int Value2 { get; set; }


}

public class ParentDestination


{


public int Value1 { get; set; }


}

public class ChildDestination : ParentDestination


{


public int Value2 { get; set; }


}
AutoMapper仍然要求显示配置孩子映射,因为它不能“猜出”具体使用哪一个孩子目标映射。
在Main方法中添加如下代码:
Mapper.Initialize(c =>

{

    c.CreateMap<ParentSource, ParentDestination>()

        .Include<ChildSource, ChildDestination>();

    c.CreateMap<ChildSource, ChildDestination>();

});

var sources = new[]

{

    new ParentSource(){Value1 = 11},

    new ChildSource(){Value2 = 22},

    new ParentSource(),

};

var dests = Mapper.Map<ParentDestination[]>(sources);


Console.WriteLine(dests[0]);


Console.WriteLine(dests[1]);


Console.WriteLine(dests[2]);
测试结果如下:
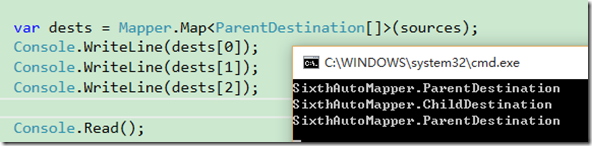
上面我们创建了一个源的数组,其中包含两个ParentSource和一个ChildSource,所以两个ParentSource成功地映射到了ParentDestination,而CreateMap配置中,ParentSource到ParentDestination的映射配置包含了ChildSource到ChildDestination的配置,所以执行Mapper.Map<ParentDestination[]>(sources)的时候,也可以将ChildSource映射到ChildDestination。
映射继承
在派生类中标明继承
上面的代码,是在基类中配置继承的,除此之外,也可以在派生类中配置继承:
//在基类中配置继承

 Mapper.Initialize(c =>

 {

     c.CreateMap<ParentSource, ParentDestination>()

         .Include<ChildSource, ChildDestination>();

     c.CreateMap<ChildSource, ChildDestination>();

 });

 //在派生类中配置继承

 Mapper.Initialize(c =>

 {

     c.CreateMap<ParentSource, ParentDestination>();

     c.CreateMap<ChildSource, ChildDestination>()

         .IncludeBase<ParentSource, ParentDestination>();

 });
继承映射属性
这里介绍一下额外的复杂性,因为一个属性映射时可以有多种方式。下面是这些源的优先级:
- 显式映射 (使用.MapFrom())
- 继承的显式映射
- 惯例映射 (通过惯例匹配的属性)
- 忽略的属性映射
下面来演示一下:
这里还是用上面定义的四个类:Order,OrderDto,PCOrder,MobileOrder:
//领域对象

public class Order { }

//电脑端订单

public class PCOrder : Order

{

    public string Referrer { get; set; }

}

//手机订单

public class MobileOrder : Order { }

//Dtos


public class OrderDto


{


public string Referrer { get; set; }


}
配置映射的方法使用的是在父类中配置继承映射
//在父类中配置继承映射

Mapper.CreateMap<Order, OrderDto>()

    .Include<PCOrder,OrderDto>()

    .Include<MobileOrder,OrderDto>()

    .ForMember(o => o.Referrer, m => m.Ignore());//这里配置了忽略目标属性Referrer的映射

Mapper.CreateMap<PCOrder,OrderDto>();

Mapper.CreateMap<MobileOrder, OrderDto>();
// 执行映射

var order = new PCOrder() { Referrer = "天猫" };

var mapped = Mapper.Map<OrderDto>(order);

Console.WriteLine(mapped.Referrer);
执行结果如下:
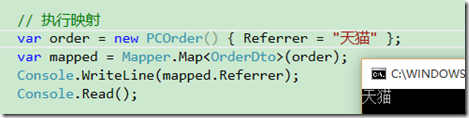
注意在我们的映射配置中,我们已经忽略了Referrer(因为Order基类中不存在这个属性),但是在基类的映射中,惯例比忽略的属性有更高的优先级,因而属性仍然得到了映射。
AutoMapper(六)的更多相关文章
- 一步一步创建ASP.NET MVC5程序[Repository+Autofac+Automapper+SqlSugar](六)
前言 大家好,我是Rector 又是星期五,很兴奋,很高兴,很high...啦啦啦... Rector在图享网又和大家见面啦!!!上一篇<一步一步创建ASP.NET MVC5程序[Reposit ...
- DTO学习系列之AutoMapper(六)----EntityFramework和AutoMapper的婚后生活
写在前面 我到底是什么? 越界的可怕 做好自己 后记 文章标题主要关键字:mapping DTOs to Entities,注意并不是“Entities to DTOs”,表示实体对象到DTO的转换, ...
- 【道德经】漫谈实体、对象、DTO及AutoMapper的使用
写在前面 实体和值对象 实体和对象 故常无欲以观其妙,常有欲以观其徼 初始实体和演化实体 代码中的DTO AutoMapper实体转换 后记 实体(Entity).对象(Object).DTO(Dat ...
- C#进阶系列——DDD领域驱动设计初探(五):AutoMapper使用
前言:前篇搭建了下WCF的代码,就提到了DTO的概念,对于为什么要有这么一个DTO的对象,上章可能对于这点不太详尽,在此不厌其烦再来提提它的作用: 从安全上面考虑,领域Model都带有领域业务,让Cl ...
- C#进阶系列——DDD领域驱动设计初探(六):领域服务
前言:之前一直在搭建项目架构的代码,有点偏离我们的主题(DDD)了,这篇我们继续来聊聊DDD里面另一个比较重要的知识点:领域服务.关于领域服务的使用,书中也介绍得比较晦涩,在此就根据博主自己的理解谈谈 ...
- 一步一步创建ASP.NET MVC5程序[Repository+Autofac+Automapper+SqlSugar](七)
前言 大家好,我依旧是你们的老朋友Rector,很高兴又在周五的时候准时和大家见面. Rector的系列文章[一步一步创建ASP.NET MVC5程序[Repository+Autofac+Autom ...
- 8分钟学会使用AutoMapper
一.什么是AutoMapper与为什么用它. 它是一种对象与对象之间的映射器,让AutoMapper有意思的就是在于它提供了一些将类型A映射到类型B这种无聊的实例,只要B遵循AutoMapper已经建 ...
- c# AutoMapper 使用方式和再封装
安装方式:使用vs自带的nuget管理工具,搜索AutoMapper ,选择第一个安装到你的项目即可. 我从网上找了一些资料, 参考网址:http://blog.csdn.net/csethcrm/a ...
- c# automapper 使用(一)
一.最简单的用法 有两个类User和UserDto public class User { public int Id { get; set; } public string Name { get; ...
随机推荐
- 【探索】机器指令翻译成 JavaScript
前言 前些时候研究脚本混淆时,打算先学一些「程序流程」相关的概念.为了不因太枯燥而放弃,决定想一个有趣的案例,可以边探索边学. 于是想了一个话题:尝试将机器指令 1:1 翻译 成 JavaScript ...
- iOS逆向工程之Theos
如果你对iOS逆向工程有所了解,那么你对Tweak并不陌生.那么由Tweak我们又会引出Theos, 那么什么是Theos呢,简单一句话,Theos是一个越狱开发工具包,Theos是越狱开发工具的首先 ...
- OpenGL超级宝典笔记----框架搭建
自从工作后,总是或多或少的会接触到客户端3d图形渲染,正好自己对于3d图形的渲染也很感兴趣,所以最近打算从学习OpenGL的图形API出发,进而了解3d图形的渲染技术.到网上查了一些资料,OpenGL ...
- 深入浅出JavaScript之闭包(Closure)
闭包(closure)是掌握Javascript从人门到深入一个非常重要的门槛,它是Javascript语言的一个难点,也是它的特色,很多高级应用都要依靠闭包实现.下面写下我的学习笔记~ 闭包-无处不 ...
- java使用websocket,并且获取HttpSession,源码分析
转载请在页首注明作者与出处 http://www.cnblogs.com/zhuxiaojie/p/6238826.html 一:本文使用范围 此文不仅仅局限于spring boot,普通的sprin ...
- WebApi基于Token和签名的验证
最近一段时间在学习WebApi,涉及到验证部分的一些知识觉得自己并不是太懂,所以来博客园看了几篇博文,发现一篇讲的特别好的,读了几遍茅塞顿开(都闪开,我要装逼了),刚开始读有些地方不理解,所以想了很久 ...
- slf4j中的MDC
slf4j中MDC是什么鬼 slf4j除了trace.debug.info.warn.error这几个日志接口外,还可以配合MDC将数据写入日志.换句话说MDC也是用来记录日志的,但它的使用方式与使用 ...
- org.jboss.deployment.DeploymentException: Trying to install an already registered mbean: jboss.jca:service=LocalTxCM,name=egmasDS
17:34:37,235 INFO [Http11Protocol] Starting Coyote HTTP/1.1 on http-0.0.0.0-8080 17:34:37,281 INFO [ ...
- eclipse如何添加Memory Analyzer
①启动Eclipse,并打开"Install New software..."对话框: ②点击Add,如图: ③点击OK,最后一直点next,完成
- docker4dotnet #1 – 前世今生 & 世界你好
作为一名.NET Developer,这几年看着docker的流行实在是有些眼馋.可惜的是,Docker是基于Linux环境的,眼瞧着那些 java, python, node.js, go 甚至连p ...