python数据结构与算法第七天【链表】
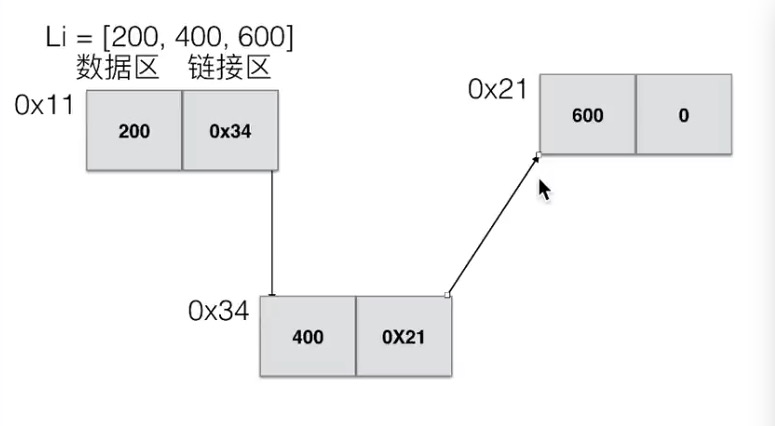
1.链表的定义
如图:
注意:
(1)线性表包括顺序表和链表
(2)顺序表是将元素顺序地存放在一块连续的存储区里
(3)链表是将元素存放在通过链构造的存储快中
2. 单向链表的实现
#!/usr/bin/env python
# _*_ coding:UTF-8 _*_

class Node(object):

    def __init__(self, elem):
        self.elem = elem
        self.next = None

class SingleLinkList(object):
    '''单向链表'''
    def __init__(self, node=None):
        self.__head = node

    def add(self, item):
        '''向单向链表的头部添加元素'''
        node = Node(item)
        node.next = self.__head
        self.__head = node
        return True

    def insert(self, pos, item):
        '''向单向链表指定位置插入元素'''
        if pos <= 0:
            self.add(item)
        elif pos > self.length() -1:
            self.append(item)
        else:
            pre = self.__head
            count = 0
            while pos - 1 > count:
                count += 1
                pre = pre.next
            node.next = pre.next
            pre.next = node
        return True

    def append(self, item):
        '''向单向链表的尾部追加元素'''
        node = Node(item)
        cur = self.__head
        while cur != None:
            if cur.next != None:
                cur = cur.next
            else:
                break
        cur.next = node
        return True

    def remove(self, item):
        '''删除元素'''
        pre = None
        cur = self.__head
        while cur != None:
            if cur.elem == item:
                if pre != None:
                    pre.next = cur.next
                else:
                    self.__head = cur.next
                break
            else:
                pre = cur
                cur = cur.next
        return False

    def search(self, item):
        '''指定元素搜索'''
        cur = self.__head
        index = 0
        while cur != None:
            if cur.elem != item:
                cur = cur.next
                index += 1
            else:
                return index
        return -1

    def travel(self):
        '''遍历打印单向链表的值'''
        cur = self.__head
        str = ''
        while cur != None and cur.elem != None:
            str += '%s' % cur.elem
            cur = cur.next
        return str

    def length(self):
        '''返回单向链表的长度'''
        cur = self.__head
        count = 0
        while cur != None:
            count += 1
            cur = cur.next
        return count

    def is_empty(self):
        return self.__head == None

if __name__ == "__main__":
    singleLinkList = SingleLinkList()
    print singleLinkList.is_empty()
    print singleLinkList.length()

    singleLinkList.add(1)
    singleLinkList.insert(0, 2)
    singleLinkList.append(3)

    print singleLinkList.is_empty()
    print singleLinkList.length()

    print singleLinkList.travel()
    print singleLinkList.search(3)

    singleLinkList.remove(2)
    print singleLinkList.travel()
结果如下:
/Users/liudaoqiang/PycharmProjects/numpy/venv/bin/python /Users/liudaoqiang/Project/python_project/bat_day3/link_list_test.py
True
0
False
3
213
2

Process finished with exit code 0
3.链表与顺序表的对比
| 操作 | 链表 | 顺序表 |
| 访问 | O(n) | O(1) |
| 头插法 | O(1) | O(n) |
| 尾插法 | O(n) | O(1) |
| 指定位置插入法 | O(n) | O(n) |
| 存储 | 可以存储在分散的存储空间中;需要存放下一元素的地址,导致占用内存较大 | 只能存放在连续的存储空间中;无需存放下一元素的地址 |
4.单向循环链表的实现
#!/usr/bin/env python
#! _*_ coding:UTF-8 _*_

class Node(object):
    '''链表的节点'''
    def __init__(self, elem):
        '''构造方法'''
        self.elem = elem
        self.next = None

class SingleCycleLinkList(object):
    '''单向循环链表'''
    def __init__(self, node=None):
        '''构造方法'''
        self.__head = node
        if node != None:
            node.next = node

    def is_empty(self):
        '''判断单向循环链表是否为空'''
        return self.__head == None

    def length(self):
        '''返回单向循环链表的长度'''
        if self.is_empty():
            return 0

        cur = self.__head
        count = 1
        while cur.next != self.__head:
            count += 1
            cur = cur.next
        return count

    def travel(self):
        '''遍历单向循环链表'''
        if self.is_empty():
            return

        cur = self.__head
        str = ''
        while cur.next != self.__head:
            str += '%s ' % cur.elem
            cur = cur.next
        str += '%s' % cur.elem
        return str

    def add(self, item):
        '''单向循环链表头部插入元素'''
        node = Node(item)
        if self.is_empty():
            self.__head = node
            node.next = node
        else:
            cur = self.__head
            while cur.next != self.__head:
                cur = cur.next

            node.next = self.__head
            self.__head = node
            cur.next = node

        return True

    def append(self, item):
        '''向单向循环链表尾部插入元素'''
        node = Node(item)
        if self.is_empty():
            self.__head = node
            node.next = node
        else:
            cur = self.__head
            while cur.next != self.__head:
                cur = cur.next
            node.next = self.__head
            cur.next = node

        return True

    def insert(self, pos, item):
        '''向单向链表指定位置插入元素'''
        if pos <= 0:
            self.add(item)
        elif pos > self.length() -1:
            self.append(item)
        else:
            pre = self.__head
            count = 0
            while pos - 1 > count:
                count += 1
                pre = pre.next
            node.next = pre.next
            pre.next = node
        return True

    def remove(self, item):
        '''删除单向循环链表中元素'''
        if self.is_empty():
            return True
        cur = self.__head
        pre = None
        while cur.next != self.__head:
            if cur.elem == item:
                if cur == self.__head:
                    rear = self.__head
                    while rear.next != self.__head:
                        rear = rear.next
                    self.__head = cur.next
                    rear.next = self.__head
                else:
                    pre.next = cur.next
                break

            else:
                pre = cur
                cur = cur.next

        if cur.item == item:
            if cur == self.__head:
                self.__head = None
            else:
                pre.next = cur.next
        return True
4.双向链表的实现
class Node(object):
    """双向链表节点"""
    def __init__(self, item):
        self.item = item
        self.next = None
        self.prev = None

class DLinkList(object):
    """双向链表"""
    def __init__(self):
        self._head = None

    def is_empty(self):
        """判断链表是否为空"""
        return self._head == None

    def length(self):
        """返回链表的长度"""
        cur = self._head
        count = 0
        while cur != None:
            count += 1
            cur = cur.next
        return count

    def travel(self):
        """遍历链表"""
        cur = self._head
        while cur != None:
            print cur.item,
            cur = cur.next
        print ""

    def add(self, item):
        """头部插入元素"""
        node = Node(item)
        if self.is_empty():
            # 如果是空链表,将_head指向node
            self._head = node
        else:
            # 将node的next指向_head的头节点
            node.next = self._head
            # 将_head的头节点的prev指向node
            self._head.prev = node
            # 将_head 指向node
            self._head = node

    def append(self, item):
        """尾部插入元素"""
        node = Node(item)
        if self.is_empty():
            # 如果是空链表,将_head指向node
            self._head = node
        else:
            # 移动到链表尾部
            cur = self._head
            while cur.next != None:
                cur = cur.next
            # 将尾节点cur的next指向node
            cur.next = node
            # 将node的prev指向cur
            node.prev = cur

    def search(self, item):
        """查找元素是否存在"""
        cur = self._head
        while cur != None:
            if cur.item == item:
                return True
            cur = cur.next
        return False

def insert(self, pos, item):
        """在指定位置添加节点"""
        if pos <= 0:
            self.add(item)
        elif pos > (self.length()-1):
            self.append(item)
        else:
            node = Node(item)
            cur = self._head
            count = 0
            # 移动到指定位置的前一个位置
            while count < (pos-1):
                count += 1
                cur = cur.next
            # 将node的prev指向cur
            node.prev = cur
            # 将node的next指向cur的下一个节点
            node.next = cur.next
            # 将cur的下一个节点的prev指向node
            cur.next.prev = node
            # 将cur的next指向node
            cur.next = node

def remove(self, item):
        """删除元素"""
        if self.is_empty():
            return
        else:
            cur = self._head
            if cur.item == item:
                # 如果首节点的元素即是要删除的元素
                if cur.next == None:
                    # 如果链表只有这一个节点
                    self._head = None
                else:
                    # 将第二个节点的prev设置为None
                    cur.next.prev = None
                    # 将_head指向第二个节点
                    self._head = cur.next
                return
            while cur != None:
                if cur.item == item:
                    # 将cur的前一个节点的next指向cur的后一个节点
                    cur.prev.next = cur.next
                    # 将cur的后一个节点的prev指向cur的前一个节点
                    cur.next.prev = cur.prev
                    break
                cur = cur.next

if __name__ == "__main__":
    ll = DLinkList()
    ll.add(1)
    ll.add(2)
    ll.append(3)
    ll.insert(2, 4)
    ll.insert(4, 5)
    ll.insert(0, 6)
    print "length:",ll.length()
    ll.travel()
    print ll.search(3)
    print ll.search(4)
    ll.remove(1)
    print "length:",ll.length()
    ll.travel()
注意:
is_empty() 链表是否为空
length() 链表长度
travel() 遍历链表
add(item) 链表头部添加
append(item) 链表尾部添加
insert(pos, item) 指定位置添加
remove(item) 删除节点
search(item) 查找节点是否存在
python数据结构与算法第七天【链表】的更多相关文章
- Java数据结构和算法(七)——链表
前面博客我们在讲解数组中,知道数组作为数据存储结构有一定的缺陷.在无序数组中,搜索性能差,在有序数组中,插入效率又很低,而且这两种数组的删除效率都很低,并且数组在创建后,其大小是固定了,设置的过大会造 ...
- python数据结构与算法
最近忙着准备各种笔试的东西,主要看什么数据结构啊,算法啦,balahbalah啊,以前一直就没看过这些,就挑了本简单的<啊哈算法>入门,不过里面的数据结构和算法都是用C语言写的,而自己对p ...
- Java数据结构和算法(七)B+ 树
Java数据结构和算法(七)B+ 树 数据结构与算法目录(https://www.cnblogs.com/binarylei/p/10115867.html) 我们都知道二叉查找树的查找的时间复杂度是 ...
- Python数据结构与算法--List和Dictionaries
Lists 当实现 list 的数据结构的时候Python 的设计者有很多的选择. 每一个选择都有可能影响着 list 操作执行的快慢. 当然他们也试图优化一些不常见的操作. 但是当权衡的时候,它们还 ...
- Python数据结构与算法--算法分析
在计算机科学中,算法分析(Analysis of algorithm)是分析执行一个给定算法需要消耗的计算资源数量(例如计算时间,存储器使用等)的过程.算法的效率或复杂度在理论上表示为一个函数.其定义 ...
- Python数据结构与算法之图的最短路径(Dijkstra算法)完整实例
本文实例讲述了Python数据结构与算法之图的最短路径(Dijkstra算法).分享给大家供大家参考,具体如下: # coding:utf-8 # Dijkstra算法--通过边实现松弛 # 指定一个 ...
- Python数据结构与算法之图的广度优先与深度优先搜索算法示例
本文实例讲述了Python数据结构与算法之图的广度优先与深度优先搜索算法.分享给大家供大家参考,具体如下: 根据维基百科的伪代码实现: 广度优先BFS: 使用队列,集合 标记初始结点已被发现,放入队列 ...
- python数据结构与算法——链表
具体的数据结构可以参考下面的这两篇博客: python 数据结构之单链表的实现: http://www.cnblogs.com/yupeng/p/3413763.html python 数据结构之双向 ...
- Python 数据结构和算法
阅读目录 什么是算法 算法效率衡量 算法分析 常见时间复杂度 Python内置类型性能分析 数据结构 顺序表 链表 栈 队列 双端队列 排序与搜索 冒泡排序 选择排序 插入排序 希尔排序 快速排序 归 ...
随机推荐
- 【转】Java日志框架:logback详解
为什么使用logback 记得前几年工作的时候,公司使用的日志框架还是log4j,大约从16年中到现在,不管是我参与的别人已经搭建好的项目还是我自己主导的项目,日志框架基本都换成了logback,总结 ...
- Linux内核入门到放弃-内存管理-《深入Linux内核架构》笔记
概述 内存管理的实现涵盖了许多领域: 内存中的物理内存页管理 分配大块内存的伙伴系统 分配较小内存块的slab.slub和slob分配器 分配非连续内存块的vmalloc机制 进程的地址空间 在IA- ...
- Sharding-JDBC实践(一)简介
转载自:ShardingSphere官网 目录 一.介绍 1. Sharding-JDBC 2. Sharding-Proxy 3. Sharding-Sidecar(TBD) 4. 混合架构 二.功 ...
- Mac支持ntfs格式的移动硬盘读写操作
转好文:https://blog.csdn.net/u013247765/article/details/77932144 本机环境: macOS Sierra version 10.12.6 201 ...
- Redis学习之字典源码分析
字典,又叫映射,是一种用于保存键值对的抽象数据结构 划重点:抽象数据结构 Redisd字典使用哈希表作为底层实现,一个哈希表里面可以有多个哈希表结点,而每个哈希表结点就保存了字典中的一个键值对 一.哈 ...
- input表单提交完毕,返回重新填入有黄色背景,和 历史记录 清除
<input autocomplete="value"> // 添加这个属性,可以解决然后添加一个css input:-webkit-autofill {box-sha ...
- Codechef SUMCUBE Sum of Cubes 组合、三元环计数
传送门 好久没有做过图论题了-- 考虑\(k\)次方的组合意义,实际上,要求的所有方案中导出子图边数的\(k\)次方,等价于有顺序地选出其中\(k\)条边,计算它们在哪一些图中出现过,将所有方案计算出 ...
- OPPO Developers Conference(2018.12.26)
时间:2018.12.26地点:北京国家会议中心
- HBase篇(2)-数据模型与操作
HBase其实就是一个数据库,无非就是存储和增删改查,那我们先从数据模型说起把 这里有一张表,是用关系型数据库的思维画出来的表,这样比较易于理解: 概念 Table(表格) 没啥说的,和关系型数据库一 ...
- python--map()、reduce()
map()和reduce()是一种在处理大数据时的重要思想,在平时也可以利用.在python中内置了这两个方法,map取映射的意思,reduce取归纳的意思. 一.map() map(func, ls ...