DeepLearning.ai-Week4-Face Recognition for the Happy House
1 - Task
- Implement the triplet loss function
- Use a pretrained model to map face images into 128-dimensional encodings
- Use these encodings to perform face verification and face recognition
2 - Import Packages
from keras.models import Sequential

from keras.layers import Conv2D, ZeroPadding2D, Activation, Input, concatenate

from keras.models import Model

from keras.layers.normalization import BatchNormalization

from keras.layers.pooling import MaxPooling2D, AveragePooling2D

from keras.layers.merge import Concatenate

from keras.layers.core import Lambda, Flatten, Dense

from keras.initializers import glorot_uniform

from keras.engine.topology import Layer

from keras import backend as K

K.set_image_data_format('channels_first')

import cv2

import os

import numpy as np

from numpy import genfromtxt

import pandas as pd

import tensorflow as tf

from fr_utils import *

from inception_blocks_v2 import *

%matplotlib inline

%load_ext autoreload

%autoreload 2

np.set_printoptions(threshold=np.nan)
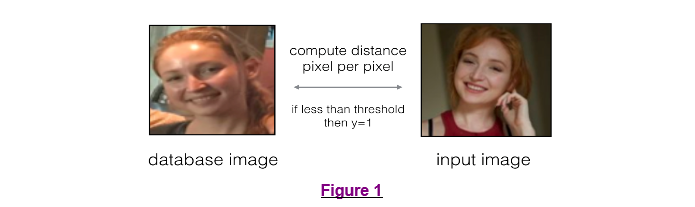
3 - Naive Face Verification
在人脸验证任务中,我们需要判断两张图片中的人脸是否为同一个人。最简单的做法是逐个像素点比较,如果总共的距离低于给定的某一个阈值,则判断为同一个人。这种方法效果会很差。所以我们可以通过学习一个模型,可以将人脸图片提取出特征向量,再比较特征向量的距离来判断是否为同一个人。
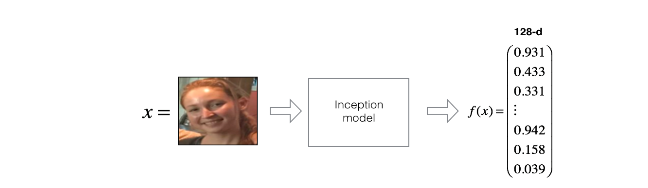
4 - Encoding face images into a 128-dimensional vector
4.1 - Using an ConvNet to compute encodings
注意到
- 这个网络的输入的批次图像维度为$(m,3,96,96)$
- 网络的输出为$(m,128)$的编码,网络是对每一个输入编码成一个128维度向量的输出
FRmodel = faceRecoModel(input_shape=(3, 96, 96))
print("Total Params:", FRmodel.count_params())
Result:

Total Params: 3743280

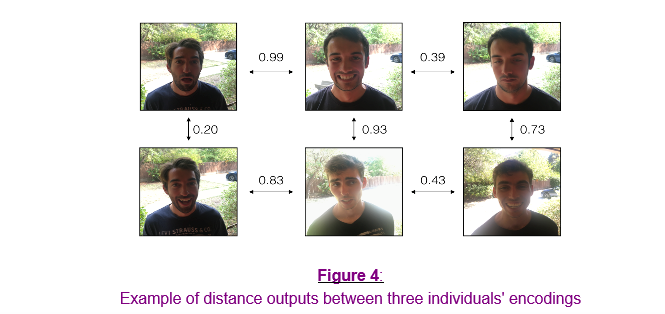
好的编码应该具有如下性质:
- 同一个人的两张图片的编码应该尽可能的相似
- 不同人的两张图片的编码要非常不同
$triplet loss$损失函数便是描述上述性质的,并且尽量使得同一个人的两张图片的编码更加相似,不同人的两张图片的编码更具有区分性。
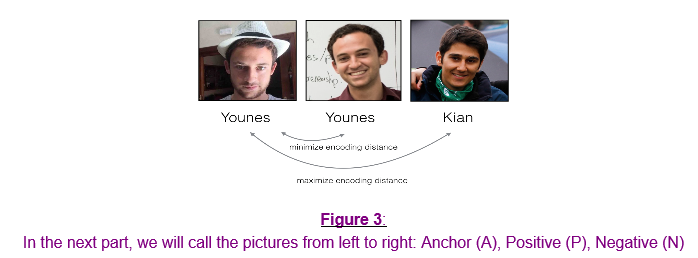
4.2 - The Triplet Loss
训练用于编码的神经网络(对应上面f映射),需要三元组图片$(A,P,N)$:
- A is an "Anchor" image--a picture of a person.
- P is a "Positive" image--a picture of the same person as the Anchor image.
- N is a "Negative" image--a picture of a different person than the Anchor image.
它们之间具有下式所示关系:
$$\mid \mid f(A^{(i)}) - f(P^{(i)}) \mid \mid_2^2 + \alpha < \mid \mid f(A^{(i)}) - f(N^{(i)}) \mid \mid_2^2$$
所以我们要最小化的"$triplet cost$"如下:
- Compute the distance between the encodings of "anchor" and "positive": $\begin{Vmatrix} f(A^{(i)}) - f(P^{(i)}) \end{Vmatrix}_2^2$
- Compute the distance between the encodings of "anchor" and "negative": $\begin{Vmatrix} f(A^{(i)}) - f(N^{(i)}) \end{Vmatrix}_2^2$
- Compute the formula per training example: $\begin{Vmatrix} f(A^{(i)}) - f(P^{(i)}) \end{Vmatrix} - \begin{Vmatrix} f(A^{(i)}) - f(N^{(i)}) \end{Vmatrix}_2^2 + \alpha$
- Compute the full formula by taking the max with zero and summing over the training examples:$$\mathcal{J} = \sum^{m}_{i=1} \large[ \small \mid \mid f(A^{(i)}) - f(P^{(i)}) \mid \mid_2^2 - \mid \mid f(A^{(i)}) - f(N^{(i)}) \mid \mid_2^2+ \alpha \large ] \small_+ \tag{3}$$
# GRADED FUNCTION: triplet_loss

def triplet_loss(y_true, y_pred, alpha = 0.2):

    """

    Implementation of the triplet loss as defined by formula (3)

    Arguments:

    y_true -- true labels, required when you define a loss in Keras, you don't need it in this function.

    y_pred -- python list containing three objects:

            anchor -- the encodings for the anchor images, of shape (None, 128)

            positive -- the encodings for the positive images, of shape (None, 128)

            negative -- the encodings for the negative images, of shape (None, 128)

    Returns:

    loss -- real number, value of the loss

    """

    anchor, positive, negative = y_pred[0], y_pred[1], y_pred[2]

    ### START CODE HERE ### (≈ 4 lines)

    # Step 1: Compute the (encoding) distance between the anchor and the positive, you will need to sum over axis=-1

    pos_dist = tf.reduce_sum(tf.square(tf.subtract(anchor, positive)))

    # Step 2: Compute the (encoding) distance between the anchor and the negative, you will need to sum over axis=-1

    neg_dist = tf.reduce_sum(tf.square(tf.subtract(anchor, negative)))

    # Step 3: subtract the two previous distances and add alpha.

    basic_loss = tf.add(tf.subtract(pos_dist, neg_dist), alpha)

    # Step 4: Take the maximum of basic_loss and 0.0. Sum over the training examples.

    loss = tf.reduce_sum(tf.maximum(basic_loss, 0.0))

    ### END CODE HERE ###

    return loss
with tf.Session() as test:

    tf.set_random_seed(1)

    y_true = (None, None, None)

    y_pred = (tf.random_normal([3, 128], mean=6, stddev=0.1, seed = 1),

              tf.random_normal([3, 128], mean=1, stddev=1, seed = 1),

              tf.random_normal([3, 128], mean=3, stddev=4, seed = 1))

    loss = triplet_loss(y_true, y_pred)

    print("loss = " + str(loss.eval()))
Result: //和答案不一样,但我找到别人能出正确答案的代码也跟我一样,所以我认为应该是随机种子的问题

loss = 350.027
5 - Loading the trained model
因为训练FaceNet需要大量的数据和计算,因此此作业不打算训练该模型,而是直接加载已经训练好的模型。
FRmodel.compile(optimizer = 'adam', loss = triplet_loss, metrics = ['accuracy'])

load_weights_from_FaceNet(FRmodel)
6 - Applying the model
6.1 - Face Verification
使用方法$img_to_encoding(image_path, model)$建立一个人脸特征库,只有识别到其中的人脸才能通过验证。
database = {}

database["danielle"] = img_to_encoding("images/danielle.png", FRmodel)

database["younes"] = img_to_encoding("images/younes.jpg", FRmodel)

database["tian"] = img_to_encoding("images/tian.jpg", FRmodel)

database["andrew"] = img_to_encoding("images/andrew.jpg", FRmodel)

database["kian"] = img_to_encoding("images/kian.jpg", FRmodel)

database["dan"] = img_to_encoding("images/dan.jpg", FRmodel)

database["sebastiano"] = img_to_encoding("images/sebastiano.jpg", FRmodel)

database["bertrand"] = img_to_encoding("images/bertrand.jpg", FRmodel)

database["kevin"] = img_to_encoding("images/kevin.jpg", FRmodel)

database["felix"] = img_to_encoding("images/felix.jpg", FRmodel)

database["benoit"] = img_to_encoding("images/benoit.jpg", FRmodel)

database["arnaud"] = img_to_encoding("images/arnaud.jpg", FRmodel)
实现$verify()$方法去识别这个人是否能够通过验证,有如下几步:
- Compute the encoding of the image from image_path
- Compute the distance about this encoding and the encoding of the identity image stored in the database
- Open the door if the distance is less than 0.7, else do not open.
# GRADED FUNCTION: verify

def verify(image_path, identity, database, model):

    """

    Function that verifies if the person on the "image_path" image is "identity".

    Arguments:

    image_path -- path to an image

    identity -- string, name of the person you'd like to verify the identity. Has to be a resident of the Happy house.

    database -- python dictionary mapping names of allowed people's names (strings) to their encodings (vectors).

    model -- your Inception model instance in Keras

    Returns:

    dist -- distance between the image_path and the image of "identity" in the database.

    door_open -- True, if the door should open. False otherwise.

    """

    ### START CODE HERE ###

    # Step 1: Compute the encoding for the image. Use img_to_encoding() see example above. (≈ 1 line)

    encoding = img_to_encoding(image_path, model)

    # Step 2: Compute distance with identity's image (≈ 1 line)

    dist = np.linalg.norm(encoding-database[identity])

    # Step 3: Open the door if dist < 0.7, else don't open (≈ 3 lines)

    if dist<0.7:

        print("It's " + str(identity) + ", welcome home!")

        door_open = True

    else:

        print("It's not " + str(identity) + ", please go away")

        door_open = False

    ### END CODE HERE ###

    return dist, door_open
verify("images/camera_0.jpg", "younes", database, FRmodel)

verify("images/camera_2.jpg", "kian", database, FRmodel)

6.2 - Face Recognition
实现$who\_is\_it()$方法需要以下几步:
- Compute the target encoding of the image from image_path
- Find the encoding from the database that has smallest distance with the target encoding.
- Initialize the
min_distvariable to a large enough number (100). It will help you keep track of what is the closest encoding to the input's encoding. - Loop over the database dictionary's names and encodings. To loop use
for (name, db_enc) in database.items().- Compute L2 distance between the target "encoding" and the current "encoding" from the database.
- If this distance is less than the min_dist, then set min_dist to dist, and identity to name.
- Initialize the
# GRADED FUNCTION: who_is_it

def who_is_it(image_path, database, model):

    """

    Implements face recognition for the happy house by finding who is the person on the image_path image.

    Arguments:

    image_path -- path to an image

    database -- database containing image encodings along with the name of the person on the image

    model -- your Inception model instance in Keras

    Returns:

    min_dist -- the minimum distance between image_path encoding and the encodings from the database

    identity -- string, the name prediction for the person on image_path

    """

    ### START CODE HERE ###

    ## Step 1: Compute the target "encoding" for the image. Use img_to_encoding() see example above. ## (≈ 1 line)

    encoding = img_to_encoding(image_path, model)

    ## Step 2: Find the closest encoding ##

    # Initialize "min_dist" to a large value, say 100 (≈1 line)

    min_dist = 100

    # Loop over the database dictionary's names and encodings.

    for (name, db_enc) in dataset:

        # Compute L2 distance between the target "encoding" and the current "emb" from the database. (≈ 1 line)

        dist = np.linalg.norm(encoding-db_enc)

        # If this distance is less than the min_dist, then set min_dist to dist, and identity to name. (≈ 3 lines)

        if dist < min_dist:

            min_dist = dist

            identity = name

    ### END CODE HERE ###

    if min_dist > 0.7:

        print("Not in the database.")

    else:

        print ("it's " + str(identity) + ", the distance is " + str(min_dist))

    return min_dist, identity
who_is_it("images/camera_0.jpg", database, FRmodel)
7 - Summary
虽然我们没有实现和训练神经网络,但是可以通过下面两种方法来提高算法的准确性:
- Put more images of each person (under different lighting conditions, taken on different days, etc.) into the database. Then given a new image, compare the new face to multiple pictures of the person. This would increae accuracy.(增加数据集)
- Crop the images to just contain the face, and less of the "border" region around the face. This preprocessing removes some of the irrelevant pixels around the face, and also makes the algorithm more robust.(降低噪声)
8 - References
https://web.stanford.edu/class/cs230/
DeepLearning.ai-Week4-Face Recognition for the Happy House的更多相关文章
- Coursera机器学习+deeplearning.ai+斯坦福CS231n
日志 20170410 Coursera机器学习 2017.11.28 update deeplearning 台大的机器学习课程:台湾大学林轩田和李宏毅机器学习课程 Coursera机器学习 Wee ...
- DeepLearning.ai学习笔记汇总
第一章 神经网络与深度学习(Neural Network & Deeplearning) DeepLearning.ai学习笔记(一)神经网络和深度学习--Week3浅层神经网络 DeepLe ...
- Coursera深度学习(DeepLearning.ai)编程题&笔记
因为是Jupyter Notebook的形式,所以不方便在博客中展示,具体可在我的github上查看. 第一章 Neural Network & DeepLearning week2 Logi ...
- DeepLearning.ai学习笔记(三)结构化机器学习项目--week2机器学习策略(2)
一.进行误差分析 很多时候我们发现训练出来的模型有误差后,就会一股脑的想着法子去减少误差.想法固然好,但是有点headlong~ 这节视频中吴大大介绍了一个比较科学的方法,具体的看下面的例子 还是以猫 ...
- Coursera DeepLearning.ai Logistic Regression逻辑回归总结
既<Machine Learning>课程后,Andrew Ng又推出了新一系列的课程<DeepLearning.ai>,注册了一下可以试听7天.之后每个月要$49,想想还是有 ...
- Deeplearning.ai课程笔记--汇总
从接触机器学习就了解到Andrew Ng的机器学习课程,后来发现又出来深度学习课程,就开始在网易云课堂上学习deeplearning.ai的课程,Andrew 的课真是的把深入浅出.当然学习这些课程还 ...
- deeplearning.ai学习RNN
一.RNN基本结构 普通神经网络不能处理时间序列的信息,只能割裂的单个处理,同时普通神经网络如果用来处理文本信息的话,参数数目将是非常庞大,因为如果采用one-hot表示词的话,维度非常大. RNN可 ...
- deeplearning.ai 旁听如何做课后编程作业
在上吴恩达老师的深度学习课程,在coursera上. 我觉得课程绝对值的49刀,但是确实没有额外的钱来上课.而且课程提供了旁听和助学金. 之前在coursera上算法和机器学习都是直接旁听的,这些课旁 ...
- deeplearning.ai课程学习(1)
本系列主要是我对吴恩达的deeplearning.ai课程的理解和记录,完整的课程笔记已经有很多了,因此只记录我认为重要的东西和自己的一些理解. 第一门课 神经网络和深度学习(Neural Netwo ...
- 吴恩达deepLearning.ai循环神经网络RNN学习笔记_看图就懂了!!!(理论篇)
前言 目录: RNN提出的背景 - 一个问题 - 为什么不用标准神经网络 - RNN模型怎么解决这个问题 - RNN模型适用的数据特征 - RNN几种类型 RNN模型结构 - RNN block - ...
随机推荐
- unsigned 变量名:n
在结构体内定义位,节省空间 /* * size是字节数 * addr是打印的起始地址 */ static void printb(void * addr,size_t size){ ;i<siz ...
- 手机nv
NV值是记录手机的射频参数的,和手机的IMEI号.手机信号.WIFI信号等有关,如果NV值刷没了,手机没有这些校准的数据了,会对手机有一定的影响. qcn里面包含手机的imei 所有改变imei就改变 ...
- MySQL中IO问题定位
在前面讲过在linux下定位磁盘IO的一个命令:iostat其实还有一个查看linux下磁盘IO读写速度命令:iotop 查看iotop -help,有哪些用法 # iotop -help Usage ...
- 使用docker-compose部署nginx
1.新建docker-compose.yml文件,文件的基本模板如下:(由于yml格式比较严格,注意空格缩进) version: '2.0' services: nginx: restart: a ...
- makefile解析:一些常用函数
#======================================================================= #指定目标文件名,makefile中的变量直接使用不用 ...
- 流明(lux)和坎德拉;
流明是光照度: 坎德拉是光强: 流明是光通量的单位, cd是光强单位 光强是单位立体角的光通量: 照度是单位面积的光通量: 尼特是亮度单位 1尼特 = 1CD/m^2: 1 lx = 1 流明每 ...
- Shell 同步时间脚本
Linux系统同步时间脚本 Linux操作系统,如果时间和网络时间差距太大的话.可能会导致程序,进程启动不了.所以linux系统时间同步显得尤为重要,本文在借鉴网上众多资料后,以centos_6.X系 ...
- Spring Boot笔记三:配置文件
配置文件这里需要讲的东西很多,所以我写在了这里,但是这个是和上篇文章衔接的,所以看这篇文章,先看上篇文章笔记二 一.单独的配置文件 配置文件里面不能都写我们的类的配置吧,这样那么多类太杂了,所以我们写 ...
- Linux下C语言连接MySQL
本文出自 http://blog.csdn.net/shuangde800 首先保证安装: 1:安装MySQL:sudo apt-get install mysql-server mysql-cl ...
- linux 内核模块makefile通用模板
ifneq ($(KERNELRELEASE),)# 在 mylist 后面添加需要编译的模块数量 mylist=hello.o a.o# 为每一个模块添加所需的文件 hello-objs := ma ...