如何发布jar包到maven中央仓库
自使用maven以来,没少使用maven中央仓库中的各种jar包,方便有效,但是咱们也不能总是只取不予,也应该懂得奉献,当你写好了一个十分好用的jar包,想贡献出去给大家使用的时候,应该怎么做呢?当然是发布到maven的中央仓库了,不过要说这个发布过程,还真是比较复杂,本文就来详细说下如何发布jar包到maven中央仓库。
开始之前,请注意几个地址:
1、工单管理:https://issues.sonatype.org/secure/Dashboard.jspa
说明:注册账号、创建和管理issue,Jar包的发布是以解决issue的方式起步的
2、构件仓库:https://oss.sonatype.org/#welcome
说明:算是正式发布前的一个过段仓库,使用maven提交后的jar包先到这个库中
1、创建工单
在上述的工单管理的地址中进行创建,如果没有账号,需要先注册一个,记住用户名密码,后边要配置到setting.xml中。
Create Issue 填写内容说明: 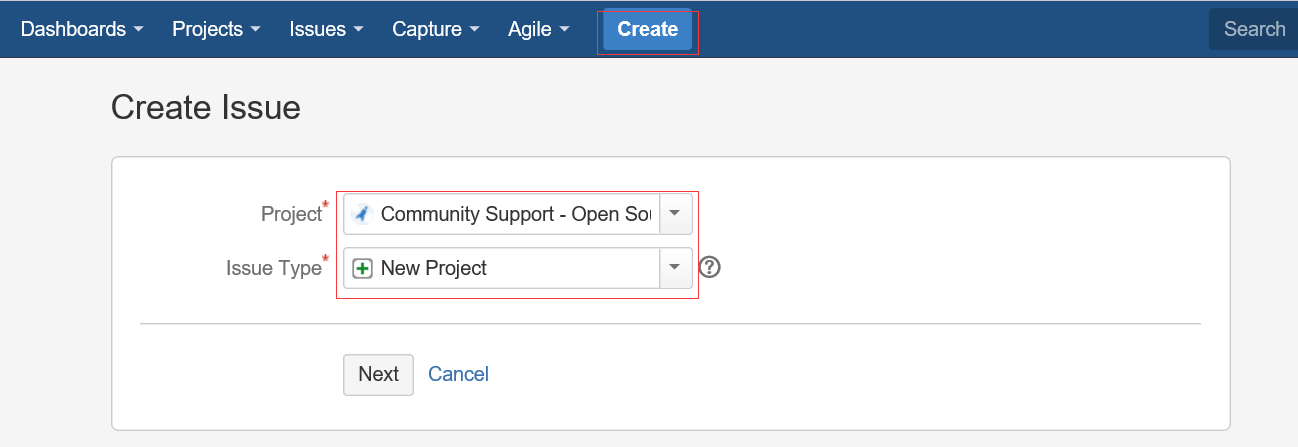
===Step 1===

Project:Community Support - Open Source Project Repository Hosting

Issue Type:New Project

===Step 2===

Summary:JAR包名称,如:marathon-client

Group Id:你懂得,不用多说,如com.cloudnil

Project URL:项目站点,如:https://github.com/CloudNil/marathon-client

SCM url:项目源码仓库,如:https://github.com/CloudNil/marathon-client.git
其他内容不用填写,创建Issue后需要等待一小段时间,Sonatype的工作人员审核处理,速度还是很快的,一般一个工作日以内,当Issue的Status变为RESOLVED后,就可以进行下一步操作了,否则,就等待… 
2、配置Maven
在工程的pom.xml文件中,引入Sonatype官方的一个通用配置oss-parent,这样做的好处是很多pom.xml的发布配置不需要自己配置了:
    <parent>

        <groupId>org.sonatype.oss</groupId>

        <artifactId>oss-parent</artifactId>

        <version>7</version>

    </parent>
并增加Licenses、SCM、Developers信息:
    <licenses>

        <license>

            <name>The Apache Software License, Version 2.0</name>

            <url>http://www.apache.org/licenses/LICENSE-2.0.txt</url>

            <distribution>repo</distribution>

        </license>

    </licenses>

    <scm>

        <tag>master</tag>

        <url>git@github.com:cloudnil/marathon-client.git</url>

        <connection>scm:git:git@github.com:cloudnil/marathon-client.git</connection>

        <developerConnection>scm:git:git@github.com:cloudnil/marathon-client.git</developerConnection>

    </scm>

    <developers>

        <developer>

            <name>cloudnil</name>

            <email>cloudnil@126.com</email>

            <organization>CloudNil</organization>

        </developer>

    </developers>
修改maven配置文件setting.xml,在servers中增加server配置,找不到这个文件的同学请自己去旁边哭会先。
  <servers>

    <server>

      <id>sonatype-nexus-snapshots</id>

      <username>Sonatype 账号</username>

      <password>Sonatype 密码</password>

    </server>

    <server>

      <id>sonatype-nexus-staging</id>

      <username>Sonatype 账号</username>

      <password>Sonatype 密码</password>

    </server>

  </servers>
3、配置gpg-key
如果是使用的windows,可以下载gpg4win,地址:https://www.gpg4win.org/download.html,安装后在命令行中执行 gpg --gen-key生成,过程中需要填写名字、邮箱等,其他步骤可以使用默认值,不过有个叫:Passphase的参数需要记住,这个相当于是是密钥的密码,下一步发布过程中进行签名操作的时候会用到。 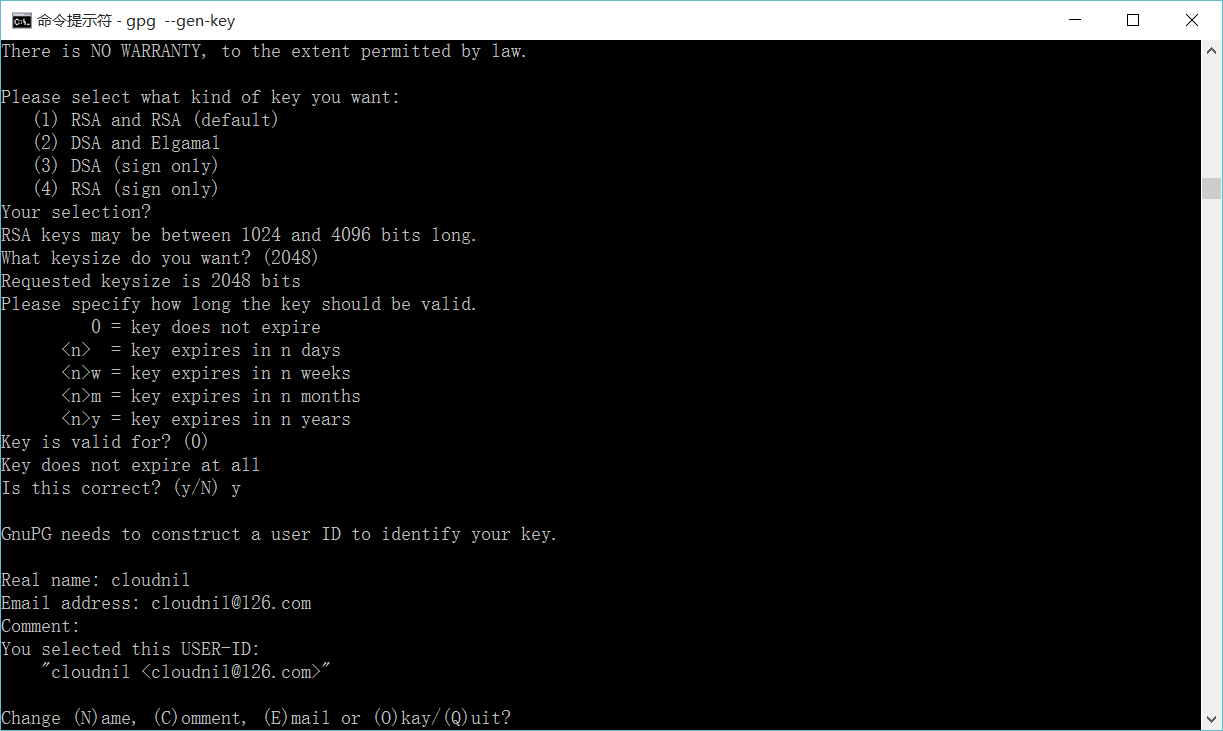
4、Deploy
这步就简单了,就是一套命令:
mvn clean deploy -P sonatype-oss-release -Darguments="gpg.passphrase=密钥密码"
如果使用eclipse的mvn插件发布的话,配置如下: 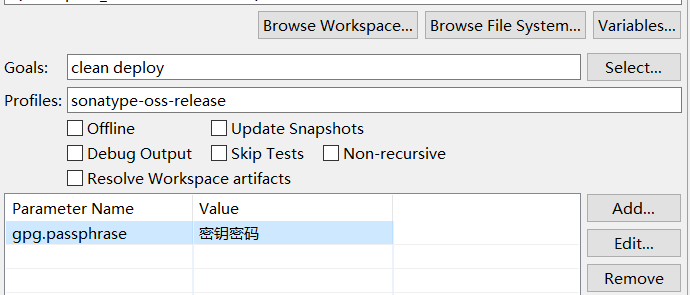
如果发布成功,就可以到构件仓库中查看了。
5、Release
进入https://oss.sonatype.org/#stagingRepositories查看发布好的构件,点击左侧的Staging Repositories,一般最后一个就是刚刚发布的jar了,此时的构件状态为open。
打开命令行窗口,查看gpg key并上传到第三方的key验证库:
E:\98_code\workSpace\marathon-client>gpg --list-keys

C:/Users/VF/AppData/Roaming/gnupg/pubring.gpg

---------------------------------------------

pub   2048R/824B4D7A --

uid       [ultimate] cloudnil <cloudnil@.com>

sub   2048R/7A10AD69 --

E:\98_code\workSpace\marathon-client>gpg --keyserver hkp://keyserver.ubuntu.com:11371 --send-keys 824B4D7A

gpg: sending key 824B4D7A to hkp server keyserver.ubuntu.com

E:\98_code\workSpace\marathon-client>
回到https://oss.sonatype.org/#stagingRepositories,选中刚才发布的构件,并点击上方的close–>Confirm,在下边的Activity选项卡中查看状态,当状态变成closed后,执行Release–>Confirm,并在下边的Activity选项卡中查看状态,成功后构件自动删除,一小段时间(约1-2个小时)后即可同步到maven的中央仓库。
http://blog.csdn.net/tiger435/article/details/50470316
https://www.iteblog.com/archives/1807.html
SCM Implementation: Git
SCM URL
For all URLs below, we use a colon (:) as separator. If you use a colon for one of the variables (e.g. a windows path), then use a pipe (|) as separator. The separator for the port has to be a colon in any case since this part is specified in the git URL specification. See man git-fetch.
scm:git:git://server_name[:port]/path_to_repository

scm:git:http://server_name[:port]/path_to_repository

scm:git:https://server_name[:port]/path_to_repository

scm:git:ssh://server_name[:port]/path_to_repository

scm:git:file://[hostname]/path_to_repository
- Examples
scm:git:git://github.com/path_to_repository

scm:git:http://github.com/path_to_repository

scm:git:https://github.com/path_to_repository

scm:git:ssh://github.com/path_to_repository

scm:git:file://localhost/path_to_repository
Different Fetch and Push URLs
In some cases a different URL has to be used for read and write operations. This can happen if e.g. fetch is performed via the http protocol, but writing to the repository is only possible via ssh. In this case both URLs may be written into the developerConnection tag. The fetch URL has to be prefixed with [fetch=] and the push URL with [push=]
- Example:
<developerConnection>scm:git:[fetch=]http://mywebserver.org/path_to_repository[push=]ssh://username@otherserver:8898/~/repopath.git</developerConnection>
Working with branches
Since version 1.3, we assume that the name of the branch in the upstream repo is the same as the name of the current local branch. So whenever you invoke a maven-scm action which has to access the upstream repository, e.g. start a release, you should be on that very branch.
In other words: If no branch is specified manually, every git-fetch, git-pull, git-push, etc will always work on the branch in the upstream repository which has the same branch name as your current local branch
git push pushUrl currentBranch:currentBranch
Provider Configuration
The provider configuration is defined in $user.home/.scm/git-settings.xml.
<git-settings>

  <!-- will had the option --no-verify to the commit command can be helpfull to ignore trailing spaces issues with cygwin and the release plugin -->

  <commitNoVerify>false</commitNoVerify>

</git-settings>
http://maven.apache.org/scm/git.html
在编码过程中,有些通用的代码模块,有时候我们不想通过复制拷贝来粗暴地复用,因为这样不仅体现不了变化,也不利于统一管理。这里我们使用maven deploy的方式,将通用的模块打成jar包,发布到nexus,让其他的项目来引用,以更简洁高效的方式来实现复用和管理。
第一:maven的settings.xml文件中设置<server>标签
    <server>

      <id>my-deploy-release</id>

      <username>admin</username>

      <password>admin123</password>

    </server>

    <server>

      <id>my-deploy-snapshot</id>

      <username>admin</username>

      <password>admin123</password>

    </server>
此处设置的用户名和密码都是nexus的登陆配置
第二:在项目的pom.xml文件中设置
<distributionManagement>

    <repository>

        <id>my-deploy-release</id>

        <url>http://192.168.1.123:8081/nexus/content/repositories/releases/</url>

    </repository>

    <snapshotRepository>

        <id>my-deploy-snapshot</id>

        <url>http://192.168.1.123:8081/nexus/content/repositories/snapshots/</url>

    </snapshotRepository>

</distributionManagement>
在此,url都是nexus相应仓库的链接地址,这一步做完之后,已经完成了发布所需要的基本配置。【试试命令:mvn deploy】
注意:<server>中的<id>要和<repository>、<snapshotRepository>的<id>一致,maven在发布时,会根据此id来查找相应的用户名密码进行登录验证并上传文件。
第三:发布的灵活性配置
maven会判断版本后面是否带了-SNAPSHOT,如果带了就发布到snapshots仓库,否则发布到release仓库。这里我们可以在pom.xml文件中,设置
<groupId>com.test</groupId>

<artifactId>my-test</artifactId>

<packaging>jar</packaging>

<version>${project.release.version}</version>

<properties>

    <java.version>1.8</java.version>

    <project.release.version>1.0-SNAPSHOT</project.release.version>

</properties>

<profiles>

    <profile>

        <id>product</id>

        <properties>

            <project.release.version>1.0</project.release.version>

        </properties>

    </profile>

</profiles>
说明:通过占位符${project.release.version}来控制需要发布的版本,用命令mvn deploy -P product,发布my-test的1.0版本到releases库。如果使用命令mvn deploy,则默认使用 1.0-SNAPSHOT版本号,将发布my-test的1.0-SNAPSHOT版本到snapshots库。
第四:发布时遇到的一些问题
- 部署到snapshot仓库时,jar包会带上时间戳,这没关系,maven会自动取相应版本最新的jar包;
- Failed to execute goal org.apache.maven.plugins:maven-deploy-plugin:2.8.2:deploy (default-deploy) on project my-test: Failed to deploy artifacts: Could not transfer artifact...from/to release...
部署到release仓库时,相同版本的jar包不能提交。
原因:因为release的部署策略是【disable redeploy】,不允许覆盖更新组件。
解决办法:修改一下版本号,再提交即可。
持续更新...
https://www.cnblogs.com/yucy/p/7509561.html
如何发布jar包到maven中央仓库的更多相关文章
- 发布Jar包到maven中央仓库
什么是maven中央仓库 maven是java世界最流行的构建工具,构建内容囊括了一个java项目的整个生命周期.其中最重要的功能就是依赖管理,maven通过一个类似云的ftp站点统一管理所有java ...
- 一份可以发布jar包到MAVEN中央仓库的POM
[2017-01-03 更新]将基础的pom抽离成一个项目无关的parent pom,euler-framework的pom继承这个parent pom 今天在家折腾了一下怎么把Jar包发布到Mave ...
- 如何发布自己的 jar 包到 maven 中央仓库(待更新...)
参考链接 如何发布自己的 jar 包到 maven 中央仓库
- maven插件上传本地jar包到maven中央仓库
settings配置(如果设置后有问题,可以重启idea,保证重新加载settings文件): <!-- 上传jar包到maven中央仓库配置start --> <server> ...
- 上传jar包到maven中央仓库过程中遇到的一些问题总结!
网上有很多相关教程, 我按步骤一步步走下来, 都还算顺利, 简单列举一下步骤以及其中需要注意的几个点(不详细, 不适合当教程) 第一步: 到https://issues.sonatype.org/se ...
- 发布jar包到远端github仓库使用(将github仓库当作maven仓库)
今天把单点登陆的core模块搬到了github仓库 并且利用github仓库作为maven仓库 在项目中进行了引用 1. 起初看技术博客没有完全引入进来,调整了一下OK了 2. 还可以将其他模块或者工 ...
- 如何将 jar 包导入Maven 本地仓库
案例:oracle jar包由于在maven 远程仓库中找不到,需要先将oracle jar 文件下载到本地,然后导入maven本地仓库,就可以通过 pom 进行依赖 例如:下载后的 jar 地址 D ...
- 手动安装jar包到Maven本地仓库
接手别人的一个项目,Maven工程,导入后,某些jar包找不到,然后从同事那复制Maven本地仓库的文件夹到我的电脑,发现依旧找不到.问题大致总结为:本地maven仓库存在jar,但是依然报Missi ...
- 本地jar包安装Maven本地仓库
下载jar包 如果本地存在,可以忽略. 本地安装命令 mvn install:install-file -Dfile=D:\Environment\Java\JDK\lib\tools.jar -Dg ...
随机推荐
- C语言之鞍点的查找
鞍点(Saddle point)在微分方程中,沿着某一方向是稳定的,另一条方向是不稳定的奇点,叫做鞍点.在泛函中,既不是极大值点也不是极小值点的临界点,叫做鞍点.在矩阵中,一个数在所在行中是最大值,在 ...
- 集群增量会话管理器——DeltaManager
DeltaManager会话管理器是tomcat默认的集群会话管理器,它主要用于集群中各个节点之间会话状态的同步维护,由于相关内容涉及到集群,可能会需要一些集群通信相关知识,如果有疑问可结合集群相关章 ...
- 详解Linux2.6内核中基于platform机制的驱动模型 (经典)
[摘要]本文以Linux 2.6.25 内核为例,分析了基于platform总线的驱动模型.首先介绍了Platform总线的基本概念,接着介绍了platform device和platform dri ...
- 色彩转换——RGB & HSV
RGB to HSV The R,G,B values are divided by 255 to change the range from 0..255 to 0..1: R' = R/255 G ...
- HBase BlockCache
1. Cache 读写 调用逻辑: hmaster.handleCreateTable->HRegion.createHRegion-> HRegion. initialize-> ...
- shc/unshc加/解密shell脚本
一.加密软件shcshc是linux的一款加密脚本的插件东西比较安全我们可以利用wget将文件放在root目录下也可以通过sftp放在root目录也可以直接利用cd命令选择目录一切随意shc官网:ht ...
- 代理网络中安装tomcat的注意事项
搭建J2EE开发环境的时候,tomcat怎么都没办法访问主页面.主要的问题就是Network Error (tcp_error) 百度了半天也没搞明白,最后没办法,打算重装tomcat,便对照完整的安 ...
- vue中get和post请求
import axios from 'axios'; import router from '@/router'; import { setSessionStorage, getSes ...
- currval of sequence "follow_id_seq" is not yet defined in this session
postgresql上使用 select currval('follow_id_seq'); 报错: currval of sequence "follow_id_seq" is ...
- JSF-页面导航
页面导航 1)导航处理涉及的术语: -动作值:触发动作事件的组件的action:EL方法表达式.字符串文字. -结果值:动作组件的action属性的:EL方法表达式的返回值.字符串文字:或结果组件的o ...