
OpenID 配置步骤
允许客户端基于授权服务器执行的身份验证来验证最终用户的身份,以及以可互操作和类似REST的方式获取关于最终用户的基本配置文件信息。
创建一个MVC客户端
1.新建一个ASP.NET Core MVC应用程序
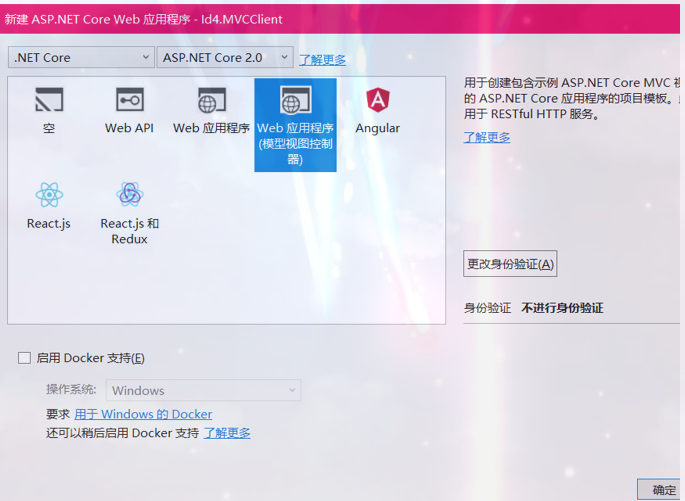
2.配置 OpenID Connect 认证
在类Startup的 ConfigureServices方法中添加以下代码:
 public void ConfigureServices(IServiceCollection services)

 {

     services.AddMvc();

     JwtSecurityTokenHandler.DefaultInboundClaimTypeMap.Clear();

     services.AddAuthentication(options =>

     {

         options.DefaultScheme = "Cookies";

         options.DefaultChallengeScheme = "oidc";

     })

     .AddCookie("Cookies")

     .AddOpenIdConnect("oidc", options =>

     {

         options.SignInScheme = "Cookies";

         options.Authority = "http://localhost:5000";

         options.RequireHttpsMetadata = false;

         options.ClientId = "mvc";

         options.SaveTokens = true;

     });

 }
AddAuthentication将认证服务添加到依赖注入容器中,使用Cookie作为验证用户的主要方法(通过"Cookies"作为 DefaultScheme)。
DefaultChallengeScheme 设置为"oidc"(OIDC是OpenID Connect的简称),因为当我们需要用户登录时,我们将使用OpenID Connect方案。
然后我们使用AddCookie添加可以处理Cookie的处理程序。
最后,AddOpenIdConnect用于配置执行OpenID Connect协议的处理程序。Authority表示id4服务的地址。 然后我们通过ClientId识别该客户端。SignInScheme 用于在OpenID Connect协议完成后使用cookie处理程序发出cookie。 而SaveTokens用于在Cookie中保存IdentityServer中的令牌(稍后将需要)。
然后确保在每个请求上执行认证服务,在Startup中的Configure方法添加UseAuthentication:
 public void Configure(IApplicationBuilder app, IHostingEnvironment env)

 {

     if (env.IsDevelopment())

     {

         app.UseDeveloperExceptionPage();

     }

     else

     {

         app.UseExceptionHandler("/Home/Error");

     }

     app.UseAuthentication();

     app.UseStaticFiles();

     app.UseMvcWithDefaultRoute();

 }
验证中间件应该在MVC之前添加。
最后一步是触发认证。为了进入HomeController,并在其中一个Action上添加特性[Authorize]
还要修改该Action的View以显示用户的信息,例如:
 <dl>

     @foreach (var claim in User.Claims)

     {

         <dt>@claim.Type</dt>

         <dd>@claim.Value</dd>

     }

 </dl>
如果您现在使用浏览器访问HomeController,将会导致重定向到IdentityServer,这将导致错误,因为MVC客户端尚未注册。
添加OpenID Connect Identity Scopes的支持
与OAuth 2.0类似,OpenID Connect也使用Scopes概念。 再次,Scopes代表您想要保护的客户端希望访问的内容。 与OAuth相反,OIDC中的范围不代表API,而是代表用户ID,姓名或电子邮件地址等身份信息。
在Config.cs中添加如下代码:
 public static IEnumerable<IdentityResource> GetIdentityResources()

 {

     return new List<IdentityResource>

     {

         new IdentityResources.OpenId(),

         new IdentityResources.Profile(),

     };

 }
所有标准Scopes及其相应的声明都可以在OpenID Connect规范中找到。
然后,您需要将这些身份资源添加到Startup.cs中的IdentityServer配置中。使用AddInMemoryIdentityResources扩展方法调用AddIdentityServer():
 public void ConfigureServices(IServiceCollection services)

 {

     services.AddMvc();

     // configure identity server with in-memory stores, keys, clients and scopes

     services.AddIdentityServer()

         .AddDeveloperSigningCredential()

         .AddInMemoryIdentityResources(Config.GetIdentityResources())

         .AddInMemoryApiResources(Config.GetApiResources())

         .AddInMemoryClients(Config.GetClients())

         .AddTestUsers(Config.GetUsers());

 }
为OpenID Connect implicit flow 添加客户端
Implicit Flow指的是使用OAuth2的Implicit流程获取Id Token和Access Token
最后一步是将MVC客户端的配置添加到IdentityServer。
基于OpenID Connect的客户端与我们迄今添加的OAuth 2.0客户端非常相似。 但是由于OIDC中的流程始终是交互式的,我们需要在配置中添加一些重定向URL。
将以下内容添加到您的客户端配置:
 public static IEnumerable<Client> GetClients()

 {

     return new List<Client>

     {

         // other clients omitted...

         // OpenID Connect implicit flow client (MVC)

         new Client

         {

             ClientId = "mvc",

             ClientName = "MVC Client",

             AllowedGrantTypes = GrantTypes.Implicit,

             // where to redirect to after login

             RedirectUris = { "http://localhost:5002/signin-oidc" },

             // where to redirect to after logout

             PostLogoutRedirectUris = { "http://localhost:5002/signout-callback-oidc" },

             AllowedScopes = new List<string>

             {

                 IdentityServerConstants.StandardScopes.OpenId,

                 IdentityServerConstants.StandardScopes.Profile

             }

         }

     };

 }
测试客户端
通过访问受保护的Action来触发身份验证握手。 你应该看到重定向到IdentityServer的登录页面。
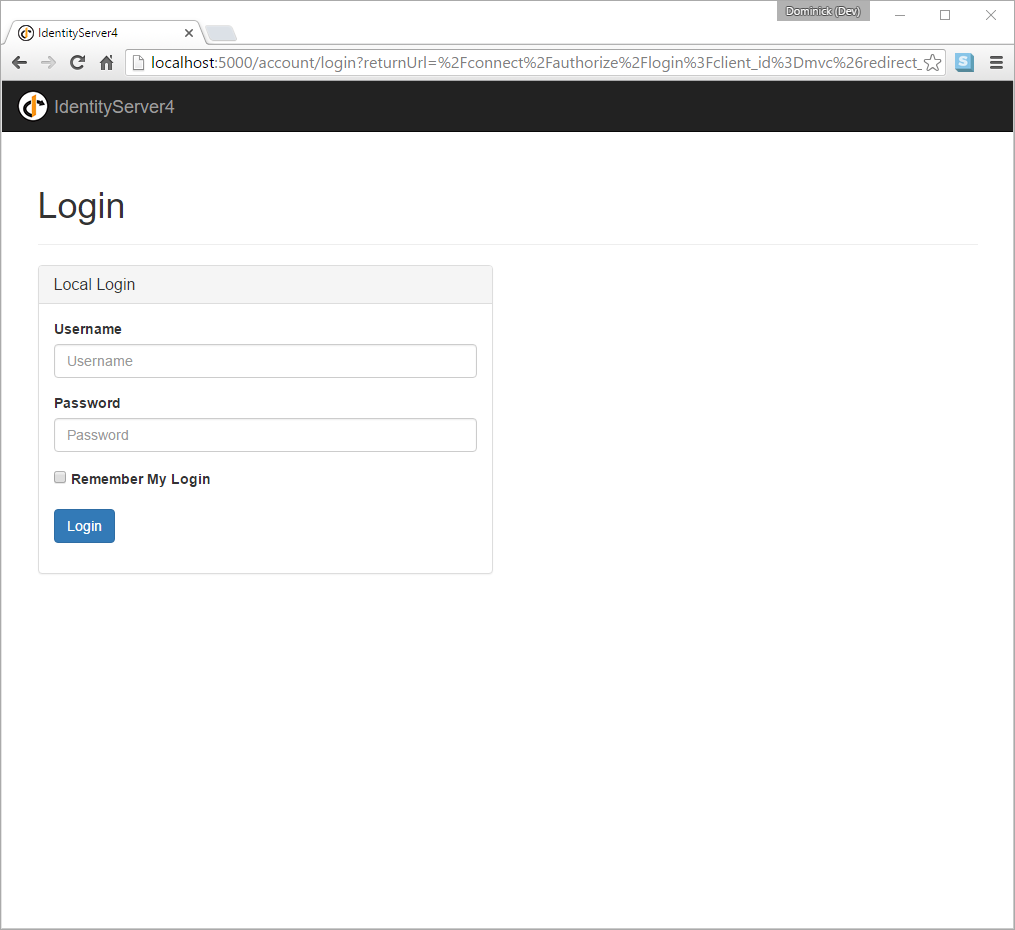
成功登录后,用户将看到同意画面。 在这里,用户可以决定是否要将他的身份信息发布到客户端应用程序。
可以使用客户端对象上的RequireConsent属性以每个客户端为基础关闭同意询问。

最后浏览器重定向到客户端应用程序,该应用程序显示了用户的声明。
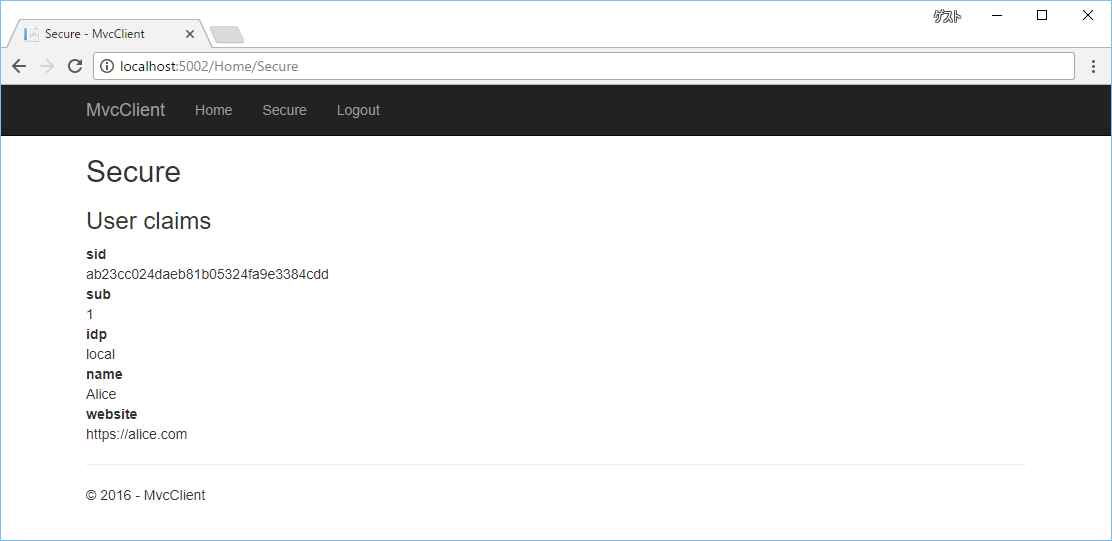
在开发过程中,您有时可能会看到一个异常,说明令牌无法验证。 这是因为签名密钥信息是即时创建的,并且只保存在内存中。 当客户端和IdentityServer不同步时,会发生此异常。 只需在客户端重复操作,下次元数据已经追上,一切都应该正常工作。
添加注销
最后一步是给MVC客户端添加注销功能。
使用IdentityServer等身份验证服务,仅清除本地应用程序Cookie是不够的。 此外,您还需要往身份服务器交互,以清除单点登录会话。
确切的协议步骤在OpenID Connect中间件内实现,只需将以下代码添加到某个控制器即可触发注销:
 public async Task Logout()

 {

     await HttpContext.SignOutAsync("Cookies");

     await HttpContext.SignOutAsync("oidc");

 }
这将清除本地cookie,然后重定向到IdentityServer。 IdentityServer将清除它的cookie,然后给用户一个链接返回到MVC应用程序。
进一步实验
如上所述,OpenID Connect中间件默认要求配置 profile scope。 这个scope还包括像名字或网站这样的声明。
让我们将这些声明添加到用户,以便IdentityServer可以将它们放入身份令牌中:
 public static List<TestUser> GetUsers()

 {

     return new List<TestUser>

     {

         new TestUser

         {

             SubjectId = "",

             Username = "alice",

             Password = "password",

             Claims = new []

             {

                 new Claim("name", "Alice"),

                 new Claim("website", "https://alice.com")

             }

         },

         new TestUser

         {

             SubjectId = "",

             Username = "bob",

             Password = "password",

             Claims = new []

             {

                 new Claim("name", "Bob"),

                 new Claim("website", "https://bob.com")

             }

         }

     };

 }
下一次您进行身份验证时,你的声明页面现在将显示额外的声明。
OpenID Connect中间件上的Scope属性是您配置哪些Scope将在身份验证期间发送到IdentityServer。
值得注意的是,对令牌中身份信息的遍历是一个扩展点 - IProfileService。因为我们正在使用 AddTestUser,所以默认使用的是 TestUserProfileService。你可以检出这里的源代码来查看它的工作原理。
Demo下载地址
参考官方文档:https://identityserver4.readthedocs.io/en/release/quickstarts/3_interactive_login.html
官方的Demo已经更新到最新的.NET Core 2.0
OpenID 配置步骤的更多相关文章
- .net 4.0+ 应用接入openid Server步骤
.net 4.0+ 应用接入openid Server步骤: Requirements:Microsoft.AspNet.Mvc 5.2.4+ 1 确认应用是否是katana启动(项目引用了owin, ...
- log4j.properties 详解与配置步骤
一.log4j.properties 的使用详解 1.输出级别的种类 ERROR.WARN.INFO.DEBUGERROR 为严重错误 主要是程序的错误WARN 为一般警告,比如session丢失IN ...
- log4j.properties 详解与配置步骤(转)
找的文章,供参考使用 转自 log4j.properties 详解与配置步骤 一.log4j.properties 的使用详解 1.输出级别的种类 ERROR.WARN.INFO.DEBUGERROR ...
- MySQL数据库集群进行正确配置步骤
MySQL数据库集群进行正确配置步骤 2010-06-09 10:47 arrowcat 博客园 字号:T | T 我们今天是要和大家一起分享的是对MySQL数据库集群进行正确配置,我前两天在相关网站 ...
- Apache安装配置步骤
注释:这里以Linux 红帽商业版为例~~~~~~~纯手打啊 Apache安装配置步骤 准备:关闭其他虚拟设备 #/etc/init.d/libvirtd stop #/etc/init.d/xend ...
- Windows Live Writer配置步骤
推荐文档: [超详细教程]使用Windows Live Writer 2012和Office Word 2013 发布文章到博客园全面总结 Live Writer 使用小贴示:发博客时始终使用图片原始 ...
- 获取微信openID 的步骤
获取微信openid的步骤:1.进入-->判断openID是否为空: 空-->$url=urlencode("http://xxx/xxx.php");//回调链接 $ ...
- Oracle 11g客户端在Linux系统上的配置步骤详解
Oracle 11g客户端在Linux系统上的配置步骤详解 2011-07-26 10:47 newhappy2008 CSDN博客 字号:T | T 本文我们主要介绍了Oracle 11g客户端在L ...
- jenkins 邮件配置步骤
一.进行系统管理中的邮件配置步骤: 1.设置Extended E-mail Notification 二.对构建的job 添加邮件发送的步骤: 3.成功截图:
随机推荐
- CF-503div2-A/B/C
A. New Building for SIS time limit per test 1 second memory limit per test 256 megabytes input stand ...
- poj-2369-置换
Permutations We remind that the permutation of some final set is a one-to-one mapping of the set ont ...
- HTTP及RFC解析。
HTTP协议描述的是发送方与接收方的通信协议,通过两方的自觉遵守而存在,当然有不少的浏览器并没有百分百遵守这份协议.HTTP是运行于应用层的协议,基于TCP协议而运作.基本上是客户/服务器对答模式,其 ...
- git拉取远程分支并创建本地分支
本地分支推送至远程 git checkout local_branch git push origin local_branch:remote_branch 一.查看远程分支 使用如下Git命令查看所 ...
- activiti实战系列之动态表单 formService 自定义变量类型
目前Activiti默认支持的类型有String,long,enum,date,boolean,collection 要自定义字段类型,首先需要表单类型解析类 /** * @Author:LJ * @ ...
- ftp主动模式与被动模式交互过程分析
1.相关介绍 1.1主动模式和被动模式 主动模式:服务端通过指定的数据传输端口(默认20),主动连接客户端提交的端口,向客户端发送数据. 被动模式:服务端采用客户端建议使用被动模式,开启数据传输端口的 ...
- Vscode extensions开发
Vscode extensions开发 1◆ generatorcode install npm install -g yo generator-code 2◆ 步骤 yo code ...
- linux下查看物理CPU个数、核数、逻辑CPU个数
cat /proc/cpuinfo中的信息 processor 逻辑处理器的id.physical id 物理封装的处理器的id.core id 每个核心的id.cpu cores 位于相同物理封装的 ...
- Python Oracle连接与操作封装
一.封装方式一 #encoding:utf-8 import cx_Oracleclass Oracle_Status_Output: def __init__(self,db_name,db_ ...
- day01 初识Python
今日主要内容 1.初识python 2.简单了解下python的数据类型 nubmer=int(input("请输入数字大小:")) if nubmer>66: print( ...