img2html实现将图片转换成网页
简单介绍img2html的用法,安装就不用说了pip。这个包现只支持python2,支持python的话需改下源码这几个部分:
加注释的是修改的地方
#!/usr/bin/env python

# encoding=utf-8

from __future__ import print_function, unicode_literals

from collections import namedtuple

from itertools import cycle

import jinja2

from PIL import Image

Point = namedtuple('Point', ['x', 'y'])

Pixel = namedtuple('Pixel', ['r', 'g', 'b'])

RenderItem = namedtuple('RenderItem', ['color', 'char'])

RenderGroup = list

HTMLImage = list

TEMPLATE = '''

<html>

<head>

    <meta charset="utf-8">

    <title>{{ title }}</title>

    <style type="text/css">

        body {

            margin: 0px; padding: 0px; line-height:100%; letter-spacing:0px; text-align: center;

            min-width: {{width}}px;

            width: auto !important;

            font-size: {{size}}px;

            background-color: #{{background}};

            font-family: {{font_family}};

        }

    </style>

</head>

<body>

<div>

{% for group in html_image %}

    {% for item in group %}<font color="#{{ item.color }}">{{ item.char }}</font>{% endfor %}

    <br>

{% endfor %}

</div>

</body>

</html>'''

_c = cycle(r'/-\|')

def _progress_callback(percent):

    if percent == 100:

        print('\rDone!               ')

    else:

        import sys, time

        lca = getattr(_progress_callback, '_last_call_at', 0)

        if time.time() - lca > 0.1:

            _progress_callback._last_call_at = time.time()

            # _c.next() => next(_c)

            sys.stdout.write('\r{} progress: {:.2f}%'.format(next(_c), percent))

            sys.stdout.flush()

class Img2HTMLConverter(object):

    def __init__(self,

                 font_size=10,

                 char='䦗',

                 background='#000000',

                 title='img2html by xlzd',

                 font_family='monospace',

                 progress_callback=None):

        self.font_size = font_size

        self.background = background

        self.title = title

        self.font_family = font_family

        # if isinstance(char, str):

        #     char = char.decode('utf-8')

        self.char = cycle(char)

        self._prg_cb = progress_callback or _progress_callback

    def convert(self, source):

        image = Image.open(source)

        width, height = image.size

        row_blocks = int(round(float(width) / self.font_size))

        col_blocks = int(round(float(height) / self.font_size))

        html_image = HTMLImage()

        progress = 0.0

        step = 1. / (col_blocks * row_blocks)

        # xrange => range

        for col in range(col_blocks):

            render_group = RenderGroup()

            for row in range(row_blocks):

                pixels = []

                for y in range(self.font_size):

                    for x in range(self.font_size):

                        point = Point(row * self.font_size + x, col * self.font_size + y)

                        if point.x >= width or point.y >= height:

                            continue

                        pixels.append(Pixel(*image.getpixel(point)[:3]))

                average = self.get_average(pixels=pixels)

                color = self.rgb2hex(average)

                # render_item = RenderItem(color=color, char=self.char.next())

                render_item = RenderItem(color=color, char=next(self.char))

                render_group.append(render_item)

                progress += step

                self._prg_cb(progress * 100)

            html_image.append(render_group)

        self._prg_cb(100)

        return self.render(html_image)

    def render(self, html_image):

        template = jinja2.Template(TEMPLATE)

        return template.render(

            html_image=html_image,

            size=self.font_size,

            background=self.background,

            title=self.title,

            font_family=self.font_family,

            width=self.font_size * len(html_image[0]) * 2

        )

    @staticmethod

    def rgb2hex(pixel):

        return '{:02x}{:02x}{:02x}'.format(*pixel)

    @staticmethod

    def get_average(pixels):

        r, g, b = 0, 0, 0

        for pixel in pixels:

            r += pixel.r

            g += pixel.g

            b += pixel.b

        base = float(len(pixels))

        return Pixel(

            r=int(round(r / base)),

            g=int(round(g / base)),

            b=int(round(b / base)),

        )
具体实现代码如下:
# -*- coding: utf-8 -*-

# Nola

"""

img2html : Convert image to HTML

optional arguments:

  -b #RRGGBB, --background #RRGGBB  background color (#RRGGBB format)

  -s (4~30), --size (4~30)          font size (int)

  -c CHAR, --char CHAR              characters

  -t TITLE, --title TITLE           html title

  -f FONT, --font FONT              html font

  -i IN, --in IN                    要转换的图片

  -o OUT, --out OUT                 输出文件名

$ img2html -i timg.jpg -o timg_html.html

"""

from img2html.converter import Img2HTMLConverter

converter = Img2HTMLConverter(char='爱',title='金木研')

html = converter.convert('timg.jpg')

with open('timg_html.html',mode='w',encoding='utf-8') as f:

    f.write(html)
准备一张图片,编写py文件,生成html文件,文件结构如图:
前后对比效果如图:
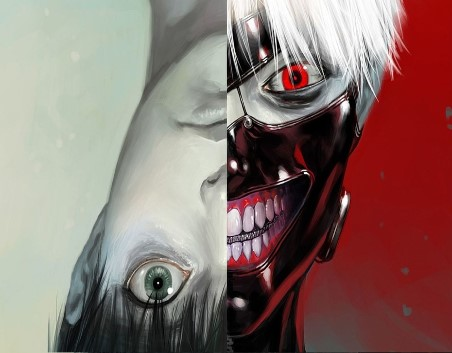

密密麻麻的爱字,看起来着实有点像十字绣,也许你会发现这个包更有趣的实用之处。
img2html实现将图片转换成网页的更多相关文章
- 使用CSS将图片转换成黑白(灰色、置灰)z转
小tip: 使用CSS将图片转换成黑白(灰色.置灰) by zhangxinxu from http://www.zhangxinxu.com 本文地址:http://www.zhangxinxu.c ...
- [转]C#将image中的显示的图片转换成二进制
本文转自:http://www.cnblogs.com/shuang121/archive/2012/07/09/2582654.html .将Image图像文件存入到数据库中 我们知道数据库里的Im ...
- 小tip: 使用CSS将图片转换成模糊(毛玻璃)效果
去年盛夏之时,曾写过“小tip: 使用CSS将图片转换成黑白”一文,本文的模式以及内容其实走得是类似路线.CSS3 → SVG → IE filter → canvas. 前段时间,iOS7不是瓜未熟 ...
- ABBYY如何把图片转换成pdf格式
在制作工作文件的时候,有时候会遇到需要进行文件格式转换的情况,比较常见的文件格式转换就包含了Office与pdf格式之间的转换.但除此之外,图片与pdf格式也是可以进行转换的,那么图片要怎么操作,才能 ...
- [转] 小tip: 使用CSS将图片转换成模糊(毛玻璃)效果 ---张鑫旭
by zhangxinxu from http://www.zhangxinxu.com本文地址:http://www.zhangxinxu.com/wordpress/?p=3804 去年盛夏之时, ...
- C#将image中的显示的图片转换成二进制
原文:C#将image中的显示的图片转换成二进制 1.将Image图像文件存入到数据库中 我们知道数据库里的Image类型的数据是"二进制数据",因此必须将图像文件转换成字节数组才 ...
- 【caffe-windows】 caffe-master 之 训练自己数据集(图片转换成lmdb or leveldb)
前期准备: 文件夹train:此文件夹中按类别分好子文件夹,各子文件夹里存放相应图片 文件夹test:同train,有多少类就有多少个子文件夹 trainlabels.txt : 存的是训练集的标签 ...
- 运用C语言将图片转换成16进制的字符串(base64)
最近在写手机端的性能测试脚本的时候,发现手机在上传图片数据时,先将图片转换成一堆16进制的字符,将字符传输过去,服务器再将字符解码成图片 我们在loadrunner中测试时,就需要用C语言将图片编码. ...
- jpg、png格式的图片转换成webp后颜色失真的问题
今天简单的试用了一下 cweb.exe 将 jpg, png 格式的图片转换成 webp 格式. 我今天下载的是当前最新版:1.0.0 cwebp 3.jpg -q 85 -o 3.webp 发现图 ...
随机推荐
- stop 用法
1. stop 文档 $(selector).stop(stopAll,goToEnd) stopAll 可选.规定是否停止被选元素的所有加入队列的动画.goToEnd 可选.规定是否允许完成当前的动 ...
- 学习笔记29—Linux基础
一.简单命令: 1.进入文件夹heyi目录:cd ./heyi 2.查看该目录下内容:ls 二.linux压缩和解压缩命令大全 tar命令 解包:tar zxvf FileName.tar 打包:ta ...
- Codeforces 377A - Maze
A. Maze 题目链接:http://codeforces.com/contest/377/problem/A time limit per test 2 seconds memory limit ...
- Fiddler 手机抓包介绍
直接打开tools -> Options 进行设置 点击OK,在这里代理就设置完成,一定要重启软件配置才生效,下面是手机端的设置. 手机端代理设置以三星S4为例子,1.如下图真机三星S4设置:找 ...
- sql server 我常用的语句
1. computed column ) persisted; 2. unique nullable create unique nonclustered index[UniqueName] on [ ...
- 编写脚本,出现 TypeError: exceptions must be old-style classes or derived from BaseException, not unicode怎样解决?
小编使用robot framework,在编写安卓自动化脚本时,出现这样的情况: 在网上搜了好久,发现都是python的解决方法,到底怎样解决robot里面的问题呢?最终发现: (1)代码中我是这样写 ...
- Linux中apt与apt-get命令的区别与解释
2019-01-15 14:35:39 随着 apt install package 命令的使用频率和普遍性逐步超过 apt-get install package,越来越多的其它 Linux 发行版 ...
- js插件---iCheck是用来做什么的
js插件---iCheck是用来做什么的 一.总结 一句话总结:25 种参数 用来定制复选框(checkbox)和单选按钮(radio button) 定制复选框 定制单选按钮 1.iCheck常用的 ...
- learn the python the hard way习题11~17总结
关于 input() 格式: input("prompt")功能:从 CLI 获取 User 的一个输入,显示 promt 的内容,并且返回一个 string 类型的数值其他:如果 ...
- 用C#实现多种方式播放Wav声音
using System; using System.Collections.Generic; using System.ComponentModel; using System.Data; usin ...