How to Use JUnit With JMeter
Do you need to use JUnit in your testing processes? To answer this question, let’s take a look first at unit testing.
Unit testing is the lowest resolution of testing in the software testing lifecycle. When you run unit tests, you need to take the smallest piece of testable functionality in the application, isolate it from the other code and determine whether its behaviour matches expectations. This enables you to verify that small “units” of the application under test functionality work fine - before you start building up larger modules.
JUnit is by far the most popular unit testing framework for the Java language. According to a recent survey, more than 30% of GitHub projects use JUnit for unit testing. JMeter developers and contributors also use JUnit to verify that a new feature or bug fix won’t break any existing functionality.
So JUnit clearly has a big value for developers. But how do you use it?
If you’re already using JMeter, you can use its JUnit Request sampler. This sampler can execute individual JUnit test cases, enabling you to:
Run JUnit test cases in multiple threads
Apply JMeter features like:
Logic Controllers
Timers
Assertions
Listeners
Control the test execution order and conditions to build an advanced test plan
In this article, I’m going to highlight the most common use cases, show you how to perform configurations, reveal where you should put your JUnit tests .jar files, and provide tips on extended scenarios.
Running Existing JUnit Tests
Feeding JUnit .jar Files to JMeter
The best place to put your .jar file(s) containing JUnit test cases is in the JMETER_HOME/lib/junit folder. Just drop your .jar file into this folder, restart JMeter, and add a JUnit Request Sampler to your Test Plan. JMeter scans this folder and picks up everything that looks like a JUnit test case - so you should be able to see your JUnit Test Class names and associated methods in the dropdowns.
You can also “tell” JMeter to look into additional locations via the “user.classpath” property. This property lives in the “user.properties” file under the /bin folder of your JMeter installation. It can take the following values:
Single jar file: user.classpath=/Projects/junit/test1.jar
Multiple jar files: user.classpath=/Projects/junit/test1.jar;/Projects/junit/test2.jar
A folder: user.classpath=/Projects/junit
Any combination of the above. Individual classpath entries need to be separated by semicolon.
More information on various JMeter properties and ways to set and override them can be found in the Apache JMeter Properties Customization Guide
Remember that forward or back slashes in the classpath should correspond to the file separator of the operating system:
For Windows, the file separator is a backslash: \
For Linux/Unix/MacOSX, the file separator is a forward slash: /
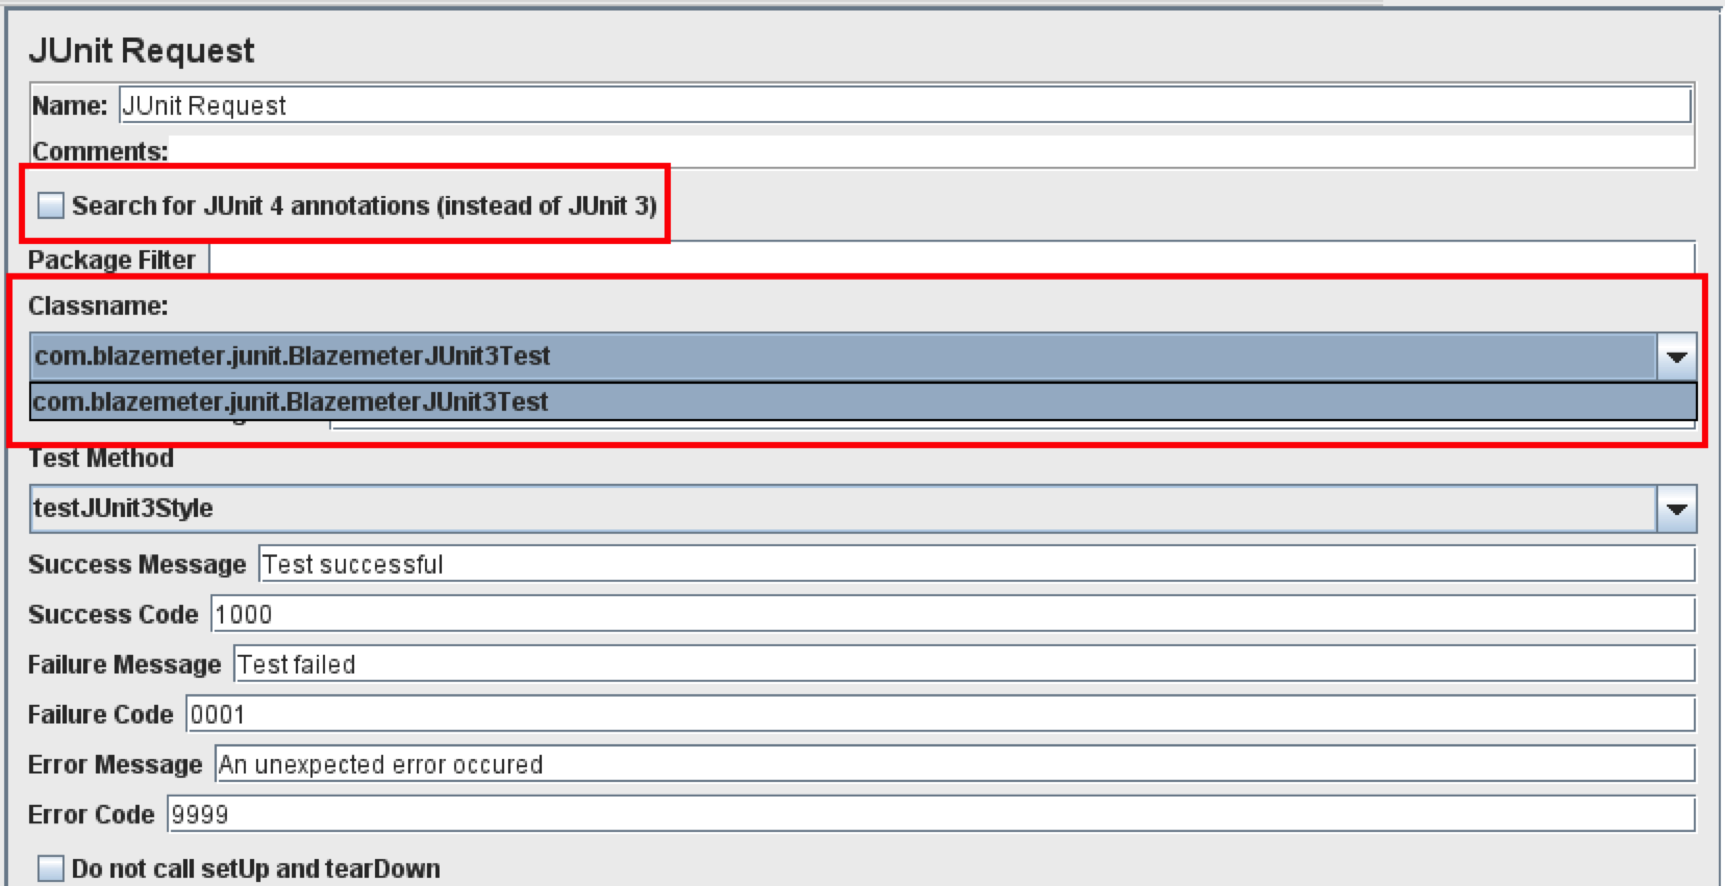
JMeter’s JUnit Request Sampler recognizes both JUnit3- and JUnit4-style classes and methods, but you need to ‘tell’ it which version to look for via the “Search for JUnit 4 annotations (instead of JUnit3)” checkbox. When the box is checked, JMeter will look for JUnit4-style annotations and JUnit3 classes won’t be shown (and vice versa if the box isn’t checked).
For instance, I have jars with both JUnit3 and JUnit4 test classes. If I don’t check the box, JMeter will look for JUnit3 tests and JUnit4 won’t be displayed:

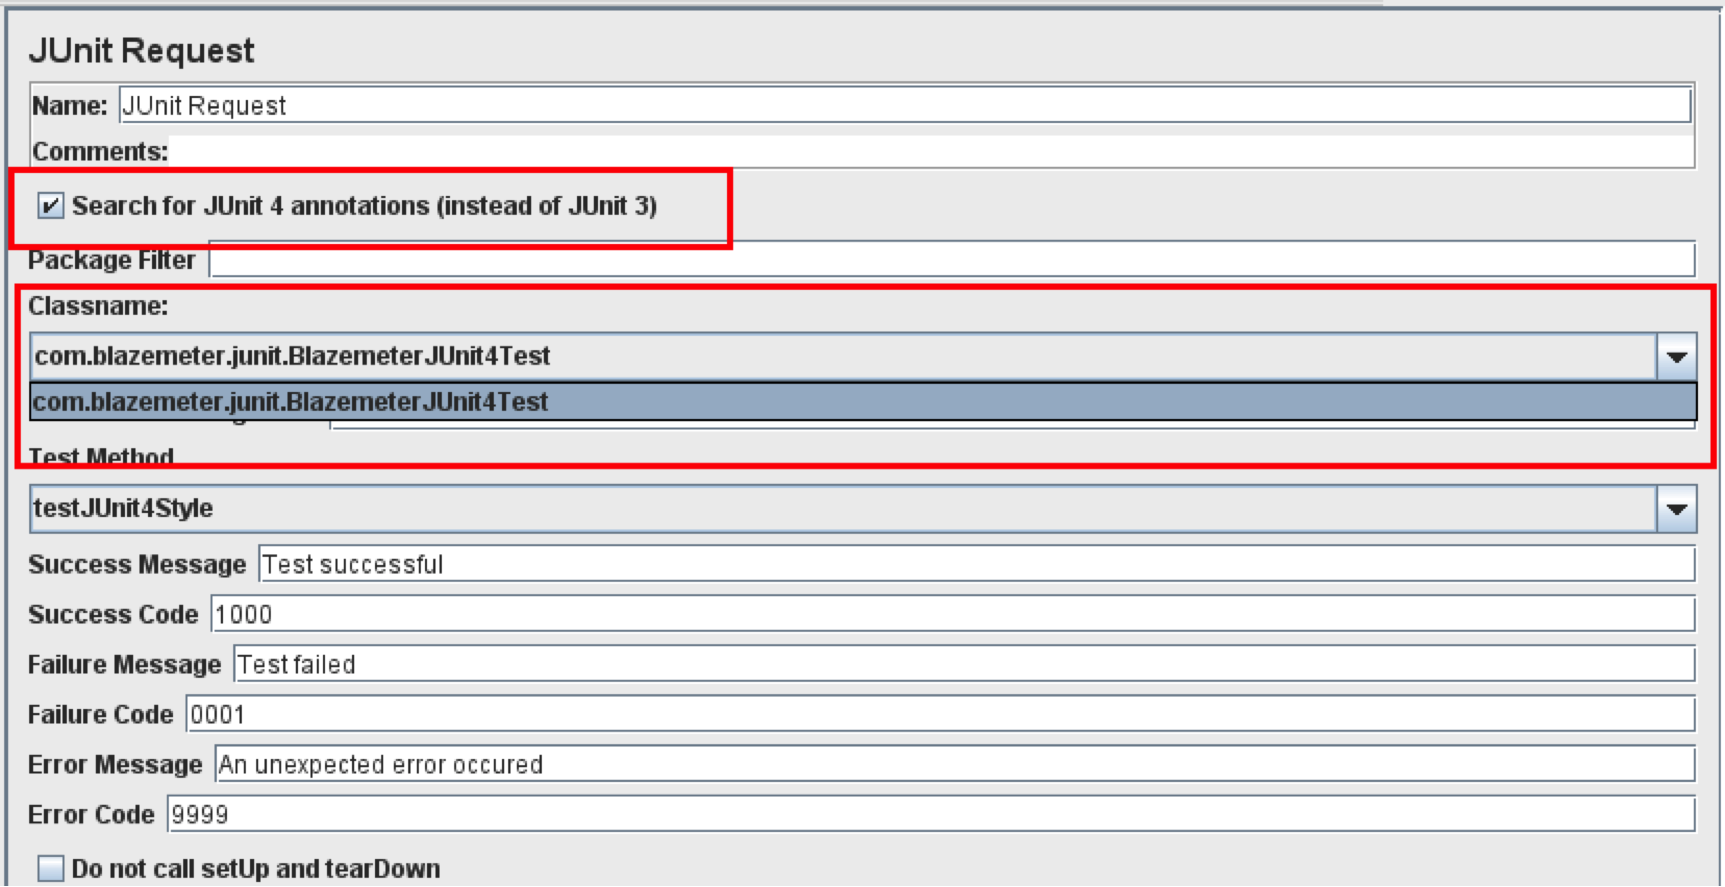
And when the box is checked, JMeter is instructed to scan only for JUnit4 tests. As you can see, JUnit3 tests aren’t in the dropdown
Hopefully you now have all your classes and methods listed in JMeter’s JUnit Sampler. So what’s next?
The JUnit Sampler’s Control Panel Parameters - Explained!
Before you can go much further, you’ll need to understand all the parameters of the JUnit Sampler’s control panel. Here’s a quick explanation of each:
Name
This is for the name of the JUnit Sampler, just like any other Sampler or Config Element or Logic Controller. It’s better to give the sampler a proper, unique name to ensure you’ll be able to distinguish it from others when running your performance test results analysis.
Comment
Here you can enter arbitrary comments - either for yourself or for colleagues if you’re working in collaboration. This normally involves a short summary of what the sampler does.
Search for JUnit4 Annotations
I’ve already covered this above. It tells JMeter whether to look for JUnit3 or JUnit4 tests.
Package Filter
By using the Package Filter, you can limit JMeter’s output of JUnit test classes to just one. This will contain the pattern provided through the input.
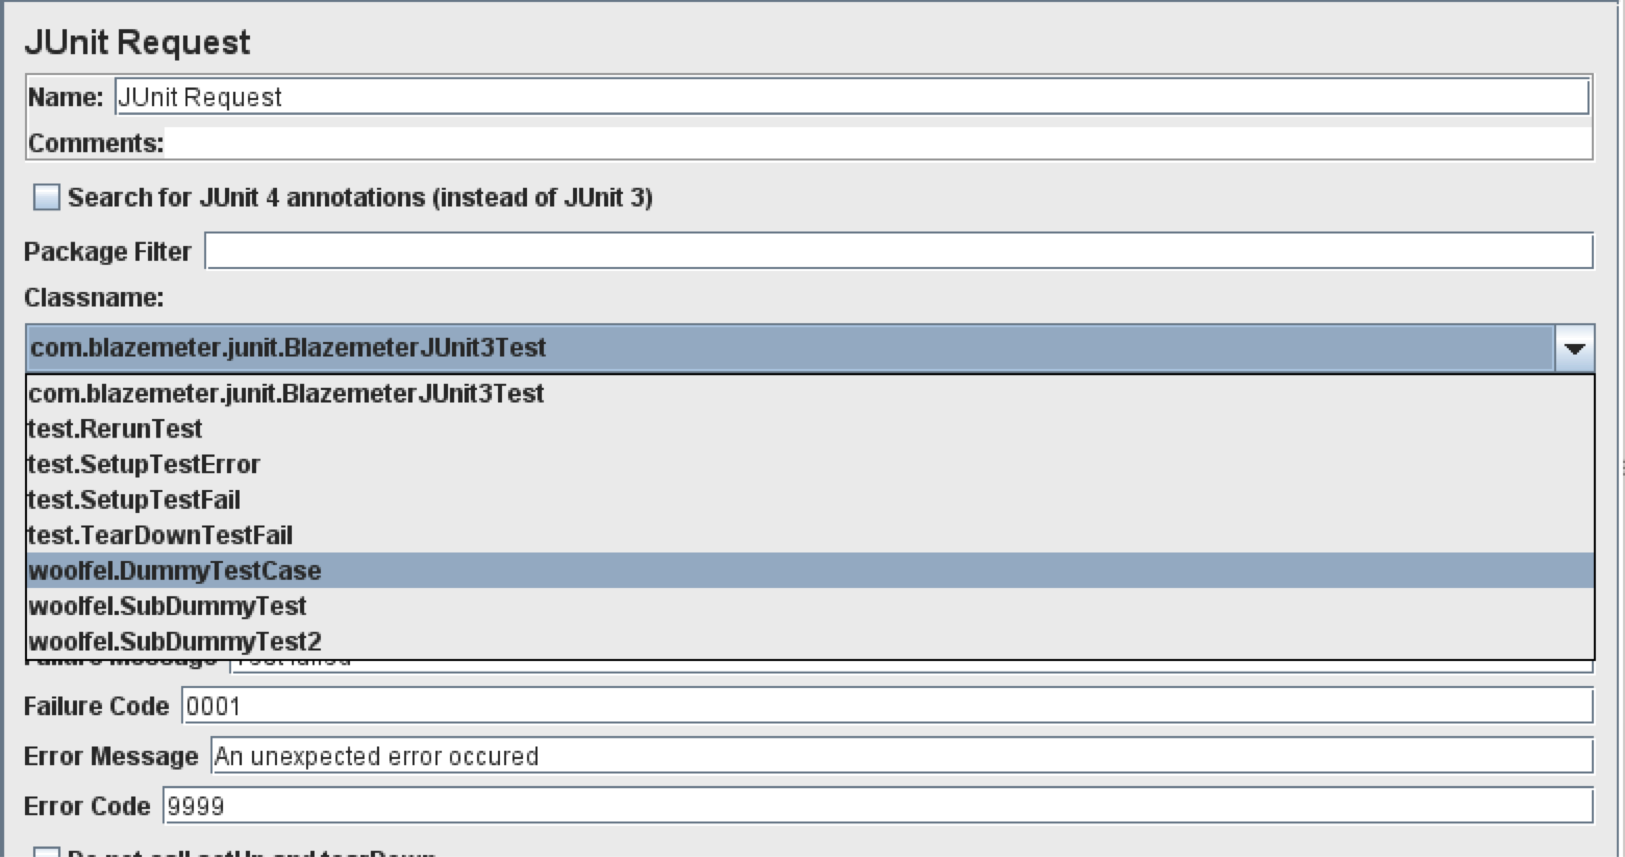
By default JMeter lists all the classes
If you type “woolfel” into the filter, you’ll see that JMeter only shows classes with “woolfel” in package name.
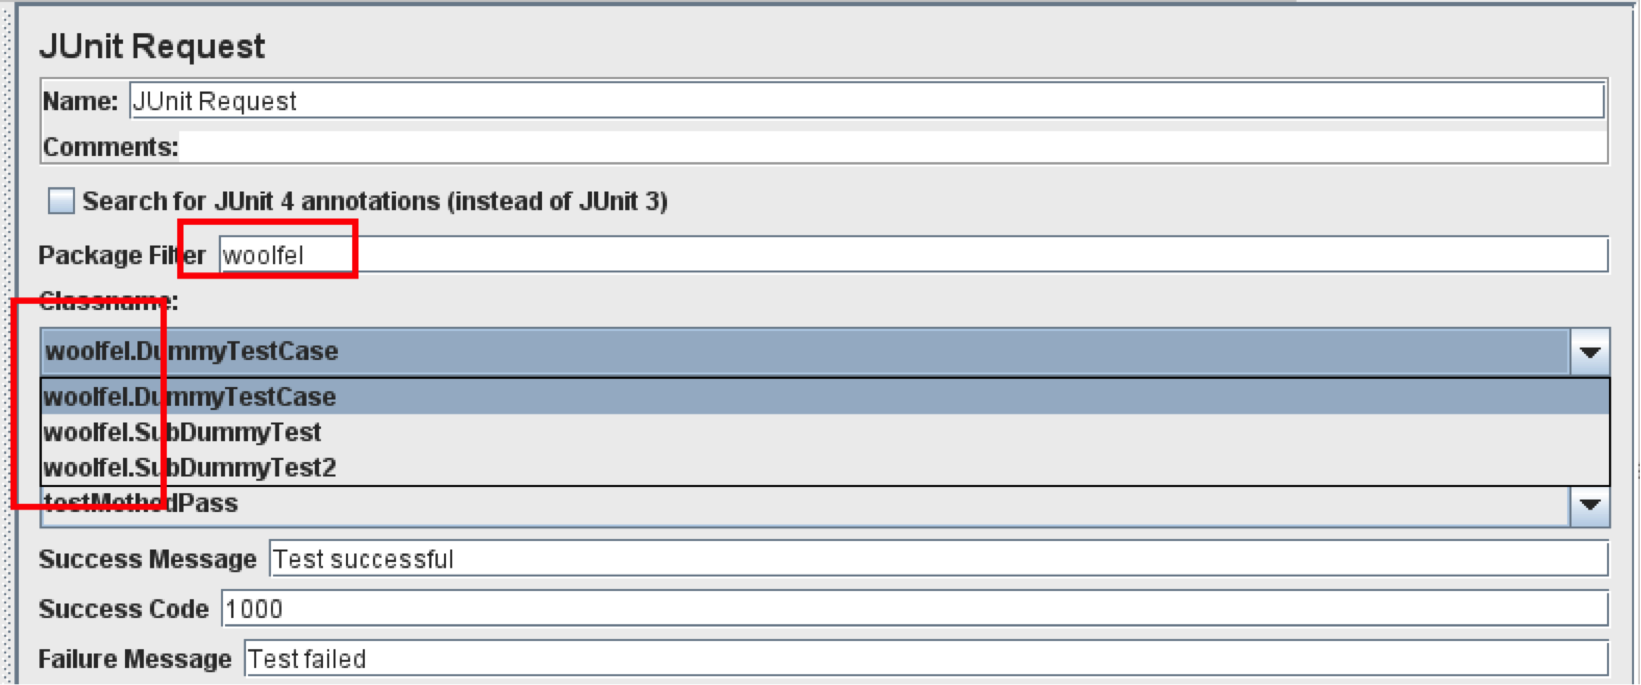
Remember that the Package Filter only works for packages, not for class names. So “woolfel” will work but “Dummy” won’t.
Classname
This parameter is pretty self-explanatory. Just select the class where the test case you want to run from lives.
Constructor String Label
If your JUnit test class has a constructor which accepts a single String, you can set its value with this parameter. If your JUnit test class doesn’t declare such a constructor, the JUnit Sample will try to look for an empty constructor.
Test Method
This is the most important part of the JUnit sampler. Based on the “Classname” selection, the Test Method drop-down shows all the available methods. Only one JUnit test method can be run by the JUnit Sampler at a time.
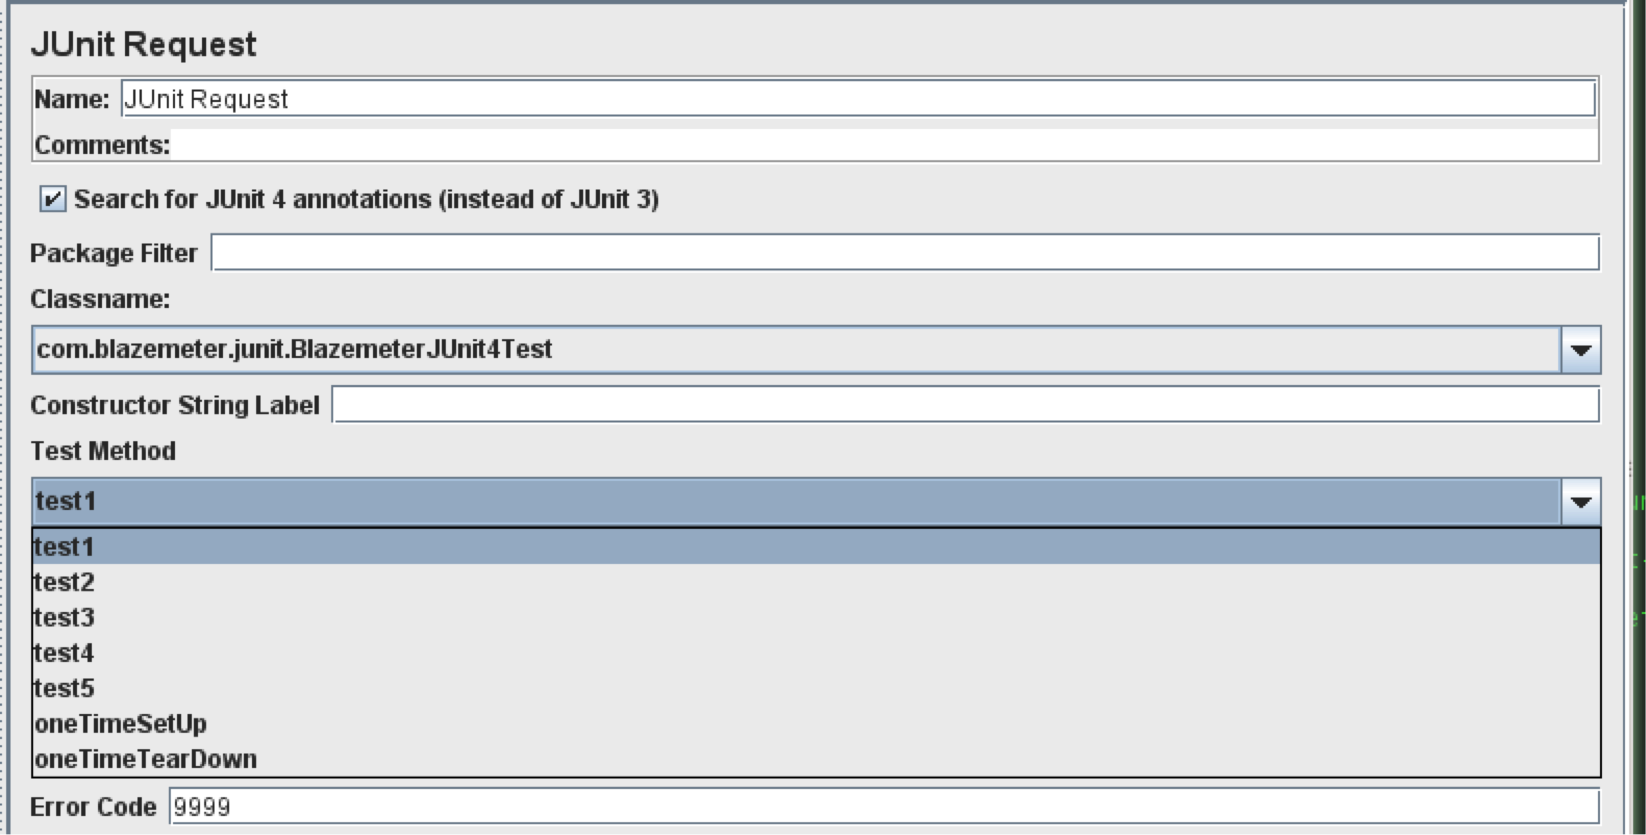
It’s worth mentioning the “oneTimeSetUp” and “oneTimeTearDown” methods, which stand for @BeforeClass and @AfterClass JUnit4 annotations. These are shown as individual test methods and aren’t executed automatically due to JMeter’s multi-threaded nature.
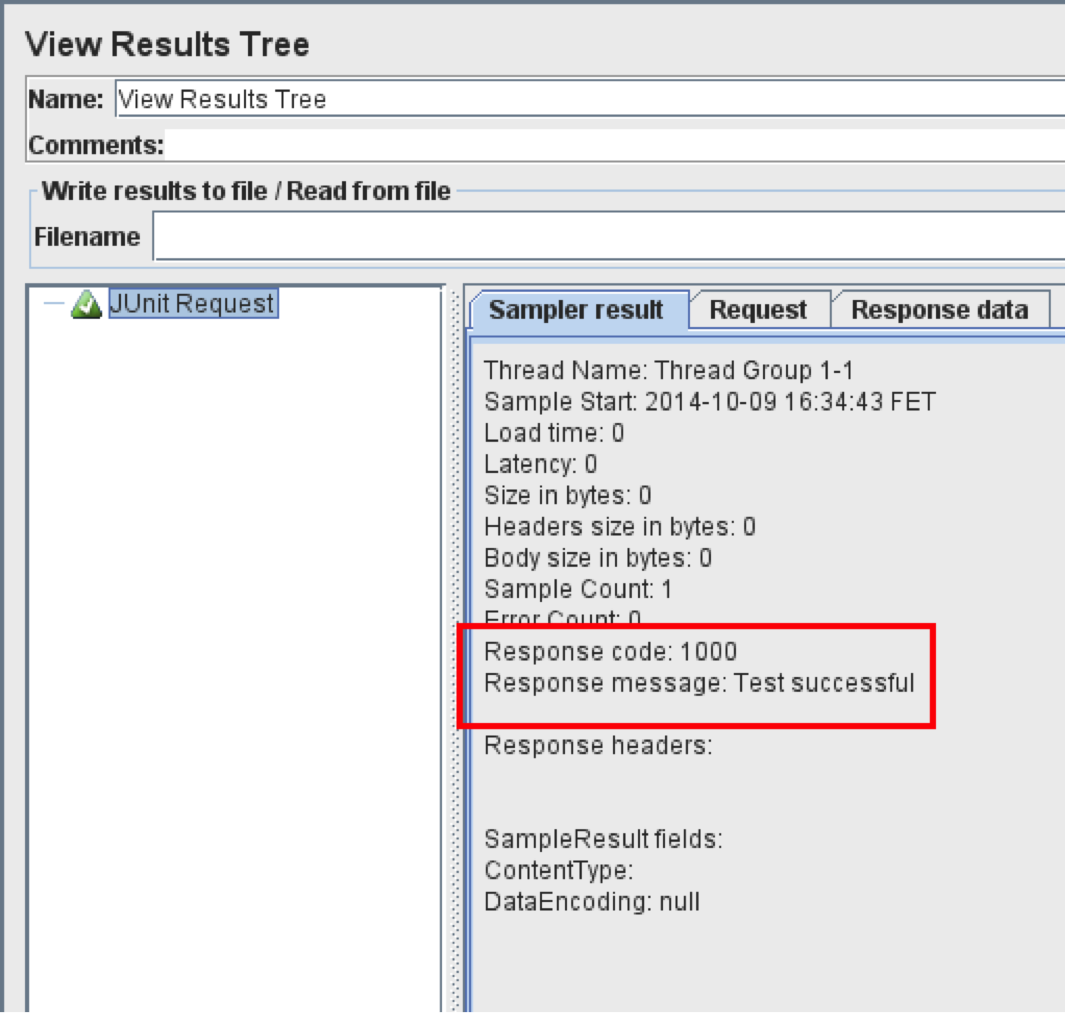
Success Message and Code
The Custom Response Message and Response Code can be set using these parameters. On the JUnit test, the success of a specified response message and code will be displayed.

Failure Code and Message
These fields allow you to define custom Response Codes and Response Messages when you have a JUnit test failure (assertion failure).
Error Code and Message
The Error Code and Message parameters can be used to set the Response Code and Response Message when there are unexpected test flaws. For example: if an Exception is thrown during the test case execution and it isn’t handled, this test will be reported as an Error, not a Failure.
Do Not Call the setUp and tearDown
By default, the setUp and tearDown methods are called by the JUnit Request sampler.
For JUnit3:
@Override
public void setUp() {
// set up logic here
}
@Override
public void tearDown() {
// tear down logic here
}
For JUnit4:
@Before
public void setUp() {
//set up logic here
}
@After
public void tearDown() {
// tear down logic here
}
The time to perform the setUp and tearDown isn’t taken into account when calculating the sampler’s elapsed time. Only the execution time of the test method itself is measured - so from a reporting point of view it doesn’t make any difference. Just make sure that:
You know what you’re doing if you intentionally check this box as the associated setUp and tearDown methods won’t be executed. In the world of the JUnit Request Sampler, it’s almost the only way to perform pre-test configurations and after-test clean-ups.
If you’re using the oneTimeSetUp and oneTimeTearDown JUnit4 methods (annotated as @BeforeClass and @AfterClass) make sure that this box is checked
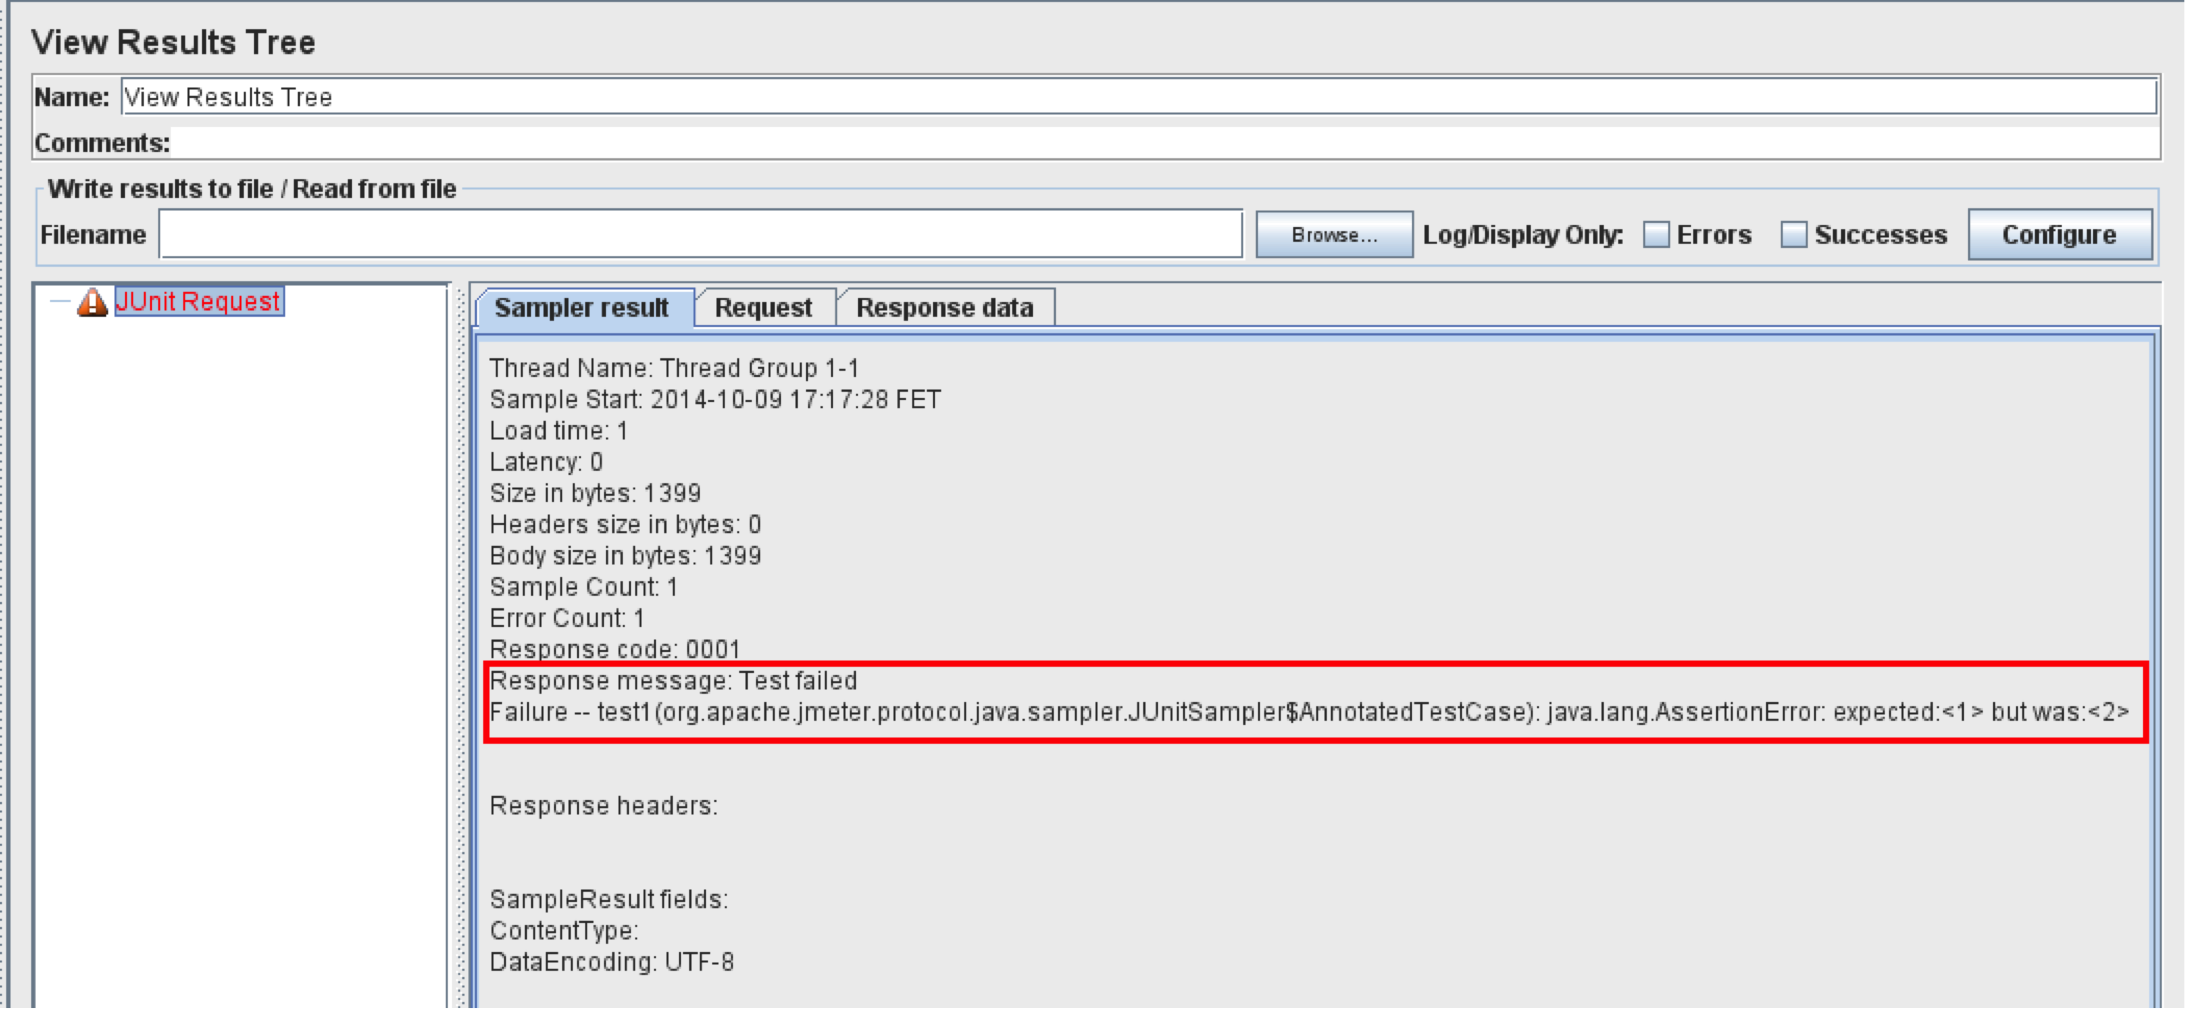
Appending Assertion Errors
When the “Append assertion errors” box is checked, the AssertionError message is attached to your Response Message.
If you take the following JUnit test case code:
@Test
public void test1() {
Assert.assertEquals(1,2);
}
The JUnit Sampler output will look like this:
Appending Runtime Exceptions
During the execution of a JUnit test, any exception which doesn’t come from failed assertion is considered as an “Error” rather than a “Failure”. The “Append Runtime Exceptions” flag determines whether or not this unhandled exception message will be added to the JUnit Request Sampler’s Response Message.
Creating a New Instance Per Sample
This checkbox determines whether or not the JUnit Request Sampler will be re-initialized on every test execution.
Developing New Unit Tests For Use With the JUnit Request Sampler
Here are few recommendations on how the JUnit tests need to be designed in order to work with JMeter’s JUnit Request Sampler:
Develop and keep your tests atomic. Tests shouldn’t be dependent on each other, each test should do as minimal work as possible.
Use setUp and tearDown methods properly. Ideally, the JUnit test should leave the system in the same condition as it was before the test execution
Remember that JMeter is multithreaded - so make sure you’re using thread-safe methods, collections, etc.
A parent test class instance is created every time the JUnit method is called. Each time, these results are passed on to Listeners.
If your JUnit test relies on 3rd-party libraries - make sure that the necessary jars are under one of the following locations:
JMETER_HOME/lib/junit
Location specified by “user.classpath”
JMeter will be able to locate the required classes even if the jars are under /lib or /lib/ext folders. However, this isn’t recommended as the /lib folder is for JMeter dependency libraries and the /lib/ext is for real core components and plugins. Therefore, their behavior may be undefined.
JUnit Sampler - Advanced Usage
Accessing JMeter Variables from the JUnit Test Case
In this section, I’m going to cover how you can use JMeter Variables in your JUnit test.
Unlike the Java Request Sampler (mentioned in WebSocket Testing demo), the JUnit Request Sampler doesn’t have a name-value pair based configuration. Therefore, the only available option is the class constructor string.
However, if you include JMeter libraries into your JUnit project classpath, you’ll be able to use this trick:
Create a JUnit test case in your project (or amend existing) as follows:
private static final Logger log = LoggingManager.getLoggerForClass();
@Test
public void getJMeterVariableTest() {
JUnitSampler sampler = new JUnitSampler();
String foo = sampler.getThreadContext().getVariables().get("foo");
log.info("foo variable value is: " + foo);
}
Compile the JUnit test case into a .jar file and drop the jar into the /lib/junit folder
Restart JMeter (if it’s running)
Add the User Defined Variables config element to your Test Plan and define the “foo” variable with the value of “bar”
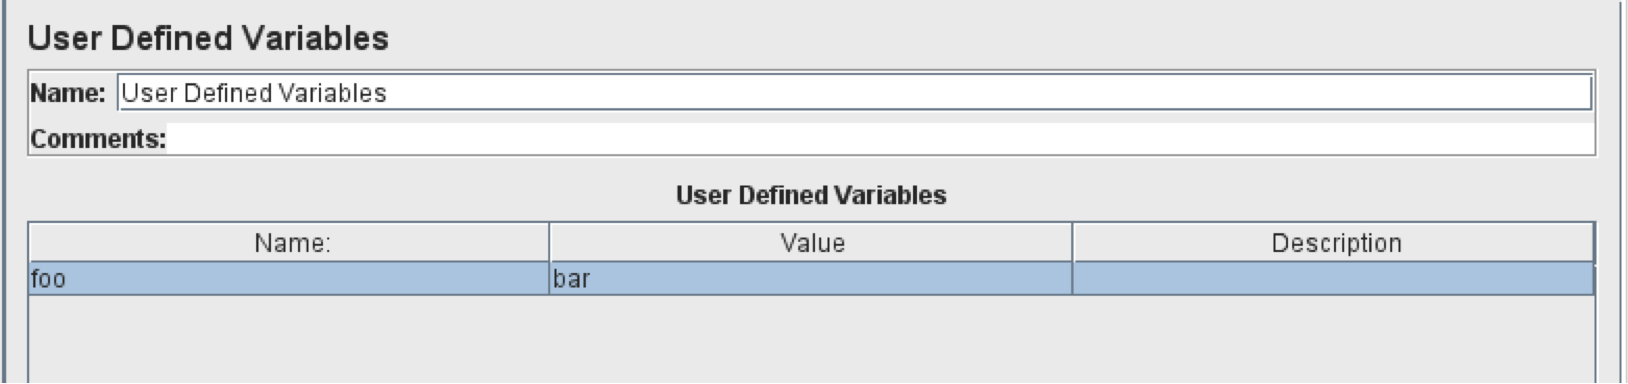
Add a JUnit Request Sampler and choose the relevant class and getJMeterVariableTest method.
Open the Log Viewer window and run your test.
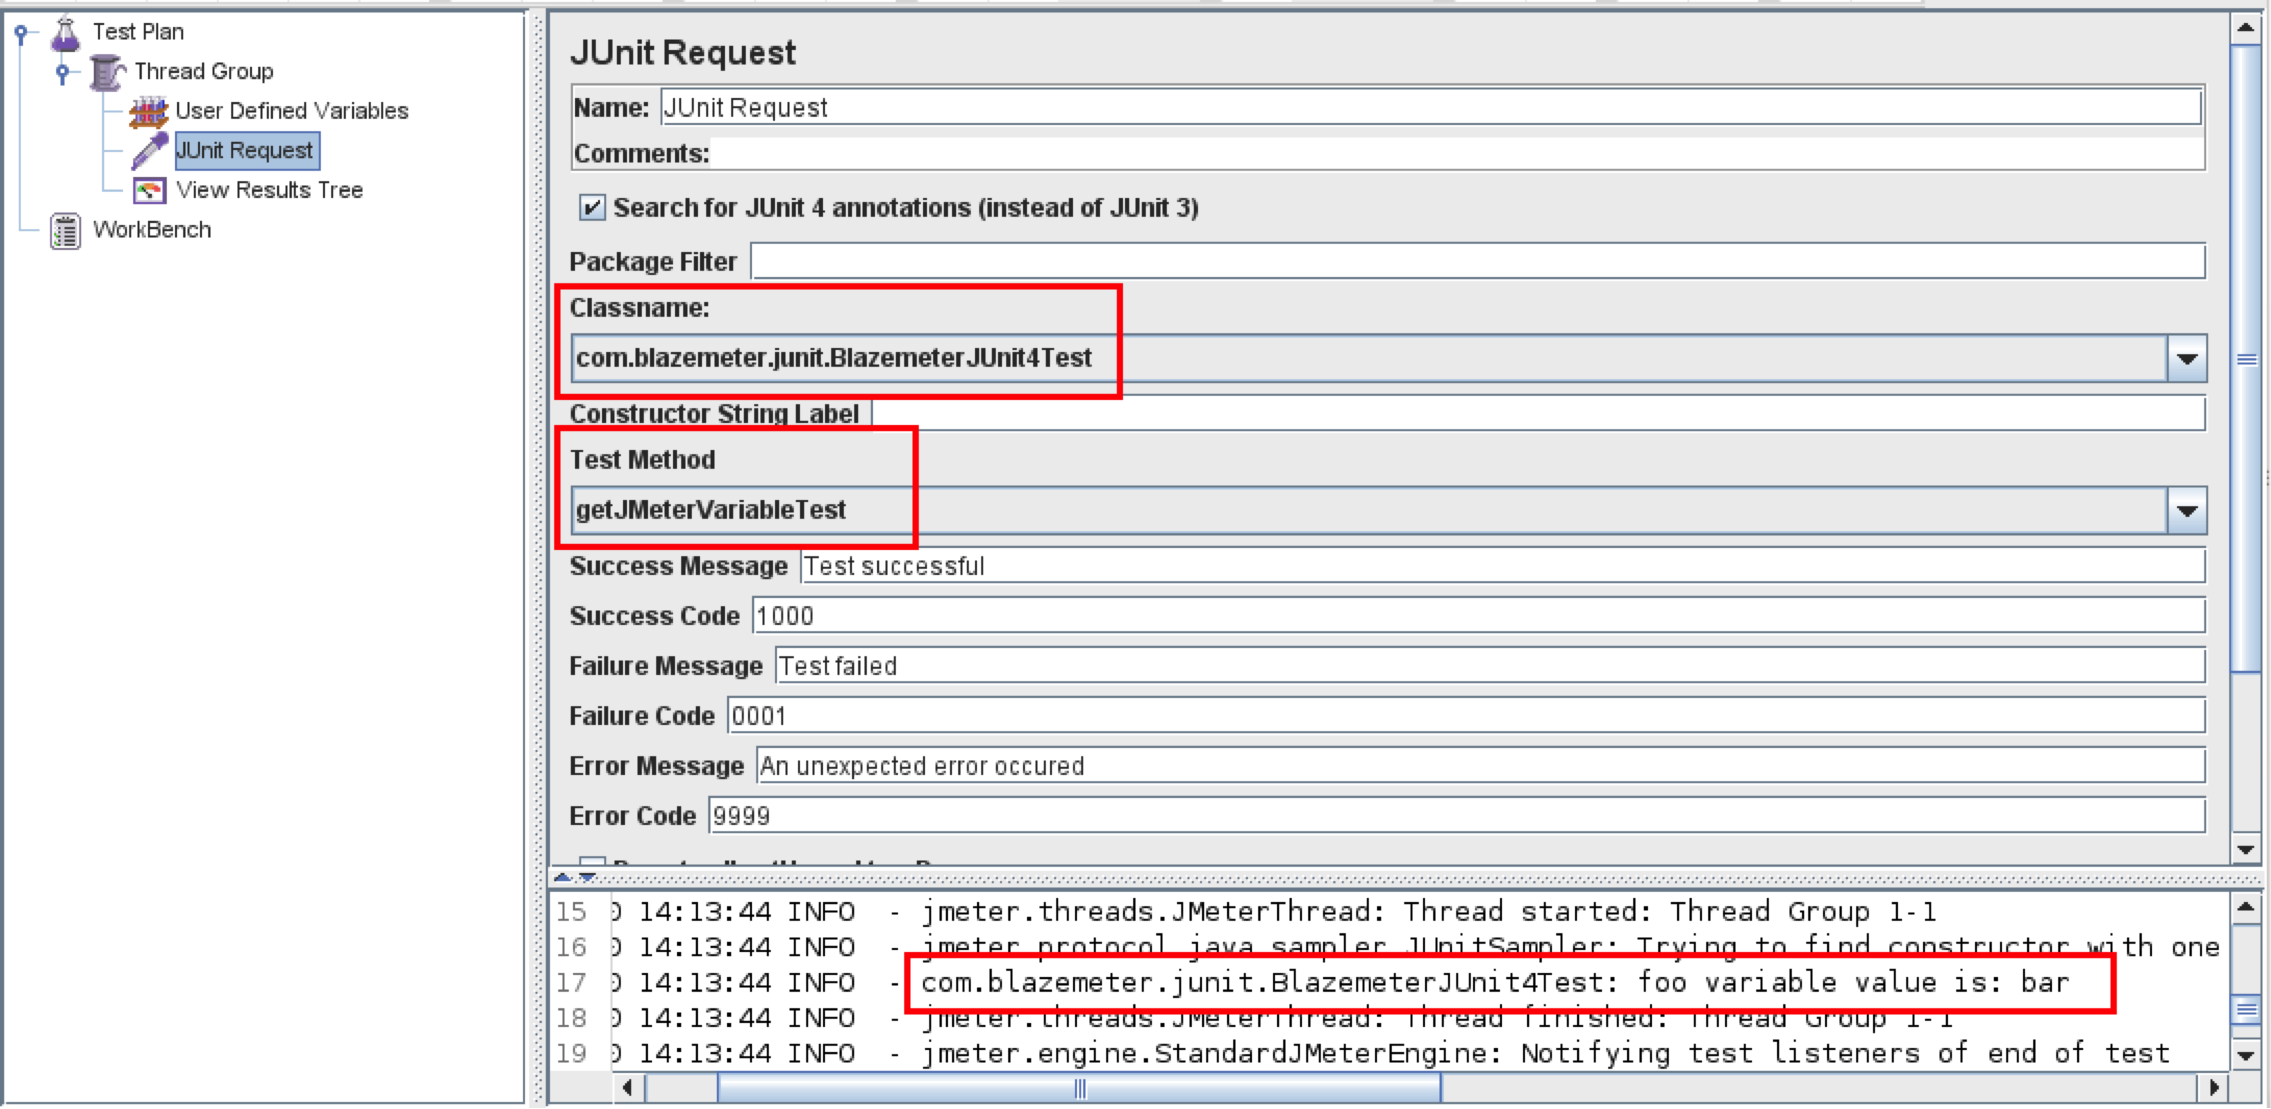
Look for the “foo variable value is” string in the Log Viewer output window
This approach works on any JMeter Variable. For example: you can use the JUnit Request Sampler in combination with the CSV Data Set Config.
Setting a JMeter Variable in the JUnit Request
If you need to pull some data from the JUnit Request, you can take a similar approach to getting the JMeter Variable from the parent context:
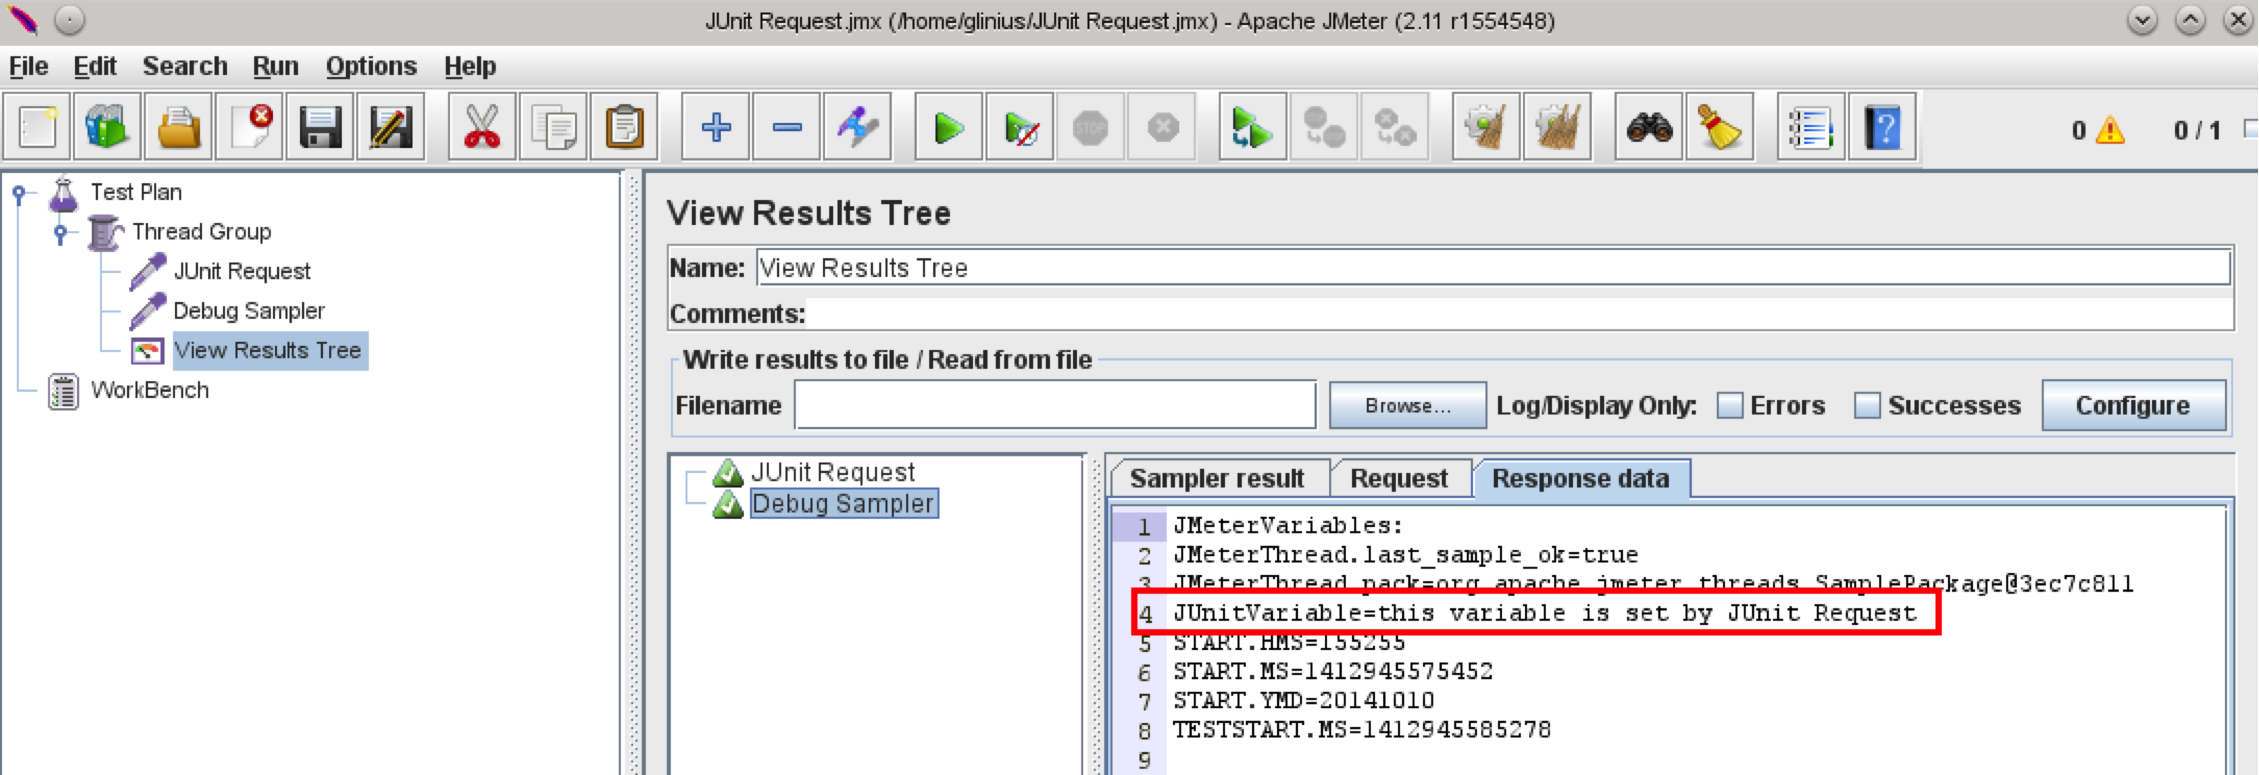
Create a new test case with the following code (or similar):
@Test
public void setJMeterVariableTest() {
JUnitSampler sampler = new JUnitSampler();
JMeterVariables vars = sampler.getThreadContext().getVariables();
vars.put("JUnitVariable", "this variable is set by " + sampler.getThreadContext().getCurrentSampler().getName());
sampler.getThreadContext().setVariables(vars);
}
Compile the test case into the jar file and drop it to the /lib/junit folder
Restart JMeter (if it’s running)
Add a JUnit Request Sampler to the test plan
Add the Debug Sampler and View Results Tree Listeners beneath the JUnit Request. If you haven’t debugged JMeter scripts before, take a look at the guide: How to debug your Apache JMeter script
Run the test
Open the Debug Sampler in the View Results Tree Listener and look for the “JUnitVariable” in the Response Data tab
JUnit Request Sampler Limitations
There are some limitations to using the JUnit Sampler. Here are some that you should be aware of:
- Only the “Elapsed Time” is recorded for the JUnit Request Sampler. You won’t be able to see Latency or Bytes metrics as JMeter knows nothing about your JUnit test. Therefore, JMeter is only capable of measuring your test method execution time
- There is currently (as per JMeter 2.11) no way to run the JUnit suite or fixture. Only individual test cases can be executed and only one test case per the JUnit Request Sampler instance
- There are certain limitations to the JUnit test design. Due to JMeter’s multithreaded nature, the test developer needs to use a thread-safe approach (i.e. avoid static fields and methods wherever possible and keep in mind that the resource might be busy with another thread).
- Limited JUnit Request Sampler configuration capabilities assume that all pre- and post-test logic should go in setUp and tearDown methods. If you need to feed external data to a sampler use property files or system properties
Blazemeter and the JUnit Sampler
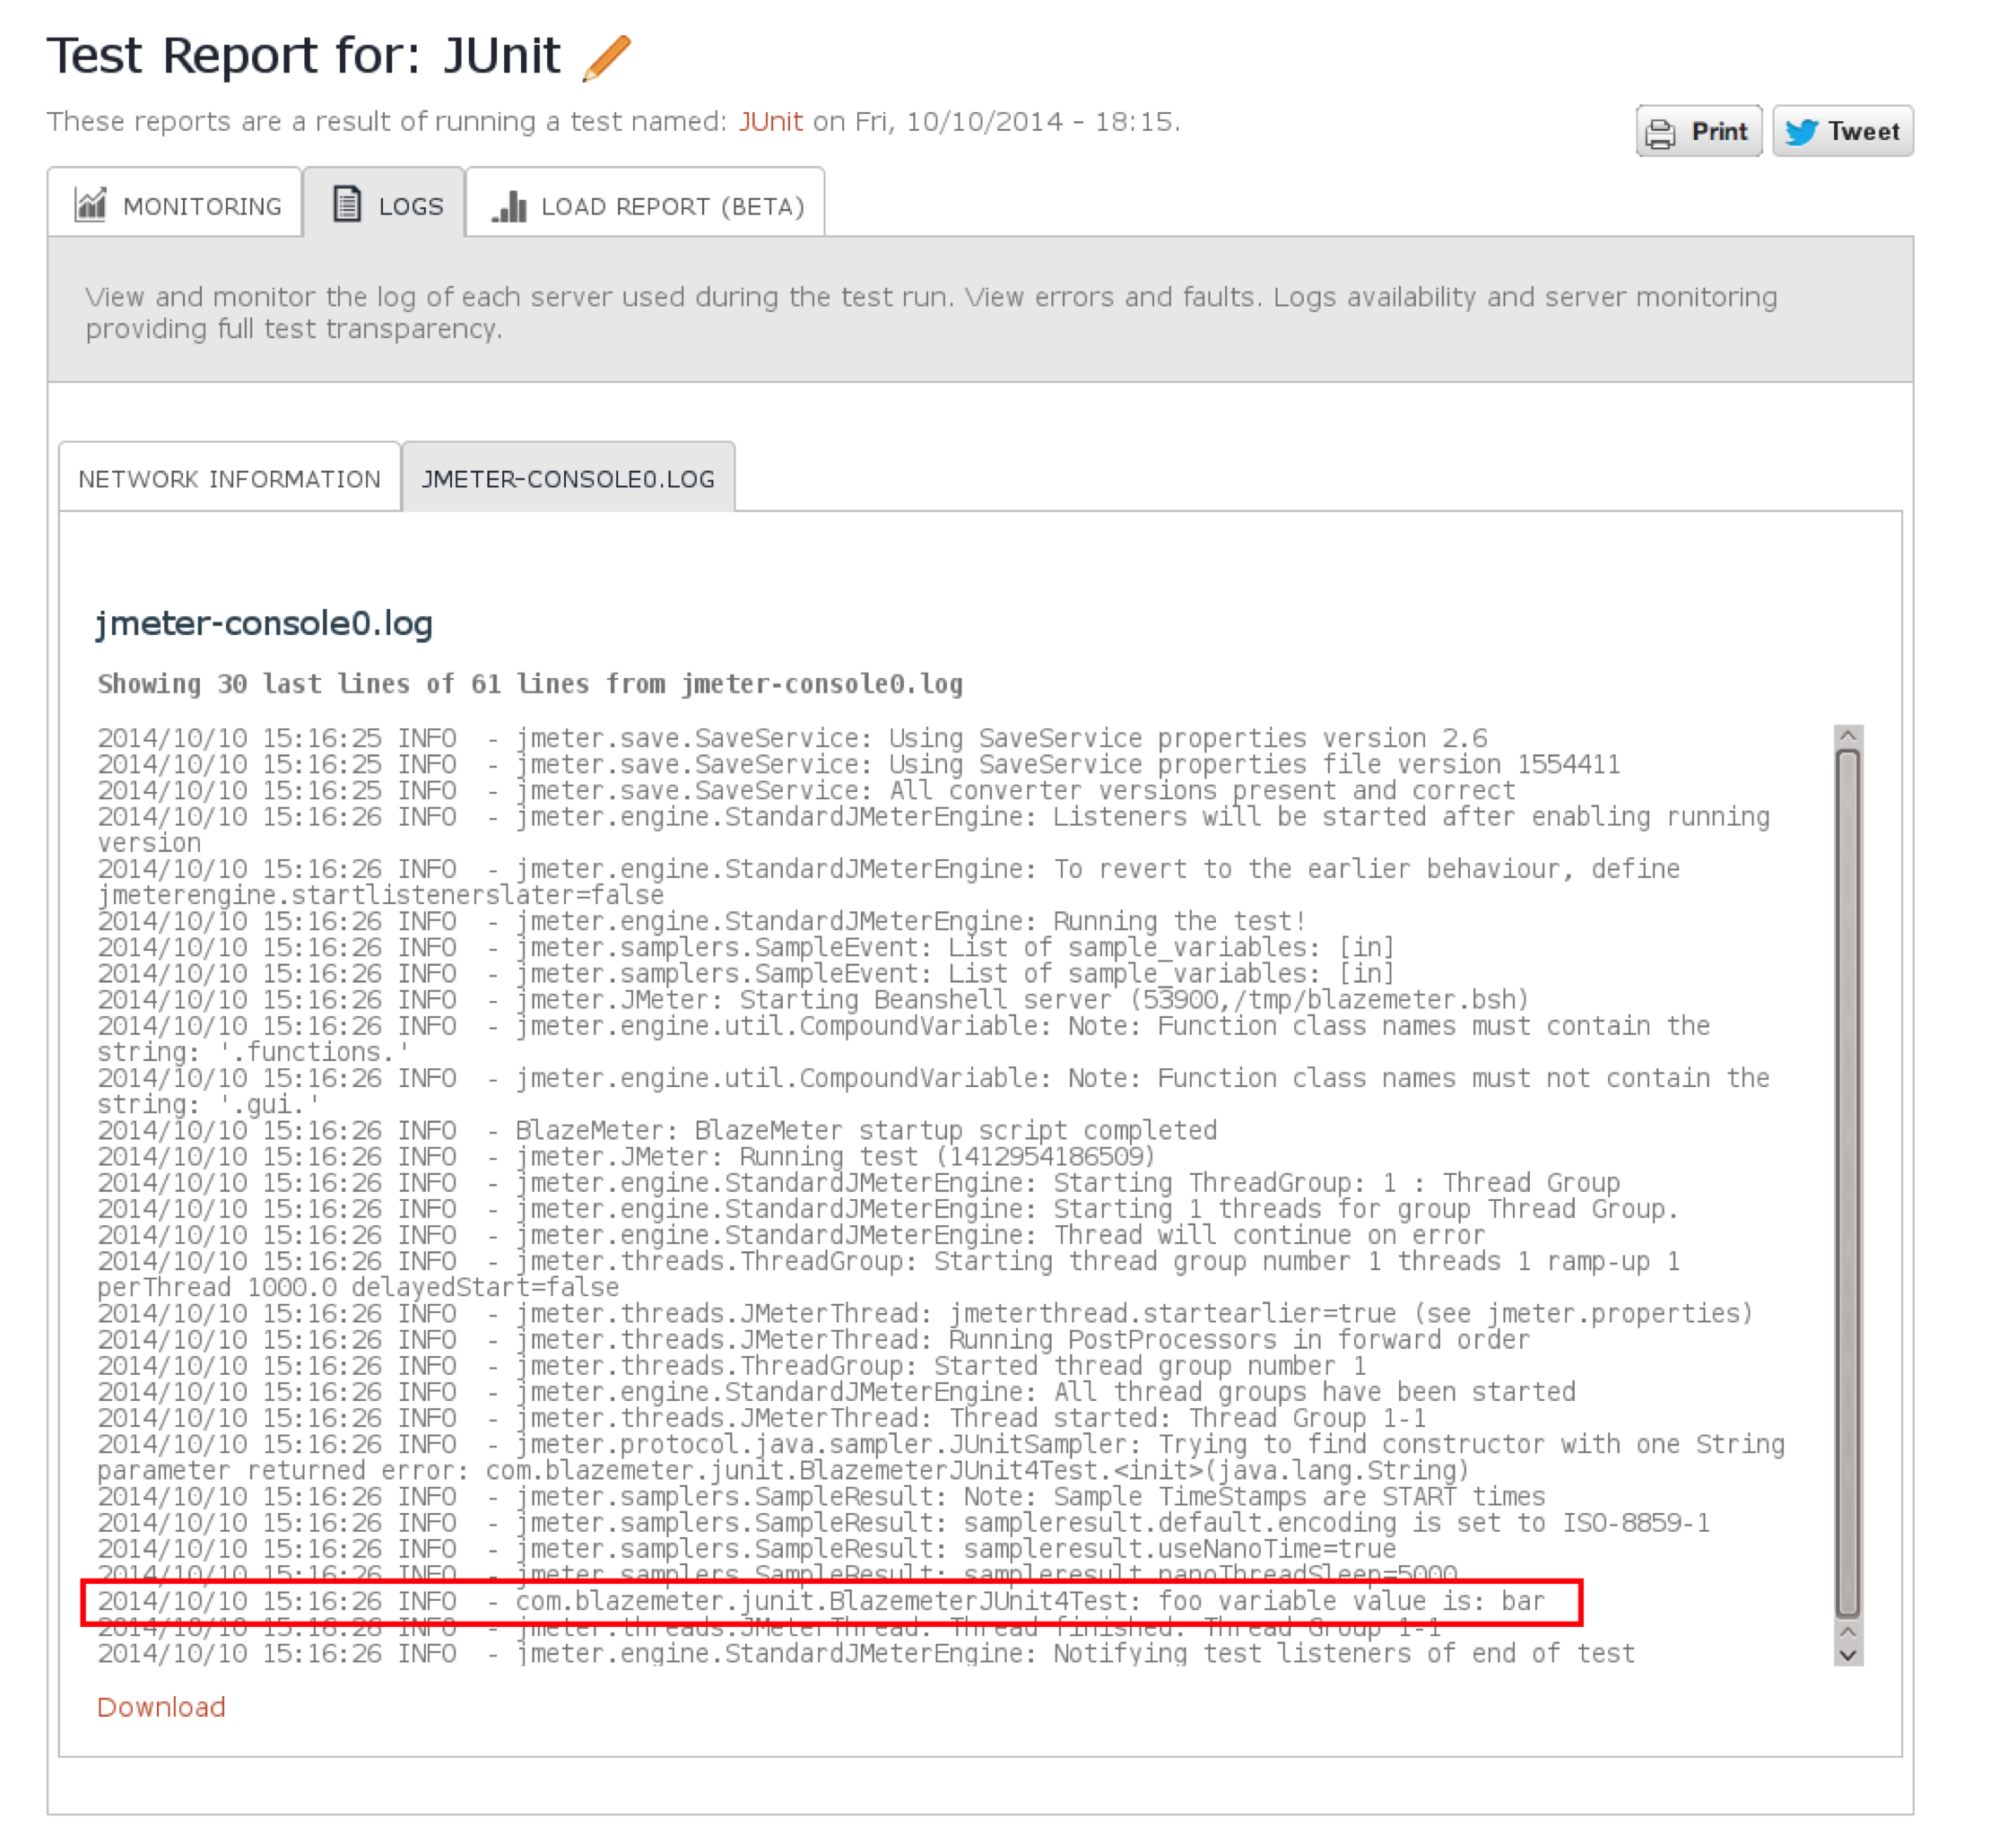
Blazemeter systems fully support the JUnit Request Sampler. Just make sure that you upload the .jar files along with your test and your 3rd party dependencies (if any) along with your .jmx file.

And here’s how the ‘getJMeterVariableTest’ scenario looks in Blazemeter’s system log viewer:
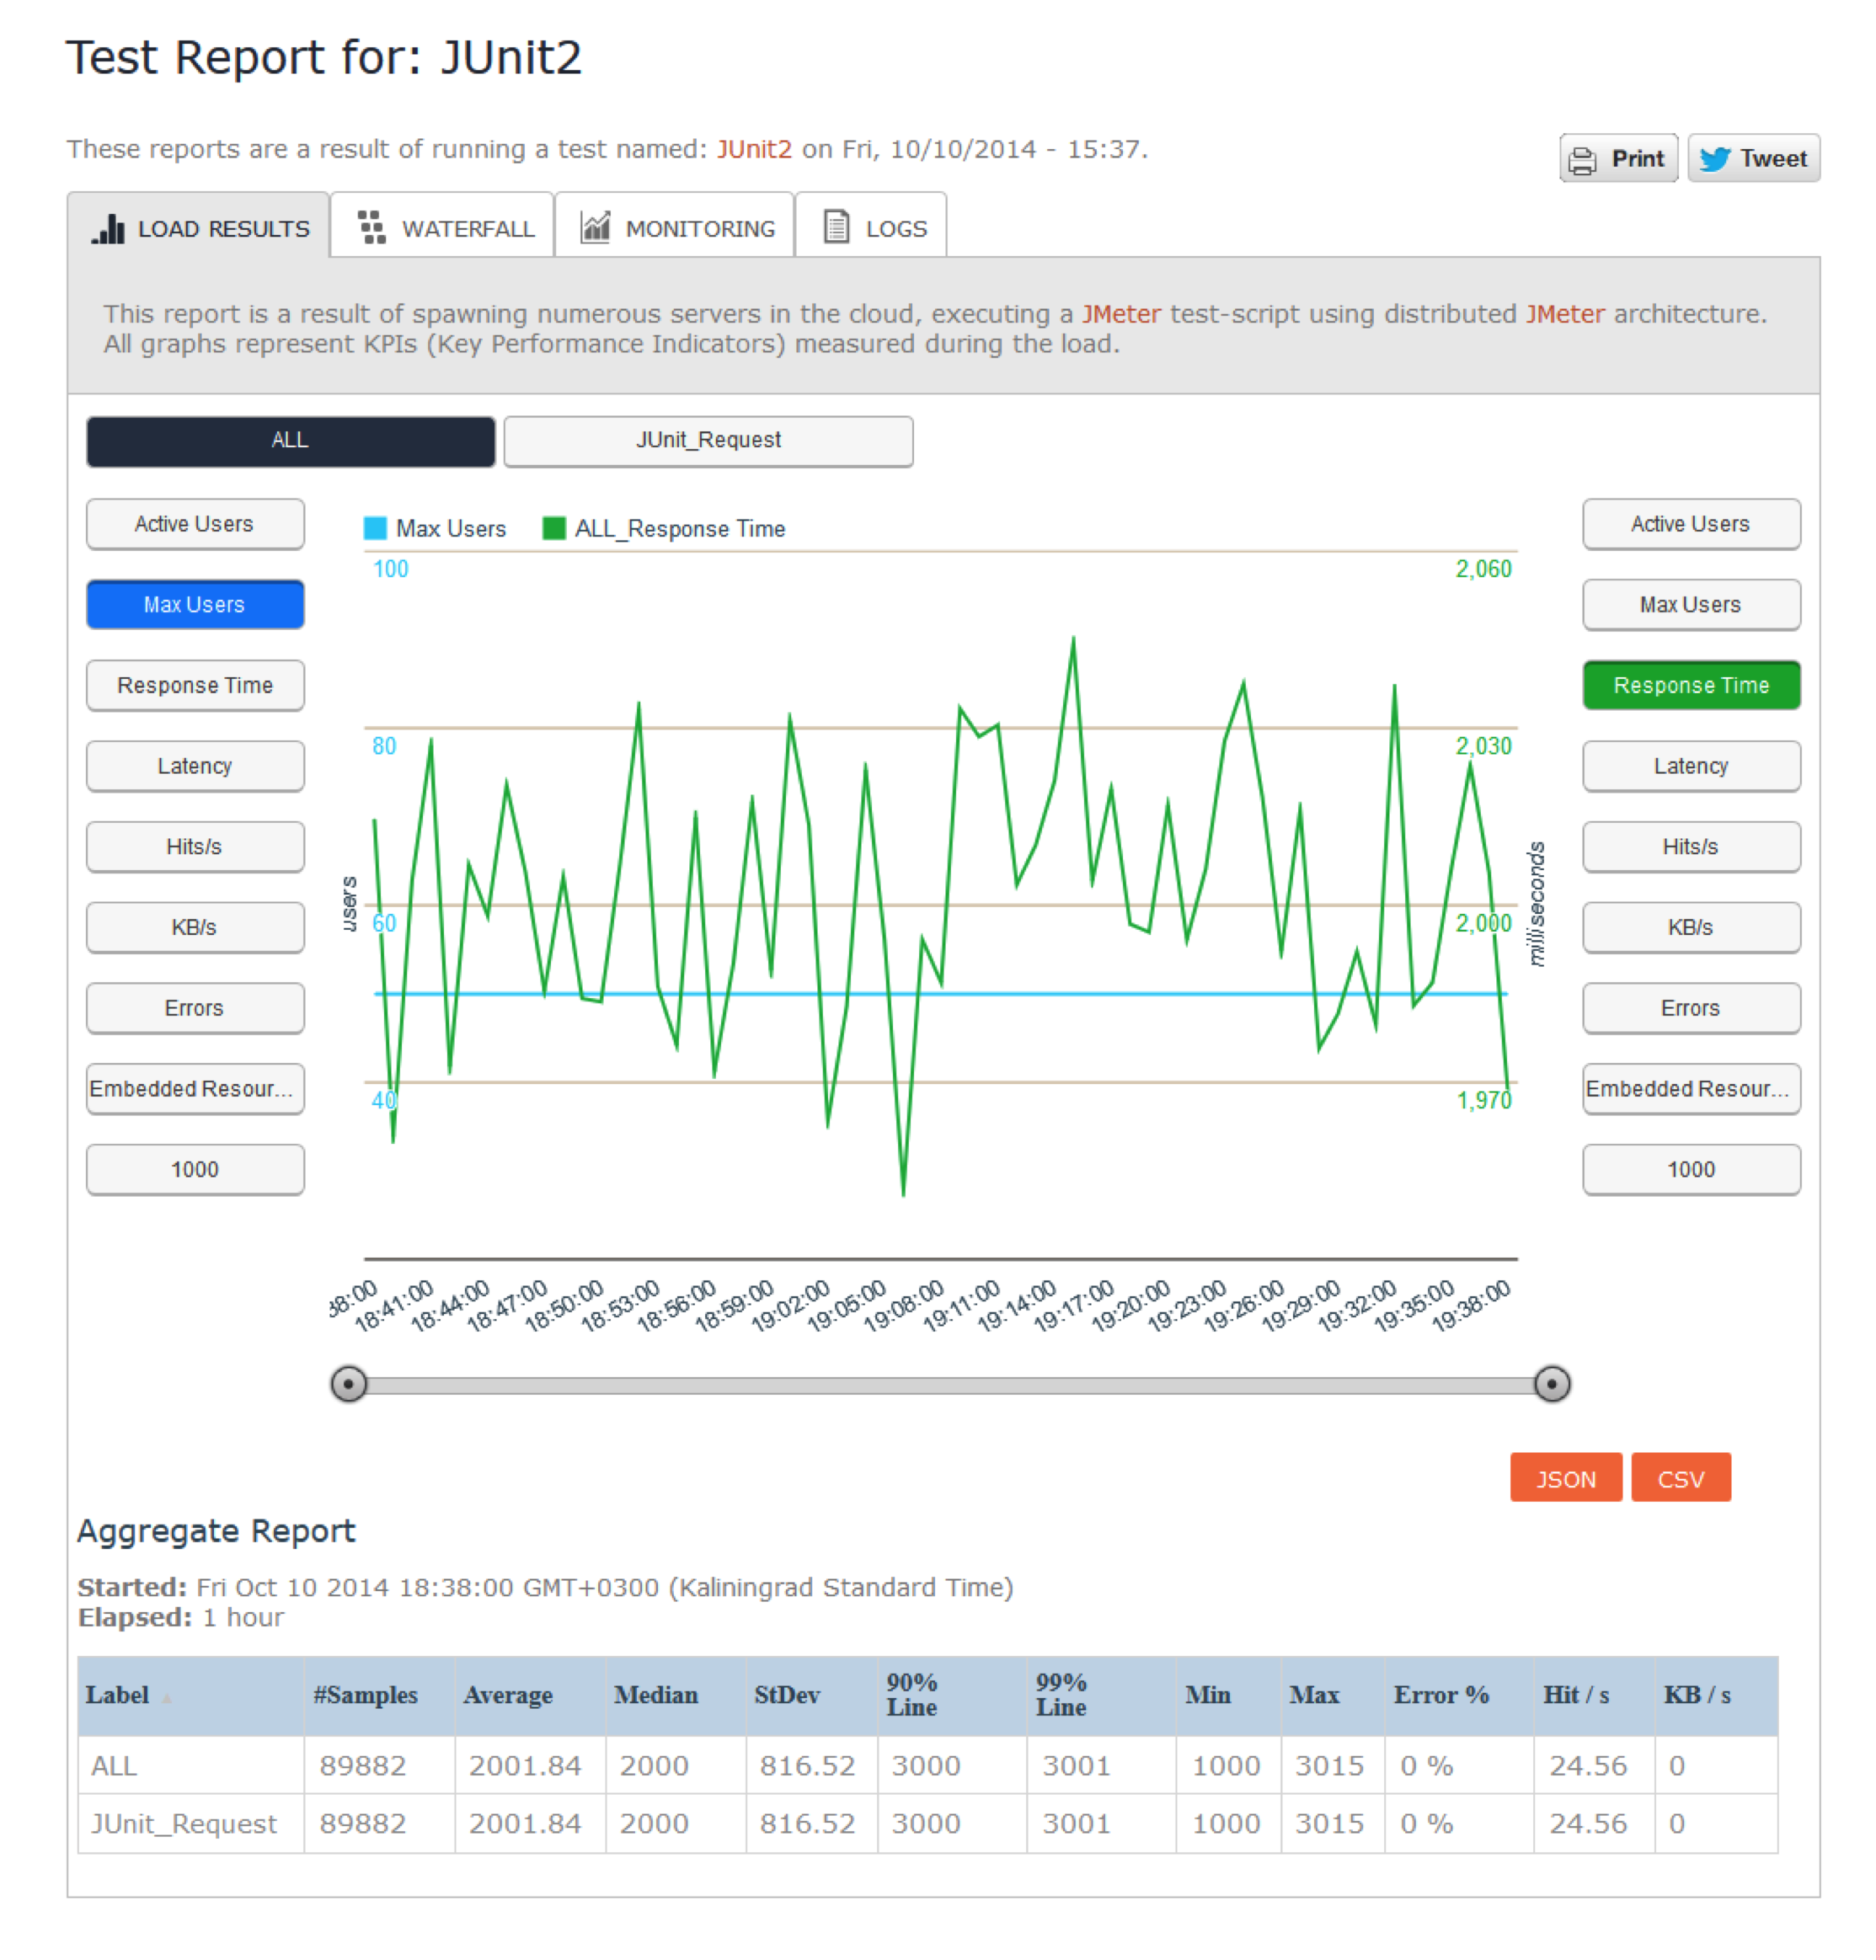
 Blazemeter’s Load Report for the JUnit Request Sampler looks like any other sampler - except for latency and embedded resources which aren’t supported by the sampler.
 That’s it! I think that’s all you need to know about the JUnit Request Sampler. But if I’ve missed something out or you have any questions - give me a shout!
How to Use JUnit With JMeter的更多相关文章
- 使用JMeter进行负载测试——终极指南
这篇教程讨论的是JMeter,它是一款基于Java的.集合了几个应用程序.具有特定用途的负载和性能测试工具. 本篇主要涉及的内容: 解释一下JMeter的用途 JMeter的实现方式以及采用的技术 安 ...
- 【转】使用JMeter进行负载测试——终极指南
使用JMeter进行负载测试——终极指南 这篇教程讨论的是JMeter,它是一款基于Java的.集合了几个应用程序.具有特定用途的负载和性能测试工具. 本篇主要涉及的内容: 解释一下JMeter的用途 ...
- Jmeter测试接口
文主要针对http接口进行测试,使用Jmeter工具实现. Jmter工具设计之初是用于做性能测试的,它在实现对各种接口的调用方面已经做的比较成熟,因此,本次直接使用Jmeter工具来完成对Http接 ...
- DevOps/TestOps概念
天下大势分久必合合久必分,早期的软件开发只有软件工程师一人完成,为了提高效率逐渐实行分工模式:开发.测试.运维.不同角色担任不同的任务.分工越来越细之后带来了问题也越来越突出,那就是各角色之间的沟通成 ...
- [转帖]DevOps/TestOps概念
发现收藏不好用..还是转吧.. https://www.cnblogs.com/fnng/p/8232410.html DevOps/TestOps概念 2018-01-07 22:02 by 虫师, ...
- 最全Java学习路线图——Java学习指南
准备篇 适用/适合人群:适合基础小白 目标:掌握JavaSE. ●技术点小节: 1.开发工具的安装配置的介绍 2.JDK安装 3.DOS环境编程 4.Eclipse的安装使用 ●JAVA基础 1.基本 ...
- 项目Alpha冲刺(团队)-测试篇
格式描述 课程名称:软件工程1916|W(福州大学) 作业要求:项目Alpha冲刺(团队)-代码规范.冲刺任务与计划 团队名称:为了交项目干杯 测试用例:测试用例文档.zip 作业目标:描述项目的测试 ...
- 基于webdriver的jmeter性能测试-Eclipse+Selenium+JUnit生成jar包
续接 打开eclipse新建java项目,如下图所示: 输入项目名称后点击"完成"按钮,如下图所示: eclipse中新建一个java项目,如下图所示: 添加类库,如下图所示: 在 ...
- Jmeter常用脚本开发之Junit Request
说明:Junit Request就是把Junit测试框架的自动化用例在jmeter上执行 步骤: 1.创建Java工程,编写Junit自动化测试用例 2.然后把用例打成jar包,复制到Jmter的li ...
随机推荐
- ORA-12154: TNS:could not resolve the connect identifier specified
场景: .Net程序无法连接到数据库 现象: 2015/8/26 11:02:03 ORA-12154: TNS:could not resolve the connect identifier sp ...
- .NET:序列化和反序列化
.NET:序列化和反序列化 需要反序列化的字符串: { "LouPanID": "sample string 1", "LouPanHao" ...
- sql 数据量高并发的数据库优化(转)
Mysql 大数据量高并发的数据库优化 一.数据库结构的设计 如果不能设计一个合理的数据库模型,不仅会增加客户端和服务器段程序的编程和维护的难度,而且将会影响系统实际运行的性能.所以,在一个系统开始实 ...
- maven-bundle-plugin 2.4.0以下版本导出META-INF中的内容到MANIFEST.MF中
今天终于把maven-bundle-plugin不能导出META-INF中的内容到Export-Package中的问题解决了,因为用到的第三方JAR包需要加载META-INF/XX/XX.xml这个内 ...
- 便捷的php操作mysql库MysqliDb
github 地址:https://github.com/joshcam/PHP-MySQLi-Database-Class MysqliDb -- Simple MySQLi wrapper and ...
- 编译错误:error: multi-line comment
编译错误:error: multi-line comment 这其实是有宏定义的地方的问题. 原因是宏定义非一行,在宏定义的行尾使用 '\' 连接符导致的. 所以这个地方的注释使用 /* */ ...
- DELPHI高性能大容量SOCKET并发(九):稳定性问题解决
http://blog.csdn.net/sqldebug_fan/article/details/9043699
- 53. Minimum Window Substring
Minimum Window Substring Given a string S and a string T, find the minimum window in S which will co ...
- Oracle EBS Java Applet报错:找不到类
Oracle EBS Home Page可以打开,但是无法打开EBS的Form,查看Java控制台,有错误报出. java控制台报错,如下: Java Plug-in 1.6.0_07 使用 JRE ...
- Home not found. Define system property "openfireHome" or create and add the openfire_init.xml file to the classpath
启动openfire后出现这个错误,貌似什么配置没对吧.网上搜索了下,找到解决办法, $ vi /etc/profile在里面加入:export openfireHome=/opt/openfire ...