
Linux 期中架构 rsync
上篇
Rsync
rysnc查看版本 --version
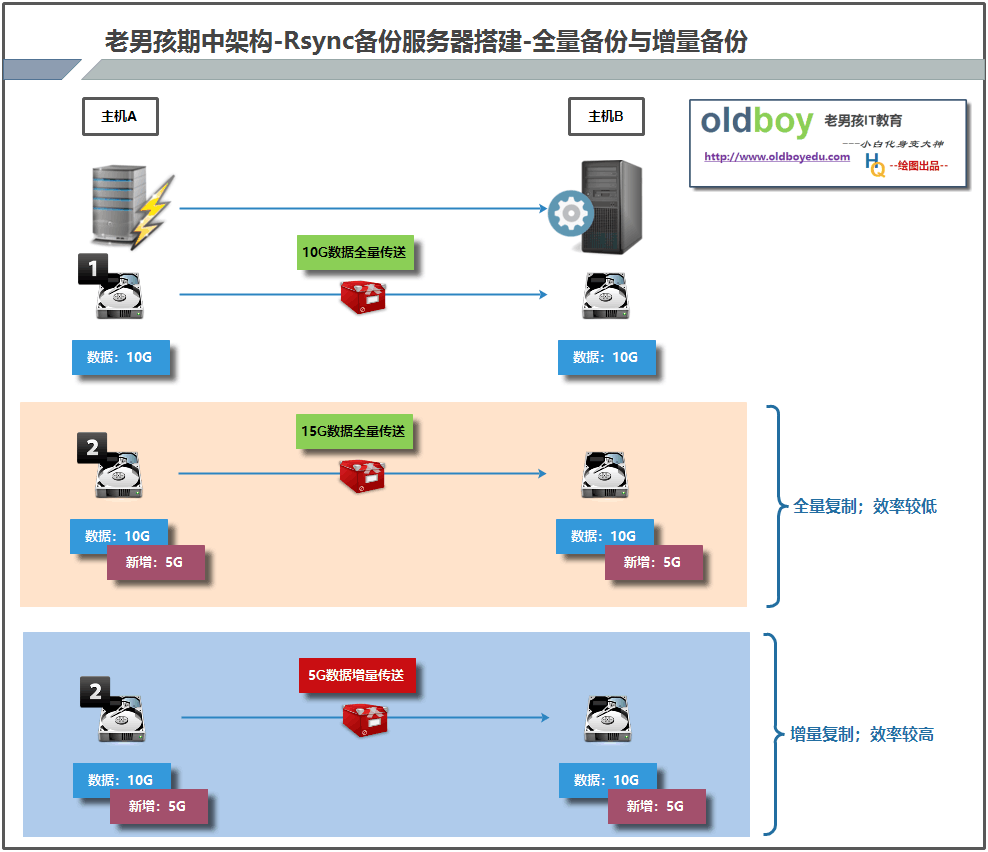
全量 与增量在效率上有区别
cp mv scp --全量复制
rsync --增量复制
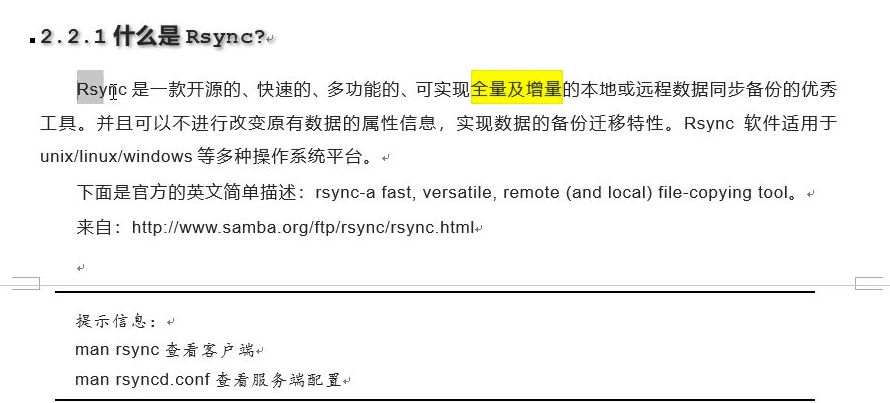
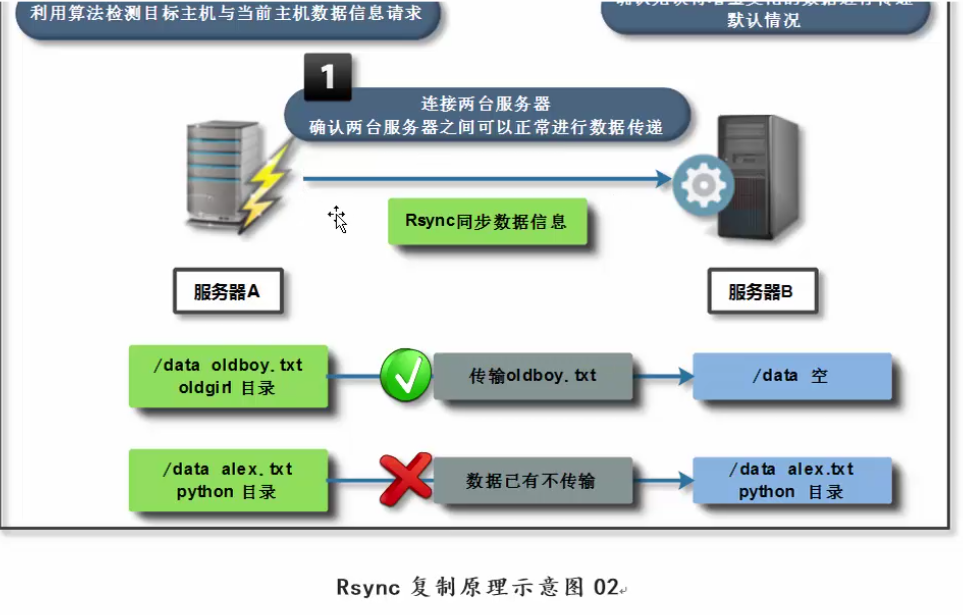
rsync利用的是quick check算法
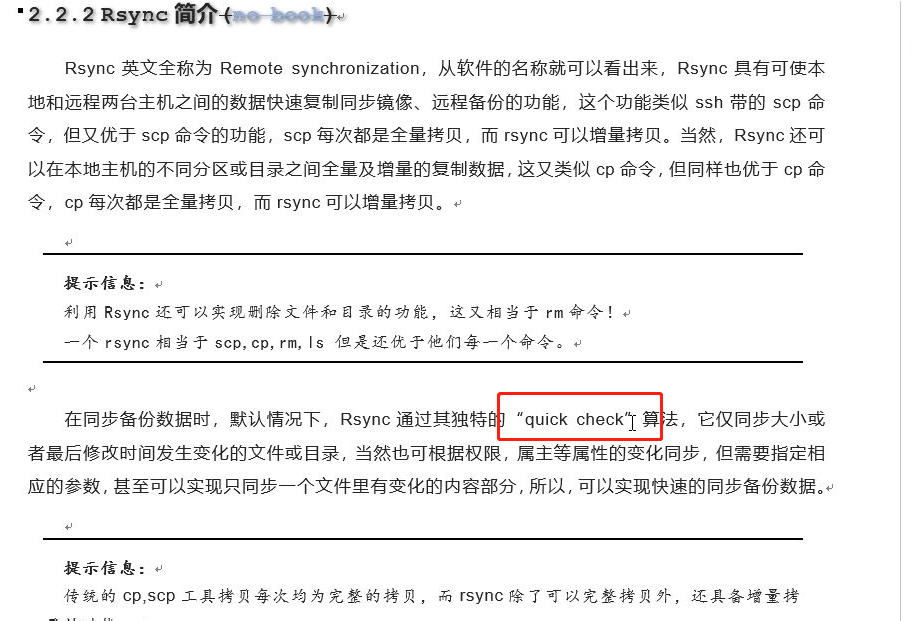
rsync可以替换的命令 scp cp ls rm
cp与rsync rsyncs 是增量部分 利用quick check算法
cp文件
[root@backup ~]# cp /etc/hosts /oldboy_dir/
[root@backup ~]# ls /oldboy_dir/
hosts
[root@backup ~]# rm -fr /oldboy_dir/hosts
[root@backup ~]# rsync /etc/hosts /oldboy_dir/
[root@backup ~]# ll /oldboy_dir/
total 4
-rw-r--r-- 1 root root 379 May 3 10:12 hosts
cp目录
注意带/和不带/的区别
注意此处带/和不带/的区别 带/ 是拷贝了oldboy_dir下的文件 目录下的内容
不带/ 是拷贝oldboy_dir这个文件夹 目录及其数据
[root@backup ~]# cp -a /oldboy_dir/ /tmp/
[root@backup ~]# ls /tmp/
etc etc.tar.gz oldboy_dir yum.log
[root@backup ~]# rm -fr /tmp/oldboy_dir/
[root@backup ~]# ls /tmp/
etc etc.tar.gz yum.log
[root@backup ~]# rsync -a /oldboy_dir/ /tmp/
[root@backup ~]# ls /tmp/
10.txt 1.txt 2.txt 3.txt 4.txt 5.txt 6.txt 7.txt 8.txt 9.txt etc etc.tar.gz yum.log
[root@backup ~]# rsync -a /oldboy_dir /tmp/
[root@backup ~]# ls /tmp/
10.txt 1.txt 2.txt 3.txt 4.txt 5.txt 6.txt 7.txt 8.txt 9.txt etc etc.tar.gz oldboy_dir yum.log
ls 与rsync
[root@backup ~]# ls /oldboy/
ext jeacen oldboy test wodi.gz xiaodong xiaofan xingfujie yingsui.gz
[root@backup ~]# rsync /oldboy/
drwxr-xr-x 4096 2018/03/24 11:53:23 .
-rw-r--r-- 0 2018/03/24 11:53:23 jeacen
-rw-r--r-- 0 2018/03/24 11:53:23 oldboy
-rw-r--r-- 0 2018/03/24 11:53:23 wodi.gz
-rw-r--r-- 0 2018/03/24 11:53:23 yingsui.gz
drwxr-xr-x 4096 2018/03/24 11:53:23 ext
drwxr-xr-x 4096 2018/03/24 11:53:23 test
drwxr-xr-x 4096 2018/03/24 11:53:23 xiaodong
drwxr-xr-x 4096 2018/03/24 11:53:23 xiaofan
drwxr-xr-x 4096 2018/03/24 11:53:23 xingfujie
rm与rsync
rm
[root@backup oldboy_dir]# touch {1..10}.txt
[root@backup oldboy_dir]# ls
10.txt 1.txt 2.txt 3.txt 4.txt 5.txt 6.txt 7.txt 8.txt 9.txt
[root@backup oldboy_dir]# cd
[root@backup ~]# rm -fr /oldboy_dir/*
[root@backup ~]# ls /oldboy_dir/
[root@backup ~]# touch /oldboy_dir/{1..10}.txt
[root@backup ~]# ls /oldboy_dir/
10.txt 1.txt 2.txt 3.txt 4.txt 5.txt 6.txt 7.txt 8.txt 9.txt
rysnc
[root@backup ~]# mkdir /null
[root@backup ~]# rsync --delete -r /null /oldboy_dir/
[root@backup ~]# ls /oldboy_dir/
10.txt 1.txt 2.txt 3.txt 4.txt 5.txt 6.txt 7.txt 8.txt 9.txt null
[root@backup ~]# rsync --delete -r /null/ /oldboy_dir/
[root@backup ~]# ll /oldboy_dir/
total 0
注意此处的--delete属性 可以快速清空,效率高,删除大文件
scp与rsync
拷贝文件:
[root@backup ~]# scp -rp /etc/hosts 172.16.1.31:/tmp/
The authenticity of host '172.16.1.31 (172.16.1.31)' can't be established.
RSA key fingerprint is c8:17:90:8d:90:a4:f7:5b:10:19:36:7a:6c:5d:b8:7b.
Are you sure you want to continue connecting (yes/no)? yes
Warning: Permanently added '172.16.1.31' (RSA) to the list of known hosts.
root@172.16.1.31's password:
hosts 100% 379 0.4KB/s 00:00
[root@backup ~]# rsync -rp /etc/hosts 172.16.1.31:/tmp/
root@172.16.1.31's password:
拷贝目录:
scp拷贝172.16.1.31下的history目录
[root@backup ~]# scp -rp 172.16.1.31:/home/history /backup/

注意 此处history后加不加/ 效果是一样的
rsync拷贝172.16.1.31下的history目录
注意此处带/和不带/的区别 带/ 是拷贝了history下的文件 目录下的内容
不带/ 是拷贝history这个文件夹 目录及其数据
[root@backup ~]# rsync -rp 172.16.1.31:/home/history/ /backup/
root@172.16.1.31's password:
[root@backup ~]# cd /backup/
[root@backup backup]# ls
0329.txt dec.py delphi.py func.py home luna.py nod.py.bak python seq.txt test.txt
b.txt dectorator.py func1.py history0330.tar.gz hosts nod.py passwd.txt python.py test.py
[root@backup backup]# rm -fr *
[root@backup backup]# ls
[root@backup backup]# cd
[root@backup ~]# rsync -rp 172.16.1.31:/home/history /backup/
root@172.16.1.31's password:
[root@backup ~]# cd /backup/
[root@backup backup]# ls
history
总结: rsync命令不仅可以替换cp scp rm ls 命令 而且比他们的四个命令更为优秀
利用rsync删除目录下的数据要比rm删除目录中的数据效率高
===============================================
03. rsync服务特点说明
1)支持拷贝普通文件与特殊文件如链接文件,设备等。
2)可以有排除指定文件或目录同步的功能,相当于打包命令tar的排除功能。
#tar zcvf backup_1.tar.gz /opt/data -exclude=oldboy
说明:在打包/opt/data时就排除了oldboy命名的目录和文件。
3)可以做到保持原文件或目录的权限、时间、软硬链接、属主、组等所有属性均不改变-p。
4)可实现增量同步,既只同步发生变化的数据,因此数据传输效率很高(tar -N)。
# 将备份/home 目录自 2008-01-29 以来修改过的文件
# tar -N 2008-01-29 -zcvf /backups/inc-backup_$(date +%F).tar.gz /home
# 将备份 /home 目录昨天以来修改过的文件
# tar -N $(date -d yesterday "+%F") -zcvf /backups/inc-backup_$(date +%F).tar.gz /home
# 添加文件到已经打包的文件
# tar -rf all.tar *.gif
说明:这条命令是将所有.gif的文件增加到all.tar的包里面去。-r是表示增加文件的意思。
5)可以使用rcp,rsh,ssh等方式来配合进行隧道加密传输文件(rsync本身不对数据加密)
6)可以通过socket(进程方式)传输文件和数据(服务端和客户端)*****。重点掌握 监听模式
7)支持匿名的或认证(无需系统用户)的进程模式传输,可实现方便安全的进行数据备份及镜像。
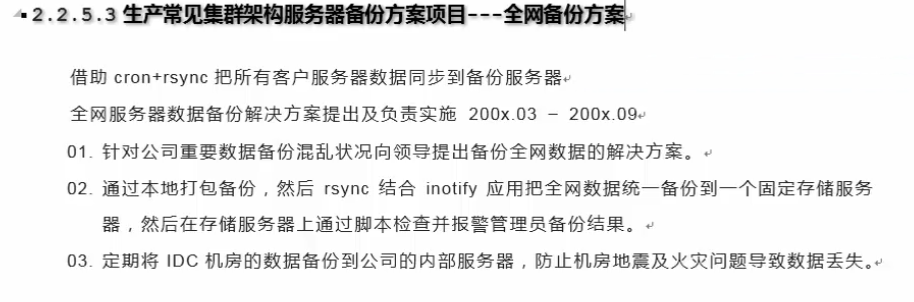
Rsync的企业工作场景说明
1 利用定时任务+rsync方式实现数据同步
对于网站内部技术人员创建的数据材料,可以采用定时任务的方式
2 利用实时任务+rsync方式实现数据同步
对于网站外部访问用户创建的数据,可以采取实时同步的方式
Rsync的工作方式介绍与实践
01 本地方式
02 通过远程shell方式
03 通过rsync daemon方式
rsync三种工作方式(使用方法)
# 1 本地备份数据方式(类似cp功能)
Local: rsync [OPTION...] SRC... [DEST]
rsync ---备份数据命令
[OPTION...] ---命令参数信息
src ---要备份的数据信息,源信息
[DEST] ---将备份的数据保存到哪,目标信息(目录)
举例:rsync /etc/hosts /opt/
# 2 远程备份数据方式(类似scp功能)
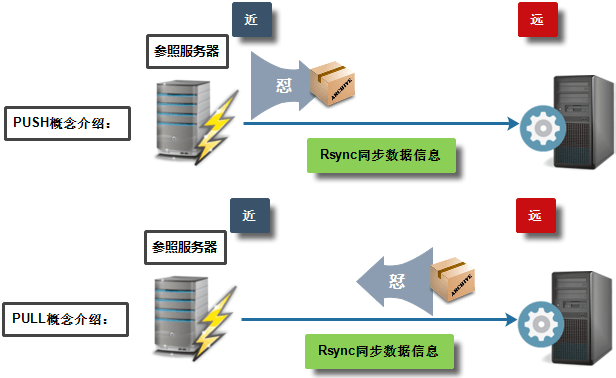
先理解推和拉的关系 怼就是推 恏就是拉
Access via remote shell:
Pull: rsync [OPTION...] [USER@]HOST:SRC... [DEST]
rsync ---备份数据命令
[OPTION...] ---命令参数信息
[USER@] ---以什么身份远程登陆到主机上,以当前用户身份进行登陆
要确保远程主机上有相应用户信息
HOST ---远程主机IP地址或者主机名称信息
:SRC ---要备份的数据信息,源信息
[DEST] ---将备份的数据保存到本地相应目录中,目标信息(目录)
推: rsync -rp /etc/hosts root@172.16.1.31:/opt 此处root表示进来的身份
@前定义传输数据的身份 传输数据的身份信息
Push: rsync [OPTION...] SRC... [USER@]HOST:DEST
rsync ---备份数据命令
[OPTION...] ---命令参数信息
:SRC ---要备份的数据信息,源信息(本地数据信息)
[USER@] ---以什么身份远程登陆到主机上,以当前用户身份进行登陆
要确保远程主机上有相应用户信息
HOST ---远程主机IP地址或者主机名称信息
:SRC ---要备份的数据信息,源信息
[DEST] ---将备份的数据保存到远程主机相应目录中,目标信息(目录)
拉: rsync -rp root@172.16.1.31:/opt/hosts /etc/hosts 拉到本地并且改名
对于目录的操作:
rsync -rp /etc/sysconfig 172.16.1.31:/opt
如果sysconfig后带/ 表示是将目录下的内容推送过去
如果不带/ 是将目录本身和目录下的内容推送过去 注意2者的区别
#3 守护进程方式备份数据
守护进程:可以在后台看到进程 并且创建了socket
Access via rsync daemon:
Pull: rsync [OPTION...] [USER@]HOST::SRC... [DEST]
rsync ---备份数据命令
[OPTION...] ---命令参数信息
[USER@] ---认证用户信息
HOST ---远程主机IP地址或者主机名称信息
::SRC ---要备份的模块信息
[DEST] ---将备份的数据保存到本地相应目录中,目标信息(目录
rsync [OPTION...] rsync://[USER@]HOST[:PORT]/SRC... [DEST]
Push: rsync [OPTION...] SRC... [USER@]HOST::DEST
rsync ---备份数据命令
[OPTION...] ---命令参数信息
[USER@] ---认证用户信息
HOST ---远程主机IP地址或者主机名称信息
SRC ---要备份的数据目录或者文件信息
[DEST] ---备份的模块信息
rsync [OPTION...] SRC... rsync://[USER@]HOST[:PORT]/DEST
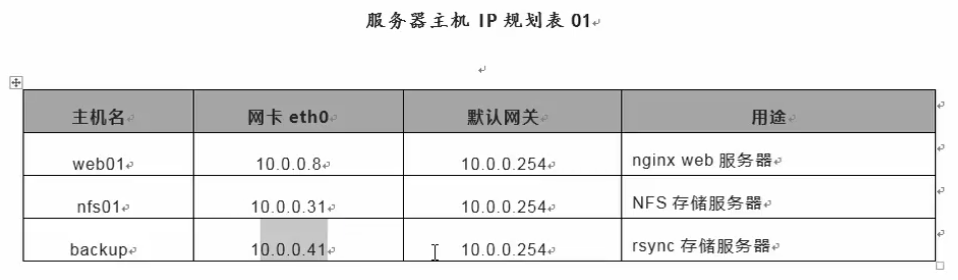
守护进程部署方式分为2部分
1 服务端的部署 ---rsync
2 客户端的部署 ---web服务 采用推的方式
rsync服务器作为服务端
其他服务器作为客户端
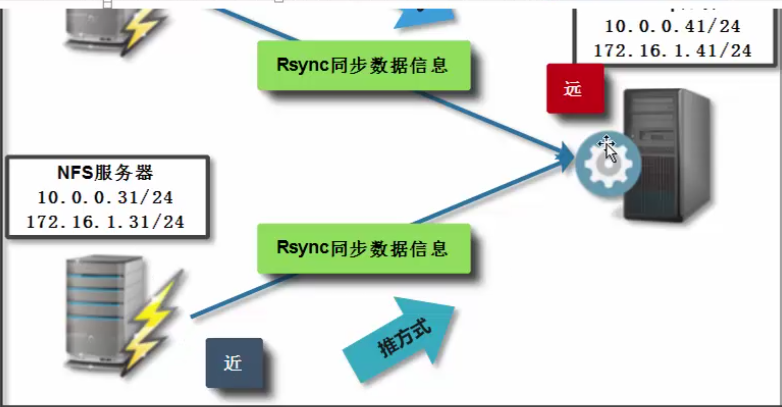

服务端:
1 第一个里程碑:查看有没有这个软件
rpm -qa rsync
2 第二个里程碑:安装rsync软件
yum install -y rsync
3 第三个里程碑:编写配置文件(编写好配置文件,后续操作步骤可以按照配置文件进行):
默认没有 需要手工创建
配置文件详解:
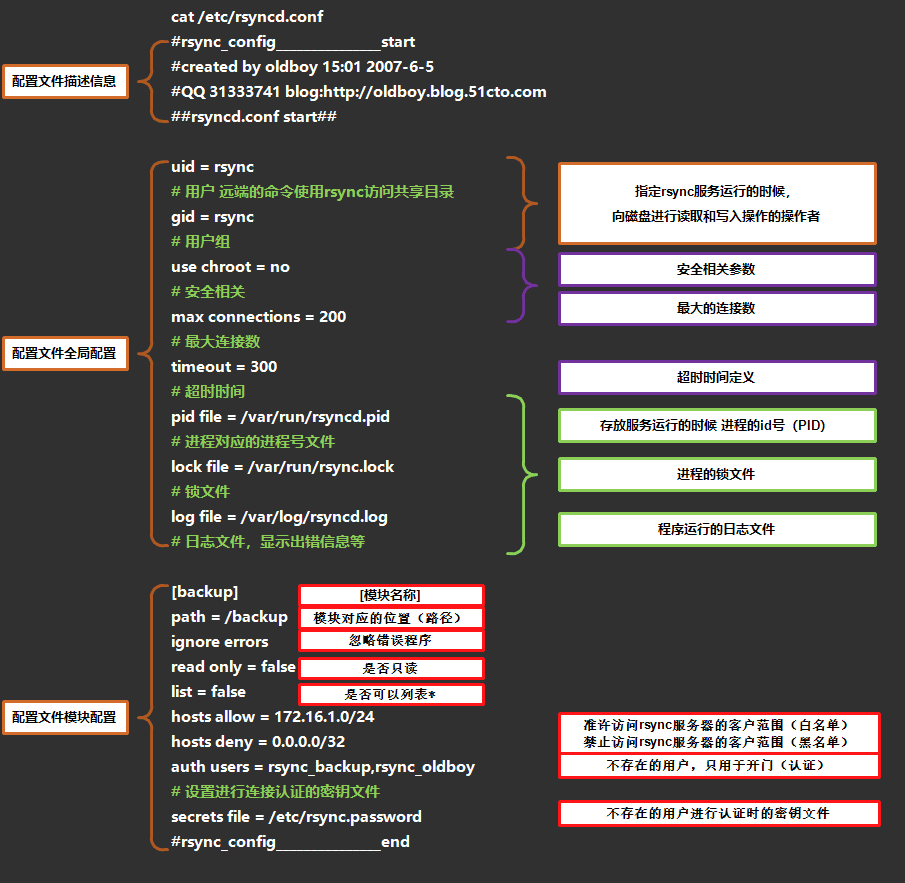
#第三个里程碑
配置文件:
#rsync_config

#created by Nod at 2018

##rsyncd.conf start##

uid = rsync

gid = rsync

use chroot = no

max connections = 200

timeout = 300

pid file = /var/run/rsyncd.pid

lock file = /var/run/rsync.lock

log file = /var/log/rsyncd.log

ignore errors

read only = false

list = false

hosts allow = 172.16.1.0/24

hosts deny = 0.0.0.0/32

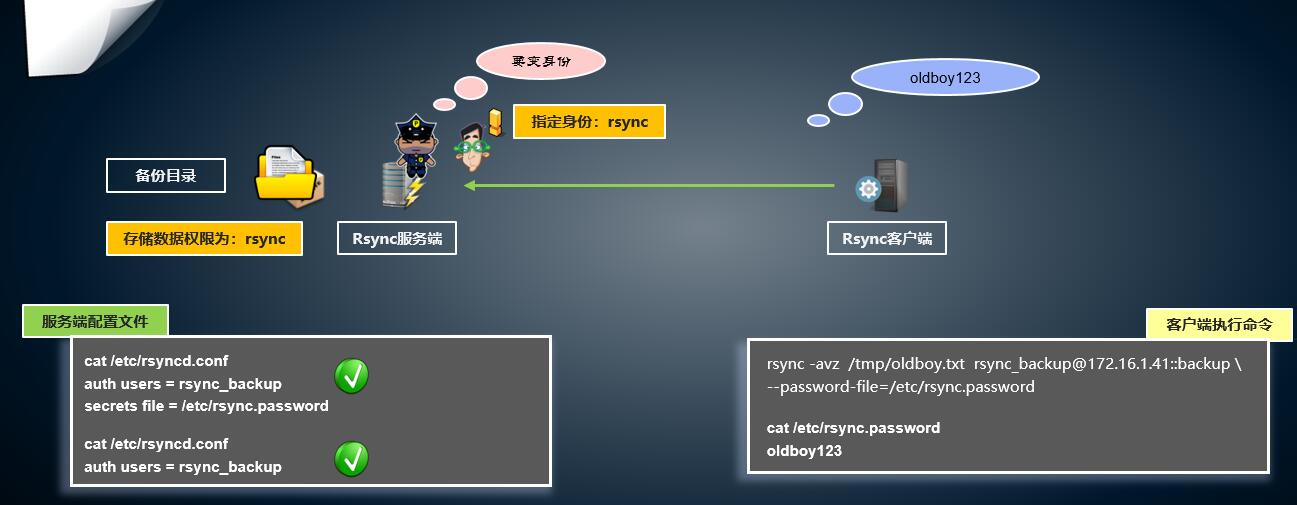
auth users = rsync_backup

secrets file = /etc/rsync.password

exclude=a b d/3.txt

[backup]

comment = "backup dir by oldboy"

path = /backup

[backupdev]

comment = "backup dir by oldboy"

path = /backupdev

[backupdba]

comment = "backup dir by oldboy"

path = /backupdba

[backupsa]

comment = "backup dir by oldboy"

path = /backupsa
[root@backup ~]# vim /etc/rsyncd.conf
#rsync_config
#created by HQ at 2017
##rsyncd.conf start##
uid = rsync
gid = rsync
use chroot = no
max connections = 200
timeout = 300
pid file = /var/run/rsyncd.pid
lock file = /var/run/rsync.lock
log file = /var/log/rsyncd.log
ignore errors
read only = false
list = false
hosts allow = 172.16.1.0/24
hosts deny = 0.0.0.0/32
auth users = rsync_backup
secrets file = /etc/rsync.password
[backup]
comment = "backup dir by oldboy"
path = /backup
~
~
~
"/etc/rsyncd.conf" [New] 22L, 445C written
# 4 第四个里程碑 创建备份目录的管理用户 此处为虚拟用户
[root@backup ~]# useradd -s /sbin/nologin -M rsync
[root@backup ~]# id rsync
uid=502(rsync) gid=502(rsync) groups=502(rsync)
# 5 第五个里程碑:创建安全认证文件
[root@backup ~]# echo "rsync_backup:oldboy123">>/etc/rsync.password
[root@backup ~]# cat /etc/rsync.password
rsync_backup:oldboy123
#5.1 修改权限
[root@backup ~]# chmod 600 /etc/rsync.password
#6 第六个里程碑:创建备份目录
至此服务端配置操作完成
[root@backup ~]# mkdir -p /backup
[root@backup ~]# chown -R rsync.rsync /backup/
[root@backup ~]# ll /backup/
total 4
-rw-r--r-- 1 rsync rsync 379 May 2 16:51 hosts
#7 第七个里程碑:启动rsync服务
[root@backup ~]# rsync --daemon
[root@backup ~]# netstat -lntup | grep rsync
tcp 0 0 0.0.0.0:873 0.0.0.0:* LISTEN 2932/rsync
tcp 0 0 :::873 :::* LISTEN 2932/rsync
[root@backup ~]# netstat -lutup | grep rsync
tcp 0 0 *:rsync *:* LISTEN 3593/rsync
tcp 0 0 *:rsync *:* LISTEN 3593/rsync
[root@backup ~]# ps -ef | grep rsync
root 3593 1 0 03:57 ? 00:00:00 rsync --daemon
客户端:
#第一个里程碑:查看有无rsync这个软件
#第二个里程碑:yum -y install rsync
#第三个里程碑:客户端创建安全认证文件
[root@nfs01 ~]# echo "oldboy123">/etc/rsync.password
[root@nfs01 ~]# chmod 600 /etc/rsync.password
至此客户端配置完毕
#进行数据推送的测试
拉:nfs: rsync -avz rsync_backup@172.16.1.41::backup/oldboy.txt /tmp/
推:nfs rsync -avz /etc rsync_backup@172.16.1.41::backup
1 需要进行交互的方式 就是需要输入密码
[root@nfs01 ~]# rsync -avz /etc/hosts rsync_backup@172.16.1.41::backup
Password:
sending incremental file list
hosts
sent 202 bytes received 27 bytes 35.23 bytes/sec
total size is 379 speedup is 1.66
2 不需要输入密码 免交互
[root@nfs01 ~]# echo "oldboy123">/etc/rsync.password
[root@nfs01 ~]# chmod 600 /etc/rsync.password
[root@nfs01 ~]# rsync -avz /etc/hosts rsync_backup@172.16.1.41::backup --password-file=/etc/rsync.password
sending incremental file list
hosts
sent 202 bytes received 27 bytes 458.00 bytes/sec
total size is 379 speedup is 1.66
===========================================================================
Rsync的参数说明
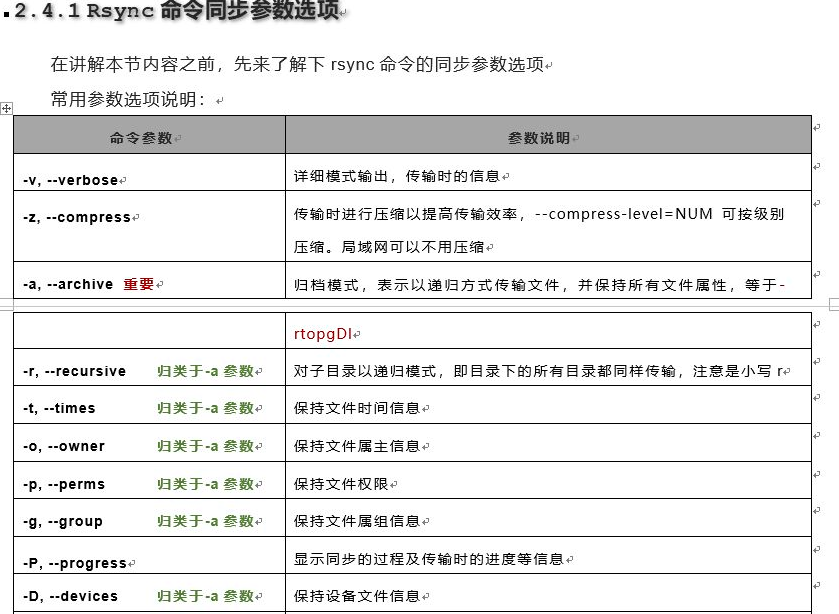
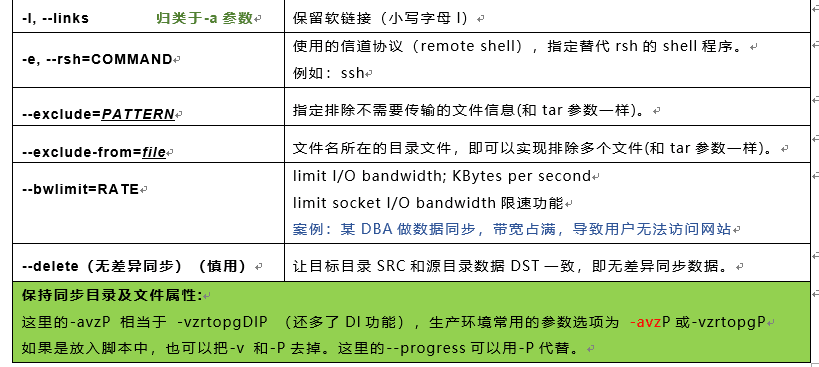
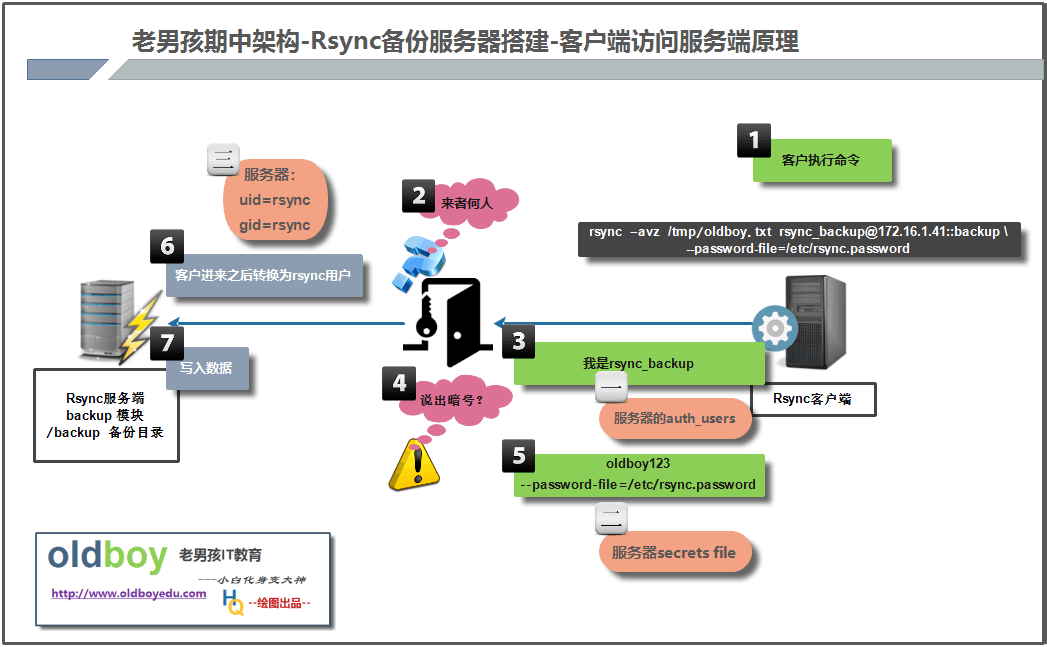
小结:
服务端:
第一个历程:检查软件是否安装
rpm -qa rsync
yum install -y rsync
第二个历程:编写配置文件
vim /etc/rsyncd.conf ---默认此文件是不存在的,需要创建出来
#rsync_config
#created by HQ at 2017
##rsyncd.conf start##
uid = rsync
gid = rsync
use chroot = no
max connections = 200
timeout = 300
pid file = /var/run/rsyncd.pid
lock file = /var/run/rsync.lock
log file = /var/log/rsyncd.log
ignore errors
read only = false
list = false
hosts allow = 172.16.1.0/24
hosts deny = 0.0.0.0/32
auth users = rsync_backup
secrets file = /etc/rsync.password
[backup]
comment = "backup dir by oldboy"
path = /backup
第三个历程:创建备份目录管理用户(虚拟用户)
useradd -s /sbin/nologin -M rsync
id rsync
第四个历程:创建服务密码文件,并修改权限为600
echo "rsync_backup:oldboy123" >>/etc/rsync.password
chmod 600 /etc/rsync.password
第五个历程:创建备份目录
mkdir /backup
第六个历程:启动rsync守护进程服务
rsync --daemon
netstat -lntup|grep rsync
rsync的三种工作方式:使用方法
# 远程备份数据方式(类似scp功能)
Access via remote shell:
Pull: rsync [OPTION...] [USER@]HOST:SRC... [DEST]
rsync ---备份数据命令
[OPTION...] ---命令参数信息
[USER@] ---以什么身份远程登陆到主机上,以当前用户身份进行登陆
要确保远程主机上有相应用户信息
HOST ---远程主机IP地址或者主机名称信息
:SRC ---要备份的数据信息,源信息
[DEST] ---将备份的数据保存到本地相应目录中,目标信息(目录)
Push: rsync [OPTION...] SRC... [USER@]HOST:DEST
rsync ---备份数据命令
[OPTION...] ---命令参数信息
:SRC ---要备份的数据信息,源信息(本地数据信息)
[USER@] ---以什么身份远程登陆到主机上,以当前用户身份进行登陆
要确保远程主机上有相应用户信息
HOST ---远程主机IP地址或者主机名称信息
:SRC ---要备份的数据信息,源信息
[DEST] ---将备份的数据保存到远程主机相应目录中,目标信息(目录)
===================================================add begin 0504==============================================
杀进程方式:
杀进程方式(三种)
第一个杀手:kill
kill 进程号pid
[root@backup etc]# kill 2347
[root@backup etc]# kill 2347
-bash: kill: (2347) - No such process
说明:kill杀进程会有提示信息。
第二个杀手:killall(优选)
killall 进程名
[root@backup etc]# killall rsync
[root@backup etc]# killall rsync
rsync: no process killed
说明:killall杀进程会有提示信息。
第三个杀手:pkill(模糊杀手)杀人范围太广(慎用)
pkill 进程名
说明:pkill杀进程不会有提示信息。
02. rsync命令参数说明
rsync -avz -e "ssh -p22" /etc/hosts 172.16.1.41:/tmp/ --- -e实现数据加密传输
无差异同步:(同步数据双方,数据信息高度一致)
我有一个苹果手机,也给你买一个,你也有
我的苹果手机坏了,你的手机也要砸了
03. rsync守护进程模式企业应用实践
1. 守护进程模式架构部署方式
1)将服务端部署在备份服务器上 客户端部署在架构中其他服务器上 将数据推送到服务端(优选)
2)将服务端部署在架构中其他服务器上,客户端部署在备份服务器上 将数据从服务端拉取
生成多个配置文件的模块
19,21copy21
19,21move11
2. rsync服务端多模块配置实践
第一个历程:编写rsync服务端配置文件 添加多模块
[backup]
comment = "backup dir by oldboy"
path = /backup
[backupdba]
comment = "backup dir by oldboy"
path = /backupdba
[backupdev]
comment = "backup dir by oldboy"
path = /backupdev
第二个历程:rsync服务端创建备份目录
服务端:
命令:
mkdir /{backupdev,backupdba,backupsa}
chown -R rsync.rsync /{backupdev,backupdba,backupsa}
ll -d /{backupdev,backupdba,backupsa}
[root@backup ~]# mkdir /backupdba
[root@backup ~]# mkdir /backupsa
[root@backup ~]# mkdir /backupdev
[root@backup ~]# chown -R rsync.rsync /backupdba
[root@backup ~]# chown -R rsync.rsync /backupsa
[root@backup ~]# chown -R rsync.rsync /backupdev
第三个历程:重启rsync服务
分步式:
killall rsync 杀掉进程
rsync --daemon 重启服务
一键式:
killall rsync;sleep 3;rsync --daemon --- 服务重启脚本中的命令
[root@backup ~]# killall rsync;sleep 2; rsync --daemon
第四个历程:进行测试
[root@nfs01 ~]# rsync -avz /etc/hosts rsync_backup@172.16.1.41::backupdba --password-file=/etc/rsync.password
sending incremental file list
hosts
sent 202 bytes received 27 bytes 458.00 bytes/sec
total size is 379 speedup is 1.66
[root@nfs01 ~]# rsync -avz /etc/hosts rsync_backup@172.16.1.41::backupsa --password-file=/etc/rsync.password
sending incremental file list
hosts
sent 202 bytes received 27 bytes 458.00 bytes/sec
total size is 379 speedup is 1.66
[root@nfs01 ~]# rsync -avz /etc/hosts rsync_backup@172.16.1.41::backupdev --password-file=/etc/rsync.password
sending incremental file list
hosts
sent 202 bytes received 27 bytes 458.00 bytes/sec
total size is 379 speedup is 1.66
注意:此处是copy到一个目录下的子目录;注意要逐层创建,如果backupdev/1/2 必须要建立在backupdev/1/有的前提下
[root@nfs01 ~]# rsync -avz /etc/hosts rsync_backup@172.16.1.41::backupdev/1/ --password-file=/etc/rsync.password
sending incremental file list
created directory 1
hosts
sent 202 bytes received 27 bytes 152.67 bytes/sec
total size is 379 speedup is 1.66
[root@backup ~]# ls /backup*
/backup:
history
/backupdba:
hosts
/backupdev:
1 hosts
/backupsa:
hosts
3. rsync服务端自动创建目录信息
[root@nfs01 ~]# rsync -avz /etc/hosts rsync_backup@172.16.1.41::backupdev/1/ --password-file=/etc/rsync.password
sending incremental file list
created directory 1
hosts
sent 200 bytes received 27 bytes 454.00 bytes/sec
total size is 379 speedup is 1.67
强调:不能创建多级目录;
注意:此处是copy到一个目录下的子目录;注意要逐层创建,如果backupdev/1/2 必须要建立在backupdev/1/有的前提下
4. rsync守护进程模式实现数据排除功能
客户端排除方式 --exclude
环境创建在nfs上 :

创建好测试环境:
[root@nfs01 ~]# mkdir /oldboy_dir/{a..d}
[root@nfs01 ~]# touch /oldboy_dir/a/{1..3}.txt
[root@nfs01 ~]# touch /oldboy_dir/b/{1..3}.txt
[root@nfs01 ~]# touch /oldboy_dir/c/{1..3}.txt
[root@nfs01 ~]# touch /oldboy_dir/d/{1..3}.txt
[root@nfs01 ~]# tree /oldboy_dir/
/oldboy_dir/
├── a
│ ├── 1.txt
│ ├── 2.txt
│ └── 3.txt
├── b
│ ├── 1.txt
│ ├── 2.txt
│ └── 3.txt
├── c
│ ├── 1.txt
│ ├── 2.txt
│ └── 3.txt
└── d
├── 1.txt
├── 2.txt
└── 3.txt
# 排除a b目录不需要同步备份,d目录中3.txt文件不需要同步
|
--exclude=a |
表示的是排除a文件夹 |
|
--exclude=b |
表示的是排除b文件夹 |
|
--exclude=d/3.txt |
表示的是排除d文件夹下的3.txt文件 |
客户端
[root@nfs01 ~]# rsync -avz /oldboy_dir --exclude=a --exclude=b --exclude=d/3.txt rsync_backup@172.16.1.41::backup --password-file=/etc/rsync.password
sending incremental file list
oldboy_dir/
oldboy_dir/c/
oldboy_dir/c/1.txt
oldboy_dir/c/2.txt
oldboy_dir/c/3.txt
oldboy_dir/d/
oldboy_dir/d/1.txt
oldboy_dir/d/2.txt
sent 330 bytes received 115 bytes 890.00 bytes/sec
total size is 0 speedup is 0.00
此处是简洁的写法。将a &b文件夹一起包含
rsync -avz /oldboy_dir --exclude={a,b} --exclude=d/3.txt rsync_backup@172.16.1.41::backup --password-file=/etc/rsync.password
--exclude-from
根据指定的文件内的内容进行过滤
生成1个文件
cat exclude.txt
a 表示a文件夹不上传
b 表示b文件夹不上传
d/3.txt
exclude.txt
[root@nfs01 oldboy_dir]# rsync -avz /oldboy_dir --exclude-from=/oldboy_dir/exclude.txt rsync_backup@172.16.1.41::backup --password-file=/etc/rsync.password
sending incremental file list
oldboy_dir/
oldboy_dir/c/
oldboy_dir/c/1.txt
oldboy_dir/c/2.txt
oldboy_dir/c/3.txt
oldboy_dir/d/
oldboy_dir/d/1.txt
oldboy_dir/d/2.txt
sent 330 bytes received 115 bytes 890.00 bytes/sec
total size is 0 speedup is 0.00
总结说明:
利用exclude指定排除信息时,需要写上排除信息的相对路径
利用exclude-from指定排除文件时,可以写绝对路由也可以写相对路径
服务端排除方式
exclude = a b d/3.txt --- 编写配置文件排除信息,并进行重启
[root@nfs01 ~]# rsync -avz /oldboy_dir/ --exclude={a,b} --exclude=d/3.txt rsync_backup@172.16.1.41::backupdba --password-file=/etc/rsync.password
sending incremental file list
./
c/
c/1.txt
c/2.txt
c/3.txt
d/
d/1.txt
d/2.txt
sent 308 bytes received 114 bytes 844.00 bytes/sec
total size is 0 speedup is 0.00
[root@nfs01 ~]# cd /oldboy_dir/
[root@nfs01 oldboy_dir]# vim exclude.txt
a
b
d/3.txt
~
"exclude.txt" [New] 3L, 12C written
[root@nfs01 oldboy_dir]# cd
[root@nfs01 ~]# rsync -avz /oldboy_dir/ --exclude-from=/oldboy_dir/exclude.txt rsync_backup@172.16.1.41::backupsa --password-file=/etc/rsync.password
sending incremental file list
./
exclude.txt
c/
c/1.txt
c/2.txt
c/3.txt
d/
d/1.txt
d/2.txt
sent 384 bytes received 133 bytes 1034.00 bytes/sec
total size is 12 speedup is 0.02
[root@nfs01 ~]# rsync -avz /oldboy_dir/ rsync_backup@172.16.1.41::backupsa --password-file=/etc/rsync.password
sending incremental file list
skipping daemon-excluded directory "a"
*** Skipping any contents from this failed directory ***
skipping daemon-excluded directory "b"
*** Skipping any contents from this failed directory ***
skipping daemon-excluded file "d/3.txt"
sent 258 bytes received 12 bytes 540.00 bytes/sec
total size is 12 speedup is 0.04
rsync error: some files/attrs were not transferred (see previous errors) (code 23) at main.c(1039) [sender=3.0.6]
[root@nfs01 ~]#
守护进程来创建备份目录
backup: mkdir {sa,dev,dba} -p
rsync -avz /oldboy/ rsync_backup@172,16.1.41::backup/dev --password-file=/etc/rsync.password
存在的问题:backup下可以有/dev 但是不能创建多级目录 无法实现
会删除根的命令 rsync -avz --delete rsync_backup@172.16.1.41::backup / --password-file=/etc/rsync.password
建议黑名单在配置文件中只配置一种名单策略即可;
局部配置优于全局配置
5. rsync守护进程实现无差异同步
我有的,你也有
我没有的,你也不能有
rsync -avz --delete /oldboy_dir rsync_backup@172.16.1.41::backup --password-file=/etc/rsync.password
总结:实现数据统一一致
使用无差异同步时要小心谨慎
企业面试题:
有1个目录,存储空间占用了1个T,请将这个目录下面的内容快速清空
rysnc -avz --delete /null/ 172.16.1.41:/data_1T/
有1个目录,存储空间占用了1个T,请将这个文件里面的内容快速清空
rysnc -avz --delete /null/null.txt 172.16.1.41:/data_1T/file_1T.txt
6. rsync守护进程实现同步数据访问控制
在配置文件当中实现 rsync.conf
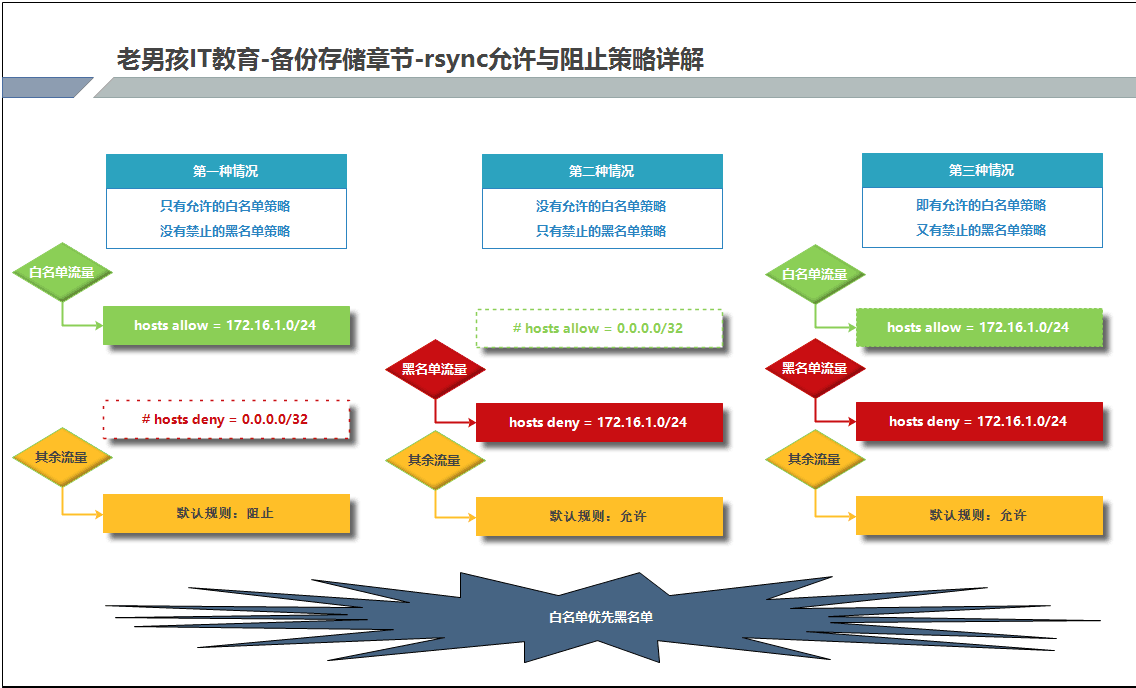
hosts allow = 172.16.1.0/24 --- 白名单
hosts deny = 0.0.0.0/32 --- 黑名单
说明白名单和黑名单同时存在时,权限为大者优先使用
谁放行的大的 谁优先
白名单和黑名单建议选择其一使用 不要2个都选
参见图示理解访问控制策略原理
建议:在配置文件中只配置一种名单策略即可
# backupdev---172.16.1.0/24 backupdba---10.0.0.0/24
# 全局配置 局部配置
# 全局配置:所有配置信息影响所有模块
# 局部配置:只影响指定模块,其他模块不会受到影响
局部配置信息优于全局配置,当全局配置和局部配置相同时,遵循局部配置
[backupdba]
comment = "backup dir by oldboy"
path = /backupdba
hosts allow = 10.0.0.0/24
[backupdev]
comment = "backup dir by oldboy"
path = /backupdev
hosts allow = 172.16.1.0/24
7. rsync守护进程模式列表功能
在配置文件中
list = true --- 表示将服务端模块信息列表显示在客户端
建议:改为false更加安全
8. rsync服务扩展启动方式
xinetd服务:超级守护进程服务,可以管理多个守护进程(rsync telnet tftp)
第一个历程:下载超级守护进程软件
yum install -y xinetd
第二个历程:编写xinetd相关配置文件
cd /etc/xinetd.d/
vim rsync
disable = no --- 愿意让xinetd服务管理
第三个历程:重启xined服务(但需要前蹄把rsync服务停止掉)
/etc/init.d/xinetd start|stop|restart
说明:只作为了解,不建议使用xinetd服务启动rsync
rsync 是备份服务
下篇

Linux 期中架构 rsync的更多相关文章
- Linux 期中架构 inotify
全网备份数据同步方案 备份网站内部人员信息 不能解决外部(人员)上传数据的备份 定时任务最短执行的周期为一分钟,采用定时任务方式,有时可能造成一分钟内的数据丢失 因此对于重要数据需要采用实时同步的方 ...
- Linux 期中架构 Ansible
ansible 自动化软件 基于Python开发 特点概述: 配置文件不需要过多配置 了解就可以了 ###部署ansble软件 ##受控主机部署 backup nfs01 web01 ...
- Linux 期中架构 SSH
为其他网络服务提供安全协议.替代Telnet SSH: 实现数据加密传输 22 默认支持root用户远程连接 类似sftp-server服务 nmap -p 22 10.0.0.41 nc 10 ...
- Linux期中架构 全网备份案例
server端脚本 #!/bin/bash #1 进行数据完整性验证 并生成结果 find /backup -type f -name "finger.txt"| xargs md ...
- Linux期中架构
1 在构建完模板后 开启虚拟机后 需要再重启一次 以解决网卡不能看见的问题 ########################################add begin 2018-05 ...
- Linux 期中架构 PHP
环境 PHP安装前准备 先将需要的软件包如下位置放置.另外需要有WWW用户 参照nginx 满足以上条件后执行安装脚本 PHP安装脚本: #!/bin/bash #install PHP #au ...
- Linux 期中架构 MySQL
MySQL基础部分 mysql安装脚本 安装前请将相关安装包copy放到/server/tools目录下 -rw-r--r-- 1 root root 314149697 Mar 23 2017 ...
- linux 期中架构之 nginx 安装与排错
1, 安装 nginx 所需要的pcre库 即:perl 兼容正则表达式 yum install pcre pcre-devel -y rpm -qa pcre pcre-devel 检查是否安装好p ...
- Linux运维就业技术指导(八):期中架构考核
一,期中架构考核概述 1.1 架构图 1.2 架构图公司背景概述 公司是一个新兴的人脸识别高新创业公司,公司名称xxxx 老总是博士生导师,还有一个副总是研究生导师 副总同时是研发总监,负责所有的研发 ...
随机推荐
- Python 数值计算库之-[Pandas](六)
- 玩转X-CTR100 l STM32F4 l 红外遥控接收
我造轮子,你造车,创客一起造起来!塔克创新资讯[塔克社区 www.xtark.cn ][塔克博客 www.cnblogs.com/xtark/ ] X-CTR100控制器具有红外接收头,例程 ...
- Java语言的概述
- android编译环境安装
Android 编译环境安装 安装 Java 6 安装 Java 6 安装依赖包 (Ubuntu 12.04) $ sudo apt-get install git gnupg flex bison ...
- nwjs 实现的 分块上传
1.先上核心工具类/** * Created by Administrator on 2017/6/12. */let fs = require("fs");/** * Creat ...
- Android 网络教程: 开始
原文:Android Networking Tutorial: Getting Started 作者:Eunice Obugyei 译者:kmyhy 从 API 级别 1 开始,网络始终是 Andro ...
- c++跨文件变量声明
常量是内部链接的,可以直接定义; 变量是外部链接,如果在头文件定义的话,如果出现多次引用同一个头文件的编译单元,就会引发multi redifine错误, 这个时候就要只是声明变量来解决:exter ...
- liunx系统和其它的基本命令
1.su 更换用户 2.sudo 管理员权限 3.PATH 4.sudo shutdown -h now 现在关机 sudo shutdown -r now 现在重启 5.kill ...
- 在Windows XP系统下架设FTP服务器需要5个步骤。
4步win7下简单FTP服务器搭建:http://blog.sina.com.cn/s/blog_3f7e47f20100haur.html 申请网域护照(即帐户),开通免费域名.连接到www.ora ...
- 磁盘 -> 硬盘 -> c盘 && 内存
磁盘是计算机的外部存储器,分为两类,一类是硬盘,一类是软盘. (附:计算机的存储器有两类,一类是内部存储器(内存条是用半导体材料做成的),断电不会保存当前工作:一类是外部存储器,断了电也能可以保存.) ...