spring boot2 kafka
一.软件版本
1.linux:centos6
2.zookeeper:zookeeper-3.4.1
3.kafka:kafka_2.12-2.2.0
4.jdk:1.8
5.instelliJ Idea
二.环境准备
1.关闭防火墙:service iptables stop
2.zookeeper:复制conf目录下的zoo_sample.cfg配置文件并改名为zoo.cfg
3.kafka:修改配置文件conf/server.properties中
①broker.id=123(broker.id每个kafka的都不一样,必须唯一)
②advertised.listeners=PLAINTEXT://192.168.56.101:9092(对应自己的linux的ip地址)
③zookeeper.connect=127.0.0.1:2181(本机默认端口是2181,有需要到zookeeper的zoo.cfg文件中修改)
三.软件setup&start
1.zookeeper:zookeeper-3.4.14/bin目录下执行
①./zkServer.sh start ../conf/zoo.cfg
2.kafka:kafka_2.12-2.2.0/bin目录下执行
①./kafka-server-start.sh ../config/server.properties
四.创建topic&发送消息&消费消息
1.创建topic “test”,kafka_2.12-2.2.0/bin目录下执行
①./kafka-topics.sh --create --bootstrap-server localhost:9092 --replication-factor 1 --partitions 1 --topic test
②验证是否创建成功:./kafka-topics.sh --list --bootstrap-server localhost:9092
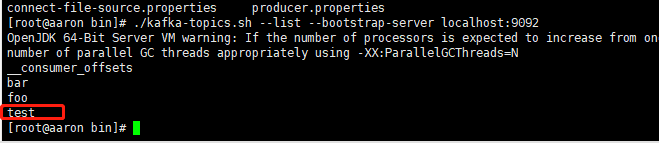
③开启消息生产者的console,kafka_2.12-2.2.0/bin目录下执行,并发送几条信息
./kafka-console-producer.sh --broker-list localhost:9092 --topic test

④开启消息消费者的console,kafka_2.12-2.2.0/bin目录下执行
./kafka-console-consumer.sh --bootstrap-server localhost:9092 --topic test

以上步骤没出现问题表示kafka服务器端以及搭建完毕。
五.Spring boot2 kafka通信
1.创建topic:TopicConfiguration
package com.aaron.kafka.springboot.configuration;

import org.apache.kafka.clients.admin.AdminClientConfig;

import org.apache.kafka.clients.admin.NewTopic;

import org.springframework.context.annotation.Bean;

import org.springframework.context.annotation.Configuration;

import org.springframework.kafka.core.KafkaAdmin;

import org.springframework.util.StringUtils;

import java.util.HashMap;

import java.util.Map;

@Configuration

public class TopicConfiguration {

    @Bean

    public KafkaAdmin admin() {

        Map<String, Object> configs = new HashMap<>();

        configs.put(AdminClientConfig.BOOTSTRAP_SERVERS_CONFIG,

                StringUtils.arrayToCommaDelimitedString(new String[]{"192.168.56.101:9092"}));

        return new KafkaAdmin(configs);

    }

    @Bean

    public NewTopic topic1() {

        return new NewTopic("test", 1, (short) 2);

    }

}
2.spring boot2中建立kafka的消息生产者:KafkaProducerConfiguration
package com.aaron.kafka.springboot.configuration;

import com.aaron.kafka.springboot.listener.MessageListenerImpl;

import org.springframework.context.annotation.Bean;

import org.springframework.context.annotation.Configuration;

import org.springframework.kafka.core.DefaultKafkaConsumerFactory;

import org.springframework.kafka.listener.ContainerProperties;

import org.springframework.kafka.listener.KafkaMessageListenerContainer;

import java.util.HashMap;

import java.util.Map;

@Configuration

public class kafkaConsumerConfiguration {

    @Bean

    public MessageListenerImpl messageListener(){

        return new MessageListenerImpl();

    }

    @Bean

    public KafkaMessageListenerContainer kafkaMessageListenerContainer(){

        ContainerProperties containerProps = new ContainerProperties("test");

        containerProps.setMessageListener(messageListener());

        DefaultKafkaConsumerFactory<Integer, String> cf =

                new DefaultKafkaConsumerFactory<Integer, String>(consumerProps());

        KafkaMessageListenerContainer<Integer, String> container =

                new KafkaMessageListenerContainer<>(cf, containerProps);

        return container;

    }

    /**

     * 设置consumer的properties

     * @return

     */

    private Map<String,Object> consumerProps(){

        Map<String, Object> consumerProps = new HashMap<>();

        consumerProps.put("bootstrap.servers","192.168.56.101:9092");

        consumerProps.put("group.id","123");

        consumerProps.put("enable.auto.commit","true");

        consumerProps.put("auto.commit.interval.ms","1000");

        consumerProps.put("key.deserializer","org.apache.kafka.common.serialization.StringDeserializer");

        consumerProps.put("value.deserializer","org.apache.kafka.common.serialization.StringDeserializer");

        return consumerProps;

    }

}
3.建立测试代码:KafkaTest
package com.aaron.kafka.springboot;

import org.junit.Test;

import org.junit.runner.RunWith;

import org.springframework.boot.test.context.SpringBootTest;

import org.springframework.kafka.core.KafkaTemplate;

import org.springframework.test.context.junit4.SpringRunner;

import javax.annotation.Resource;

@RunWith(SpringRunner.class)

@SpringBootTest

public class KafkaTest {

    @Resource

    private KafkaTemplate kafkaTemplate;

    @Test

    public void sendMsg(){

        kafkaTemplate.send("test","hello","world");

    }

}
运行测试结果如下:

4.Spring boot2中建立消费者和消息监听器:kafkaConsumerConfiguration和MessageListenerImpl
package com.aaron.kafka.springboot.configuration;

import com.aaron.kafka.springboot.listener.MessageListenerImpl;

import org.springframework.context.annotation.Bean;

import org.springframework.context.annotation.Configuration;

import org.springframework.kafka.core.DefaultKafkaConsumerFactory;

import org.springframework.kafka.listener.ContainerProperties;

import org.springframework.kafka.listener.KafkaMessageListenerContainer;

import java.util.HashMap;

import java.util.Map;

@Configuration

public class kafkaConsumerConfiguration {

    @Bean

    public MessageListenerImpl messageListener(){

        return new MessageListenerImpl();

    }

    @Bean

    public KafkaMessageListenerContainer kafkaMessageListenerContainer(){

        ContainerProperties containerProps = new ContainerProperties("test");

        containerProps.setMessageListener(messageListener());

        DefaultKafkaConsumerFactory<Integer, String> cf =

                new DefaultKafkaConsumerFactory<Integer, String>(consumerProps());

        KafkaMessageListenerContainer<Integer, String> container =

                new KafkaMessageListenerContainer<>(cf, containerProps);

        return container;

    }

    /**

     * 设置consumer的properties

     * @return

     */

    private Map<String,Object> consumerProps(){

        Map<String, Object> consumerProps = new HashMap<>();

        consumerProps.put("bootstrap.servers","192.168.56.101:9092");

        consumerProps.put("group.id","123");

        consumerProps.put("enable.auto.commit","true");

        consumerProps.put("auto.commit.interval.ms","1000");

        consumerProps.put("key.deserializer","org.apache.kafka.common.serialization.StringDeserializer");

        consumerProps.put("value.deserializer","org.apache.kafka.common.serialization.StringDeserializer");

        return consumerProps;

    }

}
package com.aaron.kafka.springboot.listener;

import org.springframework.kafka.listener.MessageListener;

public class MessageListenerImpl implements MessageListener {

    @Override

    public void onMessage(Object o) {

        System.out.println(o.toString());

    }

}
关闭服务器上的消费者然后启动springBoot
在服务器上的producer中输入文本 Hello World
Idea 中的console显示如下:

六.kafka的集群配置
1.复制配置文件server.properties改名为server-1.properties、server-2.properties
修改配置文件中
broker.id=121
log.dirs=/tmp/kafka-logs-1
advertised.listeners=PLAINTEXT://192.168.56.101:9093
(server-2.properties中的则为:
broker.id=122
log.dirs=/tmp/kafka-logs-2
advertised.listeners=PLAINTEXT://192.168.56.101:9094)
2.运行方式启动kafka,kafka_2.12-2.2.0/bin下执行
./kafka-server-start.sh ../config/server-1.properties
./kafka-server-start.sh ../config/server-2.properties
后台方式运行命令如下:
nohup ./kafka-server-start.sh ../config/server-1.properties &
nohup ./kafka-server-start.sh ../config/server-2.properties &
注意:如果出现

则配置文件(server-1.properties和server-2.properties)中打开注释并修改为:listeners=PLAINTEXT://192.168.56.101:9093(server-2.properties的为:listeners=PLAINTEXT://192.168.56.101:9094)
spring boot2 kafka的更多相关文章
- Spring Boot2.0 整合 Kafka
Kafka 概述 Apache Kafka 是一个分布式流处理平台,用于构建实时的数据管道和流式的应用.它可以让你发布和订阅流式的记录,可以储存流式的记录,并且有较好的容错性,可以在流式记录产生时就进 ...
- Spring Boot2.0 设置拦截器
所有功能完成 配置登录认证 配置拦截器 在spring boot2.0 之后 通过继承这个WebMvcConfigurer类 就可以完成拦截 新建包com.example.interceptor; 创 ...
- Spring Boot2.0 静态资源被拦截问题
在Spring Boot2.0+的版本中,只要用户自定义了拦截器,则静态资源会被拦截.但是在spring1.0+的版本中,是不会拦截静态资源的. 因此,在使用Spring Boot2.0+时,配置拦截 ...
- Spring Boot2.0使用Spring Security
一.Spring Secutity简介 Spring 是一个非常流行和成功的 Java 应用开发框架.Spring Security 基于 Spring 框架,提供了一套 Web 应用安全性 ...
- spring boot2.0(一 ) 基础环境搭建
1.基础配置 开发环境:window jdk版本:1.8(spring boot2.0最低要求1.8) 开发工具:eclipse 构建方式:maven3 2.POM配置文件 <project x ...
- Spring Boot2.0自定义配置文件使用
声明: spring boot 1.5 以后,ConfigurationProperties取消locations属性,因此采用PropertySource注解配合使用 根据Spring Boot2. ...
- Spring boot2.0 设置文件上传大小限制
今天把Spring boot版本升级到了2.0后,发现原来的文件上传大小限制设置不起作用了,原来的application.properties设置如下: spring.http.multipart.m ...
- spring boot 2.0(一)权威发布spring boot2.0
Spring Boot2.0.0.RELEASE正式发布,在发布Spring Boot2.0的时候还出现一个小插曲,将Spring Boot2.0同步到Maven仓库的时候出现了错误,然后Spring ...
- 【spring cloud】spring cloud2.X spring boot2.0.4调用feign配置Hystrix Dashboard 和 集成Turbine 【解决:Hystrix仪表盘Unable to connect to Command Metric Stream】【解决:Hystrix仪表盘Loading...】
环境: <java.version>1.8</java.version><spring-boot.version>2.0.4.RELEASE</spring- ...
随机推荐
- Qt如何在QTabWidget上绘图
Qt绘图事件必须在paintEvent事件下绘图,这样导致我们在向Qt设计师界面上拖拽的控件绘图时,造成了很大的麻烦. 我们不能在拖拽的控件上写paintEvent函数,但是可以自定义一个类,继承某一 ...
- logback 按时间和大小生成日志不生效的问题
服务器要记录所有的日志,这些日志输入到一个文件中太大了,就需要按大小和时间还分割,比如每小时产生一个文件或当文件大小大于200MB的时候生成一个文件. 第一版这样版本,但是服务器启动之后没有生成日志文 ...
- 简单尝试Spring Cloud Gateway
简单尝试Spring Cloud Gateway 简介 Spring Cloud Gateway是一个API网关,它是用于代替Zuul而出现的.Spring Cloud Gateway构建于Sprin ...
- java多线程之AtomicLong与LongAdder
AtomicLong简要介绍 AtomicLong是作用是对长整形进行原子操作,显而易见,在java1.8中新加入了一个新的原子类LongAdder,该类也可以保证Long类型操作的原子性,相对于At ...
- HTTP笔记1
传输层:提供进程地址 TCP:传输控制协议,面向连接的协议:通信前需要建立虚拟链路:结束后拆除链路.端口号:0-65535 UDP:用户报文协议,无连接的协议.端口号:0-65535 IANA(互联网 ...
- linux安装sz && rz功能
[1]编译安装 root 账号登陆后,依次执行以下命令: cd /tmp wget http://www.ohse.de/uwe/releases/lrzsz-0.12.20.tar.gz . ./c ...
- c# WebApi之接口返回类型详解
c# WebApi之接口返回类型详解 https://blog.csdn.net/lwpoor123/article/details/78644998
- 遍历tr通过name获取对应值用作判断或者赋值
$("#table tr:gt(0)").each(function(i){ var bidPrice = $("input[name='bidPrice2s']&quo ...
- java eclipse war包的二次开发方法
有实际项目在跑的war包,却没有源码,苦于想查看源码,身处运维组为研发组看不起,拿不到源码,只能自己来反编译了. 只要你细心点,其实在解压war包后,可以看到文件夹中,已经存在了jsp文件,但是却没有 ...
- 牛客OI周赛7-提高组 A 小睿睿的等式
链接:https://ac.nowcoder.com/acm/contest/371/A来源:牛客网 小睿睿在游戏开始时有n根火柴棒,他想知道能摆成形如“A+B=n”的等式且使用的火柴棒数也恰好等于n ...