Object Detection with 10 lines of code - Image AI
To perform object detection using ImageAI, all you need to do is
- Install Python on your computer system
- Install ImageAI and its dependencies
3. Download the Object Detection model file
4. Run the sample codes (which is as few as 10 lines)
Now let’s get started.
1) Download and install Python 3 from official Python Language website
2) Install the following dependencies via pip:
i. Tensorflow
pip install tensorflow
ii. Numpy
pip install numpy
iii. SciPy
pip install scipy
iv. OpenCV
pip install opencv-python
v. Pillow
pip install pillow
vi. Matplotlib
pip install matplotlib
vii. H5py
pip install h5py
viii. Keras
pip install keras
ix. ImageAI
pip installhttps://github.com/OlafenwaMoses/ImageAI/releases/download/2.0.1/imageai-2.0.1-py3-none-any.whl
3) Download the RetinaNet model file that will be used for object detection via this link.
Great. Now that you have installed the dependencies, you are ready to write your first object detection code. Create a Python file and give it a name (For example, FirstDetection.py), and then write the code below into it. Copy the RetinaNet model file and the image you want to detect to the folder that contains the python file.
FirstDetection.py
from imageai.Detection import ObjectDetection

import os

execution_path = os.getcwd()

detector = ObjectDetection()

detector.setModelTypeAsRetinaNet()

detector.setModelPath( os.path.join(execution_path , "resnet50_coco_best_v2.0.1.h5"))

detector.loadModel()

detections = detector.detectObjectsFromImage(input_image=os.path.join(execution_path , "image.jpg"), output_image_path=os.path.join(execution_path , "imagenew.jpg"))

for eachObject in detections:

    print(eachObject["name"] + " : " + eachObject["percentage_probability"] )
Then run the code and wait while the results prints in the console. Once the result is printed to the console, go to the folder in which your FirstDetection.py is and you will find a new image saved. Take a look at a 2 image samples below and the new images saved after detection.
Before Detection:

Image Credit: alzheimers.co.uk
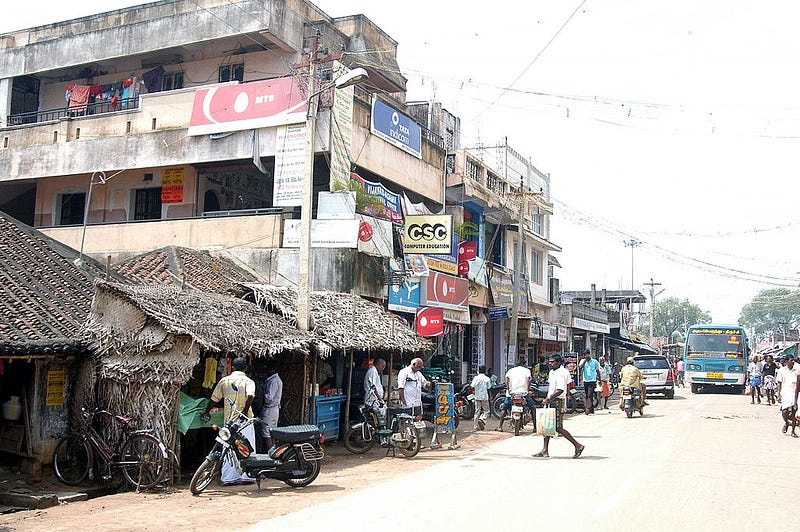
Image Credit: Wikicommons
After Detection:
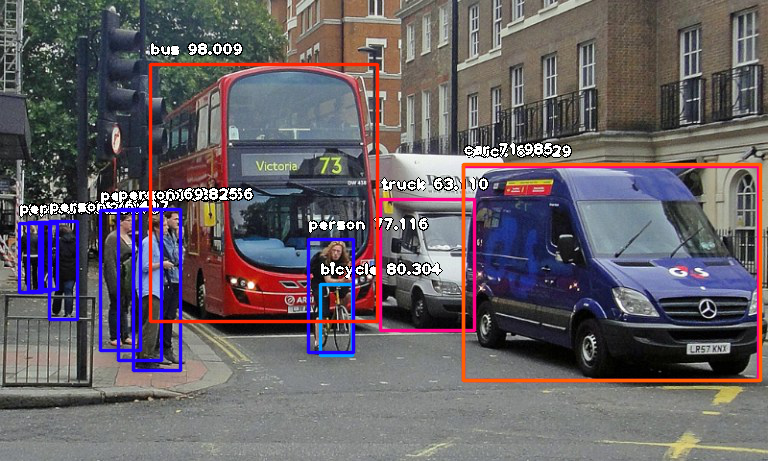
Console result for above image:
person : 55.8402955532074
person : 53.21805477142334
person : 69.25139427185059
person : 76.41745209693909
bicycle : 80.30363917350769
person : 83.58567953109741
person : 89.06581997871399
truck : 63.10953497886658
person : 69.82483863830566
person : 77.11606621742249
bus : 98.00949096679688
truck : 84.02870297431946
car : 71.98476791381836
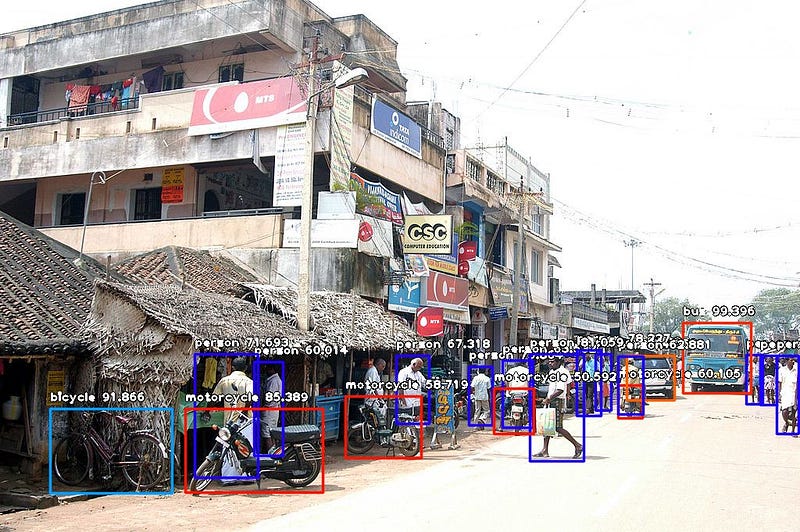
Console result for above image:
person : 71.10445499420166
person : 59.28672552108765
person : 59.61582064628601
person : 75.86382627487183
motorcycle : 60.1050078868866
bus : 99.39600229263306
car : 74.05484318733215
person : 67.31776595115662
person : 63.53200078010559
person : 78.2265305519104
person : 62.880998849868774
person : 72.93365597724915
person : 60.01397967338562
person : 81.05944991111755
motorcycle : 50.591760873794556
motorcycle : 58.719027042388916
person : 71.69321775436401
bicycle : 91.86570048332214
motorcycle : 85.38855314254761
Now let us explain how the 10-line code works.
from imageai.Detection import ObjectDetection

import os

execution_path = os.getcwd()
In the above 3 lines, we imported the ImageAI object detection class in the first line, imported the python os class in the second line and defined a variable to hold the path to the folder where our python file, RetinaNet model file and images are in the third line.
detector = ObjectDetection()

detector.setModelTypeAsRetinaNet()

detector.setModelPath( os.path.join(execution_path , "resnet50_coco_best_v2.0.1.h5"))

detector.loadModel()

detections = detector.detectObjectsFromImage(input_image=os.path.join(execution_path , "image.jpg"), output_image_path=os.path.join(execution_path , "imagenew.jpg"))
In the 5 lines of code above, we defined our object detection class in the first line, set the model type to RetinaNet in the second line, set the model path to the path of our RetinaNet model in the third line, load the model into the object detection class in the fourth line, then we called the detection function and parsed in the input image path and the output image path in the fifth line.
for eachObject in detections:

    print(eachObject["name"] + " : " + eachObject["percentage_probability"] )
In the above 2 lines of code, we iterate over all the results returned by the detector.detectObjectsFromImage function in the first line, then print out the name and percentage probability of the model on each object detected in the image in the second line.
ImageAI supports many powerful customization of the object detection process. One of it is the ability to extract the image of each object detected in the image. By simply parsing the extra parameter extract_detected_objects=True into the detectObjectsFromImagefunction as seen below, the object detection class will create a folder for the image objects, extract each image, save each to the new folder created and return an extra array that contains the path to each of the images.
detections, extracted_images = detector.detectObjectsFromImage(input_image=os.path.join(execution_path , "image.jpg"), output_image_path=os.path.join(execution_path , "imagenew.jpg"), extract_detected_objects=True)
Object Detection with 10 lines of code - Image AI的更多相关文章
- 论文阅读笔记四十六:Feature Selective Anchor-Free Module for Single-Shot Object Detection(CVPR2019)
论文原址:https://arxiv.org/abs/1903.00621 摘要 本文提出了基于无anchor机制的特征选择模块,是一个简单高效的单阶段组件,其可以结合特征金字塔嵌入到单阶段检测器中. ...
- (转)Awesome Object Detection
Awesome Object Detection 2018-08-10 09:30:40 This blog is copied from: https://github.com/amusi/awes ...
- 论文阅读笔记五十二:CornerNet-Lite: Efficient Keypoint Based Object Detection(CVPR2019)
论文原址:https://arxiv.org/pdf/1904.08900.pdf github:https://github.com/princeton-vl/CornerNet-Lite 摘要 基 ...
- 论文阅读笔记五十一:CenterNet: Keypoint Triplets for Object Detection(CVPR2019)
论文链接:https://arxiv.org/abs/1904.08189 github:https://github.com/Duankaiwen/CenterNet 摘要 目标检测中,基于关键点的 ...
- 论文阅读笔记四十八:Bounding Box Regression with Uncertainty for Accurate Object Detection(CVPR2019)
论文原址:https://arxiv.org/pdf/1809.08545.pdf github:https://github.com/yihui-he/KL-Loss 摘要 大规模的目标检测数据集在 ...
- object detection[NMS]
非极大抑制,是在对象检测中用的较为频繁的方法,当在一个对象区域,框出了很多框,那么如下图: 上图来自这里 目的就是为了在这些框中找到最适合的那个框.有以下几种方式: 1 nms 2 soft-nms ...
- 论文阅读笔记五十六:(ExtremeNet)Bottom-up Object Detection by Grouping Extreme and Center Points(CVPR2019)
论文原址:https://arxiv.org/abs/1901.08043 github: https://github.com/xingyizhou/ExtremeNet 摘要 本文利用一个关键点检 ...
- 课程四(Convolutional Neural Networks),第三 周(Object detection) —— 2.Programming assignments:Car detection with YOLOv2
Autonomous driving - Car detection Welcome to your week 3 programming assignment. You will learn abo ...
- YOLO object detection with OpenCV
Click here to download the source code to this post. In this tutorial, you’ll learn how to use the Y ...
随机推荐
- 使用String. localeCompare比较字符串
javascript提供stringA.localeCompare(stringB)方法,来判断一个字符串stringB是否排在stringA的前面. 返回值: 如果引用字符存在于比较字符之前则 ...
- 解决No 'Access-Control-Allow-Origin' header is present on the requested resource.跨域问题(后台(java)解决方法)
附:前端常见跨域解决方案(全) 跨域错误 解决方法 在后台写一个过滤器来改写请求头 附上一个前端不知所以然的后台java代码: public class CorsFilter implements F ...
- 四大机器学习编程语言对比:R、Python、MATLAB、Octave
本文作者是一位机器学习工程师,他比较了四种机器学习编程语言(工具):R.Python.MATLAB 和 OCTAVE.作者列出了这些语言(工具)的优缺点,希望对想开始学习它们的人有用. 图源:Pixa ...
- arcgis api 3.x for js 入门开发系列十叠加 SHP 图层(附源码下载)
前言 关于本篇功能实现用到的 api 涉及类看不懂的,请参照 esri 官网的 arcgis api 3.x for js:esri 官网 api,里面详细的介绍 arcgis api 3.x 各个类 ...
- 基础环境系列:Apache2.4.37
一.安装 进入官网http://www.apache.org/,滑至最下方,排名第一的HTTP Server就是我们需要的. 当前时间的最新版本是2.4.37.呃……并没有msi版本,我们选择最后一个 ...
- JS中简单的二级城市联动
代码奉上: <!DOCTYPE html><html><head> <meta charset="UTF-8"> < ...
- 【原】Java学习笔记017 - 面向对象
package cn.temptation; public class Sample01 { public static void main(String[] args) { // 继承关系中的pri ...
- Asp.Net Core 下 Newtonsoft.Json 转换字符串 null 替换成string.Empty
public class NullToEmptyStringResolver : DefaultContractResolver { /// <summary> /// 创建属性 /// ...
- C语言----int (*p)[4] ---思考总结
a+1 跳4个int (*a)+1 跳一个int
- 基于Angular和Spring WebFlux做个小Demo
前言 随着Spring Boot2.0正式发布,Spring WebFlux正式来到了Spring Boot大家族里面.由于Spring WebFlux可以通过更少的线程去实现更高的并发和使用更少的硬 ...