
Halcon 学习笔记3 仿射变换
像素的减少
开运算(较少)
腐蚀(去除更多)
对灰度图像的开运算或腐蚀 相当于将灰度图像变暗
像素增加
闭运算(较少)
膨胀(较多)
对灰度图像的闭运算或膨胀 相当于将灰度图像变亮
仿射变换
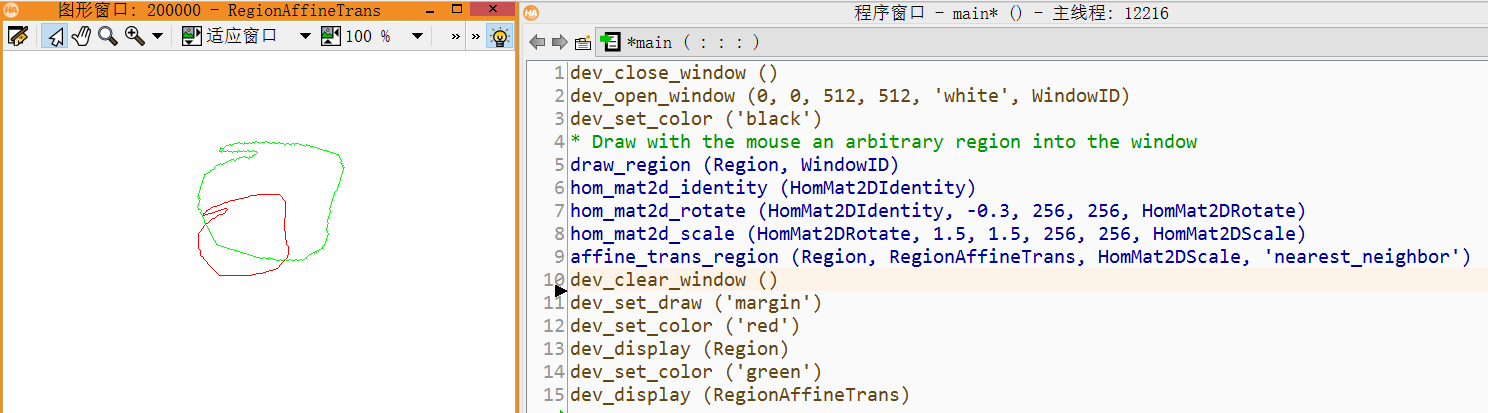
另外一种仿射变换
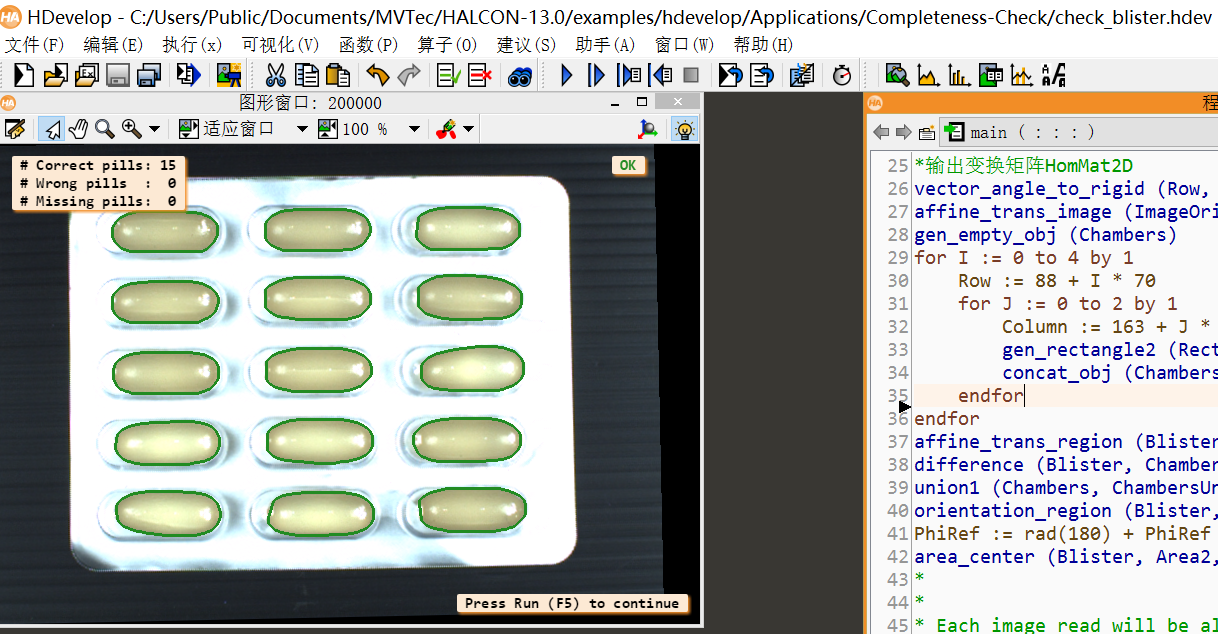
* This example demonstrates an application from the pharmaceutical

* industry. The task is to check the content of automatically filled

* blisters. The first image (reference) is used to locate the chambers

* within a blister shape as a reference model, which is then used to

* realign the subsequent images along to this reference shape. Using

* blob analysis the content of each chamber is segmented and finally

* classified by a few shape features.

*

dev_close_window ()

dev_update_off ()

read_image (ImageOrig, 'blister/blister_reference')

dev_open_window_fit_image (ImageOrig, 0, 0, -1, -1, WindowHandle)

set_display_font (WindowHandle, 14, 'mono', 'true', 'false')

dev_set_draw ('margin')

dev_set_line_width (3)

*

* In the first step, we create a pattern to cut out the chambers in the

* subsequent blister images easily.

access_channel (ImageOrig, Image1, 1)

threshold (Image1, Region, 90, 255)

shape_trans (Region, Blister, 'convex')

orientation_region (Blister, Phi)//计算角度Phi

area_center (Blister, Area1, Row, Column)//获取面积和中心点坐标

*将原来的(Row, Column, Phi)表示为(Row, Column, 0),也就是将角度调正

*输出变换矩阵HomMat2D

vector_angle_to_rigid (Row, Column, Phi, Row, Column, 0, HomMat2D)

affine_trans_image (ImageOrig, Image2, HomMat2D, 'constant', 'false')

gen_empty_obj (Chambers)

for I := 0 to 4 by 1

    Row := 88 + I * 70

    for J := 0 to 2 by 1

        Column := 163 + J * 150

        gen_rectangle2 (Rectangle, Row, Column, 0, 64, 30)

        concat_obj (Chambers, Rectangle, Chambers)

    endfor

endfor

affine_trans_region (Blister, Blister, HomMat2D, 'nearest_neighbor')

difference (Blister, Chambers, Pattern)

union1 (Chambers, ChambersUnion)

orientation_region (Blister, PhiRef)

PhiRef := rad(180) + PhiRef

area_center (Blister, Area2, RowRef, ColumnRef)

*

*

* Each image read will be aligned to this pattern and reduced to the area of interest,

* which is the chambers of the blister

Count := 6

for Index := 1 to Count by 1

    read_image (Image, 'blister/blister_' + Index$'02')

    threshold (Image, Region, 90, 255)

    connection (Region, ConnectedRegions)

    select_shape (ConnectedRegions, SelectedRegions, 'area', 'and', 5000, 9999999)

    shape_trans (SelectedRegions, RegionTrans, 'convex')

    *

    * Align pattern along blister of image

    orientation_region (RegionTrans, Phi)

    area_center (RegionTrans, Area3, Row, Column)

    vector_angle_to_rigid (Row, Column, Phi, RowRef, ColumnRef, PhiRef, HomMat2D)

    affine_trans_image (Image, ImageAffineTrans, HomMat2D, 'constant', 'false')

    *

    * Segment pills

    reduce_domain (ImageAffineTrans, ChambersUnion, ImageReduced)

    decompose3 (ImageReduced, ImageR, ImageG, ImageB)

    var_threshold (ImageB, Region, 7, 7, 0.2, 2, 'dark')

    connection (Region, ConnectedRegions0)

    closing_rectangle1 (ConnectedRegions0, ConnectedRegions, 3, 3)

    fill_up (ConnectedRegions, RegionFillUp)

    select_shape (RegionFillUp, SelectedRegions, 'area', 'and', 1000, 99999)

    opening_circle (SelectedRegions, RegionOpening, 4.5)

    connection (RegionOpening, ConnectedRegions)

    select_shape (ConnectedRegions, SelectedRegions, 'area', 'and', 1000, 99999)

    shape_trans (SelectedRegions, Pills, 'convex')

    *

    * Classify segmentation results and display statistics

    count_obj (Chambers, Number)

    gen_empty_obj (WrongPill)

    gen_empty_obj (MissingPill)

    for I := 1 to Number by 1

        select_obj (Chambers, Chamber, I)

        intersection (Chamber, Pills, Pill)

        area_center (Pill, Area, Row1, Column1)

        if (Area > 0)

            min_max_gray (Pill, ImageB, 0, Min, Max, Range)

            if (Area < 3800 or Min < 60)

                concat_obj (WrongPill, Pill, WrongPill)

            endif

        else

            concat_obj (MissingPill, Chamber, MissingPill)

        endif

    endfor

    *

    dev_clear_window ()

    dev_display (ImageAffineTrans)

    dev_set_color ('forest green')

    count_obj (Pills, NumberP)

    count_obj (WrongPill, NumberWP)

    count_obj (MissingPill, NumberMP)

    dev_display (Pills)

    if (NumberMP > 0 or NumberWP > 0)

        disp_message (WindowHandle, 'Not OK', 'window', 12, 12 + 600, 'red', 'true')

    else

        disp_message (WindowHandle, 'OK', 'window', 12, 12 + 600, 'forest green', 'true')

    endif

    *

    Message := '# Correct pills: ' + (NumberP - NumberWP)

    Message[1] := '# Wrong pills  :  ' + NumberWP

    Message[2] := '# Missing pills:  ' + NumberMP

    *

    Colors := gen_tuple_const(3,'black')

    if (NumberWP > 0)

        Colors[1] := 'red'

    endif

    if (NumberMP > 0)

        Colors[2] := 'red'

    endif

    disp_message (WindowHandle, Message, 'window', 12, 12, Colors, 'true')

    dev_set_color ('red')

    dev_display (WrongPill)

    dev_display (MissingPill)

    if (Index < Count)

        disp_continue_message (WindowHandle, 'black', 'true')

    endif

    stop ()

endfor
仿射变换 理论
https://www.cnblogs.com/liekkas0626/p/5238564.html
Halcon 学习笔记3 仿射变换的更多相关文章
- Halcon学习笔记之支持向量机(二)
例程:classify_halogen_bulbs.hdev 在Halcon中模式匹配最成熟最常用的方式该署支持向量机了,在本例程中展示了使用支持向量机对卤素灯的质量检测方法.通过这个案例,相信大家可 ...
- Halcon学习笔记之支持向量机(一)
例程:class_overlap_svm.hdev 说明:这个例程展示了如何用一个支持向量机来给一幅二维的图像进行分类.使用二维数据的原因是因为它可以很容易地联想成为区域和图像.本例程中使用了三个互相 ...
- halcon学习笔记——机器视觉工程应用的开发思路【转】
转自:http://www.cnblogs.com/hanzhaoxin/archive/2013/02/15/2912879.html 机器视觉工程应用主要可划分为硬件和软件两大部分. 硬件:工程应 ...
- Halcon学习笔记——条形码的定位与识别
一维码的原理与结构 条码基本原理是利用条纹和间隔或宽窄条纹(间隔)构成二进制的”0“和”1“,反映的是某种信息. 一维条码数据结构,分四个区域.组成分别为静区.起始/终止符.校验符.数据符. 一维条码 ...
- Halcon学习笔记——机器视觉应用工程开发思路及相机标定
机器视觉应用工程开发思路 机器视觉应用工程主要可划分为两大部分,硬件部分和软件部分. 1.硬件部分,硬件的选型至关重要,决定了后续工作是否可以正常开展,其中关键硬件部分包括:光源,相机以及镜头. 2. ...
- Halcon学习笔记1
转:https://www.cnblogs.com/hanzhaoxin/archive/2013/02/15/2912879.html 机器视觉工程应用主要可划分为硬件和软件两大部分. 硬件:工程应 ...
- halcon学习笔记——(11)Image,region,xld初步
一 读取的3种方式: 读取单张的图片: read_image( image,'filename') //image 是输出对象,后面是输入文件的路径和名称 读取多图: 1,申明一个数组,分别保存路径 ...
- Halcon学习笔记之缺陷检测(二)
例程:detect_indent_fft.hdev 说明:这个程序展示了如何利用快速傅里叶变换(FFT)对塑料制品的表面进行目标(缺陷)的检测,大致分为三步: 首先,我们用高斯滤波器构造一个合适的滤波 ...
- Halcon学习笔记之缺陷检测(一)
例程:surface_scratch.hdev 说明:这个程序利用局部阈值和形态学处理提取表面划痕 代码中绿色部分为个人理解和注释,其余为例程中原有代码 *surface_scratch.hdev:e ...
随机推荐
- Google protobuf使用技巧和经验
Google protobuf是非常出色的开源工具,在项目中可以用它来作为服务间数据交互的接口,例如rpc服务.数据文件传输等.protobuf为proto文件中定义的对象提供了标准的序列化和反序列化 ...
- 20155332 2016-2017-2《Java程序设计》课程总结
20155332 2016-2017-2<Java程序设计>课程总结 1.每周作业链接汇总 2.博客之最 3.实验链接汇总 博客链接汇总 预备作业1:那些年陪伴我的老师+我期待的师生关系 ...
- vim 多个文件切换
打开多个文件:1.vim还没有启动的时候:在终端里输入 vim file1 file2 ... filen便可以打开所有想要打开的文件2.vim已经启动输入:open file可以再打开一个文件,并且 ...
- c++ 时间函数和结构化数据
time和localtime 数据结构概念 struct关键字 认识数据结构 自定义结构 例:获取当前系统日期和时间;(代码例子) 一.函数: time 函数time()返回的是当 ...
- wpf TabControl控件的SelectionChanged方法
对于老手来说很简单,但是新手我从百度上找了好久没找到,最后还是去谷歌找到的,哎,万能的google. 前端界面: <TabControl Margin="0,10,0,0" ...
- c# 实体类怎么给LIST赋值,table转LIST
/// <summary> /// 缓存客服集合信息 /// </summary> public class model { /// <summary> /// 客 ...
- sql server 按月对数据表进行分区
当某张数据表数据量较大时,我们就需要对该表进行分区处理,以下sql语句,会将数据表按月份,分为12个分区表存储数据,废话不多说,直接上脚本: use [SIT_L_TMS] --开启 XP_CMDSH ...
- TCP/IP 网路基础
一.引子 TCP/IP是"Transmission Control Protocol/Internet Protocol"的简写,翻译成中文为传输控制协议/互联网网 ...
- 2019展望计划(Lamica 2019-Year Plan):
1,家人身体健康.2,好好上课,考试顺利,不要挂科.3,PETS3 9月份 杭州 一定要过.4,PETS3通过后,进军日语N3-N2.5,在杭州找一份合适的工作(底线6K).6,在杭州交到新朋友.7, ...
- 在Windows2008下添加iscsi存储出现磁盘Offine(The disk is offine because of policy set by an adminstrator)的解决方法
打开CMD命令行输入如下命令: DISKPART.EXE DISKPART> san SAN Policy : Offline Shared DISKPART> san policy=On ...