樱花的季节,教大家用canvas画出飞舞的樱花树
又到了樱花的季节,教大家使用canvas画出飞舞的樱花树效果。
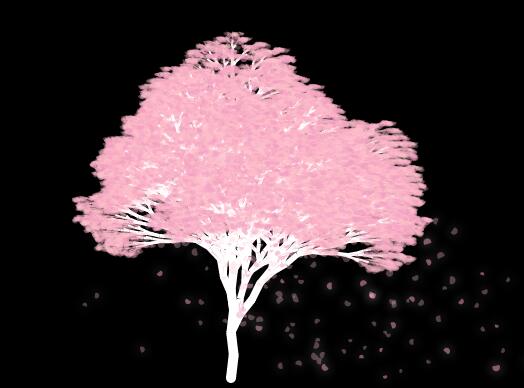
废话少说,先看效果。
演示效果地址:http://suohb.com/work/tree4.htm
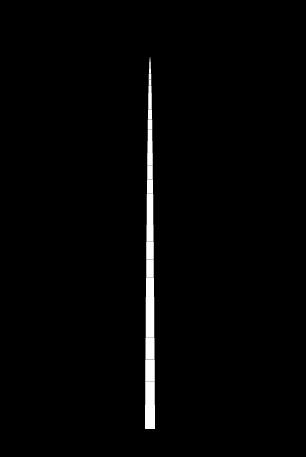
第一步,我们先画出一棵树的主体。
我画树的使用的原理是,定义一个起始点,从这个点开始,向一个角度移动一段距离。得到另一个点。
画出一条线连接两个点。
以新得到的点,依旧向这个角度,移动一段距离。得到第三个点,连写第二第三个点。
以此类推。一定步长之后,就得到一条射线。
我们根据自然界中的真实树的情况,这条线越来越细,直到最细地方结束。
<body bgcolor="#000000">

<canvas id="tree"></canvas>

<script>

var treeCanvas = document.getElementById("tree");

treeCanvas.width = window.innerWidth;

treeCanvas.height = window.innerHeight ;

var tCxt = treeCanvas.getContext("2d");

var rootTop = 450 ;//树起始位置

var treeColor = "#FFF" ;//树颜色

function drawTree(x,y,deg,step){

    var x1 = x + Math.cos(deg) * step ;//越细的枝干越短,所以以步长来做

    var y1 = y + Math.sin(deg) * step ;

    tCxt.beginPath();

    tCxt.lineWidth = step/3;//树干越来越细

    tCxt.moveTo(x,y);

    tCxt.lineTo(x1,y1);

    tCxt.strokeStyle = treeColor ;

    tCxt.stroke();

    step -- ;

    if(step > 0){

        drawTree(x1,y1,deg,step);

    }

}

drawTree(treeCanvas.width/2,rootTop,-Math.PI/2,30);

</script>

</body>
树干出来之后,要做分叉,每个分叉其实就是向另一个方向的树干。
而且分叉要比主干细一些。我们在第二阶段树干位置,每三步向左右分叉。
if(step > 0){

        drawTree(x1,y1,deg,step);

        if(step%3 == 1)

            drawTree(x1,y1,deg+0.5 ,Math.round(step/1.13));//右分叉

        if(step%3 == 0)

            drawTree(x1,y1,deg-0.5, Math.round(step/1.13));//左分叉

    }
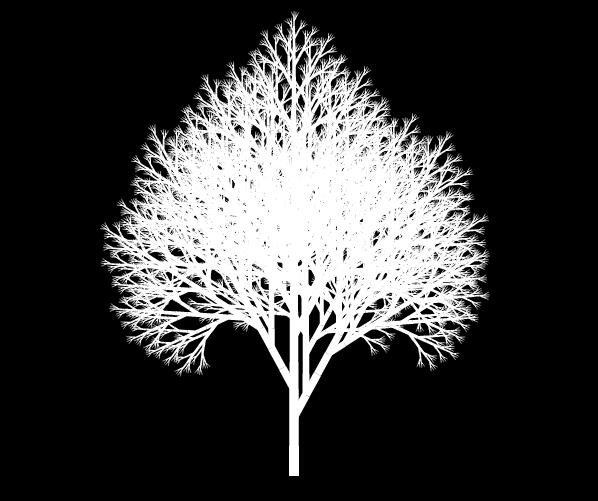
这样一棵树的主干基本上就已经完成了。
我们在树的末端几个节点,画一个粉色的半透明的圆。当做樱花。
为了保证所有樱花不是千篇一律的一个角度,我们随机一个起始角度。
function drawTree(x,y,deg,step){

    var x1 = x + Math.cos(deg) * step ;//越细的枝干越短,所以以步长来做

    var y1 = y + Math.sin(deg) * step ;

    tCxt.beginPath();

    tCxt.lineWidth = step/3;//树干越来越细

    tCxt.moveTo(x,y);

    tCxt.lineTo(x1,y1);

    tCxt.strokeStyle = treeColor ;

    tCxt.stroke();

    if(step < 5 ){//在末端五个节点,画一个半圆,作为樱花效果

        var r = 2+Math.random()*2

        tCxt.fillStyle = flowerColor ;

        tCxt.arc(x1+Math.random()*3,y1+Math.random()*3,r,0,Math.PI)

        tCxt.fill();

    }

    step -- ;

    if(step > 0){

        drawTree(x1,y1,deg,step);

        if(step%3 == 1)

            drawTree(x1,y1,deg+0.5 ,Math.round(step/1.13));//右分叉

        if(step%3 == 0)

            drawTree(x1,y1,deg-0.5, Math.round(step/1.13));//左分叉

    }

}

这个时候,如果没有特别的要求的,基本算是已经完成了。
之后再要做的就是精益求精,对现在效果做出微调。
1、树干都是直线,在计算下一个点的时候,做一些偏移。
2、樱花树形态比较扁平。给X轴方向上偏移稍微大点,Y轴稍微偏小一点。
3、至少做两种花瓣颜色,一种稍微深一些,一种浅一些。
4、在新建一个canvas层,做一些飘落樱花的效果。
5、在分叉,画花瓣等地方多使用一些随机数,树形状不能太单一
最终效果如下:
完整代码如下:
<!doctype html>

<html>

<head>

<meta http-equiv="Pragma" content="no-cache" />

<meta http-equiv="Cache-Control" content="no-cache" />

<meta http-equiv="Expires" content="0" />

<meta http-equiv="Content-Type" content="text/html;charset=utf-8" />

<meta name="viewport" content="width=device-width,initial-scale=1.0,user-scalable=no" />

<style type="text/css">

canvas{

    position: absolute;

    left: 0;

    top: 0;

}

</style>

</head>

<body bgcolor="#000000">

<canvas id="tree"></canvas>

<canvas id="flower"></canvas>

<script>

//两个canvas

var tree = document.getElementById("tree");

tree.width = window.innerWidth;

tree.height = window.innerHeight ;

var tCxt = tree.getContext("2d");

var flower = document.getElementById("flower");

flower.width = window.innerWidth;

flower.height = window.innerHeight ;

var cxt = flower.getContext("2d");

var flowerList = [];//樱花列表

var rootTop = 450 ;//树起点

var flowerColor = "rgba(255,192,203,.3)" ;//花色

var flowerColorDeep = "rgba(241,158,194,.5)" ;//花色深

var treeColor2 = "rgba(255,192,203,.5)" ;//树枝颜色

var treeColor = "#FFF" ;//树干颜色

var fallList = [];//飘落樱花列表

var g = 0.01 ;//重力加速度

var gWind = 0.005;//风力加速度

var limitSpeedY = 1;//速度上限

var limitSpeedX = 1 ;//速度上限

cxt.shadowColor= "#FFF" ;

cxt.shadowBlur = 10 ;

function drawTree(x,y,deg,step,type){

    var deg1 = step%2 == 0 ? 0.1 : -0.1 ;

    var x1 = x + Math.cos(deg+deg1) * (step+4) * 0.8 ;//以步长来判断枝干长度 x轴偏移大一些

    var y1 = y + Math.sin(deg+deg1) * (step-1) * 0.8 ;//以步长来判断枝干长度 Y轴压缩一些

    tCxt.beginPath();

    tCxt.lineWidth = step/3;

    tCxt.moveTo(x,y);

    tCxt.lineTo(x1,y1);

    tCxt.strokeStyle = (step > 5 ) ? treeColor : treeColor2 ;//细纸条都换成花的颜色

    tCxt.stroke();

    if(step > 20){//树干相交的位置有间隙,以一个圆填充

        tCxt.fillStyle = treeColor ;

        tCxt.arc(x,y,step/6,0,Math.PI*2);

        tCxt.fill();

    }

    if(step < 3 || (step < 23 && Math.random() > 0.1)){

        //末梢位置 画花瓣

        var color = [flowerColorDeep,flowerColor,flowerColor][Math.round(Math.random()+0.2)] ;

        var r = 2+Math.random()*2

        tCxt.fillStyle = color ;

        tCxt.arc(x1+Math.random()*3,y1+Math.random()*3,r,0,Math.PI)

        tCxt.fill();

        flowerList.push({x:x,y:y,sx:(Math.random()-0.5),sy:0,color:color,r:r,deg:deg});//保存下画樱花的位置

    }

    step -- ;

    if(step > 0){

        drawTree(x1,y1,deg,step,type);

        if(step%3 == 1 && step > 0 && step < 30)

            drawTree(x1,y1,deg+0.2 + 0.3 * Math.random(),Math.round(step/1.13));//右分叉

        if(step%3 == 0 && step > 0 && step < 30)

            drawTree(x1,y1,deg-0.2 - 0.3 * Math.random(),Math.round(step/1.13));//左分叉

    }

}

drawTree(tree.width/2,rootTop,-Math.PI/2,30,1);//执行

var len = flowerList.length ;

function step(){

    if(Math.random() > 0.3)    fallList.push(flowerList[Math.floor(Math.random()*len)]);//随机取出一个,花瓣复制到飘落花瓣的列表中

    cxt.clearRect(0,0,tree.width,tree.height);

    for(var i = 0 ;i < fallList.length ; i ++){

        if(fallList[i].sy < limitSpeedY) fallList[i].sy += g ;

        fallList[i].sx += gWind ;

        fallList[i].x += fallList[i].sx ;

        fallList[i].y += fallList[i].sy ;

        if(fallList[i].y > rootTop){//飘到树根的花瓣移除

            fallList.splice(i,1);

            i -- ;

            continue ;

        }

        cxt.beginPath();

        cxt.fillStyle = fallList[i].color ;

        fallList[i].deg += fallList[i].sx*0.05 ;//跟速度相关的旋转花瓣

        cxt.arc(fallList[i].x,fallList[i].y,fallList[i].r,fallList[i].deg,fallList[i].deg+Math.PI*1.3);

        cxt.fill();

    }

    requestAnimationFrame(step);

}

requestAnimationFrame(step);

</script>

</body>

</html>
更多特效,请关注我的微信公众号。

樱花的季节,教大家用canvas画出飞舞的樱花树的更多相关文章
- 撩妹技能 get,教你用 canvas 画一场流星雨
开始 妹子都喜欢流星,如果她说不喜欢,那她一定是一个假妹子. 现在就一起来做一场流星雨,用程序员的野路子浪漫一下. 要画一场流星雨,首先,自然我们要会画一颗流星. 玩过 canvas 的同学,你画圆画 ...
- 情人节,教大家使用css画出一朵玫瑰花。
情人节到了,给大家来一朵高端的玫瑰花. 在网上看到的一个canvas实现的玫瑰花,效果很好,但是代码被压缩过,也没有注释,看的云里雾里的. 今天我教大脚用CSS来实现一朵玫瑰花. 先看效果 首先我们画 ...
- 教你用SVG画出一条龙
先看demo,九十七度 其实使用svg画出这条龙很简单,关键不在于怎么使用svg,而在于你的美术功底,哈哈. 好吧,当然基础是不能忽略的,先看下这条龙的代码: <svg id="lon ...
- 手对手的教你用canvas画一个简单的海报
啦啦啦,首先说下需求,产品想让用户在我们app内,分享一张图片到微信.qq等平台.图片中包含用户的姓名.头像.和带着自己信息的二维码.然后,如何生成这张海报呢~~~首先我们老大告诉我有一个插件叫htm ...
- 公告栏添加时钟——利用canvas画出一个时钟
前言 最近在学习HTML5标签,学到Canvas,觉得很有趣.便在慕课网找了个demo练手.就是Canvas时钟. 对于canvas,w3shcool上是这么描述的: HTML5 <canvas ...
- 4种方法生成二维码 (js 控制canvas 画出 二维码)
随着网络的迅速发展 发展 发展,二维码的应用将会越来越多.同时很多只是很平凡的二维码,请拿起你的手 把这个二维码 设计起来吧.下面分享了几个非常好的二维码设计. 二维码原理: 二维条码/二维码可以分 ...
- 用canvas 画出圆形图片
/** * 把图片处理成圆形,如果不是正方形就按最小边一半为半径处理 * @param {object} imgObj 图片(img)对象 * @param {number} imgType 设置生成 ...
- WPF在圆上画出刻度线
思路 我们可以使用Ellipse先画出一个圆当背景,然后用Canvas再叠加画上刻度线,就能得到如下的效果 我们先用Ellipse画一个橙色的圆,然后将Canvas的宽度和高度绑定到Ellipse的宽 ...
- [示例] Firemonkey 画出 1 点像素的线
说明:在 Firemonkey 在移动平台 Android & iOS 要直接在 Canvas 画出 1 点像素的线,似乎有点困难,不过利用一点小技巧,还是能达到这个要求的,首先要建立一个 B ...
随机推荐
- ECMAScript 6 笔记(六)
编程风格 1. 块级作用域 (1)let 取代 var (2)全局常量和线程安全 在let和const之间,建议优先使用const,尤其是在全局环境,不应该设置变量,只应设置常量. const优于le ...
- Python自然语言处理学习笔记之信息提取步骤&分块(chunking)
一.信息提取模型 信息提取的步骤共分为五步,原始数据为未经处理的字符串, 第一步:分句,用nltk.sent_tokenize(text)实现,得到一个list of strings 第二步:分词,[ ...
- 【Java】Objects 源码学习
2017-02-10 by 安静的下雪天 http://www.cnblogs.com/quiet-snowy-day/p/6387321.html 本篇概要 Objects 与 Object ...
- .Net下的分库分表帮助类——用分库的思想来分表
简介 在大型项目中,我们会遇到分表分库的情景. 分库,将不同模块对应的表拆分到对应的数据库下,其实伴随着公司内分布式系统的出现,这个过程也是自然而然就发生了,对应商品模块和用户模块, ...
- javascript的方法
1. decodeURIComponent() decodeURIComponent() 函数可对 encodeURIComponent() 函数编码的 URI 进行解码. 语法: decodeURI ...
- WDCP下安装PHPWind
创建整站跟新建站点的区别是创建整站会一并生成ftp跟mysql数据库 这边只要填写一个域名(如果你有域名就填写下域名 如果你没有域名 或者跟我一样到这步去申请域名的可以填写ECS公网ip否则无法访问新 ...
- toupper函数及一些小程序
toupper 原型:extern int toupper(int c); 用法:#include <ctype.h> 功能:将字符c转换为大写英文字母 说明:如果c为小写英文字母,则返回 ...
- JAVA设计模式:代理模式
最近公司从新开发一个项目,为此对老的代码进行评估分析发现有些地方是可以采用代理模式来进行的,为此对代理模式进行了一次理解: 代理模式:即为指定的目标对象提供一个代理商,由代理商来完成对目标对象的操作. ...
- BZOJ 2463: [中山市选2009]谁能赢呢?(博弈论)
好吧我能说这道题我是猜过去的么= =,看到只有一个数x,x=2时alice赢,就猜奇数bob赢,偶数alice赢,然后就稀里糊涂过了= = 后来找了http://www.haogongju.net/a ...
- java学习笔记——IO部分(遍历文件夹)
用File类写的一个简单的工具,遍历文件夹,获取该文件夹下的所以文件(含子目录下的文件)和文件大小: /** * 列出指定目录下(包含其子目录)的所有文件 * @author syskey * */ ...